
Where Is the Best Place to Catch Dratini On Vivo Y100 5G | Dr.fone
Where Is the Best Place to Catch Dratini On Vivo Y100 5G
Dratini is a rare Pokemon that can be found in the wild. It is a Dragon-type Pokemon that evolves into Dragonair and then into Dragonite. Dratini is a popular Pokemon among players due to its rarity and powerful evolution. If you are looking to catch Dratini on your Vivo Y100 5G, you may be wondering where the best place to find them is.
Dratini is one of the Pokémon creatures that resemble a snake. It has an elongated blue body with a blue white underside. It carries three-pronged fins on each side of its head which are white in color. Dratini also has a white bump on the forehead.
Dratini has an energy level that is constantly increasing, which makes it grow and can reach a length of more than 6 feet. It sheds its skin every time it has to grow, and usually hide behind a waterfall when shedding. The colony of Dratini lives underwater, living at the bottom feeding on food that falls from the upper levels. Outrage is the signature move for this Pokémon creature.
Part 1: What’s the evolution of Dratini?
Dratini undergoes two different evolutions
The first un-evolved version is the serpentine Dratini that looks like a snake and continues shedding its skin as it grows. When you get to level 30, Dratini evolves into Dragonair, and at level 55 it becomes Dragonite
Dragonair
This is an evolution of Dratini, which has a long scaly serpent-like body. It still retails the blue body with a white underside. The white bump on the forehead now becomes a white horn. The budding wings on the side of the head have now grown into full wings. It also carries three crystal orbs, with one on the neck and the other two on the tail.
Dragonair has the ability to stretch its wings so it can fly. It has a huge amount of energy in the body and can discharge the energy through the crystals. The energy that it releases has the ability to change the weather wherever it is. Dragonair can be found in seas and lakes.
Dragonite
This is a Pokémon character that truly resembles a dragon and is the second evolution of Dratini. It has a yellow thick body, and a couple of antennae that come out of its forehead. It has a striated underbelly. The body is quite large when compared to the small wings.
Dragonite can fly at very high speeds despite its bulky appearance. It is a kindhearted Pokémon, which is as intelligent as a human being. It has been found to have tendencies to save humans from disasters, such as saving those who have come from a capsized ship on the high seas. It lives near the sea and is extremely rare in the Pokémon world.
Part 2: Where can I find the Dratini nest?
Dratini is a Pokémon that lives in the water. Since it loves lakes and seas, you can find it when you visit areas that are near water. For example, in the United States, the most famous nests for Dratini are found in North Eastern San Francisco, Pier 39 and Pier 15. You will always find Dratini at these sites and they are famous for people who want to farm Dratini.
You may also g West to Squirtle Nest where you can get a lot of Dratini.
Dratini has a 5% spawning chance every day, so if you have the time, you can spend it on these sites as you enjoy the watery view and wait for it to appear.
Dratini nests can also be found in other parts of the world, such as Tokyo, Japan; Sydney and New South Wales, Australia; Paris, France and others.
Part 3: Are the Dratini nest and spawn spot in the same place?
This is quite a common question for those who are new to the Pokémon universe. Basically, Dratini nests and spawn points are the same for a period of two weeks. The nests then migrate leaving the spawn points to spawn different types of Pokémon.
If the Dratini nest migrates, it can still come back in the future. You should always keep an eye at the spawn point where you first encountered your first Dratini Nest; it may come back once more and you can continue farming Dratini.
Dratini nests will migrate on alternate Thursdays at midnight. The nest migrations are random, so make sure that you visit and hit them many times over the two weeks in order to get the most Dratini that you can.
Part 4: How to increase the possibility of earning Pokémon Go Dratini?
As mentioned earlier, Dratini can be found in certain places around the world. If you live outside these regions, you cannot be able to get Dratini. The best way to go about getting Dratini in such cases is to virtually relocate your device. This means that you can take your device to Tokyo nest sites even if you live in Africa.
The best app to use for teleportation is Dr.Fone - Virtual Location (iOS)
Features of Dr.Fone - Virtual Location (iOS)
- Instantly teleport to an area where a Dratini nest has been found and remotely collect as many as you can.
- Use the joystick feature to move around the map until you come across Dratini.
- The app allows you to seem to be walking, riding a bike, or in a vehicle, on the map. This simulates real-time travel data, which is important when playing Pokémon Go.
- Any app that relies on geo-location data can safely use Dr.Fone - Virtual Location for teleportation.
A step-by-step guide to spoof your location using Dr.Fone Virtual Location (iOS)
On the official Dr.Fone page, download and install Dr.Fone on your computer or you can click the Download button below to download it directly. Launch it and then go to the Home screen and click on “Virtual Location”.

After entering the virtual location module, connect your iOS device to your computer using an original USB cable.
Next, click on “Get Started”; you will now be able to start the spoofing process.

Looking at the map, you can now see the actual location of your device. If the coordinates are not the correct ones, go to the bottom of your computer screen and click on the “Current Virtual location” icon. This will instantly point to the current virtual location of your device.


Now go to the top side of your computer screen and click on the third icon on the bar. This instantly puts you in “teleport” mode. Now enter the coordinates of the Dratini nest that you have located. Hit the “Go” button and your device will instantly be teleported to the coordinates you entered.
The image below shows an example of coordinates entered for Rome, Italy.

Once you have successfully teleported your device, you will be able to navigate to the area where the Dratini nest has been found. You can use the joystick feature for this. You should also click on “Move here” so your location is permanently moved to that place.
You may now camp and keep hitting the Dratini nest so you can farm as many as possible within the two weeks before the nest migrates to another location.
Camping and looking for other Pokémon in the area will help you cool down and therefore avoid being banned from the game for spoofing your iOS device.


This is how your location will be viewed on the map.

This is how your location will be viewed on another iPhone device.

In conclusion
Dratini is one of the most friendly but rare Pokémon to get. It can evolve from a small serpentine worm, into a might, good-hearted dragon. This is one of the Pokémon that people love to farm for trading and taking part in raids and such events.
When you need to, you can teleport your device to an area where Dratini is popular using Dr.Fone - Virtual Location (iOS). Use the Dratini nest maps to find Dratini, and then visit the area or teleport there.
Pokemon Go Error 12 Failed to Detect Location On Vivo Y100 5G?
Pokemon Go is a popular game that has taken the world by storm. It is an augmented reality game that allows players to catch Pokemon in the real world using their smartphones. However, many players have reported encountering the “Failed to detect location (12)” error while playing the game. This error can be frustrating as it prevents players from playing the game properly. In this article, we will discuss what causes the “Failed to detect location (12)” error in Pokemon Go and how you can fix it on your Vivo Y100 5G.
Pokémon Go has been on the nerves of its players and this is all because of the AR notion that it presents. The failed to detect location 12 is one of the most common errors that are faced by the players while playing this game. You might not believe but the GPS signals and the location settings on iPhone or Android are the two main reasons for this error. It can be resolved with ease and this article has been written to get the work done with ease. Applying the methods explained will ensure that you get the best results overall.
Part 1: Why is Location Important in Pokémon Go?
The best part of this game is that it has been compiled keeping in view the location mechanics. The location analytics of the game has made sure that it becomes the overnight sensation. Three main attributes are associated with the location framework of the game. These attributes also show how important the location is for the game. Understanding these attributes will also make sure that the user can overcome the errors such as failed to detect location 12 GPS joystick 2019.
i. Physical World Attribute
The best part of this attribute is that it is the center of the user experience of the game. The second part is the fact that this map has evolved and there are no shortcuts to its success. Ingress was the previous game that was developed by Niantic and the crowdsourcing of this map started with the evolution of this application. This was developed by the same team that is working on the core of Google Earth.
 PCDJ Karaoki is the complete professional karaoke software designed for KJs and karaoke venues. Karaoki includes an advanced automatic singer rotation list with singer history, key control, news ticker, next singers screen, a song book exporter and printer, a jukebox background music player and many other features designed so you can host karaoke shows faster and easier!
ii. Real World Gestures
The augmented reality is another important aspect that is related to Pokemon Go and this also means that the location services are relied on when it comes to this application. The android and the iOS location services are continuously used by the game to provide the pinpoint locations as well as the game features that are not found in other applications. The use of location through GPS satellites even becomes more important for such gestures. Especially when the player is outdoors it becomes too important to deal with using GPS location.
iii. Place Attribution
The system within the system that has been designed by the game developers makes sure that the location inaccuracies are accounted for. This also means that the 4-meter accuracy of the GPS is further enhanced to deal with the perfect location identification of each player.
Part 2: Ways to Fix Error 12 on Pokémon Go
Several ways can be used to make sure that the subject error is resolved with ease. This section of the article will deal with all such ways that can be used to get the work done with ease and perfection.
Method 1: Enable Mock Locations
As the name suggests it is to set the fake location using the build-in iPhone feature. It will also make sure that the feature of the game continues to work perfectly.
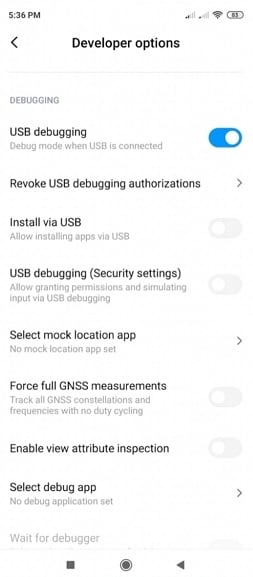
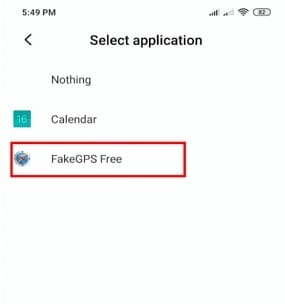
Step 1. Go to the developer options of your device. To get to the developer options simply head over to the settings > About Phone > Software Info > Build number and tap it 7 times to enable the mock locations.
Step 2. Install the Fake GPS that is a free application and can easily be found on the Play Store.
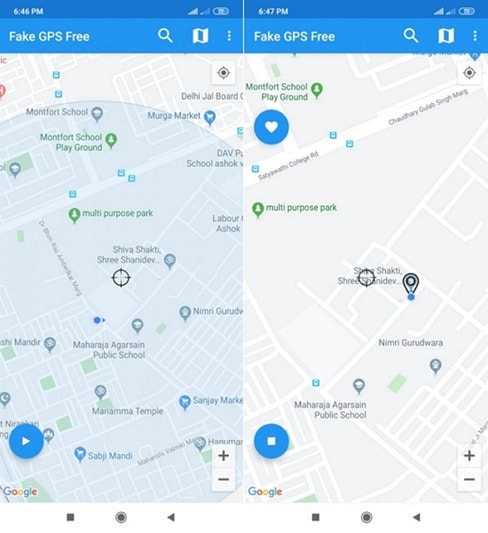
Step 3. Launch the application and you can easily enjoy Pokémon Go without any hassle and trouble and resolve the Pokémon go failed to detect location 12 fake GPS error.
Method 2: Location Activation
This is another important and easy way to make sure that the Pokémon failed to detect location 12 error is resolved with ease and perfection. To execute the process the steps are mentioned as follows:
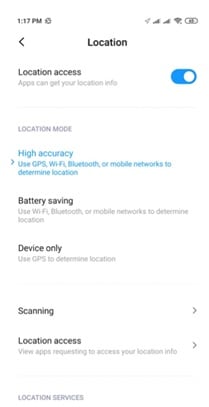
Step 1. Open the settings on your Phone to start with:
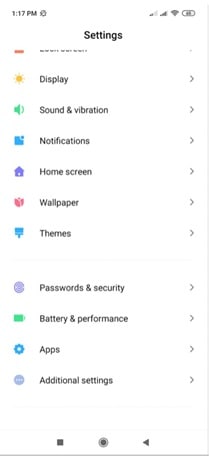
Step 2. Tap on the passwords and security to proceed with the process:
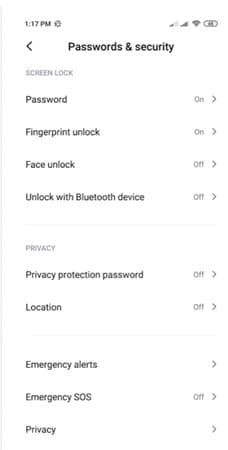
Step 3. Tap to turn on the location to finish the process and eliminate the failed to detect location 12 Pokémon Go errors.
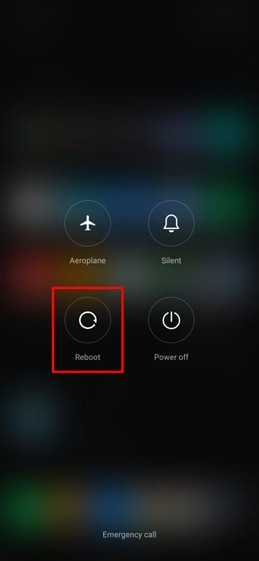
Method 3: Reboot the Vivo Y100 5G device
This might seems weird but this trick has been working to quiet some time now and has been proven to eliminate the failed location 12 Pokémon Go issue. There is a possibility that the server location is not synced with the Vivo Y100 5G device. Restarting the Vivo Y100 5G device will make sure that both the locations are sync and the problem is resolved with ease.
Just long-press the power button and choose the reboot option from the menu that appears to complete the process in full.
Part 3: Best Way to Overcome Location Error 12 on Pokémon Go for iOS Devices
Dr. Fone Virtual location is the best tool to overcome issues such as failure to detect location 12 Pokémon go on iPhone. The program has been designed to make sure that the GPS location is spoofed and you get the perfect outcome in resolving the error under discussion.
The Process
Step 1: Program Installation
To begin the process, download and install the program to get going with the process.
 HD Video Converter Factory Pro
Step 2: Enable Virtual Location
Connect your iPhone and enable virtual location from the options of the program. Hit get started to begin the spoof.
Step 3: Locate yourself
The center on the button on the next screen is to be clicked to get the accurate location.
Step 4: Teleportation
On the upper right corner click the icon on the third to begin teleportation or spoofing to be precise. Enter the name of the place where you want to teleport to.
Step 5: Move to the teleported location
Click on move here and the system will move you to the location that has been entered.

Step 6: Validate and Completion
The location will be locked by the program and your iPhone will also show the same location as on Dr. Fone. This also completes the process in full:

Conclusion
Dr.Fone - Virtual Location is the best and the state-of-the-art program to overcome Pokémon go unable to detect location 12 on iOS devices. It has an intuitive interface and it also allows the users to overcome the issues that traditional spoofing programs present. It is being updated constantly which also means that you will be able to get the best results. There is no program on the internet that can resolve the error that failed to detect location 12 in Pokémon go as easily as this one does.
What is the best Pokemon for pokemon pvp ranking On Vivo Y100 5G?
Many people play Pokemon Go to have fun and spend quality leisure time. Well, why not? This mobile game is interactive enough to stir up positive emotions and bring joy to anyone. But aside from that, Pokemon Go also serves as a great avenue to develop advanced gaming skills. One feature that can help you a lot on this subject is the Pokemon Go PvP rank game. It’s basically an option enabling trainers to gather a Pokemon team and battle another trainer. The winners of the duel receive special rewards and rank up in the league.
Should you play Pokemon Go PvP rank games? Absolutely yes. Such experiences offer lots of benefits that players can practically use in virtual and real-life applications. Hence, you must explore this hidden gem once in a while and learn how to win battles in easy steps. Don’t worry. Acing the Pokemon PvP ranking is definitely not rocket science. All it takes to defeat your opponent is a little dose of confidence and self-trust.
In this article, we will discuss everything about the Pokemon Go PvP rank game. We will also provide a short guide on how to access it on the mobile application quickly and easily. Continue reading below to learn more.
Part 1. What is the Pokemon Go PvP Rank Game?
When talking about Pokemon Go, the first thing that usually comes to mind is Pokemon hunting and spinning PokeStops. Well, it’s true to a certain degree. Your main goal as a trainer is to build large Pokemon collections and obtain as many rewards as you can. However, there’s actually more to it. Players are also given the option to increase their ranking by battling another trainer. Yes. That is called the Pokemon Go PvP rank game.
Pokemon Go PvP rank battles are far different from other forms of duel in the game. Why so? The simplest explanation is that your opponent in PvP is a real human trainer, not a pre-mediated computer program. That’s why you may expect that winning on this battlefield is not going to be a smooth ride. You have to gear up your gaming skills very well and prepare a competent strategy to bring home victory. Don’t worry. It’s just a matter of timing and practice. Just go to a match regularly and learn from every experience. That’s the ultimate secret to ace Pokemon Go PvP rank battles.
There are lots of sensible reasons why you should engage in the Pokemon Go PvP rank game. Some of them are enumerated below. Check out the list to learn more.
It upgrades the gaming experience to a whole new level
![]()
Doing the same thing over and over sometimes frustrates us. Therefore, playing Pokemon Go PvP rank battles for a change of scenery is great. It somehow gives us a perfect dose of distraction at times when we feel bored and unmotivated.
 The Tube Sites Submitter is a fast and efficient tool for anyone who needs to upload videos quickly, easily and automatically to hundreds of tube sites in mere minutes .
 It allows players to learn new gaming skills and improve their techniques
Sure. Catching Pokemon in the wild and visiting nearby PokeStops are incredibly fun activities. However, these tasks are not enough to give players a very constructive gaming training. You must participate in certain undertakings like the Pokemon Go PvP rank battles to hone your gaming skills efficiently. Don’t worry. You can take it slowly and try to work your way up one step at a time.
It serves as your key to special tournaments and worldwide events

![]()
Pokemon Go is holding various tournaments from time to time. However, some of these events require players to garner a specific rank or rating in Pokemon Go PvP battles. That means you cannot join if you don’t meet a particular rank level required in the game. Therefore, strive harder to participate in PvP games and win as many duels as you can. Your Pokemon PvP ranking is not just a mere group of numbers. It actually defines your eligibility to join prestigious Pokemon Go events. Hence, take it very seriously.

Part 2. How to Get Started With Pokemon Go PvP Rank Battles?
Go Battle League is the most basic type of Pokemon Go PvP battle. It is available to level 10 (and above) trainers whose account is in good standing. Generally, the Go Battle League comes in three game formats, namely Great League, Ultra League, and Master League. You can participate in any of them if you have the required type of Pokemon and amount of Combat Power. On a regular day, you’re given a chance to play at least five sets of battles for each league. Take advantage of this opportunity and win as many battles as you can to increase your rank in no time. Yes. Aside from special prizes, you also level up in every battle you win. That’s why you should prepare a lot and make sure to beat your opponent every chance you get.
Accessing the Go Battle League and participating in your preferred battle is indeed a piece of cake. Check out the tutorial below on how to join in the Pokemon Go PvP battle.
- Step 1: Launch the Pokemon Go mobile application.
- Step 2: On the map view, click the Poke Ball icon at the bottom of your screen to bring out the main menu.
![]()
- Step 3: From there, click Battle.
![]()
- Step 4: Choose your preferred Reward Track and then click the Battle button on your chosen track.
 PDF application, powered by AI-based OCR, for unified workflows with both digital and scanned documents.
 ![]()
- Step 5: Finalize your three-member Pokemon team and start battling against another trainer you match with.
Part 3. Explained: Pokemon PvP Ranking in Go Battle League
The lowest Pokemon PvP ranking in the Go Battle League is Rank 1. The ranks go higher as the player accomplishes more battles going forward. However, you have to win each of them if you wish to increase your Battle Ratings quickly. It is important to keep tabs on your ratings because it’s among the crucial components of Pokemon PvP ranking.
![]()
Go Battle League features a total of 24 ranks starting from Rank 1. The last four high ranks are called Ace, Veteran, Expert, and Legend. With regard to the reward, the set of items that winners will receive varies from one rank to another. More prizes are at stake as you climb the ladder. Thus, work your way up until you become a legend in the Pokemon Go PvP rank battles. You can surely do it. Just trust yourself enough and implement an efficient game plan. By any means possible, it will certainly work magic.
For your information, the Pokemon PvP ranking in the Go Battle League refreshes every season. That means the participants will all go back to Rank 1 once the new season approaches and sets in. Don’t worry. It’s not a big deal. If you’re able to make it last season, you can absolutely do it again one more time. Just stick to your original strategy and be patient at every turn. That’s how you do it.
Tips For Winning Pokemon Go PvP Rank Battles
Do you want to win many Pokemon Go PvP rank battles? Of course, you are. Check out the expert tips listed below. Implement each of them on your next trainer duel.
- You don’t exactly know who is going to appear as your opponent in the match. That’s why you should choose your team members very well. Pick three Pokemon of different types to prepare for whatever comes your way.
- Your priority during the Pokemon Go PvP rank battle is to cause damage to your opponent. It’s a tough job unless you’re aware of the Pokemon’s weaknesses and strengths. Study the type advantages of Pokemon so that you can intelligently strategize during the match.
- Deploy Charged Attacks as often as possible during the battle. As for your defense, make sure to utilize Protect Shield for the most valuable member of your team.
Part 4. Win Pokemon Go PvP Rank Battles With Wondershare Dr.Fone
It’s fair to say that winning Pokemon Go PvP rank battles relies heavily on how well you prepare. That’s why you should catch as many strong Pokemon as possible beforehand. Sure. Catching Pokemon in the wild is not as easy as falling off a log. You have to travel a distance and wander aimlessly until you come across your target. But did you know that there’s actually a tool that can help you do all this stuff without going outdoors? Yes. Wondershare Dr.Fone has a potent Virtual Location feature capable of modifying your current whereabouts and simulating GPS movements. Do you want to try it out? Here’s a short guide to get you started.
- Step 1: Download Wondershare Dr.Fone from its official website. Right after, install it on your computer.
- Step 2: Open the newly installed application on your desktop. Once it fully loads up, connect your smartphone using a data cable. Follow the on-screen instructions to ensure the connection between the two devices is strong and reliable.
- Step 3: Head over to the left-side panel and then click Toolbox. On the main dashboard, click Virtual Location. Let Wondershare Dr.Fone download additional resources if it’s your first time accessing this feature.
- Step 4: Once the downloading process has been completed, Wondershare Dr.Fone - Virtual Location will subsequently open in a separate window. From there, access the top-right menu bar and then click One-Stop Route. The starting point for the simulation will be determined according to your current location. If you wish to change it, click Teleport Mode on the menu bar and then assign your preferred location. As for the destination, enter your desired location into the search bar or tap anywhere on the map.

- Step 5: Configure the settings according to your liking. Start by specifying your preferred number and type of trips. Then, adjust the movement speed by dragging the slider from left to right. After that, it’s time to commence the simulation. Click Move Here to proceed. If you wish to reset your inputs, click Clear instead.

- Step 6: The simulation will begin in a second. Use the details on the map to monitor the real-time progress. If you wish to halt the movement for a little while, click Pause. Should you wish to start all over again, click Clear instead and repeat the entire process one more time.

Conclusion
Pokemon PvP ranking may not be the ultimate priority of most Pokemon Go players who just want to have fun. That’s totally fine. Pokemon Go surely has in store for them that don’t require trainer battles. But if you’re among the players who wish to go the extra mile, try the Pokemon Go PvP rank games. Read the discussions above because it can help you get started with the Go Battle League. Work your way up as you go along throughout the season. For preparations, download Wondershare Dr.Fone. It offers a powerful Virtual Location feature capable of simulating GPS movements needed when catching Pokemon. Try it out and take advantage of its wonderful benefits.
- Title: Where Is the Best Place to Catch Dratini On Vivo Y100 5G | Dr.fone
- Author: Nova
- Created at : 2024-07-19 21:19:32
- Updated at : 2024-07-20 21:19:32
- Link: https://change-location.techidaily.com/where-is-the-best-place-to-catch-dratini-on-vivo-y100-5g-drfone-by-drfone-virtual-android/
- License: This work is licensed under CC BY-NC-SA 4.0.