
In 2024, Detailed guide of ispoofer for pogo installation On Samsung Galaxy M34 5G | Dr.fone
Detailed guide of ispoofer for pogo installation On Samsung Galaxy M34 5G
Pokemon Go is Niantic’s most successful game that has taken the world by storm. Players get to be a part of the various regions of the Pokemon has now become one with our world. The game requires you to travel to different locations to complete researches, catch Pokemon, defend gyms, and most importantly, complete the Pokedex given by Professor Willow. Niantic’s games are designed to be played with others outdoors. This feature ends up giving players in some parts of the world advantage over others. This is specially to catch regional Pokemon and during ticketed events and sponsored events. Spoofers can avoid the barriers of distance and play anywhere in the world by iSpoofer for pogo installation and other such apps. Niantic, however, does not allow this and considers it the same as hacking. Players who were looking to play and access all the features of the game available all across the world.

Part 1: Will the iSpoofer back on 2020?
iSpoofer has been shut down. All its applications, websites, and other related services have been terminated. iSpoofer for pogo installation does not exist. If any website claims to give access to the application or iSpoofer direct download, it is fake. Also, the new Pokemon Go application version which is 0.195.0 has been updated to detect applications like iSpoofer, so on being detected, it may lead to a warning, or a permanent ban as well. And we don’t see the certainty to get it back soon.
Part 2: Detailed guide of iSpoofer for pogo installation
This detailed guide for iSpoofer installation is for those who still possess the older version of the app that works in an older iOS version.
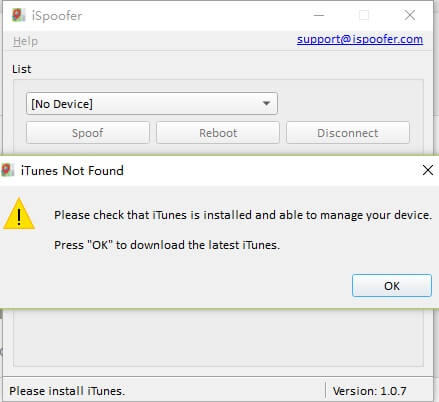
Step 1 – Install the setup for iSpoofer on your computer if you had got it using. This requires the latest version of iTunes, so make sure that you have it installed.
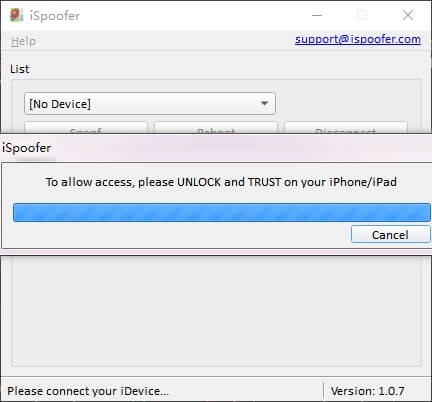
Step 2 – Once the setup is done, connect your phone to the computer and unlock it. You will have to select the “TRUST” option for the software to do its work. On selecting this option, iSpoofer will download a developer file that will spoof the location.
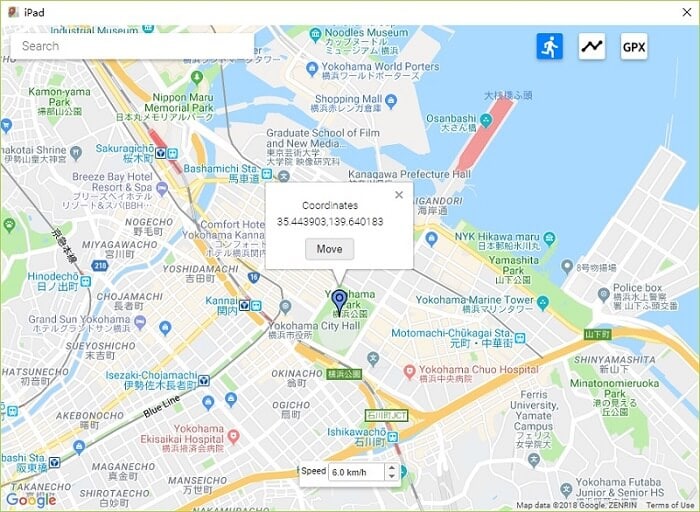
Step 3 – A map will load on your computer screen, which allows you to enter or point the location. Enter the location of your choice and click on “MOVE”. And that is it! Three simple steps and you have spoofed!
Part 3: How to use the iSpoofer when you play pokemon
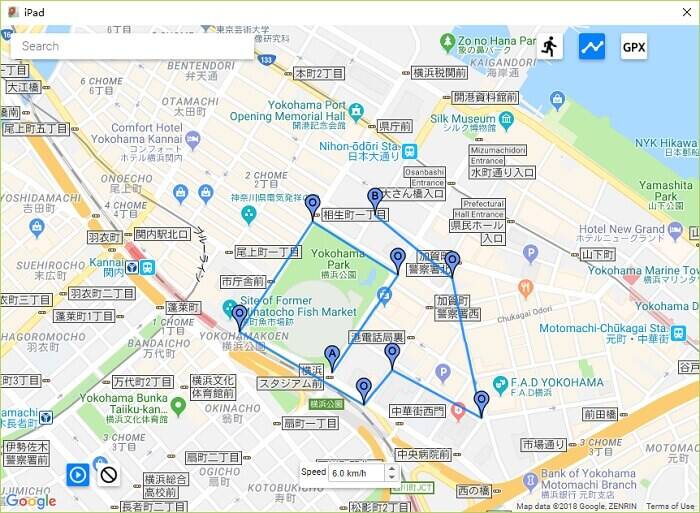
Follow the tutorial above for ispoofer for pogo installation. A mock location has now been added to your device that makes iOS believe that you are at the entered spot.

Following these steps, disconnect your phone and launch Pokemon Go. From here you can either use the joystick to move around or use a “.gpx” file to add a preset route for you to move around. That would look like this -
iSpoofer for pogo installation has the following disadvantages -
- The application cannot work without iTunes and is very dependent on it.
- Niantic can easily detect spoofing through this app and may lead to a ban.
- Movement simulations are hard and unnatural, making it more susceptible to a ban.
- Configurations and settings require some technical knowledge in to troubleshoot any errors.
- The app is prone to crashing a lot. The interface sometimes cannot handle the constant change of locations.
All these issues are overcome with great detail by Dr. Fone Virtual Location (iOS) by Wondershare.
Part 4: Safer tool to spoof pokemon- drfone virtual location
Pokemon Go Spoofers using iOS need not depend on iSpoofer for jumping locations. Dr. Fone Virtual Location by Wondershare is the new, safer app to spoof in Pokemon Go. The app uses mock location services to help you teleport to anywhere across the world. This also allows you to be safe from the detection software in Pokemon Go.

What are the benefits of using Dr. Fone Virtual Location?
- It provides a mock location and location changer – With just a single click, the application can change your location to where you want to. All apps on your phone will start recognizing this location.
- It enables you to move at different speeds - It has 3 different speeds, namely walking, cycling, and driving that helps you travel faster or log in kilometers too.
- The joystick allows movement – You can use the joystick to move your character around the map to navigate to Pokestops or rare wild spawns easily.
- The map view gives a 360o view – By scrolling around the screen, you can get to see all the routes around you and plan accordingly.
- Auto-walk feature - The game has an auto-walk feature in case you do not want to use the joystick to move around manually.
- Keyboard movement commands – The player can also use the A, S, W and D keys on the keyboard to move around
Step by Step Guide to Install and use Dr. Fone Virtual Location -
Step 1 - Download the Dr. Fone Virtual Location by official Wondershare website. Connect your phone to the computer in to execute the changes. Click on the “Virtual Location” option.

Step 2 – Now, on the next screen, you will see “Get Started” option. Click on it to proceed.

Step 3 – The screen will now show a map with your current location on it. In case the location is incorrect, click on the “Center On” button at the bottom-right side of your screen.

Step 4 – Select the “teleport” option by clicking on the icon on the top right corner. Then, in the text box, enter the city or the location’s exact name or the coordinates in the “latitude, longitude” format.

Step 5 – After entering your location, select the “GO” option.
Step 6 – The app will show you an option that says “Move Here”. Click on it, and now you have successfully spoofed to your location of choice.

Your spoofed location is now the default location of your phone, and all the apps will recognize it. The maps app on your phone looks like this –
 KoolReport Pro is an advanced solution for creating data reports and dashboards in PHP. Equipped with all extended packages , KoolReport Pro is able to connect to various datasources, perform advanced data analysis, construct stunning charts and graphs and export your beautiful work to PDF, Excel, JPG or other formats. Plus, it includes powerful built-in reports such as pivot report and drill-down report which will save your time in building ones.
 It will help you to write dynamic data reports easily, to construct intuitive dashboards or to build a whole business intelligence cockpit.
KoolReport Pro package goes with Full Source Code, Royal Free, ONE (1) Year Priority Support, ONE (1) Year Free Upgrade and 30-Days Money Back Guarantee.
Developer License allows Single Developer to create Unlimited Reports, deploy on Unlimited Servers and able deliver the work to Unlimited Clients.

The teleportation is now complete. Enjoy playing the game with no lags or errors.
Alert
While spoofing between two distant locations give the required amount of time for the cooldown timer to reach zero. If you decide to spoof too quickly, you will automatically trigger a soft ban, and you will not be able to play most parts of the game like catching Pokemon or spinning Pokestops. If this occurs consistently over multiple occasions, it will trigger Niantic’s warning and may end up getting a permanent ban. It has a 3-strike policy. 3 warnings are given before the account is permanently deleted.
The notice looks like this -

The cool-down period between two locations is based on distance and you can refer to the table below to understand the time you need to wait before logging in again.

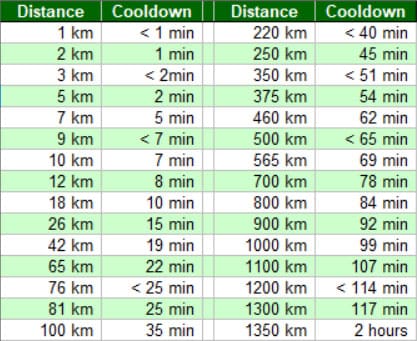
Most gamers wait for the standard 2 hours before logging in again. This gives them access to all the game’s features like before.
Conclusion
We hope that this article has been informative, about Dr Fone Virtual Location and ispoofer for pogo installation. You can now spoof locations with ease by using Dr.Fone - Virtual Location app. Vigilance is needed, and spoofing must be done by following all rules of cool down. This would prevent you from being caught by Niantic, and by Officer Jenny. We would like you to enjoy the game throughout without having to lose any of your levels and Pokemon.
4 solution to get rid of pokemon fail to detect location On Samsung Galaxy M34 5G
Pokémon go failed to detect location is an error that is frequently faced by the players and there are several reasons for it. From device to server-based all the reasons amount to the error and therefore the right solution must be applied to get the work done with ease and perfection. The location-based attribute of the game is something that has been one of the best features. It is the sole reason for which the game is not only popular but also one of the most downloaded games of all time. It is therefore important to overcome fail to detect location error in this game.
## Part 1: Why does Pokémon fail to detect location?The two main and frequent errors that are related to the Pokémon are error 11 and error 12. These not only frustrate the users but also hamper the game experience. Failed to detect location Pokémon go is the result. This part of the article will make sure that you get all the information that is needed to overcome the issue. The GPS joystick failed to detect location error will also be overcome and you will also be able to guide others.
Causes of Error 11
- If the game failed to detect location Pokémon go fake GPS then the most common reason is the fact that the GPS has been disabled. The internet and GPS are the two important aspects of this game. If anyone is not available then it is a must that the game will not work at all.
- Once the game has been installed it requires certain permissions that should be granted for proper working. All the permissions must be accepted for the game to work fine. If the GPS access has not been granted then it should be so that the GPS joystick Pokémon go failed to detect location error is resolved and you can enjoy the game.
- To install some applications and to enhance the features of the phone it is at times rooted in the case of android or jailbroken in the case of iPhone. In both cases, you will get the Pokémon to go failed to detect location fake GPS error. It is therefore important that the issue is resolved by getting the Samsung Galaxy M34 5G device back to its original shape. It can be done by unrooting the Samsung Galaxy M34 5G devices so that the issue is resolved.
Causes of Error 12
- The Mock location on the Samsung Galaxy M34 5G device is enabled can lead to failed to detect location GPS joystick or error 12 on the Samsung Galaxy M34 5G device. It is therefore advised to make sure that the location in question is disabled to get the gaming experience back on track.
- The other and the most common reason for the error 12 is the fact that the GPS signals are not received by the Samsung Galaxy M34 5G device. It also leads to Pokémon failed to detect location error and will make sure that you get all the enjoyment for which the game has been downloaded.
Part 2: 3 solutions to fix Pokémon fails to detect the location
Solution 1: Turn on GPS
This is the most common method that can be applied to make sure that the game works perfectly.
i. Drag the notification panel down on your device.
ii. Click on the location to turn it ON.

Solution 2: Setting Permissions for the application
If the right permissions are not given to the application then it can also lead to the fake GPS failed to detect location. To make sure that this is overcome you need to follow the steps as under.
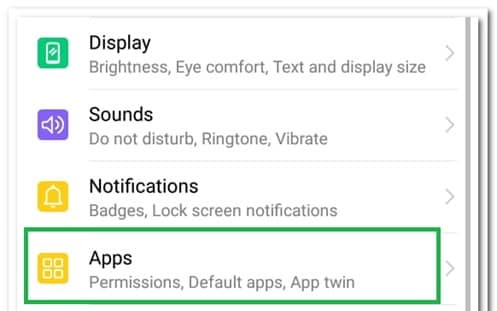
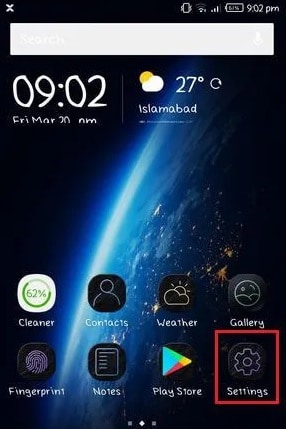
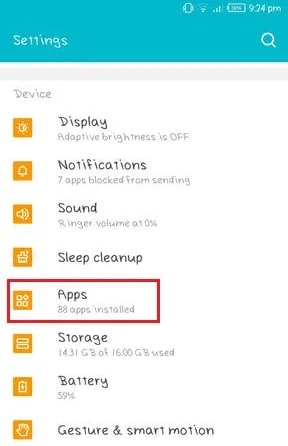
i. Go to Settings > Applications > Apps to access the permissions for the application.

ii. Go to Pokémon Go > Permissions > Turn on location to get the issue resolved.
 PDF application, powered by AI-based OCR, for unified workflows with both digital and scanned documents.
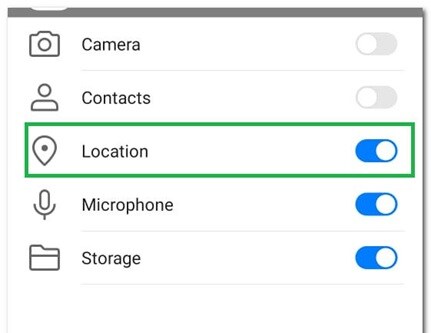
Solution 3: Clear Cache
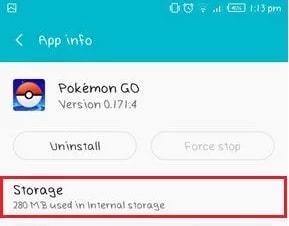
i. Go to the Settings of your device
ii. Click on the app’s icon on the next screen
iii. Click on the storage option.
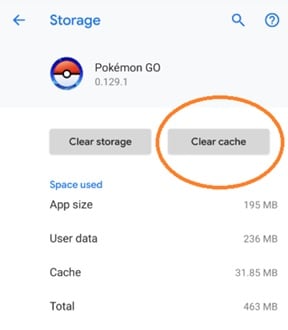
iv. Clear data and cache and restart the Samsung Galaxy M34 5G device to get the issue fixed.
Part 3: Dr.Fone Virtual location change your location in one click
To fix the fake GPS Pokémon go failed to detect location Dr. Fone’s virtual location is the best and the state of the art program that can be used. It is not only the best but also allows the users to overcome the issues that are presented by the other similar programs. With this program, it is easy to make sure that the overall game performance improves in terms of location detection. You can teleport with ease using this program. With an intuitive interface and a professional team backing the program, you get the ultimate results. Not only Pokémon but all the location-based and AR games this program is a boon.
How to use Dr. Fone Virtual Location
Step 1: Program Installation
First of all download and install the program to get started.
Step 2: Enable Virtual Location
Click the get started icon once the iPhone has been connected to the system and the virtual location has been enabled.
Step 3: Locate the Samsung Galaxy M34 5G device
Click the center on a button to make sure that your location is detected by the program.
Step 4: Change Location
The third icon on the upper right corner is to be pressed to teleport. In the bar type the name of the location you want to teleport to.
 vMix 4K - Software based live production. vMix 4K includes everything in vMix HD plus 4K support, PTZ control, External/Fullscreen output, 4 Virtual Outputs, 1 Replay, 4 vMix Call, and 2 Recorders.
Step 5: Move to a teleported location
Click on move here to get to the location that has been selected.
Step 6: Validation
Your iPhone will show the same location as on the program and this finishes the process.

Conclusion
Dr. Fone’s virtual location is the best and the most advanced program that will make sure that you get the best results. It will not only enhance your gaming experience but will also remove the Pokémon go GPS joystick that failed to detect location error with perfection. It is the best program that is easy to use and there are guides online that further foster the process. With this program, it is easy to get a step ahead for all AR and location-based games and to enjoy to your fullest.
Additional Tips About Sinnoh Stone For Samsung Galaxy M34 5G
Sinnoh Stones are similar to other evolutionary items found in Pokemon Go, like Metal Coat, Dragon Scale, and Sun Stones. Pokemon Go’s Sinnoh Stone is a rare evolution item enabling you to upgrade existing creatures into Gen 4 versions. It is extremely exciting to see your favorite Pokemon’s being upgraded, also making the best Pokemons of the game more powerful. The Pokemon Go Sinnoh Stone evolution list is also provided in the guide, which contains 18 Sinnoh Stone Evolutions.
Part 1: Understanding the idea of Pokemon Go Sinnoh Stone
The Sinnoh Stone is a new evolution item, and all eighteen-4th generation Pokémon’s require Sinnoh Stones for their evolution. It also allows Gen 1 and 2 Pokémon’s to evolve into Gen 4 evolution stages. The Sinnoh Stones items are used for all cross-generation evolutions. Below is the listing of Pokémon’s, which evolve using a Sinnoh Stone.

| Pokemon | Evolves |
|---|---|
| Misdreavus | Mismagius |
| Gligar | Gliscor |
| Yanma | Yanmega |
| Electabuzz | Electivire |
| Magmar | Magmortar |
| Porygon2 | Porygon-Z |
| Roselia | Roserade |
| Togetic | Togekiss |
| Tangela | Tangrowth |
| Sneasel | Weavile |
| Murkrow | Honchkrow |
| Dusclops | Dusknoir |
| Snorunt | Froslass |
| Rhydon | Rhyperior |
| Lickitung | Lickilicky |
| Aipom | Ambipom |
| Swinub | Mamoswine |
| Kirlia | Gallade |
Part 2: Obtaining Sinnoh Stones to Level Up
Sinnoh Stone can be obtained during the battle against the three leaders on Community Day, on the completion of the final day of your 7-day Research Task, and During PVP. You won’t be finding them at Poke Stops. Main places where you can find Sinnoh Stones are on the 7th Day of your Research Task and award for taking part in PVP. Another place that is not popular but odds to find Sinnoh Stone is present includes the introduction to PVP when you’re new to it. Players can obtain up to 10 Sinnoh Stones during the February Community Day and when the month is Pokemon Go Community Day. 5 Sinnoh Stones can be obtained by beating the three leaders in the battles and another 5 from winning PVP battles against friends. Defeating a Team Go Rocket Leader and Go Battle Reward is Sinnoh Stone.

You can use Dr. Fone’s Virtual Location to mock your location without any movement and obtain these Sinnoh Stones. Dr.Fone’s virtual location allows you to mock your location and lets the application on your phone think that you’re at a place selected in Dr.Fone’s application interface without resulting in any ban or detection from Pokemon Go developers. You can follow the steps listed below in order to catch Pokemon by one click to go anywhere without moving.
Step 1: Mocking Location Quirk:
Pokemon Go can be played by using the toolkit of Dr. Fone without shifting. Open the Virtual Location feature using a functioning lightning cable to mock the location and ensure that the iOS device is linked to the application.
You can press the Get Started” button to start the process upon phone detection.
Step 2: Imitating Movement between steps:
Open the first choice located in the top-right corner until you enter Dr.Fone’s GUI, which helps you to fake movement between the two locations. Select the location pin found in the search bar and press the “Move Here” button.

You want to make a motion, and navigate to the “March” button to start the simulation, enter the magnitude of times. By default, the movement is set to one, but the user can override it, and the application will move accordingly.
 Allavsoft Batch Download Online Videos, Music Offline to MP4, MP3, MOV, etc format

For the Pokemon Go application, the new position will appear as real and will presume that you are walking between the two selected locations you have selected on the Dr. Fone screen. The walking pace can also be changed at the bottom of the screen using the sliding menu. This way, without knowing it, you can use the fake movement of the desired position, and your application will not be prohibited.


Step 3: Movement Simulation between more than two spots:
The application by Dr.Fone also helps you to mock movement between more than two spots. The function is named after the multi-stop route that can be selected from the toolbox category gui found at the top-right corner, which lets you drop different unique stops located on the map, and your location will behave accordingly as handled by Dr.Fone’s virtual location application.
Click the ‘March’ button to allow the system to simulate motion by selecting the correct options. You’ll have to do the Pokémon Go walking trick at some point. The virtual motion simulation software for Dr. Fone makes your life easier and helps you to do the job without thinking about travel costs.

Part 3: Essential Requirement and Evolving Pokémon’s Using Sinnoh Stone
Only the trainers above the 10th Level have access to acquire Sinnoh Stone. The Sinnoh Stone can be obtained from Training Battles and Training with Team Leaders. You also need 100 candies for each of the Pokemon. Once you have got your hands on Sinnoh Stones and now you want to know where they should be used, there’s numerous 4th generation Pokémon who require Sinnoh Stone for their upgrade. Mamoswine is one of the best if you’re prioritizing attackers for a raid because it has a mix of extremely high CP with the strong ground and ice-type moves.
Conclusion
Sinnoh Stone, a rare evolution item, is one of the Perks of Pokemon Go letting you evolve your favorite Pokemon and keep them throughout your journey in the game. Dr.Fone’s virtual application lets you find them with ease without any real movement on your part and helps you enjoy the game to the fullest.
- Title: In 2024, Detailed guide of ispoofer for pogo installation On Samsung Galaxy M34 5G | Dr.fone
- Author: Nova
- Created at : 2024-07-19 18:51:44
- Updated at : 2024-07-20 18:51:44
- Link: https://change-location.techidaily.com/in-2024-detailed-guide-of-ispoofer-for-pogo-installation-on-samsung-galaxy-m34-5g-drfone-by-drfone-virtual-android/
- License: This work is licensed under CC BY-NC-SA 4.0.