
In 2024, All You Need To Know About Mega Greninja For Xiaomi Redmi A2+ | Dr.fone
All You Need To Know About Mega Greninja For Xiaomi Redmi A2+
Are you a fan of Pokemon Go? Then, you will find this article not only useful but also quite interesting. In case you have never played this game before, then you should know that Pokemon Go is a fantastic augmented reality game.
It requires the use of GPS (Global Positioning System) to track your location. Basically, Pokemon Go is a mobile application which you can easily download from Google Play Store or App Store, and it’s absolutely free. In simple words, you can say that Pokemon Go makes use of mapping technology so as to plot your actual location as you roam around in the streets to catch your favourite Pokemon.
When you play the game, your main goal would be to catch as many Pokemon or fictional characters as you can. Your main task will be to battle your opponents to catch the Pokemon and then train them.
It’s worth mentioning here that this AR-game is absolutely convenient to play. Now, one of the most amazing features that have been added to this game is Mega Evolution. But, unfortunately if you were of the opinion that greninja can mega evolve, then you are completely wrong, in fact you should note that no Kalos pokemon can mega evolve.
Through this article, we will discuss all you need to know about Greninja. So, without any further delay, let’s get started.
 EmEditor Professional (Lifetime License, non-store app)
Part 1: Who is Mega greninja?

Also, called the Ninja Pokemon, Greninja is Dark/ Water-type pokemon. Some people love to call it a frog-like master. One of the most amazing features of Greninja pokemon is that with its swift movements, you will notice that this pokemon succeeds in confusing its opponents.
It makes use of very sharp throwing stars to slice its enemies. It features Torrent ability.
There are various weaknesses of this pokemon which include “Fighting”, “Grass”, “Electric”, “Bug”, and “Fairy”.Its worth mentioning here that Greninja pokemon is the final evolution of Froakie.
Part 2: What are the Strengths of Greninja in Pokemon?

Greninja is resistant to “Water”, “Fire”, “Ice”, “Dark”, “Steel” and finally “Ghost”. Also, this pokemon is immune to “Psychic”. This pokemon’s presence can be very intimidating for its opponents, it would not be wrong if we say that Greninja is quite unpredictable. There is no doubt that the counter attacks of Greniaja prove to be very dangerous for its enemies.
Part 3: How to Catch Greninja?


In order to catch Greninja, you will be required to fulfill specific requirements in the Pokemon Sun and Moon Exclusive demo.
First of all, after launching the Pokemon Sun and Moon Demo, go to the Pokemon Center.
Then, you’ll meet Professor Kukui and when he starts talking to you and asks what you wish to do , choose the option of “bring to full version.After that, you will be required to choose Ash-Greninja. Then, open the full game, finally you have to enter the nearest Pokémon Center.
Catching your favourite Pokemon or to mega evolve a specific pokemon will require you to go to different places or explore different locations, but it’s not always possible to step out of your house, it might be raining, or its night time, in the case, we recommend using software called Dr.Fone(Virtual Location).
With the help of this amazing software, you can teleport to any location or place in the whole without even requiring you to step out of your house.
In order to get started with Dr.Fone, you need to download Dr.Fone(Virtual Location) iOS. Then, you have to install Dr.fone on your smartphone. Finally, you have to launch Dr.Fone (Virtual Location) on your device.
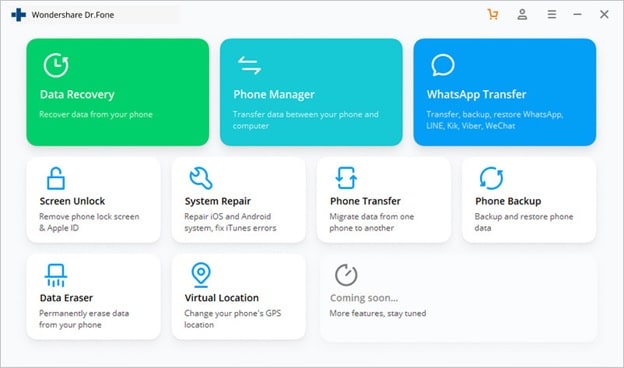
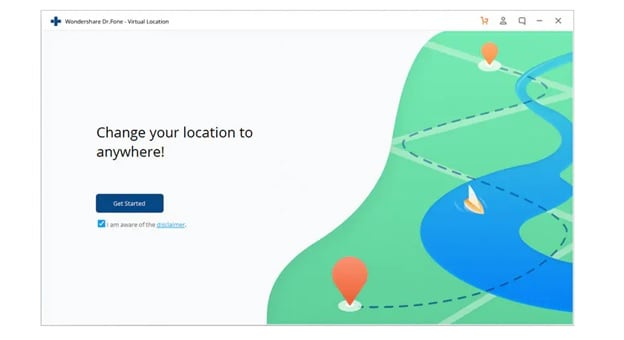
Step 1: You have to tap on “Virtual Location” among the various options that you will notice therein. It’s important to ensure that when you are setting up Dr.Fone on your device, always ensure that your iPhone is connected to the PC. Then, click on “Get Started”.
 Lyric Video Creator Professional Version
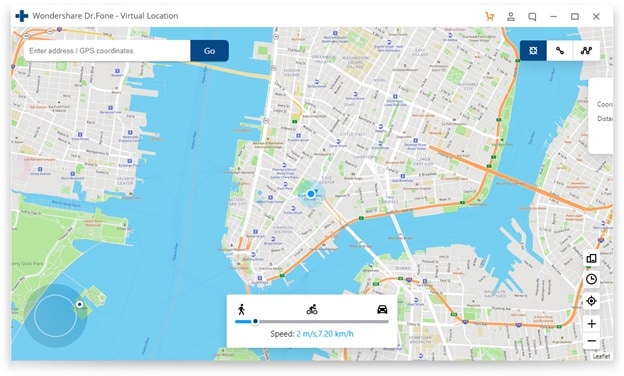
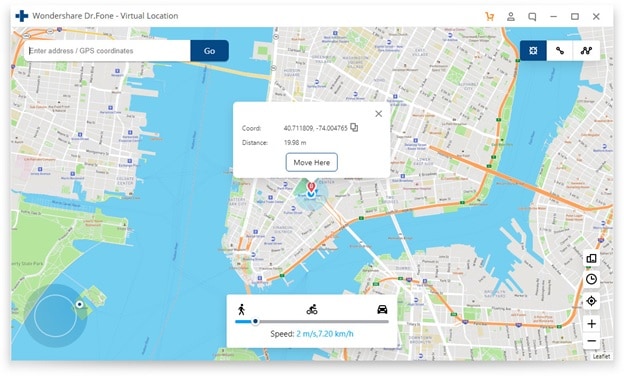
Step 2: If you have executed the prior steps or directions successfully, then you will see a new window that shows your actual location on a map will get displayed on your screen. Now, make sure that your displayed location on moa is accurate, if not, then click on “Center On,” with the help of this, you’ll be able to make your location correct.
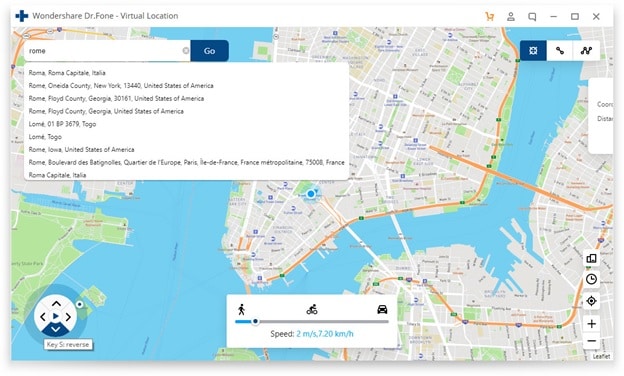
Step 3: After all the previous steps, the next step is to click on the “teleport mode” icon, which will be located in the upper-right part. This will activate the teleport mode. After that, you have to enter the name of the location or place where you wish to teleport to in the upper left field. Finally, tap on “Go”. As an example, we are going to enter “Italy”, Rome in the left field.
Step 4: In this manner, your location will now be understood or set by the system to “Italy”. You’ll see a pop-up box; you have to just click on “Move On”.
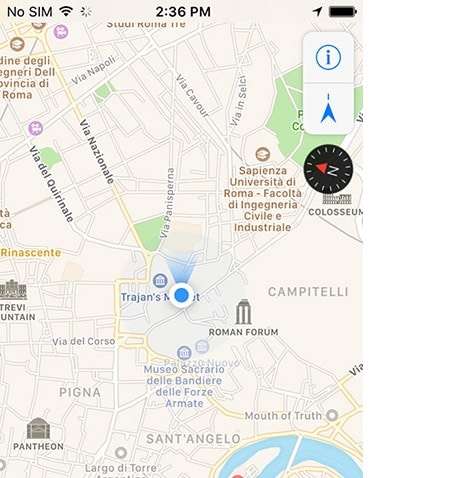
Step 5: If you have followed the directions accurately, your actual location on the map will now be set to “Italy”. You can confirm your location from the Pokemon Go’s map. Finally, below we have provided a screenshot of how the location will be shown.
Step 6: Also, you’ll see that the location on your iPhone would have also changed now to “Italy” or any other place that you have entered earlier.
Conclusion
So, we have reached the end of this article. We hope that you found the article quite useful as well as insightful. We also hope that with the help of the setup guide for Dr.Fone you can now easily catch your favourite pokemon by teleporting to different locations across the world. If you have any doubts or suggestions related to this article, then feel free to write it down in the comment section. So, this was all from our side for now. Stay Tuned
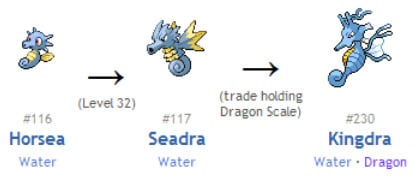
How to get the dragon scale and evolution-enabled pokemon On Xiaomi Redmi A2+?
The Dragon Scale is a special item in Pokémon Go that is used to evolve Seadra into Kingdra. To get a Dragon Scale in the game, you need to complete the 7-day Research Breakthrough. This means that you need to complete a Field Research task every day for 7 days to get the Dragon Scale. Once you have the Dragon Scale, you can use it to evolve Seadra into Kingdra.
Dragon scales in Pokémon GO are extremely exceptional and are utterly crucial in evolving pokemon. Pokemon go dragon scale evolutions can be as easy as utilizing the necessary amount of candy, but frequently scarce evolutions will call for an evolution object. These are usable that not only let you fill in your Pokedex but also gain access to many impactful beasts. There are several different ways to get a Dragon Scale, but none of them is guaranteed. This implies that you will have to accomplish as many of these tasks that are feasible – peculiarly because you can make use of them only once. Perhaps the simplest way of gaining a Dragon Scale is spinning Pokestops wherever likely. Each Pokestop comes up with a 1% probability of an evolution object, encompassing a Dragon Scale.
Following are the additional evolution items observed in Pokémon Go:
- King’s Rock
- Metal Coat
- Sinnoh Stone
- Sun Stone
- Unova Stone
- Upgrade
 The Tube Sites Submitter is a fast and efficient tool for anyone who needs to upload videos quickly, easily and automatically to hundreds of tube sites in mere minutes .
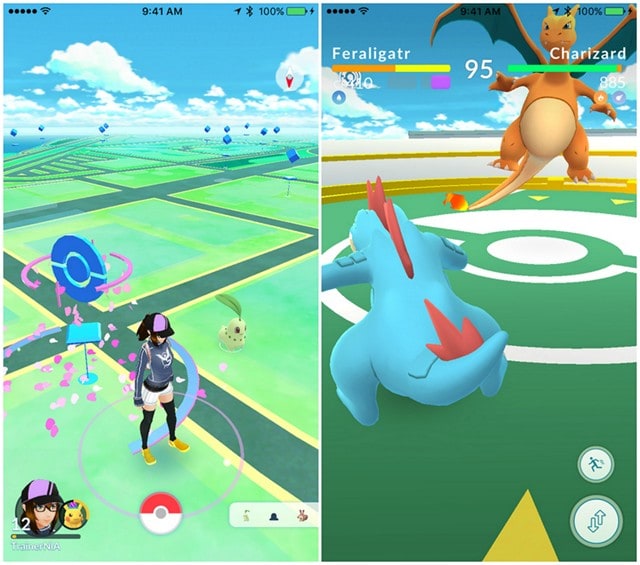
Part 1:What Pokémon can I evolve with a dragon scale on Pokémon Go?
The pokemon go dragon scale is one of the new evolution objects that can be employed in association with Pokemon Candy to evolve some of the generation 1 Pokemon to new generation 2 evolutions. The dragon scale is extremely strong and rigid. We can only make use of our Dragon Scale on a specific Pokemon. Dragon scale pokemon go evolutions contain the alteration of Seadra into Kingdra by combining the dragon scale along with 100 Horsea candies - making Kingdra a sturdy pocket monster ideal for raids and taking charge over the gyms.
Once receiving a Dragon Scale, a player can only use it to evolve Seadra. Any other Pokemon will not evolve with it or even need it to evolve.
Part 2:Fast way to get the exclusive Pokémon?
You can make use of the artificial locality of Dr. Fone to imitate your position without any motion and acquire exclusive Pokémon. The duplicate point of Dr. Fone lets you phony your orientation and permits your mobile application to presume that you are chosen in the app interface of Dr. Fone without being banned from the game or getting detected by the developers of Pokemon Go. To seize the pokemon, you can trail the instructions below with one click without having to go anywhere else.
Step 1: Replicating Position Fluke:
Pokemon Go can be played without requiring movement, using Dr. Fone’s toolkit. To replicate the position and guarantee that the iOS gadget is associated with the application, open the Virtual Location property using a functioning lightning cable.

You can click the ‘Get Started’ button to initiate the action as soon as your phone gets detected.

Step 2: Mirroring Motion amid steps:
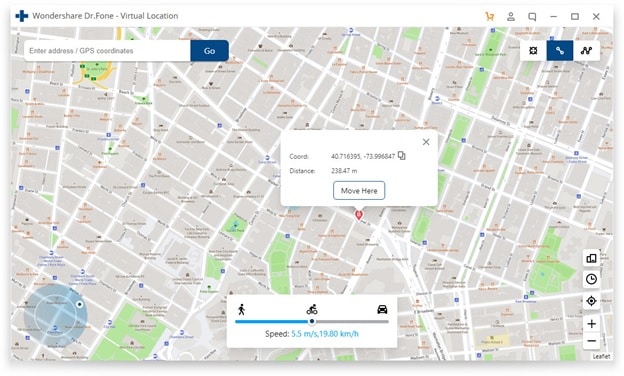
Unfold the top right area of the initial option before reaching Dr. Fone’s GUI, which permits you to imitate maneuver amid the two spots. Pick the positioning pin and click on the ‘transfer here’ button in the search bar.

To begin the replication, you will be required to make a movement and traverse the ‘March’ button to reach it multiple times. By default, the action is set to one but can be outweighed by the user, and the plan will change correspondingly.

The change location will act as genuine for the Pokémon Go application, and it will presume that the player is moving in between the two points you chose on the Dr. Fone GUI screen. At the foot of the screen, the rate of motion can also be modified, making use of the gliding menu. By following these steps, you can use the fake motion of the position of Dr. Virtual Fone without needing to understand it, and your app will not be banned.


Step 3: Movement Simulation between more than two spots:
Dr. Fone’s application also lets you fake your motion joining more than two positions. The attribute is called after the multi-stop path that can be highlighted from the GUI toolbox class situated at the top-right position, which allows you to release several accurate endpoints on the map, and your position will take action correspondingly as managed by the virtual position application of Dr. Fone.
To let the system duplicate flow by choosing the accurate choices, press the ‘March’ button. You will have to do the Pokémon Go walking trick at some point. Dr. Fone’s virtual motion replicator application makes your life a lot easier and lets you do the job without having to worry about travel charges.

Part 3: How to get the dragon scale on Pokémon Go?
Pokemon go dragon scale can be obtained by taking charge of Gyms and spinning, waiting for the Pokestops to give you free dragon scales, but the chances are extremely low. PokeStops are symbolized by little blue box images on the map and usually can be observed in places of recreation such as a train station, a landmark, or even a regional post office. When your avatar is near to entering a PokeStop, the blue box image changes into a disc shape. The next thing you need to do is tap the disc, and it will exhibit a picture of the landmark, which is a chance to get a few free products.
You can get your hands on a dragon scale by spinning a specific Pokestop seven days in a row to get the required streak bonus. This won’t ensure you a dragon scale; however, it will give you the possibility of achieving other evolutionary objects such as the Sun Stone, Upgrade, Sinnoh Stone, Unova Stone, Metal Coat, and King’s Rock.
Conclusion
Specific Pokémon in Pokémon GO now call for rare evolution items such as a steel coat, a sunstone, a king’s rock, a dragon scale, or an upgrade to evolve, all of which are unplanned drops from Pokestops. However, the players can make use of Dr.Fone - Virtual Location application to gain version exclusive Pokemon and evolution items and make advancements in the game.
Can I use iTools gpx file to catch the rare Pokemon On Xiaomi Redmi A2+
Pokemon continues to be an after-sought mobile gaming app. The iTool gpx completes the game. This tool is dully smart, letting you catch Pokemon without much hassle. iTools is a replacement for iTunes which you can now use to manage your iDevice and computer. Its simplicity makes it a walk-in-the-park as you try to catch Pokemon. It will save your computer battery life and also save you from complex background operations.
It will inform you when a pokestop arrives without the need to even use your phone. More so, simply connect the Xiaomi Redmi A2+ device to your phone via Bluetooth technology and move along as you enjoy your game. The device will vibrate or blink, an indication that you need to get ready to catch a Pokemon. So yes, you can use iTool gpx file to catch rare Pokemon.
Part 1:What can the gpx file do?
The gpx file is mainly used in software applications to transfer information about tracks and points from one application to another. These files are saved in ‘XML’ format, which makes it easy to import and read GPS data by several programs.
How to download gpx file on iOS and Android
On iOS
First, open the route that you are interested in, then select the ‘Export gpx’ option > ‘Export’ in the lower line. Next, choose whether to forward the gpx file via a provider or to copy and save it in your data.
On Android
Open the route you are interested in and hit the ‘More’ option. Next, select the ‘Export gps’ option and the file will be downloaded to your smartphone. You can forward the route to various providers by tapping the ‘Share’ button.
Why gpx Pokemon
Many games have thronged our screens but not many matches Pokemon. Once you download gpx to iTools mobile, you get real-life benefits from this hottest virtual game. As gpx files are a list of exact locations that form a route for cycling or walking, they direct the player. A player can, therefore, see their location regarding the route via GPS for surety.
Likewise, players are assured of being on the right trail when they use navigation apps with gpx files. And whey they get off track, they can redirect themselves to the path and continue gaming.
Part 2:Where to find the iTools gpx file
You have to import gpx file before opening it. The easiest way is to upload it to the web version of Google Maps. First, open and sign in to Google Maps then add a gpx file as a new map. Follow these steps.
- First, open the Google Maps menu and select ‘Your places’.
- Select ‘Maps’ > ‘Create map’.
- Select the ‘Import’ button after a new Google Maps window opens.
- Finally, upload your gpx file. You should see the map data in your file on Google Maps.
For you to use gpx file iTools, you first have to enable the virtual location on your device. It is from the virtual location where you can cycle and pin mode with teleport and joystick. More so, you can adjust the speed as desired. You just need to choose your favorite location and get to playing. Import, export, and save the iTools gpx to continue from your last stop point.
Follow these steps to save the iTools gpx file and get gpx files from friends
With ThinkSky, you can add gpx file to iTools and fake your gps location. This app comes with plenty of functionalities to make every fake location appear real to your friends.
- First, determine and click on the point that you wish to fake.
- Next, copy the coordinates by clicking the ‘Copy to clipboard’ button.
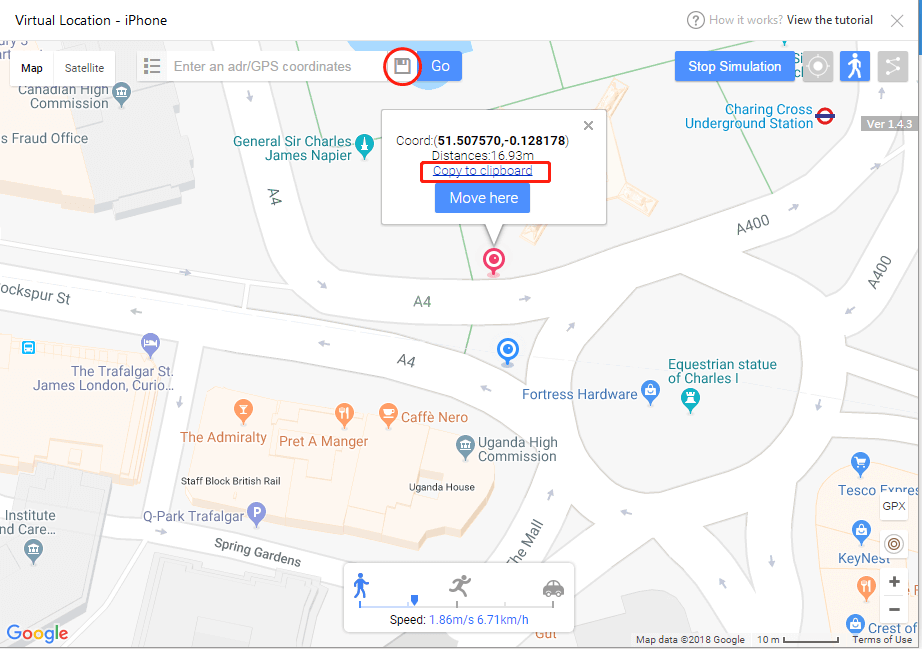
- Then, confirm group name and click on the ‘Save’ icon. You’ll see it located besides the search bar.
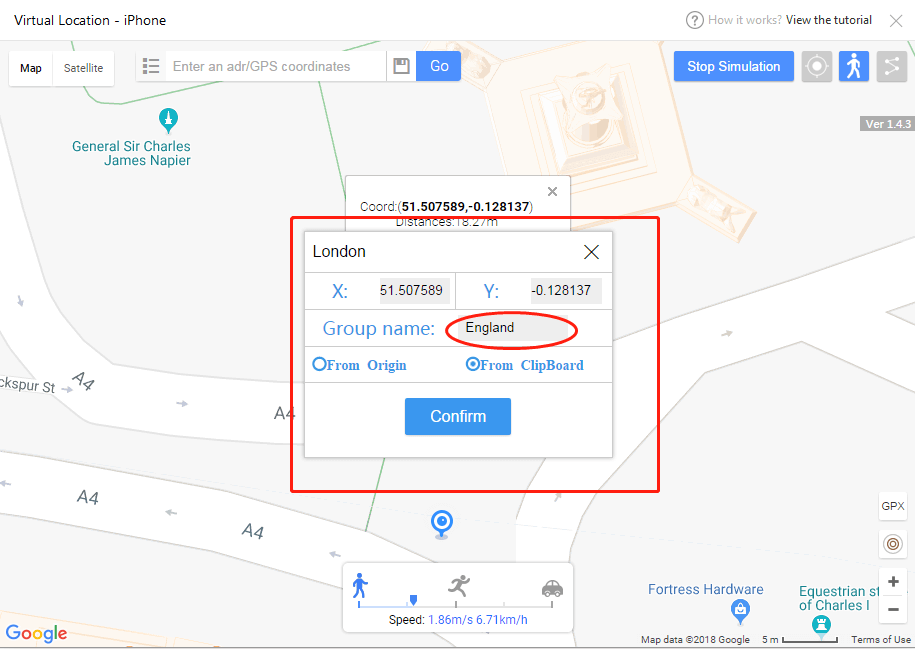
- Lastly, input the coordinates names and group name and then export your favorite location list.

 The BootIt Collection covers multi-booting, partitioning, and disk imaging on traditional PC’s using the standard BIOS and newer PC’s using UEFI. The collection includes BootIt Bare Metal (BIBM) for standard BIOS systems and BootIt UEFI (BIU) for UEFI system.
Part 3:Is there any safer tool to spoof Pokemon with iTools file?
You can opt for other safer tools for route creator. Perhaps it is raining and you can’t step out. Or it is already late in the night. What do you do? Just fake it! Dr.Fone comes with advanced features to help you iSpoofer gpx routes and fake your locations in simple steps.
How to export and import gpx to save and share location with Dr.Fone
First, you need to download, install, and launch Dr. Fone – Virtual Location to your computer. Then click the ‘Virtual Location’ option and connect your iPhone to the computer. Next, hit the ‘Get Started’ button. You’ll be redirected to a new window to find the actual location on your map. Please follow these steps to export and import gpx to save and share.
Step 1. Save the path as gpx.file
Dr. Fone virtual location supports saving customized routes. Click the ‘Export’ button once it pops-up.
Step 2. Import file
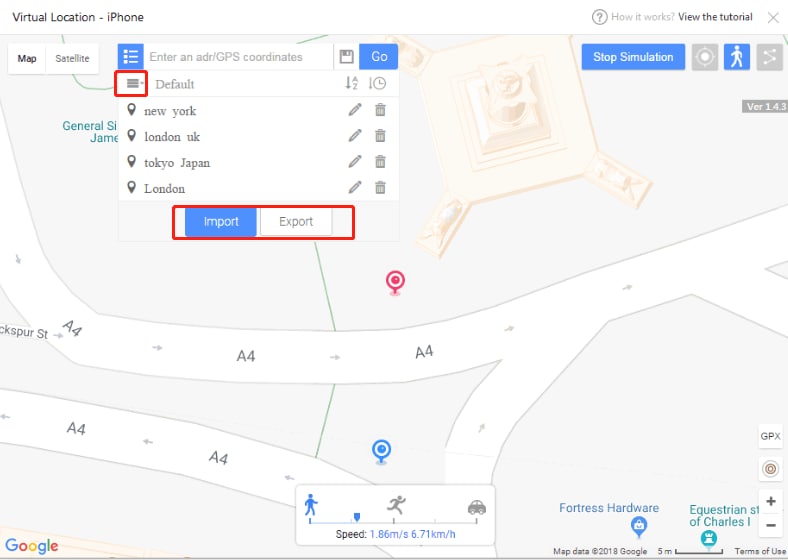
Next, import the shared gpx file into the app. You can download the gpx file from other websites or you can get it from friends. To import the file, go to the main screen of the app and check under the ‘Add-to-favorites’ icon then click the ‘Import’ button. Wait as the file is imported then click the ‘Save’ button after the process is completed.

You can also add your favorite iSpoofer gpx routes. To add any spot into your favorites, check for the five-star icon and click to add the route to favorites. You should see ‘Collection successfully’ after adding your favorites. This gpx route creator makes it easy to walk along your favorite routes. Click the ‘Move’ button and reach any place with a click of a button.
The Bottom Line
Being a first timer, you may find it very complicated to fake your gps location. But Pokemon map creator makes it easy. Dr. Fone virtual location works seamlessly with your iOS device to take you virtually to any place in the world, from the comfort of your living room.
- Title: In 2024, All You Need To Know About Mega Greninja For Xiaomi Redmi A2+ | Dr.fone
- Author: Nova
- Created at : 2024-07-19 21:53:40
- Updated at : 2024-07-20 21:53:40
- Link: https://change-location.techidaily.com/in-2024-all-you-need-to-know-about-mega-greninja-for-xiaomi-redmi-a2plus-drfone-by-drfone-virtual-android/
- License: This work is licensed under CC BY-NC-SA 4.0.