
In 2024, All Must-Knows to Use Fake GPS GO Location Spoofer On Oppo Reno 11F 5G | Dr.fone
All Must-Knows to Use Fake GPS GO Location Spoofer On Oppo Reno 11F 5G
It is highly risky to share sensitive information like location details on social media. Most social media access the location details when you perform any sort of activity on their platform. You would have given permission while installing the app for the first time on your phone. These details interest the criminals to commit the theft act at your place when you are on a vacation.
Do you know how to avoid such a situation? It is simple, try to trick the location details using Fake GPS Go Location Spoofer.
You can also make use of this app to spoof your location while playing location related games like Pokemon. This could give a chance to explore unique and more Pokemons around the globe. Those who make use of social media and play games online should know how to spoof location using an incredible app. Just scroll down to discover the techniques.

Part 1: About Fake GPS GO Location Spoofer
The Fake GPS Go Location Spoofer is the best app to trick the location details on the online space. This app implements the strategy promptly to acquire flawless results. The basic idea behind the fake GPS concept is that a false coordinates with respect to the Oppo Reno 11F 5G device on the space recorded to the cyber grounds hiding the original location details.
The method adopted to embed this strategy varies with one app to another. The Fake GPS Go Location Spoofer handles this concept wisely and offers a simple procedure to achieve this task.
Features of Fake GPS Go Location Spoofer
- Exclusively designed for the Android Versions
- No need for Root mode
- The update version is available every now and then on the internet
- Fewer steps to complete this process
- No prior technical skills are necessary to understand the procedure
- Spoofing occurs just by a single tap on the app
- Awesome user interface
- Consistent introduction of app updates with solved bugs based on the feedback from the users
- Quick response to the user’s feedback from the team of Fake GPS Go Location Spoofer app
- Great customer service

Part 2: Fake GPS GO Location Spoofer: the For and Against voices
The FOR Voices on Fake GPS GO Location Spoofer
This app is helpful while playing games related to location. You can mock your friends and family for fun with the help of Fake GPS Go Location Spoofer app. Due to its versatile design, there are many ‘For Voices’ on the internet. The persuasive feature of this app attracts users from all age groups.
Voices of the Happy Users
- Precise location spoofing without any flaws
- Excellent tutorials to guide the novice users
- Free from unwanted advertisements
- Restores to the original location when required
- Outstanding compatibility with all versions of Android devices
- Ease Installation and setup process
- Flexible and customizable
The Against Voices on Fake GPS GO Location Spoofer
There exist disappointed users struggling to understand this app. The user’s face issues only if they were not able to follow the instructions promptly provided by the development team of Fake GPS Go Location Spoofer.
Voices of the disappointed users
- Some of the users struggle to work on this app considering it as a technical software
- Confused with the updates
- The updated versions were not appreciable
- It doesn’t work well with the Pokemon Go game
- This app download from Google Play store is not reliable

Part 3: How to use Fake GPS GO Location Spoofer on your Android
Step 1: Go to the Google Play Store and type ‘Fake GPS Go Location Spoofer’ on the search box in your Oppo Reno 11F 5G to download this app.

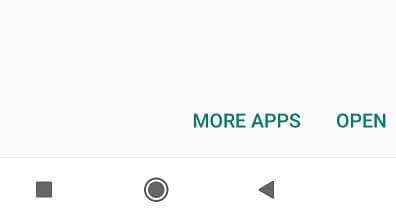
Step 2: Soon after the successful download tap ‘Open’ button.
Step 3: Allow the app to access the Oppo Reno 11F 5G device’s location

Step 4: Accept the Advertising terms to proceed

Step 5: Next, you have to enable the ‘Mock Location’ option in the ‘Developer Option’ window. To do that you must go to ‘Settings-> Software info -> Built Number’. Tap the ‘Built Number’ few times based on the model of your Oppo Reno 11F 5G to unlock into the ‘Developer option’. In the ‘Developer Option’, choose ‘Select mock location app’.

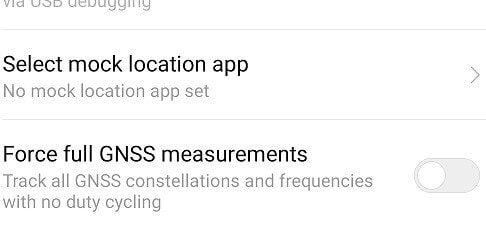
Step 6: inside the ‘Select mock location app’, you have to click the ‘FakeGPS Free’ to enable the mock location feature

Step 7: Now go to the ‘Fake GPS Go Location’ app and select your favourite spot on the map. Then press the ‘Play’ button. Select ‘Without Ads’ option to implement the changes accordingly.


Step 8: Finally, you have changed the default current location in your device using the Fake GPS Go Location Spoofer app successfully.

Step 9: Close this app and open the Google Map to check your current location you will be surprised to view the placeholder stays on your favourite spot thereby mocking the original location.

Part 4: Any other better alternative to Fake GPS GO
In this section, you will learn about the alternative tool to Fake GPS Go. The name of the alternative app is ‘Fake GPS Location’. It is a new app released this year 2019 to serve the users in a better way. You can download this software at Google play store without any issues.
Step 1: Check-in to play store and type ‘Fake GPS Location’ in the search bar. Tap the ‘Install’ button to trigger the downloading process.

Step 2: Open the app after the download process

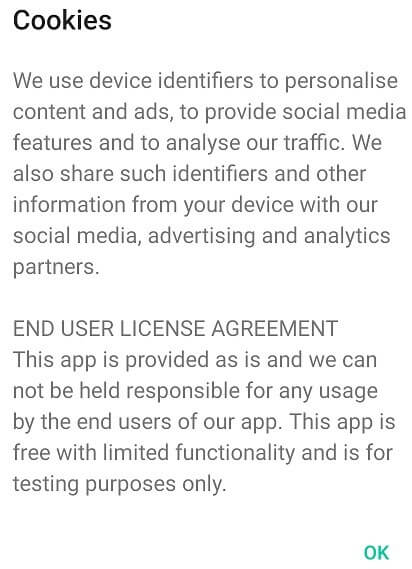
Step 3: Allow the app to access the Oppo Reno 11F 5G device location and accept the ‘Cookies’ to work on this platform
Step 4: Now, you must enable the ‘Mock Location’ option through the settings. To do so click the ‘Settings’ then ‘Additional Settings’ finally hit the ‘Developer option’. Tap ‘Select Mock Location’ and choose ‘Fake GPS Pro’ from the displayed list. Now switch on to the app to proceed further.


Step 5: To implement the fake location you must select the desired place on the map and tap the ‘Play’ button. It will lead to another screen requesting for permission.

Step 6: Enable the settings and grant permission to fake the location on your device

Step 7: At last, the fake location is marked on your device using this app. Your device will show up this new location irrespective of your current place.

Now you had a clear picture of the ‘Fake GPS Location’ app in a detailed manner. It is enough if you follow the steps carefully to mark the fake location in no time.
Conclusion
There are many apps related to fake GPS on the internet space and spotting the right app is quite challenging. This article has given great guidance to choose the perfect tool to meet all the requirements precisely without regrets. The procedure is very simple and you can work on it by tapping the options accordingly.
Make use of the ‘Fake GPS Go Location Spoofer’ app to protect your live location details. With the help of this app, you can surf through any social media and play online games without any fear. Conceal the location information and increase your privacy through innovative products at the Google play store.
Part 5: Fake GPS GO has no app for iPhone? What to do?
Tricking the location by Fake GPS Go location spoofer can come in handy under many situations. However, when it comes to iOS devices, the users may get annoyed as the app has no iOS version. Therefore, you should be thankful to Dr.Fone – Virtual Location (iOS) that helps you serve the purpose without any Fake GPS Go apk. The tool is designed by Wondershare and never disappoints users for faking location. Let us know how you can pretend to be somewhere in an iOS device sans Fake GPS Go.
Mode 1: Teleport Anywhere
Step 1: To work with this Fake GPS Go’s alternative, install and launch it on PC. Click “Virtual Location” tab on the main screen.

Step 2: Take your iOS device and establish connection between PC and device. Hit on “Get Started” button now.

Step 3: You will notice your current location on the map. If not, hit the “Center On” located at the lower right on the screen.

Step 4: Choose the third icon on the upper right part of the screen from the three given icons. This is “teleport mode”. Enter the name of the location where you need to teleport and click “Go”.

Step 5: Then entered place will be recognized by the program and you need to click “Move Here” option in the pop-up dialogue.

Step 6: The location will be changed successfully. You can now see on the map or in the location based app in iPhone, the spot will be seen as the same you selected.

Part 2: Movement Simulation Between two Places
Step 1: Launch the tool and look for the first icon at the upper right screen which is “one-stop route”. Choose the place you want to travel on the map. You will know the distance in the pop-up box.
Step 2: The slider located below the screen needs to be dragged to set the speed of travelling. You can choose cycling speed or the speed you want. Hit on “Move Here” afterwards.

Step 3: Next, key in a number that will define the number of times you want to travel the route back and forth. Hit “March” option.

Step 4: Now, the position will be seen moving as per the chosen speed on the map. And this is how you can fake the movement sans Fake GPS Go apk.

Part 3: Simulate Route Movement for Multiple Locations
Step 1: For multiple spots, you need to click the “multi-stop route” after entering map interface. This mode is the second icon on the upper right side. Now, select the multiple places one by one where you want to pass.
Step 2: The pop-up will show the distance where you need to hit the “Move Here” button. Choose the moving speed.

Step 3: Enter a digit for how many times you want to take route and click “March”. This will begin the movement simulation.

Dr.Fone - Virtual Location
1-Click Location Changer for both iOS and Android
- Teleport from one location to another across the world from the comfort of your home.
- With just a few selections on your computer, you can make members of your circle believe you’re anywhere you want.
- Stimulate and imitate movement and set the speed and stops you take along the way.
- Compatible with both iOS and Android systems.
- Work with location-based apps, like Pokemon Go , Snapchat , Instagram , Facebook , etc.
3981454 people have downloaded it
How to Share Location in Messenger On Oppo Reno 11F 5G?
We usually host a gathering once in a while and invite our friends to come over. Most of us are already used to organizing such activities because we’ve been doing that for a long time now. However, we cannot deny that it’s much easier nowadays than years ago. Why so? Simply because the communication channels available today at our disposal are more digital and more capable. For instance, Facebook Messenger now allows users to share their whereabouts in a snap of a finger. Yes. That feature is called Live Location.
The Live Location feature on Messenger works beyond sending the address or coordinates of your exact location. It basically visualizes your whereabouts by means of an interactive map and updates the details from time to time. That means the receiver can view not only your position but also your movements. Is that helpful? Absolutely yes. It’s indeed a game-changer in today’s already convenient world. Is it highly recommended? With proper handling and adequate caution, Messenger’s Live Location can definitely do more good than harm to the users.
In this article, we will delve into the highlights and benefits of Facebook Messenger’s location-sharing features. We will also provide some tutorials on how to share Live Location on Messenger. Continue reading below to learn more.
Part 1. Everything You Should Know About Messenger’s Live Location
Facebook is well aware that sharing location details is essential to its users. That’s why developers have come up with a brilliant idea and rolled out Live Location on Messenger. It basically works like other location-sharing features. However, Live Location provides more precise and thorough location information. It’s in map form, where you can view the exact location and track the movements of the sender. You’ll continue to see updates for as long as the sharing is not halted on the other end. To navigate it properly, try to read tutorials on how to share Live Location on Messenger.

What if you wish to send a particular address from another location? There is no problem with that. Messenger allows users to search for a specific place, trace it on the map, and share the details. The receiver can view it in map form and get directions if necessary. See? It’s very easy and convenient. No need to type in long addresses just to share a particular location with your friend. You just have to find it precisely on the map and send the information afterward.
Convenience is just one thing. Messenger’s location-sharing feature has a lot more to offer to users. One of which is the accuracy of the shared location information. Since the details are automatically generated through GPS, you can be sure that it is correct and definite. If you go out and track it down the neighborhood, you can certainly find the location in no time. Just make sure that the location services on your smartphone are activated so you can view your progress in real time. Also, stay vigilant while you’re out and keep yourself safe from any harm. Remember that safety remains a priority and comes above convenience.
How to Grant Facebook Messenger the Permission to Access Your Location?
Facebook Messenger’s location-sharing feature will not work without the necessary access. That’s why you should first configure the permission settings on your mobile device to avoid unwanted disruptions. Don’t worry. It’s indeed a piece of cake. Check out the tutorial provided below.
- 1: Go to Settings.
- Step 2: Click Apps.

- Step 3: Find and click Messenger.

- Step 4: Click Permissions.

- Step 5: Click Location.

- Step 6: Select Allow Only While Using the App. If you’re quite conservative regarding this matter, click Ask Every Time instead. After that, Facebook Messenger will have access to your location information.

Part 2. How to Share My Location on Messenger?
How do I share my location on Messenger? As mentioned earlier, it’s very easy to use Facebook Messenger for location sharing. All it takes is just a few clicks on the platform. No need to manually type in the address or sketch the landmarks. Messenger does the rest of the work for you. In actuality, there are three ways to share your location on Messenger. Any of them can be of great help to you, depending on your current situation. Do you want to try them now? Check out the tutorials below.
Method 1: Share location on Facebook Messenger via Live Location
How to share my location on Messenger? Well, the first option you can try is through Live Location. It works best if you wish to tell somebody where exactly you are and give updates from time to time. Don’t worry. Although it looks complicated at a glance, in reality, it’s actually not rocket science. It only takes a few seconds to complete. Below is a tutorial on how to share Live Location on Messenger in easy steps.
- Step 1: Open the Facebook Messenger application on your mobile device.
- Step 2: Browse through your conversation feed and find the contact with whom you wish to share your Live Location. Click on it.
- Step 3: Click the More (+) icon at the bottom-left corner of the screen.

- Step 4: Right after, click Location.

- Step 5: Click Start Sharing Live Location. Immediately, your current location details will be available and forwarded to the intended receiver. Live Location lasts for 60 minutes at maximum. If you wish to terminate it, simply click Stop Sharing Live Location.

Method 2: Share location on Facebook Messenger via Pinned Location
Let’s say there is a specific place you want to visit with your friend. Is there a way to share the address of the venue without you being there at the moment? Fortunately, it is possible. Apart from sharing your current location in real-time via Live Location, you can also send pinned locations on Messenger. You just need to search for it and then redirect the details to your friend. Yes. It’s just as simple as that. Do you want to try it on your smartphone? If so, follow the guide below.
- Step 1: Launch the Facebook Messenger application on your mobile device.
- Step 2: Scroll through your conversations and find the receiver from the list. Click on it.
- Step 3: On the text field, click the More (+) icon at the bottom-left corner.
- Step 4: Then, click Location.
- Step 5: Locate the search bar above the interactive map and type in the location you want to share.

- Step 6: Choose one from the suggested results and then click on it. The details will then be forwarded immediately to the intended receiver.
Method 3: Share location on Facebook Messenger via Google Maps location
How do I share my location in Messenger if I cannot find it on the map provided? Yes. That happens sometimes. There are certain places that are untraceable on the messaging platform. As a result, it doesn’t appear on the map when you try to search for it. But don’t sweat it. If you experience the same issue, you can instead use Google Maps to share location details. How to do it? Check out the tutorial provided below.
- Step 1: Launch the Google Maps application on your mobile device.
- Step 2: Click on the Search bar at the top and then type in the location.

- Step 3: Choose one from the suggestions and then tap on it. Make sure that it is exactly what you’re looking for.

- Step 4: Access the menu bar below the map and then click Share.

- Step 5: From there, click Chats or the Facebook Messenger logo.
- Step 6: Find the receiver from the provided list and then click the Send button next to its name.

NOTE: Of course, you can only send pinned locations via Google Maps. The Facebook Messenger’s Live Location is available within the platform only.
BONUS TIP: Protect Your Privacy With Wondershare Dr.Fone
There’s no denying that the location-sharing feature of Facebook Messenger is useful to many of us. It always comes in very handy whenever we need to meet people somewhere or invite them to our places. However, we should not become too complacent and let our guard down. Sharing sensitive information like whereabouts always comes with risk, regardless of the platform and the intention. Therefore, make it a habit to protect your privacy at all costs. In this regard, Wondershare Dr.Fone has something special to offer. Its Virtual Location feature, capable of modifying and simulating your location records, can be of great help for you. Don’t worry. It’s very easy to use. Here’s a short guide for you.
- Step 1: Download Wondershare Dr.Fone from its official website. Right after, install it on your computer.
- Step 2: Launch the newly installed software on your desktop. Once it fully loads up, connect your smartphone using a data cable. Follow the on-screen instructions and perform the steps accordingly to ensure the connection between the two devices is stable enough to handle the succeeding operations.
- Step 3: Navigate to the left-side panel and then click Toolbox. On the main dashboard, click Virtual Location. Is it your first time using this feature? If so, allow Wondershare Dr.Fone to download additional resources. Don’t sweat it. It will only take a few minutes to complete.
- Step 4: Once the downloading process has concluded, Wondershare Dr.Fone - Virtual Location will automatically open on a separate window. From there, go to the top-right menu bar and then click Teleport Mode. It is the first icon that appears in the row.
- Step 5: Head over to the top-left corner and enter your desired location into the search bar. Choose one from the suggested results. After that, click the Enter icon.
- Step 6: The details regarding your chosen location will be displayed on the computer screen. Review the information and make sure that it is the specific location you’re looking for. Once confirmed, click Move Here to proceed.
- Step 7: Immediately, the location settings on your smartphone will be changed according to the inputs you have provided to Wondershare Dr.Fone. You can verify it by checking the current location registered on your Maps app. After confirming that your mobile device is now showing a different location, you can now start browsing without worrying about your location’s privacy.
NOTE: Resort to Wondershare Dr.Fone - Virtual Location if your internet browsing does not require you to provide your real address. If you wish to restore your original location settings, simply close the Wondershare Dr.Fone application and restart your smartphone.
Conclusion
Gone are the days when you had to write invitation cards manually and deliver them one by one. Nowadays, all you need to do is go online and use Messenger’s location-sharing feature. Have you already tried it? If not, you should take it into consideration and use it on your next agenda. Refer to the tutorial above on how to share Live Location on Messenger. It can certainly help you get started. How do I share my location on Messenger without physically being there? That’s simple. Use Messenger or Google Maps’s pinned location. Furthermore, download Wondershare Dr.Fone on your computer. Its Virtual Location feature, capable of modifying your location settings, can provide protection for your privacy. Just connect your Oppo Reno 11F 5G to the computer and set it up from there.
The Best 8 VPN Hardware Devices Reviewed On Oppo Reno 11F 5G
In today’s world, it is highly recommended to use a VPN while using the internet. Although it helps us access geo-restricted content, it can also strengthen our security. Besides using a VPN software, you can also use a VPN hardware as well. For instance, a hardware VPN for home use can be connected to your network and let all the Oppo Reno 11F 5G devices enjoy its benefit. To help you pick an ideal hardware VPN, we have come up with this guide. In this post, we have compared various Amazon hardware VPN options and have handpicked the top 8 of them for you.
If you want to use a hardware VPN for your home or business needs, then you can certainly meet your requirements with these options.
1. Cisco Systems Gigabit Dual WAN VPN
If you have already used Cisco products in the past, then you won’t face any trouble using this Amazon hardware VPN as well. It provides a wired connection with its 14 different LAN ports.
- Load balancing is supported by its dual gigabit Ethernet WAN ports
- Has an inbuilt SSL (Secure Socket Layer) and SPI (Stateful Packet Inspection) firewall.
- It is quite easy to perform its setup, as it comes with an intuitive GUI setup wizard.
- You can analyze employee productivity as it can manage different users at once.
- It is an advanced IP Security VPN hardware.
- The data transfer rate is 100 Mbps
- Warranty: 90 days
Price: $172

2. Zyxel Next Generation VPN Firewall
This VPN hardware by Zyxel will help you meet your business needs for sure. It is one of the most secure devices that you can try to get an access to around 100 VPNs.
- The hardware VPN supports up to 60 thousand sessions at the same time
- Provides an SHA-3 encryption
- It supports a speed of 300 Mbps VPN and 1 Gbps firewall
- Provides a dual-WAN fallback and failover support
- Besides IPSec, it includes SSL tunnels as well (IPv6 is also supported)
- Layer 2 Tunneling Protocol for mobiles (Android, iOS, and Windows phones)
- Warranty: 2 years
Price: $450 (for 100 VPNs), $950 (for 300 VPNs), and $1350 (for 1000 VPNs)

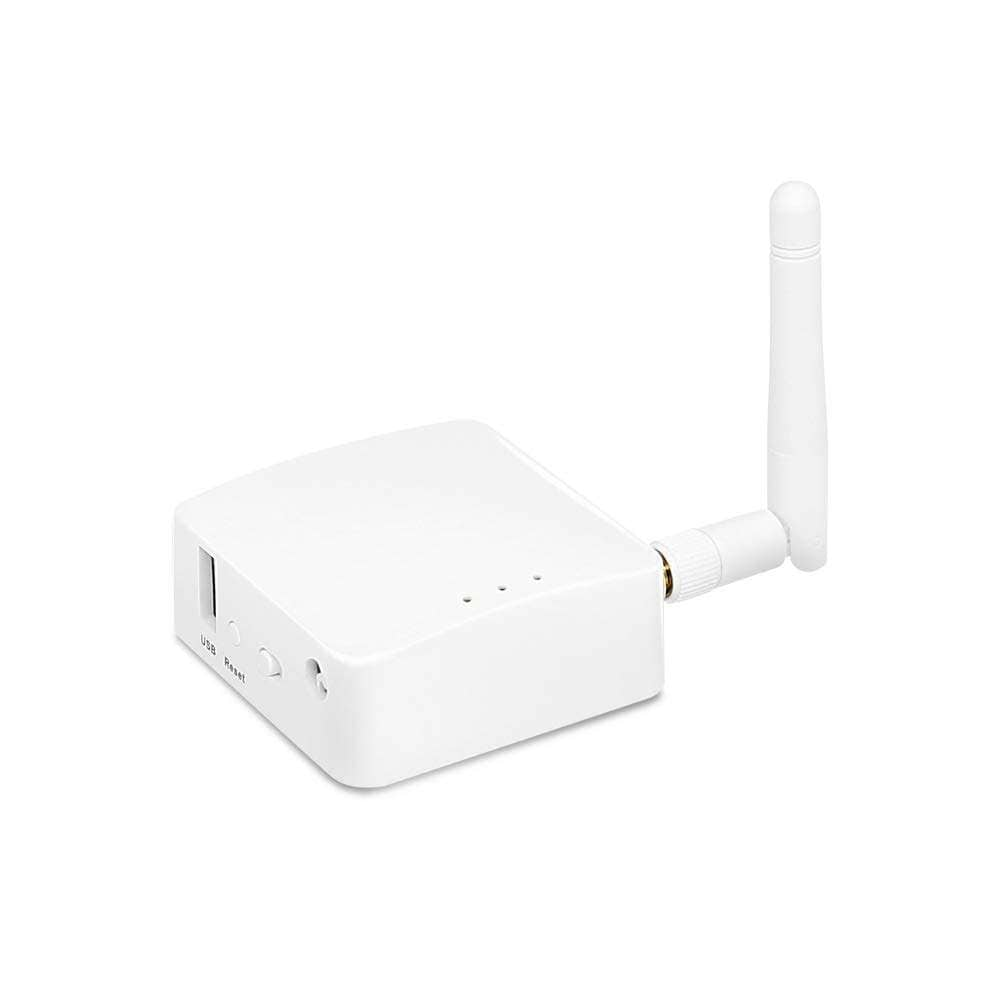
3. GL.iNet GL-AR150 Mini Travel Router & VPN
If you are looking for an affordable hardware VPN for home use, then you should check this portable VPN router by GL.iNet. Since it is lightweight and portable, you can carry it anywhere and use it as per your needs.
- It has an inbuilt OpenVPN and TOR client.
- This mini router provides an access to over 20 different VPN services.
- You can either use its adapter or any laptop/power bank to use it.
- Weight: 1.41 oz
- Dual Ethernet ports
- 64 MB RAM and 16 MB flash ROM
Price: $22
4. UTT HiPER 518 VPN
It doesn’t matter if you like to use VPN for your home network or small business, this Amazon hardware VPN will come handy to you on numerous occasions. It comes with a quick setup wizard as well to assist you.
- The hardware VPN supports real-time backup
- Inbuilt load balancing feature
- Several advanced features like native firewall, access control, IP binding, NAT, and more
- 5 VPN tunnels can be used
- Has an auto negotiation and auto MDIX property
- It has 2 10/100M WAN ports and 10/100 LAN ports
- Ethernet connectivity with 100 Mbps data transfer rate
- Warranty: 1 year
Price: $40

5. Dell Sonicwall TZ300 VPN
Another secure Amazon hardware VPN that you can try is from the house of Dell. Even though it is a high-performance router, you might need to walk an extra mile to setup its VPN compared to other products.
- The VPN hardware is optimized for Windows, Mac, and Android users
- It has an inbuilt SSL encryption.
- Comes with an anti-virus, anti-spyware, and intrusion prevention technology
- Supports IPSec and USB connectivity
Price: $554

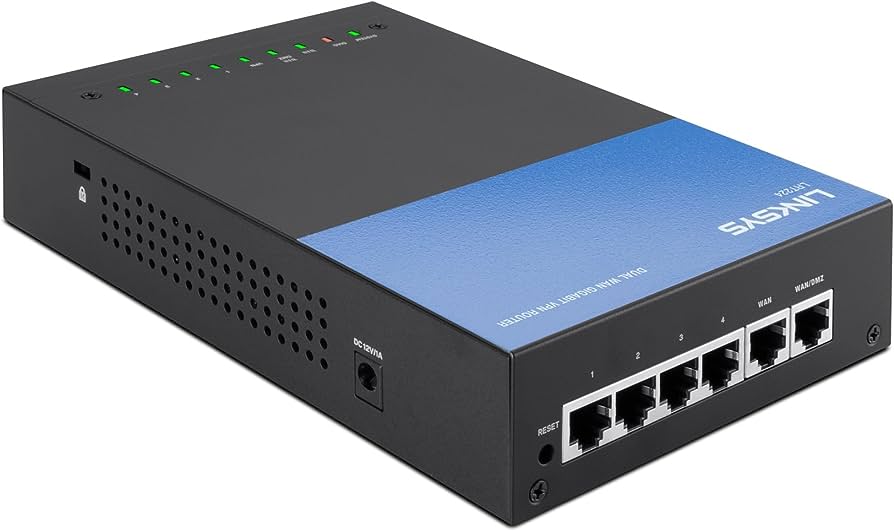
6. Linksys Business Dual WAN VPN Router
This hardware VPN router by Linksys is majorly designed for small and medium-sized offices. This site-to-site VPN supports Ethernet connectivity and has a remarkable data transfer rate of 1000 Mbps.
- It provides 110 Mbps IPSec and 900 Mbps firewall
- There are 5 OpenVPN tunnels dedicated to iOS and Android devices
- Besides that, it has 50 site-to-site IPSec tunnels
- Inbuilt features like WAN failover and load balancing
Price: $165
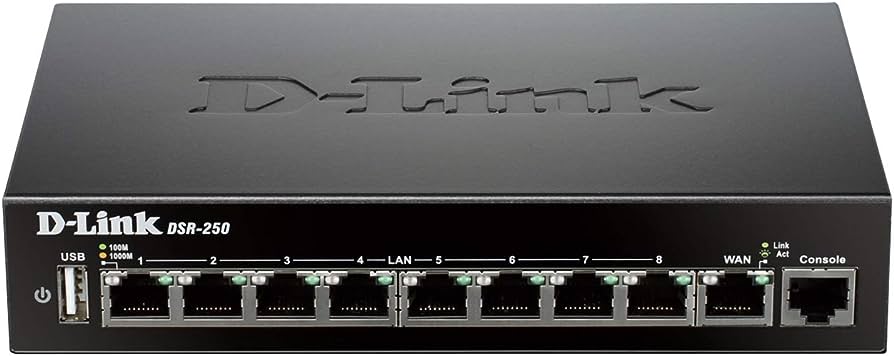
7. D-link 8-port Gigabit VPN Router
This router by D-link is an ideal pick for hardware VPN for home use and small offices. It supports Green Ethernet to optimize its power needs as well.
- VPN tunnel integration – 25 IPSec and 25 PPTP/L2TP tunnels
- It has 8 LAN (Gigabit) ports and 1 WAN (Gigabit) port
- Additionally, it has 5 SSL tunnels and 10 GRE tunnels
- Easy to configure, the VPN firewall comes with its GUI interface
- Administrations can also block websites with its dynamic web content filtering feature
- Limited lifetime warranty
Price: $130
8. TP-Link SafeStream VPN Router
This Amazon hardware VPN by TP-Link is one of the most popular Gigabit VPN routers out there. It comes in numerous versions as well and can be upgraded as per your requirements for a hardware VPN for home use.
- Supports 20 IPSec and 16 PPTP VPN tunnels
- Also has 4 Gigabit LAN and 1 Gigabit WAN port for high connectivity
- Advanced encryption techniques including AES128, AES192, AES256, DES, and 3DES with MD5 and SHA1 Authentication
- Also provides Manual and IKE Key Management
- DoS defense protection (with SPI firewall)
- Warranty: 1 year
Price: $57

Alternative: Set Up VPN on Common Hardware Devices
With any of the above VPN hardware devices, you can set up reliable VPN services in your home or office.
But many of them come with a high price, and may prove to be expensive for some individual users.
So, for a common PC, phone, router, Android TV, etc., how to set up VPN in a more affordable manner?
Many users choose NordVPN to do it for the following reasons:
- Supports 6 devices at the same time.
- VPN service can be set up on Windows, Mac, Android, iOS, Linux, and a wide range of routers.
- 24 / 7 customer service available.
- VPN service provider for large companies like CNN and BuzzFeed.
- As low as roughly 3 USD per month.
Now when you know about the various options for hardware VPN for home use and business purposes, you can easily pick a VPN hardware of your choice. We have listed different kinds of options in this post, helping you make up your mind. You can always visit their Amazon page and get more information about them. Go ahead and pick the hardware VPN of your choice and let us know about it as well.
Dr.Fone - Virtual Location
1-Click Location Changer for both iOS and Android
- Teleport from one location to another across the world from the comfort of your home.
- With just a few selections on your computer, you can make members of your circle believe you’re anywhere you want.
- Stimulate and imitate movement and set the speed and stops you take along the way.
- Compatible with both iOS and Android systems.
- Work with location-based apps, like Pokemon Go , Snapchat , Instagram , Facebook , etc.
3981454 people have downloaded it
Also read:
- [Updated] In 2024, Step Into Simplicity A Tailored Approach to Creating Shorts Thumbnails
- [Updated] Reel In Attention by Emulating TikTok Stardom on Instagram for 2024
- 2024 Approved Social Media Savvy How to Download Status Vids on FB
- 5 Ways to Move Contacts From Honor X50i to iPhone (13/14/15) | Dr.fone
- Beating the Blackout: Expert Tips for League of Legends Display Fixes, 2024 Edition
- From Paid to Free Embracing the World of FCP for 2024
- Graduate Studies Focus on Advanced Analysis, Prediction, and Optimization Techniques
- How can I get more stardust in pokemon go On Xiaomi Redmi Note 12 Pro 5G? | Dr.fone
- How to Fix Android App Not Installed Error on Tecno Spark 10 4G Quickly? | Dr.fone
- How to Fix Android.Process.Media Has Stopped on Samsung Galaxy M14 5G | Dr.fone
- How to Get and Use Pokemon Go Promo Codes On Vivo X Fold 2 | Dr.fone
- In 2024, How to use iSpoofer on Vivo Y27 5G? | Dr.fone
- Pokemon Go No GPS Signal? Heres Every Possible Solution On Samsung Galaxy S23 Tactical Edition | Dr.fone
- Step by Step Tutorial: Enhancing iPhone Typography with Custom Fonts
- The Best iSpoofer Alternative to Try On Vivo Y02T | Dr.fone
- What Pokémon Evolve with A Dawn Stone For Samsung Galaxy S24? | Dr.fone
- Why You Should Think Twice About ChatGPT as Your Online Health Consultant – Top Reasons Explained
- Title: In 2024, All Must-Knows to Use Fake GPS GO Location Spoofer On Oppo Reno 11F 5G | Dr.fone
- Author: Nova
- Created at : 2024-11-29 16:57:44
- Updated at : 2024-12-05 16:57:50
- Link: https://change-location.techidaily.com/in-2024-all-must-knows-to-use-fake-gps-go-location-spoofer-on-oppo-reno-11f-5g-drfone-by-drfone-virtual-android/
- License: This work is licensed under CC BY-NC-SA 4.0.