
How To Use Special Features - Virtual Location On Vivo T2 Pro 5G? | Dr.fone
How To Use Special Features - Virtual Location On Vivo T2 Pro 5G?
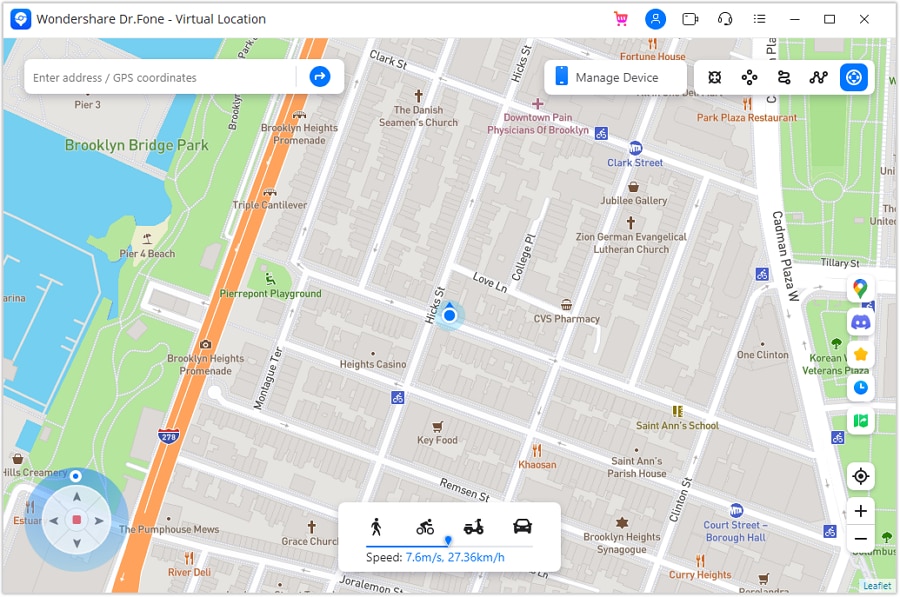
Wondershare Dr.Fone - Virtual Location comes with multiple unique features that can be used to enhance the flow of spoofing location. With all these amazing features, you can easily change your iOS location without blinking an eye. Rather than making things complicated, Dr.Fone makes it easy for you to manage operations when you perform actions like changing Android locations.
Part 1: Circle Route (For Multi-Stop Route)
The circle route feature is under the multi-stop route mode. When your starting point is close to the ending point, a pop-up asks if you want to set up a circle route. Click Yes to create a circular path on the map.

Part 2: Realistic Mode (For One-Stop Route and Multi-Stop Route)
This particular feature makes the simulation look realistic with the ability to fluctuate the speed of the simulation. If you wish to turn on realistic mode for the one-stop or multi-stop route, look for the respective checkmark option in the panel on the left.

Part 3: Fluctuation Mode (For Teleport Mode)
Whenever you are teleporting your smartphone device to another location, you can try using the fluctuation mode feature offered against it. As you activate Teleport Mode from the top-right section and search for a location, you will discover the Fluctuation Mode toggle in the confirmation tab. Turn on the toggle to slightly switch the location from the selected point to show realistic motion.

Part 4: Cooldown Timer (For Teleport Mode and Jump Teleport Mode)
While teleporting the location of your smartphone to different places for playing games like Pokemon Go, you are bound to activate a cooldown timer within your location-changing app to show realistic movement. By locating the Cooldown Timer on the right pane of icons, activate it, and this feature will automatically calculate the cooling time by measuring the distance between your destination and the starting point.

It is recommended not to start the movement until the cooldown time is completed to avoid unnecessary bans. Moreover, you can also activate the Auto jump after cooldown in the Jump teleport mode after turning on the Cooldown Timer.
This option will automatically jump you to the next destination once the timer ends. It is helpful for games like Pokemon Go, where the game servers can detect frequent jumps with no cooldown time.
Part 5: Import/Export GPX File
You can also import and export specific navigated locations from Dr.Fone in the form of GPX files. While you can export GPX files for keeping a record of your location, you can also import such files for inserting specific locations to simulate or teleport to. Find out how you can import and export GPX files with this location-changing application:
Step 1Export the GPX File
If you have defined a proper location to simulate at a particular instant using Dr.Fone - Virtual Location, you can have this location exported by clicking the Export icon on the top of the left panel. This will open a window where you can set the location for saving the GPX file.

Step 2Import a GPX File
For importing a GPX file on the platform, click the Import button on the right pane. As this opens a window, select the GPX file you wish to import to the platform.

Step 3Wait for the File to be Read
Wait for a moment until Dr.Fone - Virtual Location recognizes the specific locations within the GPX file and displays them on the map.

Part 6: Historical Records
If you want to use a similar track record on your smartphone again, you can access the historical records saved on the platform for easy access.
Step 1Open Historical Records
Click the Historical Records button on the right pane to access the entire history involving the connected smartphone and the location spoofing platform.

Step 2Access Any Location from the History
Select the Go button adjacent to any particular historical record to re-launch a similar simulation for the Vivo T2 Pro 5G device. You can also click Clear All to delete all historical records.

Part 7: Favorite List
You can also set up favorite locations within the platform to define quick accessibility to your favorite locations. To do that, you have to follow the guidelines shown next:
Step 1Favorite Specific Locations
While setting up locations in Jump Teleport Mode, One-Stop Route, or Multi-Stop Route, you can tap on the Favorite icon adjacent to every marked location or favorite an entire route with the Favorite icon on the top of the left panel.

Step 2Access your Favorite Section
To look for your favorite locations, look for the Favorite icon on the right pane to open a list containing all locations you have marked. You can choose the Move option to automatically move into a particular location in no time.

How To Simulate GPS Movement With Location Spoofer On Vivo T2 Pro 5G?
When you are playing location-based games like Pokemon Go, you might need to simulate GPS movement to catch more Pokemon. To do this, you can use the GPS movement feature of Wondershare Dr.Fone - Virtual Location . This feature allows you to simulate GPS movement between two or multiple spots on the map. Here’s how you can do it:
Part 1: Simulate Movement Along a Route (One-Stop Route)
You can set up a one-stop route when mocking locations fake with Dr.Fone - Virtual Location. This particular feature helps users to set up looping or round trips within a specific location. To perform the steps for simulating movement, look ahead for a better understanding:
Step 1Access One-Stop Route Function
Once you launch Wondershare Dr.Fone - Virtual Location and connect your smartphone successfully, proceed to select the One-Stop Route function from the top-right section. The function is represented by the third icon from the left in the section. While you have already teleported to another location or are using your current location, you can tap anywhere on the map to set your destination location.

Step 2Define Simulation Parameters
Enter a number to define how many times you want to go back and forth, and select whether you want a Round trip or a Loop trip. Drag the slider on the speed option to set how fast you want to walk. Proceed to click Move Here on the bottom to start the movement simulation.

Step 3Start Simulation Movement
The respective simulation starts, and you can see your position is moving on the map with the speed you set. If you wish to hold the simulation, click Pause or tap Clear to revert to your original state.

Part 2: Simulate Movement Along a Route (Multi-Stop Route)
You can try the multi-stop mode if you want to pass by multiple places along a route on the map. Learn how it is done when you are trying to **spoof location on Android/**iOS:
Step 1Start Multi-Stop Route and Set Parameters
Activate the Multi-Stop Route mode from the top-right section next to the One-Stop Route mode. After activating the mode, set multiple spots on the map by clicking your required place. Define the number of trips and speed. Click Start Moving to initiate the process.
Note: Select the spots along a specific road to prevent the game developer from thinking you are cheating.

Step 2View Multi-Stop Route Movement
As the simulation starts, click Pause at any instance where you want to stop the simulation. You can also Clear all settings if required.

Part 3: Use Joystick for More Flexible GPS Control (Joystick Movement)
Dr.Fone has integrated the joystick feature into the Virtual Location program to spare 90% of the labor for GPS control. You can always find the joystick on the lower left part in teleport mode. And you can also click the joystick button in the upper right (the 5th one) to use the joystick feature.
The joystick, like one-stop route or multi-stop route modes, aims to facilitate GPS movement on the map. But what’s better? The joystick lets you move on the map by changing directions in real time. Here are the two main scenes where you will definitely love the joystick.
- Automatic GPS movement: Click the Start button in the middle, and the automatic movement starts. Then just change the directions as you like by 1) clicking the left or right arrows, 2) dragging the spot around the circle, 3) pressing keys A and D on the keyboard, or 4) pressing keys Left and Right on the keyboard.
- Manual GPS movement: Move forward by constantly clicking the Up arrow in the program and long-pressing the key W or Up on the keyboard. Reverse by constantly clicking the Down arrow, or long-pressing the key S or Down on the keyboard. You can also tweak the directions using the four ways above before moving forward or reverse.
5 Easy Ways to Change Location on YouTube TV On Vivo T2 Pro 5G
Through YouTube TV, people can access different TV channels such as news, sports, and entertainment. However, as every YouTube TV works in accordance with the assigned home area, sometimes you can forget or are unable to change the home area, which can lead to certain restrictions. If you want to change the location of YouTube TV to access more services, this article is for you.
Continue reading this article to learn how to change your YouTube TV location with the help of easy methods so that you won’t tire yourself. You can easily bypass YouTube TV restrictions by following this authentic guide.
Part 1: Change your Home Area to Change Location on YouTube TV
Before jumping on the method to change YouTube TV location, keep in mind that YouTube only allows changing the location twice a year. In this part, we will provide a manual method to change location on YouTube TV for both iOS and Android devices:
How to Change Your Home Area on an iOS Device
Step 1: Start logging into your YouTube TV account and navigating to your profile icon. Select “Settings” and then tap on “Area.”
Step 2: Afterward, tap on “Home Area” and then choose the option “Update” right next to it.
How to Change Your Home Area on a Computer or Android
Step 1: Signing to your YouTube TV on your Vivo T2 Pro 5G or through a web browser. Afterward, tap on your profile icon to proceed.
Step 2: Go to “Settings” from the profile and then select “Area.” Now, locate the “ Home Area” option and click on it.
Step 3: Tap on the “Update” option next to the “Home Area” option.
Part 2: Using VPN to Bypass YouTube TV Restrictions
Sometimes, users encounter certain YouTube TV restrictions due to their home area changes. This section will suggest four amazing VPNs to help you bypass any YouTube TV restrictions.
1. NordVPN
NordVPN is a well-trusted VPN that provides exceptional security and protection from malware attacks. Furthermore, by using this VPN, you can change your device or computer location to any country by selecting a fast and secure server from its available options. Hence, you can enhance your cyber security to a great level through this platform while accessing inaccessible content.

2. Surfshark
Do you want to encrypt your browsing activity on your devices? Use Surfshark to browse in a secure manner so that no one can steal or track your information. You can also change your location through this platform to strengthen your privacy across online sites. You can access any specific YouTube TV content by selecting any location from its US servers category.

3. ExpressVPN
ExpressVPN enables the users to change the server’s location anytime and from anywhere across the world. It gives great reliability access to the server location in 94 countries. Moreover, you can enjoy internet browsing with great network speed through it.

4. CyberGhost
To bring your digital security to the next level, CyberGhost is a good option to rely upon. It is a one-click location changer VPN that helps you connect anywhere within seconds with a secured IP address. After that, you can anonymously visit and use online sites through its encrypted VPN protocols and safely hide your identity.

NordVPN | Surfshark | ExpressVPN | CyberGhost | |
Ranking | 1 | 2 | 3 | 4 |
Max Contract Length | 24 Months | 24 Months | 12 Months | 39 Months |
Torrenting | ✔ | ✔ | ✔ | ✔ |
Monthly Plan Cost | $11.99 | $12.95 | $12.95 | $12.99 |
IP Addresses | 5000 Servers | 3200 Servers | 3000 Servers | 8000 Servers |
Support System | Windows, Mac, iOS, Android | Windows, Mac, iOS, Android | Windows, Mac, iOS, Android | Windows, Mac, iOS, Android |
Support Main Streaming Platforms | Netflix, Amazon Prime, Disney+ | Netflix, HBO Max, Hotstar | Netflix, Apple TV+, Hulu | Netflix, HBO Max, Disney+ |
Part 3: One-stop Tool to Change GPS Location on iOS and Android
Although VPNs provide a great way to change YouTube TV location through IP address, it still lacks accuracy with the location. To be more precise with region accuracy, Dr.Fone – Virtual Location changes GPS location to connect your Vivo T2 Pro 5G with a particular area in a specific city. As VPNs change the location by connecting to the city’s server via IP address, Dr.Fone targets the exact location in any city by using GPS.
Dr.Fone - Virtual Location helps the users locate a precise location for YouTube TV to access specific TV channels and features. Moreover, you can instantly change your YouTube TV location with a single click. Using this tool, you can fake your location anywhere in the world with excellent speed.
For changing YouTube TV location through Dr.Fone, use the below instructions:
Step 1: Navigate Virtual Location
Download Dr.Fone on your computer and open its main home page. Select “Virtual Location” from the displayed options by clicking on it. Now connect your smartphone to your computer via a USB cable.

Step 2: Show Current Location
A new window will pop up displaying your current location on a map. However, if you cannot locate it, click on the “Center On” icon that will show your current location.

Step 3: Turn On Teleport Mode
To turn on the teleport mode, click on the second icon that you can locate on the top right. Then, type the area in the search box and press the “Go” button.

Step 4: Confirm Location
Confirm by clicking on the “Move Here” option on the pop-up message. Once done, your phone will be connected to the chosen location, and thus YouTube TV location will be changed automatically.

Part 4: FAQs
- Is it allowed to watch YouTube TV other than the home area?
Yes, it is allowed to watch YouTube TV other than the home area in the US, but the channels will differ from location to location. You can watch national programs, including local programs and other YouTube videos, while traveling domestically in the US.
- How to modify the time zone on YouTube TV?
To change the time zone on YouTube TV, open your YouTube TV and click on your profile icon. Next, go to the “Settings” and tap on the “Area.” Now, locate “Home Area” and upgrade the time zone concerning your home area.
- Is it possible to watch YouTube TV in multiple locations?
You can easily watch YouTube TV in multiple locations, but to be careful, you should check your home area frequently in a month to be aware of local networks.
- Are users allowed to watch YouTube TV at two different houses?
YouTube has provided easy access through membership that allows the users to watch YouTube TV at two different houses. You can create a family group and let 5 members watch YouTube TV.
Conclusion
This writing comprises a detailed guide regarding the YouTube TV change location and the exact steps. We have also mentioned some of the well-trusted VPNs to change YouTube TV location, but to be precise in the results, we have suggested Dr.Fone - Virtual Location as a complete and advanced tool for changing the location.
Also read:
- [New] 2024 Approved Replay Redux Mastering iPhone's Videography Backwards
- [New] Detailed Insights Into CamStudio Capture Functionality
- [New] Initiate Memelore Creation on Giphy
- 2024 Approved Guffaw Generation Generating 7 Hilarious Video Moments Online
- 2024 Approved Meticulous Study of MAGIX Photo Controls
- 9 Mind-Blowing Tricks to Hatch Eggs in Pokemon Go Without Walking On Samsung Galaxy A14 4G | Dr.fone
- A Working Guide For Pachirisu Pokemon Go Map On Vivo V29 | Dr.fone
- Guide How To Unbrick a Bricked Samsung Galaxy S23 Phone | Dr.fone
- How to Stop Google Chrome from Tracking Your Location On Oppo A1x 5G? | Dr.fone
- In 2024, Hacks to do pokemon go trainer battles For Samsung Galaxy A14 4G | Dr.fone
- In 2024, PowerDirector Unveiled A Detailed '24 Review & Tutorial
- In 2024, Reasons why Pokémon GPS does not Work On Samsung Galaxy F15 5G? | Dr.fone
- In 2024, Will Pokémon Go Ban the Account if You Use PGSharp On Samsung Galaxy M54 5G | Dr.fone
- Master Recommendations Inside: The Ultimate Guide to Windows Laptops at Best Buy - ZDNet
- The Most Useful Tips for Pokemon Go Ultra League On Vivo Y02T | Dr.fone
- The Quintessential Quest for Stories – World's Best #1-#8 Schools
- Top 10 Best Spy Watches For your Realme 12 Pro+ 5G | Dr.fone
- Title: How To Use Special Features - Virtual Location On Vivo T2 Pro 5G? | Dr.fone
- Author: Nova
- Created at : 2024-12-24 12:23:16
- Updated at : 2024-12-26 03:53:27
- Link: https://change-location.techidaily.com/how-to-use-special-features-virtual-location-on-vivo-t2-pro-5g-drfone-by-drfone-virtual-android/
- License: This work is licensed under CC BY-NC-SA 4.0.