
How To Use Special Features - Virtual Location On Infinix Note 30 5G? | Dr.fone
How To Use Special Features - Virtual Location On Infinix Note 30 5G?
Wondershare Dr.Fone - Virtual Location comes with multiple unique features that can be used to enhance the flow of spoofing location. With all these amazing features, you can easily change your iOS location without blinking an eye. Rather than making things complicated, Dr.Fone makes it easy for you to manage operations when you perform actions like changing Android locations.
Part 1: Circle Route (For Multi-Stop Route)
The circle route feature is under the multi-stop route mode. When your starting point is close to the ending point, a pop-up asks if you want to set up a circle route. Click Yes to create a circular path on the map.

Part 2: Realistic Mode (For One-Stop Route and Multi-Stop Route)
This particular feature makes the simulation look realistic with the ability to fluctuate the speed of the simulation. If you wish to turn on realistic mode for the one-stop or multi-stop route, look for the respective checkmark option in the panel on the left.

Part 3: Fluctuation Mode (For Teleport Mode)
Whenever you are teleporting your smartphone device to another location, you can try using the fluctuation mode feature offered against it. As you activate Teleport Mode from the top-right section and search for a location, you will discover the Fluctuation Mode toggle in the confirmation tab. Turn on the toggle to slightly switch the location from the selected point to show realistic motion.

Part 4: Cooldown Timer (For Teleport Mode and Jump Teleport Mode)
While teleporting the location of your smartphone to different places for playing games like Pokemon Go, you are bound to activate a cooldown timer within your location-changing app to show realistic movement. By locating the Cooldown Timer on the right pane of icons, activate it, and this feature will automatically calculate the cooling time by measuring the distance between your destination and the starting point.

It is recommended not to start the movement until the cooldown time is completed to avoid unnecessary bans. Moreover, you can also activate the Auto jump after cooldown in the Jump teleport mode after turning on the Cooldown Timer.
This option will automatically jump you to the next destination once the timer ends. It is helpful for games like Pokemon Go, where the game servers can detect frequent jumps with no cooldown time.
Part 5: Import/Export GPX File
You can also import and export specific navigated locations from Dr.Fone in the form of GPX files. While you can export GPX files for keeping a record of your location, you can also import such files for inserting specific locations to simulate or teleport to. Find out how you can import and export GPX files with this location-changing application:
Step 1Export the GPX File
If you have defined a proper location to simulate at a particular instant using Dr.Fone - Virtual Location, you can have this location exported by clicking the Export icon on the top of the left panel. This will open a window where you can set the location for saving the GPX file.

Step 2Import a GPX File
For importing a GPX file on the platform, click the Import button on the right pane. As this opens a window, select the GPX file you wish to import to the platform.

Step 3Wait for the File to be Read
Wait for a moment until Dr.Fone - Virtual Location recognizes the specific locations within the GPX file and displays them on the map.

Part 6: Historical Records
If you want to use a similar track record on your smartphone again, you can access the historical records saved on the platform for easy access.
Step 1Open Historical Records
Click the Historical Records button on the right pane to access the entire history involving the connected smartphone and the location spoofing platform.

Step 2Access Any Location from the History
Select the Go button adjacent to any particular historical record to re-launch a similar simulation for the Infinix Note 30 5G device. You can also click Clear All to delete all historical records.

Part 7: Favorite List
You can also set up favorite locations within the platform to define quick accessibility to your favorite locations. To do that, you have to follow the guidelines shown next:
Step 1Favorite Specific Locations
While setting up locations in Jump Teleport Mode, One-Stop Route, or Multi-Stop Route, you can tap on the Favorite icon adjacent to every marked location or favorite an entire route with the Favorite icon on the top of the left panel.

Step 2Access your Favorite Section
To look for your favorite locations, look for the Favorite icon on the right pane to open a list containing all locations you have marked. You can choose the Move option to automatically move into a particular location in no time.

Prevent Cross-Site Tracking on Infinix Note 30 5G and Browser
Have you ever wondered why you get the advertisements of the websites you visited a few minutes ago on your social media sites? Here comes to Cross-Site Tracking, also termed CST, and it is a process where third-party cookies and sites track your browser history.
![]()
The CST process is like invading your privacy by collecting your browser history and personal information. So, to prevent these services, there are several ways by which you can cross-site tracking on your system as well as Infinix Note 30 5G phone browsers. Keep reading to learn how to stop cross-site tracking on both Infinix Note 30 5G and browser.
Part 1: Why Do We Need to Stop Cross-site Tracking?
Cross-site Tracking is all about collecting your browsing data and other information for advertising purposes. Though the process can prove convenient for many as it provides additional information about the products and services you have searched for and offers tailor-made content, it is intrusive and about breaching your privacy.
Cross-site tracking collects information about your browsing history. The third-party cookies also monitor the content type you have visited and your personal information, which is risky.
Besides invading privacy, the CST also poses several other issues. Based on your browsing history, additional content you have not asked for is loaded on your visited sites, slows down the page loading process, and puts an extra burden on your battery. Moreover, too much-unwanted content can interfere with the basic information you are looking for.
So, it is always better to prevent cross-site tracking for all the above and more reasons.
Further reading: A detailed guide on faking location in Mozilla Firefox . Don’t worry about your location privacy anymore!
Part 2: Can Private Browsing be traced?
Yes, private browsing can be traced. When you work in private browsing mode, the web browser does not save the browsing history, which means that anyone who uses your system will not check your online activities. But websites and cookies can track your browsing history as well as other information.
Part 3: How to Disable Cross-website Tracking on Safari for iOS Devices?
Safari is the most commonly used platform by iOS users. So, to prevent CST for Safari on your iOS devices and Mac systems, below is a complete guide.
Deactivate Safari cross-website tracking for iPhone & iPad
Safari cross-site tracking can be prevented using the below steps on your iPhone and iPad.
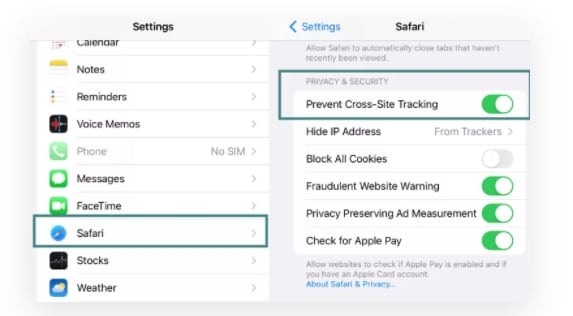
- Step 1. Launch the Settings app on your iOS device.
- Step 2. Find the Safari option by scrolling down the menu.
- Step 3. Move the slider to turn on “Prevent Cross-Site Tracking” under the PRIVACY & SECURITY option.
Deactivate Safari cross-website tracking for Mac
Use the steps below to turn off cross-site tracking on Safari on your Mac systems.
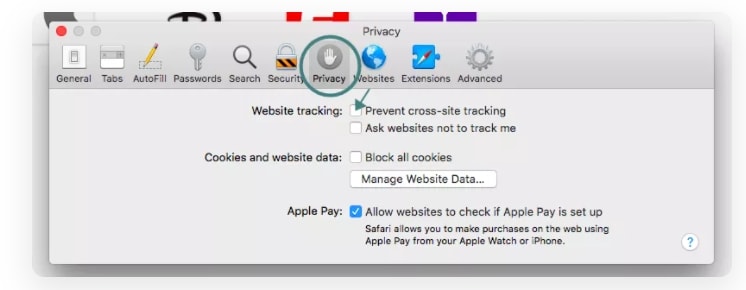
- Step 1. On your Mac system, open the Safari app.
- Step 2. Move to Safari > Preferences > Privacy
- Step 3. Enable the “Prevent cross tracking” option by clicking on the box next to it.
Part 4: How to Disable Cross-site Tracking on Google Chrome
Chrome is used widely on Windows systems and Android devices, and to prevent the CST from your browser, a detailed guide is given below.
Enable “Do Not Track” on Google Chrome for Android
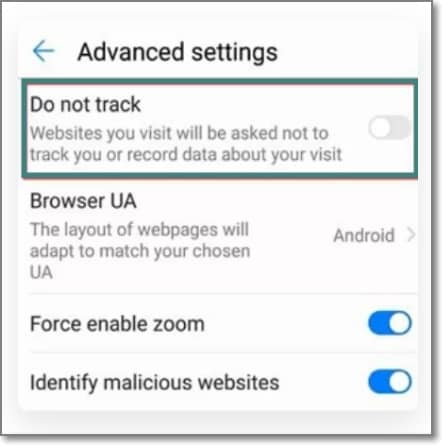
- Step 1. On your Infinix Note 30 5G, open the Chrome app.
- Step 2. At the right side of the address bar, click on the More option and choose Settings.
- Step 3. Choose the Privacy option from the Advanced tab.
- Step 4. Click on the “Do Not Track” option to turn on the feature.
Enable “Do Not Track” on Google Chrome for Computer
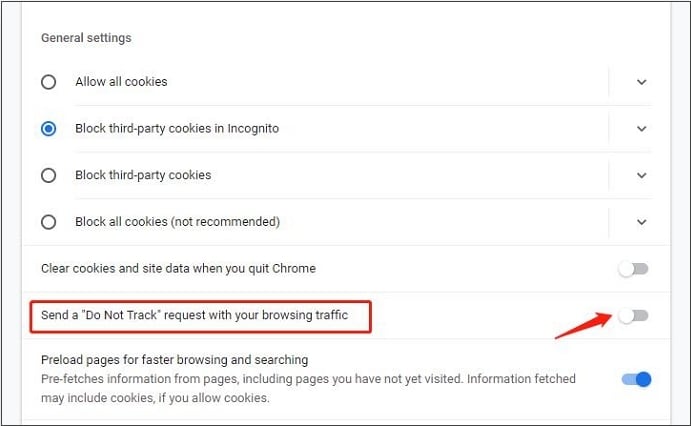
- Step 1. Launch Chrome on your system, and from the menu at the upper-right corner, click on the Settings option.
- Step 2. From the “Privacy and Security” tab, choose the “Cookies and other site data” option.
- Step 3. Tap and enable the slider next to “Send a “Do not track” request with your browsing traffic.”
Part 5: Recommended Solution: Fake a Location to Stop Cross-Site Location Tracking Using Dr. Fone
What if you let the sites and cookies track your phone location without worrying about your privacy? Yes, it can be done by spoofing your location. So, if you set a fake location while browsing the internet, you will not have to worry about cross-site tracking, as anyways, the sites and cookies will get misled browsing information that cannot harm you in any manner.
Setting a fake location on your iOS devices, a professional tool is needed, for we recommend Wondershare Dr.Fone - Virtual Location as the best tool. Using this Android and iOS-based software, you can set any fake GPS location on your device. The tool is simple to use and does not require any mastery of technical know-how.
Key features
- Simple tool to teleport to any GPS location in a single click.
- Allows simulating GPS movement along the route.
- All popular models of Android and iOS devices are compatible.
- Compatible with all location-based apps on your phone.
- Compatible with Windows and Mac systems.
Here is a video tutorial for you to take an overview of how to use Dr.Fone - Virtual Location to fake location on your Android and iOS devices.
 safe & secure
Steps to set fake location on your Android and iOS devices using DrFone-Virtual Location
Step 1. Download, install and launch the software on your Windows or Mac systems. On the main software interface, choose the Virtual Location option.

Step 2. Connect your iPhone or Android device to your system using a USB cable and then tap on the Get Started option on your software interface.

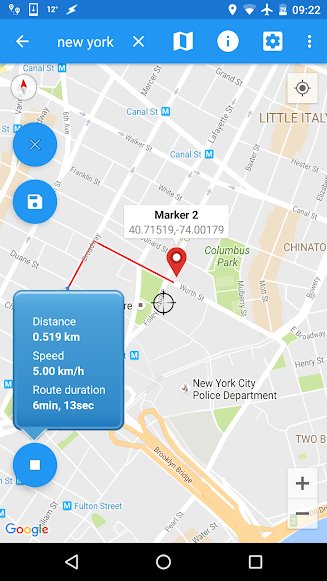
Step 3. A new window on the software interface will open, showing your connected phone’s real and actual location. If the detected location is incorrect, click on the “Center On” icon to display the right device location.

Step 4. Next, you need to activate the “teleport mode” and click o the 3rd icon at the upper-right corner.
Step 5. Next, you have to enter now the fake location to which you wish to teleport to at the upper-left corner. Click on Go.

Step 6. Finally, tap on the Move Here button and the new fake location for your connected Android or iOS device at the pop-up box.

Check the new location of your phone from the app.

Wrap it up
Preventing Cross-site tracking can be done on different browsers and devices using the guides listed in the above parts of the article. Settings a fake location for your device using Dr. Fone-Virtual Location is another interesting way to prevent tracking your browsing history by spoofing the sites and cookies. Setting a fake place will not only avoid monitoring your browsing history but will also work with all location-based apps on your phone.
safe & secure
Is pgsharp legal when you are playing pokemon On Infinix Note 30 5G?
Pokémon Go is the phenomenon that hit us in 2016 and made us obsessed with the AR game based on real-time location. If you are one of those players who have been to all the local PokeStops in hopes of finding your favorite rare Pokémon, then it might be time for you to consider spoofing your location while playing PoGo.
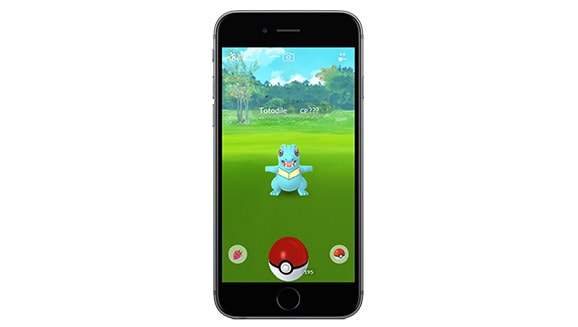
Pokémon Go relies on GPS coordinates and real-time tracking to let players catch Pokémon s in real locations. Hence, spoofing comes to the discussion of “catching them all.”
‘Spoofing’ location makes your phone, and thereby the game thinks that you’re in another location, which opens up the possibility to catch new and rare Pokémon s from gyms and PokeStops around the world.
Part 1: Is Pgsharp legal?
No game developer likes to see their game played in unfair ways. Thus, Niantic (PoGo’s Dev) made some strict rules against exploiting their game, giving some players an unfair advantage over others.
So, is PGSharp legal? No, Spoofing location, in general, is illegal. Hence, any apps like PGSharp, or Fake GPS Go, used to disguise actual real-time location and fake it, will result in an account ban.
According to Niantic’s terms and conditions:
- “Using any techniques to alter or falsify a device’s location (for example through GPS spoofing).
- And _”_Accessing Services in an unauthorized manner (including using modified or unofficial third party software).”
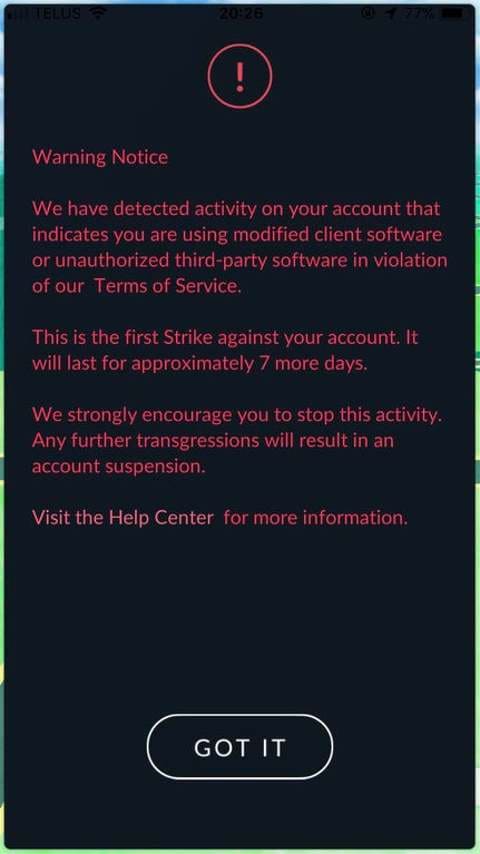
If Niantic detects usage of a fake location or GPS spoofing app while playing Pokémon Go, they will impose a strike on your account.
- The first strike would make rare Pokémon s not visible to you for seven days.
- The second strike would temporarily ban you from playing the game for 30 Days.
- The third strike will permanently ban your account.
You can appeal these strikes to Niantic if you think you’ve been banned without violation of any terms.
Part 2: Three ways to spoof on Android
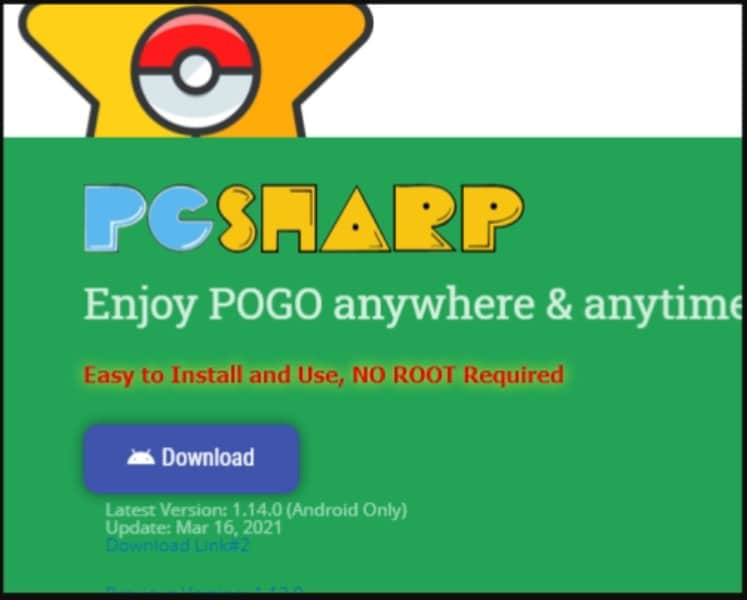
- PGSharp :

PGSharp is one of the most reliable ways to spoof your location while playing Pokémon Go. Niantic does not easily recognize its simple map-like UI as a fake location app.
Note: It is recommended not to use your main account while spoofing; rather, you should use your PTC (Pokémon Trainer Club) account.
- To spoof the location with PGSharp, go to Google’s “Play store,” search “PGSharp,” and install it.
- After installation, there are two versions: Free and Paid. For trying the app with the free version, a beta key is not required anymore, while for the paid version, a key from the developer is required.
- For the paid key, visit PGSharp’s official website and generate a license key.
You must note that it may take two or more tries to generate a working key, and often it may show an “out of stock.” message.
- After opening the app and applying the key, you can spoof the location with ease.
Note: You may need to allow “Mock location” from debugging options. For this, go to “Settings,” then to “About Phone,” then you need to tap on “Build number” seven times to enable developer’s mode, and finally go to “Debugging” to allow “Mock location.”
- Fake GPS Go:
Fake GPS Go is another location spoofer app for Android that is reliable and free. This app allows you to fake your real-time location and enables you to spoof it to any place in the world. This is one of the easiest solutions to playing Pokémon Go while spoofing location without getting detected with its real-map-like UI. Moreover, this app does not even require root access.
- To install Fake GPS Go, go to Google’s “Play store,” search “Fake GPS Go,” and install it.
- Then, go to your phone’s “Settings” and then “System” followed by “About Phone,” and tap on the “Build Number” 7 times to enable the Developer Options.
- Then you need to go to “Debugging” in “Developers Options” to allow “Mock location.”
- And then, you can use this app to not only spoof your location but virtually walk around a route at a designated pace to make it look as real as possible for being undetected by developers like Niantic.
- VPN:

Using a Virtual Private Network (VPN) App is the safest option to spoof your location while playing PoGo, as it masks your IP address and uses a server in any other location.
Moreover, some VPNs would also encrypt your data, so it would not be easy for Game Devs to track it.
- To install a VPN, go to Google’s “Play store,” search the VPN of your choice and install it.
- Close the Pokémon Go app from running in the background to prevent detection of the VPN.
- Now, select a location server to any place before opening the PoGo app again.
Note: Some Free VPNs only mask your IP address and do not spoof your location, nor do they encrypt your data. Hence, selecting a good VPN app is imperative, which will spoof GPS location and data encryption.
You can use both VPNs (which do not spoof GPS location themselves) and the Fake location app simultaneously for extra reliability.
Part 3: Best way to spoof on iOS – dr.fone Virtual Location
Spoofing the GPS location on iPhones is more difficult and much more complex than it is on Android. However, there is a solution. Dr.Fone comes to the rescue with their Virtual Location tool that works seamlessly. This program is easy to use and allows you to simulate your location between 2 and multiple spots with ease. Apart from that you can teleport anywhere with ease. Let us know how this tool works.
Step 1: Download the tool on your PC from the official website of drfone. Select “Virtual Location” given on the first page of the program.
Step 2: Now, have your iPhone connected to your computer. Then select “Get Started”. Now a map will open in a new window, showing your actual location.
Step 3: Enable the “teleport mode” by the third icon in the right-upper corner of the map. Then, enter the location you want to spoof your phone’s GPS to in the text box in the map’s left-upper section. Select “Go”.
Step 4: Now select “Move here.” And you will have successfully spoofed your location on your iOS device. To confirm, open the maps app on your device.
Pro-Tips:
- Do not spoof or change location very frequently, as this might raise suspicion to the Game Dev (Niantic), and the account may get terminated, stating violation of terms.
- Do not use spoofing too frequently. The best way to not get your account suspended is to replicate actual travel patterns.
- Please select a new spoof location and scout it for a couple of days before going to a close-by spoof location. After you are done with the country in the spoof-location, you can move on to neighboring countries before returning to your original location (i.e., switching off the spoof.)
- After you are done with your gaming, always remember to close the game from the background before turning off the spoof location.
- Do not always play with the spoof location. Play with your original location for a couple of weeks before spoofing your location.
- Do not spoof location to countries on different continents within a short time.
Following these tips will help you to behave like an actual traveler who’s on a Pokémon hunt. This will make it even harder for game devs to detect any discrepancies.
Also read:
- [New] 2024 Approved Transform Videos - Affordable, High-Quality Effs!
- [New] Visionary 6 Eco-Friendly Minecraft Mansions
- [Updated] In 2024, Mastering Trends Top 10 Instagram Tags to Elevate Your Presence
- [Updated] Invisible Watch Top 5 Stealthy Story Apps for 2024
- [Updated] Speed Dial for Vimeo Video Loading for 2024
- Custom Actions Component: Enhance Your App with Tailored Functionality
- Easy Steps to Activate Hyper-V on W11 Home PCs
- Exploring the World of RTX Cards: What You Need to Know About Nvidia's Latest Technology
- How and Where to Find a Shiny Stone Pokémon For Vivo V29? | Dr.fone
- How to Fix Android App Not Installed Error on Honor 90 Pro Quickly? | Dr.fone
- How to Fix Error 495 While Download/Updating Android Apps On Sony Xperia 1 V | Dr.fone
- How to use iSpoofer on Vivo Y100? | Dr.fone
- How to use Pokemon Go Joystick on Vivo S17t? | Dr.fone
- How to Watch Hulu Outside US On Samsung Galaxy S23 Ultra | Dr.fone
- In 2024, Detailed guide of ispoofer for pogo installation On Samsung Galaxy S21 FE 5G (2023) | Dr.fone
- In 2024, How to Come up With the Best Pokemon Team On Samsung Galaxy M14 4G? | Dr.fone
- In 2024, Reasons why Pokémon GPS does not Work On Vivo V29 Pro? | Dr.fone
- NTSC versus PAL: Análise Abrangente Dos Diferentes Formatos De Vídeo E Seu Desempenho
- Top Three AIs in Comparison: GPT and the Bing & Bard Face-Off
- Title: How To Use Special Features - Virtual Location On Infinix Note 30 5G? | Dr.fone
- Author: Nova
- Created at : 2025-01-02 17:08:12
- Updated at : 2025-01-04 17:14:07
- Link: https://change-location.techidaily.com/how-to-use-special-features-virtual-location-on-infinix-note-30-5g-drfone-by-drfone-virtual-android/
- License: This work is licensed under CC BY-NC-SA 4.0.