
How to Use Life360 on Windows PC For Itel A60? | Dr.fone
How to Use Life360 on Windows PC For Itel A60?
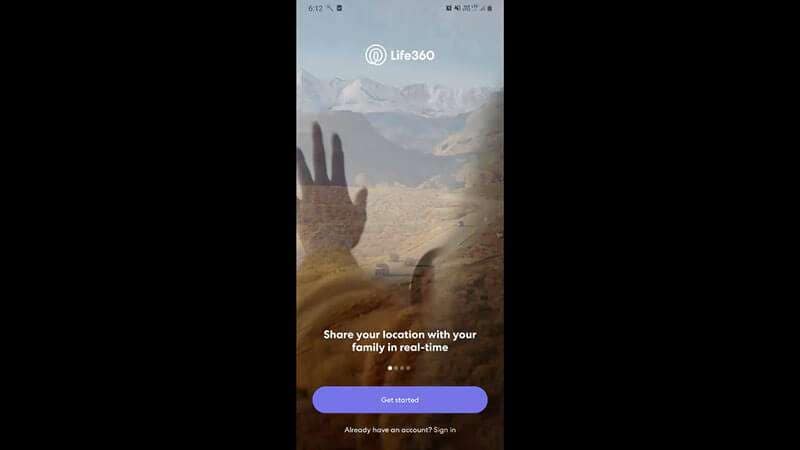
Life360 is an online platform that utilizes geo-location services to help users share their real-time location with friends and family. The app allows people to create a family group and stay connected to each other through features like chatting, sharing location, sending safety alerts, etc.
As of now, you cannot run Life360 on computer as it is only available for Android and iOS. Why? Because as opposed to a PC, one can easily carry their device everywhere! It means whether your kid is stuck in traffic and needs your help or your parents have lost their way back home, Life360 will instantly send you an alert on your device.
However, that doesn’t mean you cannot use Life360 on a PC. While it may seem a bit odd, there are a couple of methods that’ll allow you to get the Life360 app for Windows. In today’s guide, we are going to share some of these methods that’ll help you run the Life360 app on Windows.
So, without wasting another second, let’s dive straight into the guide.
Part 1: Why people seek to use Life360 on PC?
First things first; why would anyone want to use a family locator app like Life360 on their PC? Well, the truth is everyone has their own reason to get Life360 for PC. For instance, let’s say you are in the middle of an important project and don’t want to be bothered by alerts on your smartphone. However, you still don’t want to compromise with the safety of your family members.
In this situation, you can simply run the Life360 app on PC. This will allow you to directly keep track of the whereabouts of family members on your Windows system and you won’t have to constantly check your phone.
Life360 can also be used on a computer when your phone’s battery has completely drained and there’s no power outlet nearby. In this case, you can simply power-on your laptop, start the Life360 app and send your current whereabouts to family members.
Part 2: Is it possible to use Life360 on Windows PC?
Life360 is an extremely useful app for people who are always concerned about their closed ones. The app is basically designed with a vision to keep family members connected and safe. In addition to location sharing, the app also provides exclusive features like crash detection, place alerts, speed alerts, battery monitoring, etc.
The app also makes it easier for parents to monitor their child’s movement. Using the app, you can always know that your kids have safely reached school and back home. For any parent, knowing whether the kids are safe, is one less thing to worry about.
However, as we mentioned earlier, Life360 hasn’t been released for Windows yet. So, there’s no direct way to install and run the app on a Windows PC. While Life360 may release a dedicated Windows software in the future, as of now, you can only run it using the alternative methods.
These methods include:
Part 3: Use Life360 on Windows PC with Android emulator
The first and the most convenient way to run Life360 on computer is to use an Android Emulator. An emulator is basically a software that creates a virtual Android system on your computer. As a result, you’ll be able to run Android apps on your computer.
While there are dozens of Android emulators, Bluestacks seems to be the most popular and user-friendly option among all. Unlike other emulators, Bluestacks is easy to set up and use.
Here’s how you can run Life360 on a computer using Bluestacks Android emulator./
Step 1: Head over to Bluestacks official website and tap the download button.
Step 2: Open the installer and tap the “download” button. This will initiate the download process on your System.
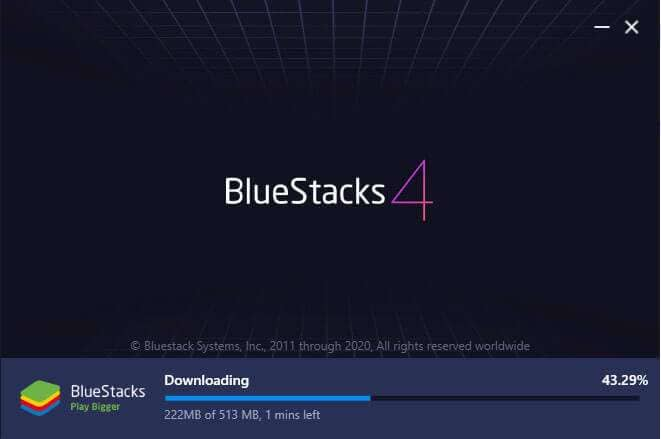
Step 3: Once the installation process completes, Bluestacks will start to boot. Keep in mind that the first boot may take some time, depending on your system configurations.

Step 4: In the home screen, tap the “Google Play Store” icon. You’ll be asked to sign-in with your Google account. Enter the right credentials and log-in to the Google Play Store.

Step 5: In the top search bar, type-in Life360 and tap the “install” button to download the app.

Step 6: Life360 is now installed on your computer. Open the app and enter your login details. You’ll now be able to run Life360 on your PC.

Part 4: Use Life360 by mirroring Android to Windows PC
While running an emulator is a great way to get Life360 on PC, it has its own set of challenges. For instance, running an Android emulator is not easy when you have a low-configuration PC. Emulators like Bluestacks requires high system configuration otherwise they take forever to load.
In this situation, we have another alternative for you to run Life360 on PC. You can simply mirror your Android to your Windows system. Mirroring the Android device will allow you to see its content on the PC itself.
Here’s how you can mirror the Android device on your PC.
Step 1: Make sure that Bluetooth is activated on both devices.
Step 2: On your Windows PC, open “Settings” and select the “Systems” tab.

Step 3: Choose the “Projecting to this PC” option in the left menu-bar and make sure that “Available Everywhere” is selected.

Step 4: If you’re running Android Pie or above on your device, scroll down to open notification drawer and select “Smart View” (or “Cast” in some devices). You’ll see your PC listed here. Tap the button to start Android mirroring.

Step 5: It may take some while for the connection to establish. Once it does, you’ll be able to cast your device screen onto your computer and you’ll be able to run life360 on your system.
Keep in mind that you’ll still require your device to navigate through the content on your computer. Any action that you perform on your device will be replicated on your computer screen as well.
Final Verdict
Life360 is probably among the top family locators for Android users. Apart from its extensive range of features, the app provides a user-friendly interface, which allows it easier for even elders to use the app without any issues. Even though there isn’t a dedicated Life360 software for Windows, you can follow the above-mentioned methods to run the Life360 on PC.
You Might Also Like
Location-based apps
GPS spoof for dating apps
GPS spoof for social apps
Pokemon Go on PC
AR game tricks

Change Phone GPS Location Easily
- ● Teleport GPS location to anywhere
- ● Play AR games without moving
- ● Spoof Location on the popular Apps
How to Find iSpoofer Pro Activation Key On Itel A60?
There are specific situations where it is necessary to fake your GPS location. By spoofing locations, you can teleport to anywhere in the world, hide your true location to prevent others from tracking you, have access to content that is restricted in your current location, and so on. Spoofing locations is also conducive in location-based games such as Pokémon GO.
There are specific applications that allow you to spoof the location of your device. However, there are no such apps for iPhones as Apple does not allow GPS spoofing apps in the App store. To change the location of your iPhone, you can connect it to your PC and use a spoofing application there to change its location. We are going to talk about iSpoofer, a professional location spoofing application; 3 ways to get the iSpoofer Pro Plan License Key for free; Wondershare Dr.Fone - Virtual Location (iOS), a better alternative to iSpoofer; and the steps to spoof your iPhone GPS location using Wondershare Dr.Fone - Virtual Location (iOS).
Part 1: Ways to Get the iSpoofer Pro Plane License Key Free 2022
iSpoofer is a professional GPS simulation desktop application that can be used to spoof the GPS location of an iOS device. It runs on Windows and Mac computers. To change the GPS location of your iOS device, you have to install and run this application on your PC, connect your iOS device to your PC, and then spoof its location by using the application on your PC.
iSpoofer has a free version and 2 subscription plans - Pro plan and Volume plan. For unlimited spoofing, you can use the Pro plan of iSpoofer, which is available at $4.95 per month. With this plan, you can change the location of up to 3 iOS devices at once. To activate iSpoofer Pro on your PC, you will have to enter a license key sent to you via email after you pay for its subscription. However, there are a few tricks with which you can get this license key without subscribing and activate iSpoofer Pro and use it for free. Below, we have mentioned 3 ways to get a free iSpoofer Pro Plan License Key.
- Check on Community Days: The game Pokémon GO sometimes offers free iSpoofer Pro PlanLicense Keys on Community Days. Community Day is a worldwide special event in Pokémon GO that occurs every month for a few hours. Various kinds of special bonuses and rewards are offered on Community Days. Among these offers, a free iSpoofer Pro Plan License Key might be available on a particular Community Day. Make assured you do not miss this offer because the key will be available only for a few hours before it gets expired.

- Check out websites: Certain websites throughout the internet occasionally offer free iSpoofer Pro Plan License Keys. Try to check them out from time to time, and someday you might be lucky to get a free iSpoofer Pro Plan License Key. One of such websites is http://www.spoofer.pro/.

- Subscribe to YouTube channels: Another way to get a free iSpoofer Pro PlanLicense Key is to subscribe to YouTube channels that offer giveaways of these license keys. There are specific YouTube channels that offer free iSpoofer Pro Plan License Keys to their lucky subscribers. Make sure you subscribe to such channels and keep checking their videos, especially around giveaway times, to see if you are the lucky subscriber to win the giveaway.

Part 2: The safer way to Spoof on iPhone
A much better and safer way to spoof your iPhone location is to do it using Wondershare Dr.Fone - Virtual Location (iOS). It is a desktop application that can be used to instantly fake the GPS location of your iOS device with just a click of your mouse. It is compatible with both Windows and Mac computers. You can use this fantastic application to safely change your GPS location on several applications, including WhatsApp, Snapchat, Tinder, and Pokémon GO. It allows you to change the location of up to 5 iOS devices at once.
Key features:
- It comes with an integrated joystick feature for controlling GPS movement.
- GPS movement can also be controlled with a keyboard.
- Offers 3 modes - teleport your location, simulate movement between two spots, and simulate movement along a specified route.
- Offers; both automatic and manual GPS movements.
- Compatible with Windows XP and above, and Mac OS X 10.13 and above.
- Requires a minimum RAM of 256 MB and a minimum free hard disk space of 200 MB.
Steps to spoof your iPhone location using Wondershare Dr.Fone - Virtual Location (iOS):
- Download and install Wondershare Dr.Fone - Virtual Location (iOS) on your Windows or Mac PC. Launch the application.
- Once the application is launched, a window will appear with a variety of options. Click “Virtual Location” from those options.

- Connect your iPhone to your PC. via USB cord. Once your device is connected successfully, click on the “Get Started” button.

- A new window will appear where the actual GPS location of your iPhone will be shown. If it is not accurately displayed, click on the “Center On” icon in the lower right part of the window to show the accurate location.

- Click on the “teleport mode” icon in the upper-right part of the window (the 3rd one from the right). This will activate “teleport mode”.
- In the search bar in the upper left part of the window, enter the name of the desired location where you wish to teleport. Then click “Go”.

- A popup box will appear. Click “Move Here”.

- With that, the GPS location of your iPhone has been successfully changed and fixed. You can check it by clicking on the “Center On” icon or checking your iPhone’s location. Also, the location of the location-based app; you are currently using on your iPhone has been successfully changed too.

Conclusion
So, that was all about the article. We have discussed 3 simple tricks to get a free iSpoofer Pro Plan License Key. Then, compared with iSpoofer Pro which allows you to change the location of up to 3 iOS devices at once, Wondershare Dr.Fone - Virtual Location (iOS) allows you to change the location up to 5 iOS devices at once. Compared with iSpoofer Pro, it is safer and easier to use and comes with more features.
How to Change Spotify Location After Moving to Another Country On Itel A60
Spotify is one of the best apps to access quality music and podcasts. Be it in your car while you commute from the workplace to home or simply when you are home with your latte, the music is made for every mood. Spotify is easy to use, you can make your own playlist and you have access to a lot of musical content.

But this depends on the country you are staying in. And if you’ve recently shifted your base, it can be tricky to change spotify region. But if you opt for the manual methods, it is a breeze to update location spotify. We will teach you how that is done effectively using different resources available to you.
Part 1: Reasons for changing Location on Spotify
But why to Change Location Spotify in the first place? Is it important to change your location if you are changing countries? Will that affect the music on the streaming app? Yes! It certainly will. Before we discuss the different ways to change country on spotify, let us understand why we should do it at all.
Region specific Content
Everything is not available everywhere. If you are looking for a specific motivational podcast that is a hit in the US, it might not be available in your region. You like that new Arabic song, maybe it won’t stream in your Australian lanes. The content can be restricted to a specific region and if you don’t stay there, it is far away from your reach. You have to rely on Spotify Change Location to access that musical content.
Playlists and Recommendations
Spotify uses your coordinates to provide the right music content for you. There are people who jump up and down and say that the app suggests songs that are their absolute favorite! As if it has read their minds. This is possible because Spotify identifies the most played songs in the region, detects the language and delivers these suggestions to you.
So, the content that you receive depends on the place that you are staying in.
Payment Plans
The Spotify premium account provides more benefits than the normal free version that people use. But what many of us are not aware of is that the premium version’s cost differs from place to place. If you can manage a spotify location update, you can save yourself some bucks.
Spotify Unavailable

Spotify did gain a lot of popularity in a very short period of time. People are making money, uploading their own content and even exploring newer genres of music. However, Spotify is not available world-wide. Currently, it is only accessible from 65 countries. If you hail from a region where Spotify hasn’t launched yet, you need to update spotify location to a place where it is fully functional.
Part 2: How To Edit Your Country on Spotify?
You can change region spotify manually by directly tweaking a few settings in the Account Overview section. If you are using a Free Spotify account, then you will have to manually change your location. But a person who has a Premium Spotify account can access all the content from all those countries where spotify is legally available. Here’s how you can change the location using the Spotify settings -
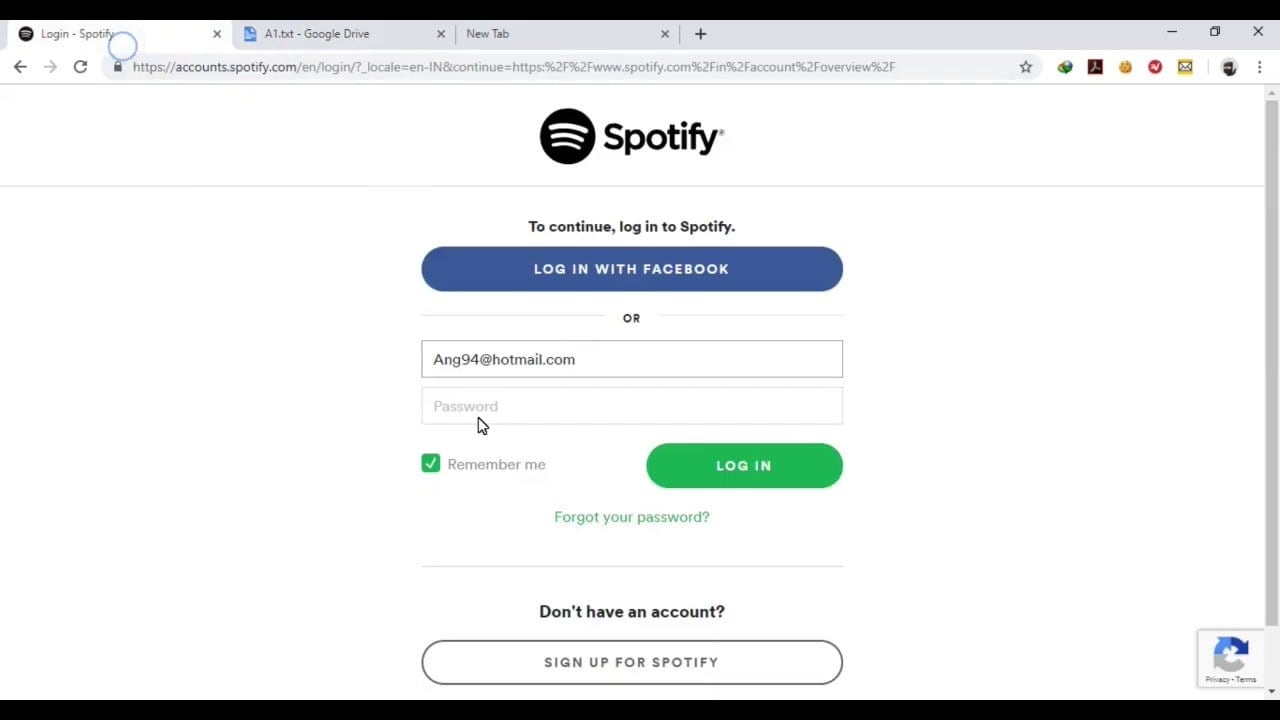
Step 1: Go to the Spotify Homepage on your desktop and Log into your account. This is how you do it if you happen to have a free account. Premium accounts don’t need it. After you Log in, go to the ‘Accounts’ section.
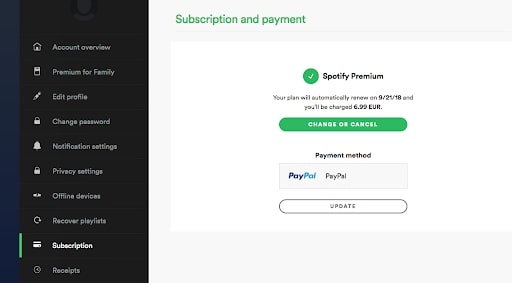
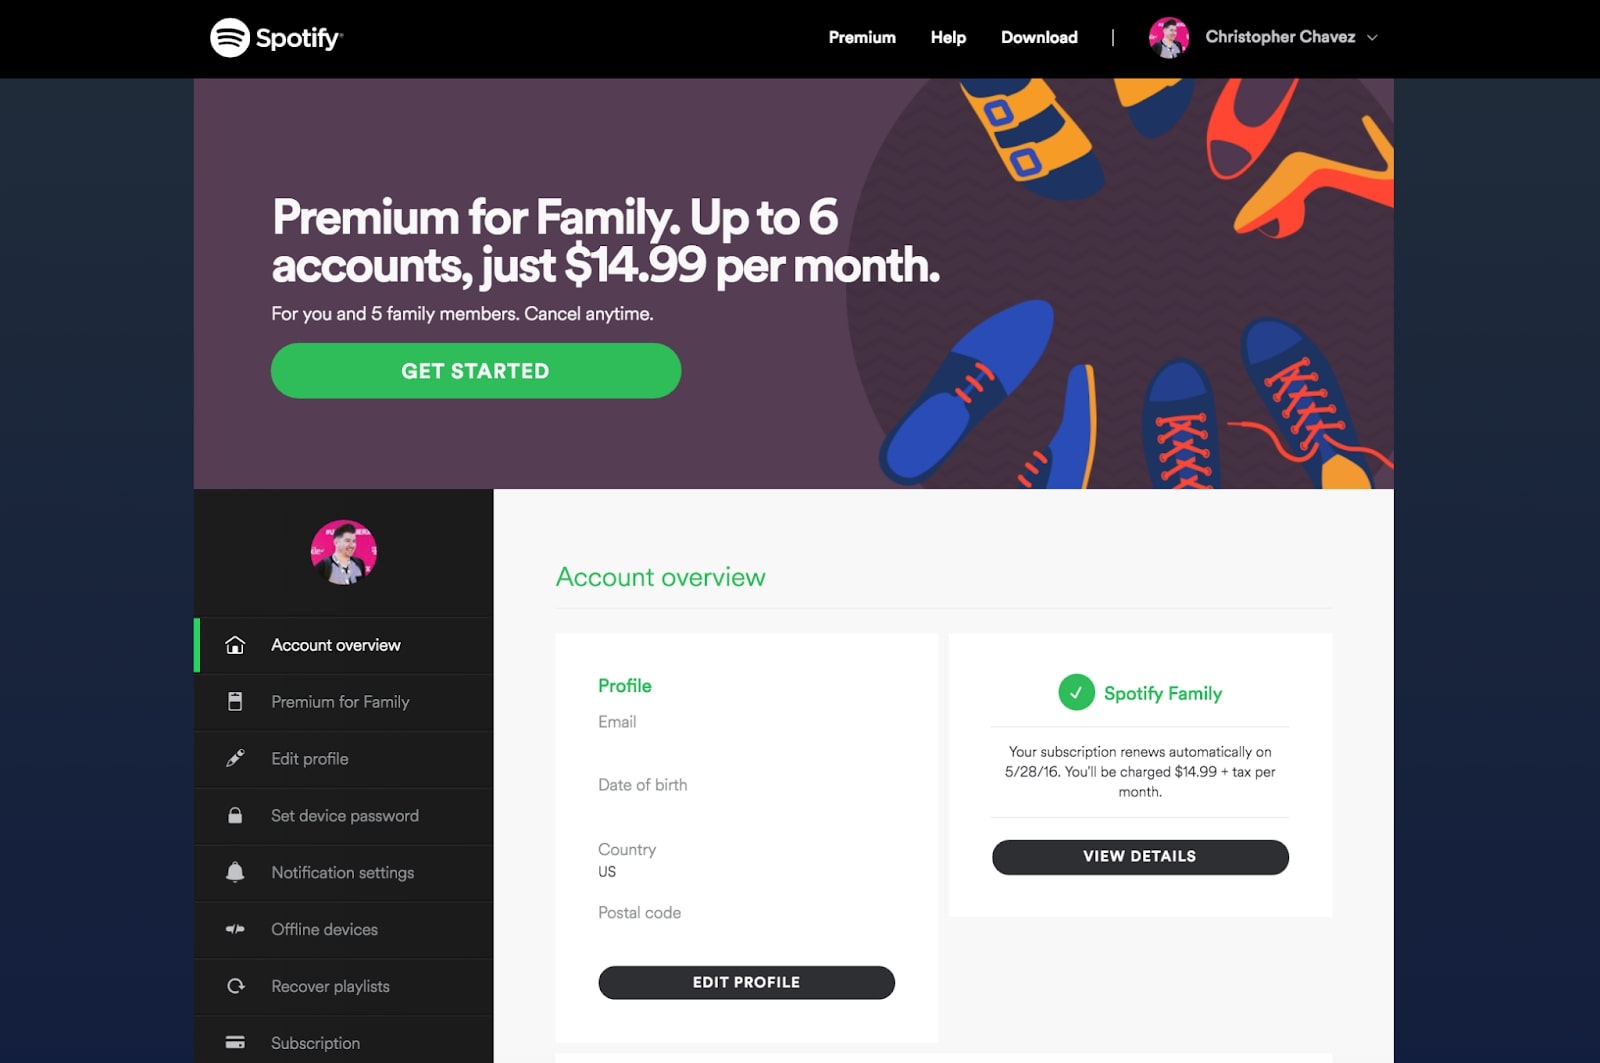
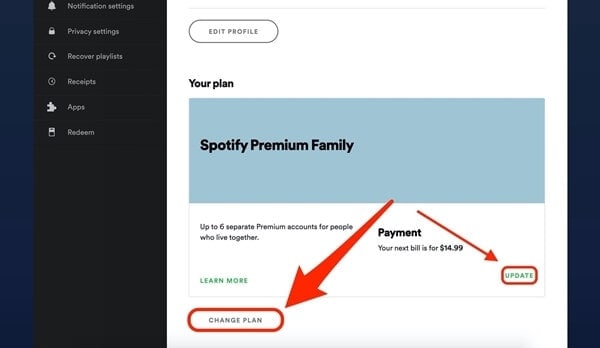
Step 2: From the sidebar, go to the ‘Account Overview’ option. When you click on it, you will find the ‘Edit Profile’ option on the screen. Go for it.
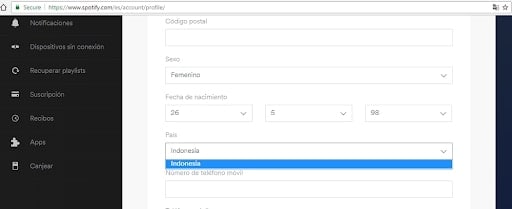
Step 3: Once you click on theEdit Profile option, there will be several categories that display your personal information. If you scroll down, you will find the ‘Country’ Option. Select the country of your choice there.
If you are a Spotify Free user, then you will have to go by the above mentioned method. But if you are a Spotify premium user, you don’t need to change location to access content. However, you can change it to update the Payment plans.
Step 4 (Premium): In the same Account Overview option, you can either ‘Update’ your new location and spotify works accordingly. Otherwise, you can completely Change your Plan as well.
Part 3: How to Use Apps to Fake Spotify Location?
Now you know that by Spotify Change Country, you can get more benefits and you can enjoy podcasts, music and other audio content that is otherwise unavailable in your region. So, it is understandable that you’d want to deliberately fake spotify location. This is possible when you use some of the best Location Spoofer softwares available on the internet. Our best suggestion would be Wondershare’s Dr.Fone. It is easy to use and your location will be changed within a few minutes in minimal steps.
Step 1: You need to download the executive file of the WondershareDr. Fone’s Virtual Location Spoofer. The android and even Windows compatible files are available on the website. Choose appropriately and download - and launch them.
Step 2: Once you launch the application, the homepage will open and several options will display on the screen. Choose the Virtual Location option that is usually at the end of the page.
Step 3: To Change Location on Spotify Mobile, connect your Itel A60 to your computer - both Android and iPhones can detect the virtual location change. Then click on Get Started.
Step 4: A map will appear on the screen. You can change the pi to a new location or you can enter the new location into the search box displayed on top of the page. You can do this by going to the ‘Teleport Mode’ on the top right corner of the page.
Step 5: Once you are sure about the new virtual location, click on ‘Move Here’ option.
The New Location will now display on your iPhone/Android Device’s GPS system too. And Spotify will reflect it too. So, when you decide to change location on spotify using this method, the new location will reflect in all your apps. So, it’s hard to figure out that you’ve deliberately changed the location.
Part 4: How to Use a VPN to change Spotify Location?
A Virtual Private Network App is also very useful for the Spotify change Region. But you need to keep two important points in mind - The Trial Versions do not provide complete protection and the features aren’t satisfactory. If you go for free VPNs available on the internet, you cannot be 100% sure that your data is safe. So, we have narrowed down the safest option for you. We suggest that you use Nord VPN if you cannot get your hands on a Location Spoofer.
Location Spoofers are much safer because they don’t maintain Log data like the VPNs. But if you have no other option left for Spotify update Location, then you can rely on NordVPN.
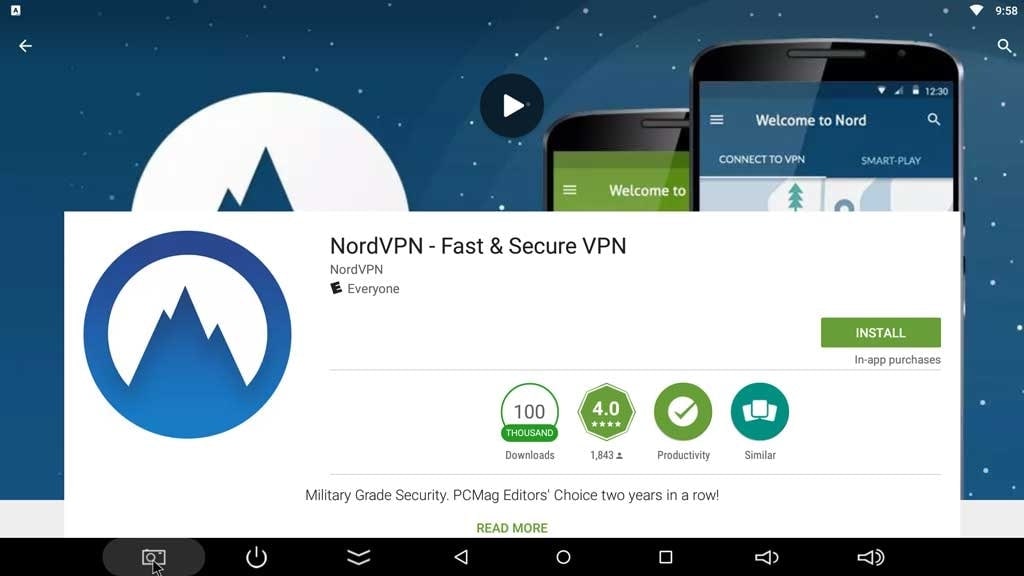
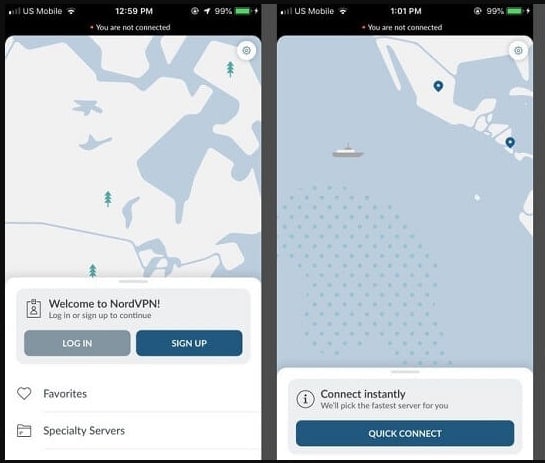
Step 1: Go to the AppStore or Google Play Store and choose NordVPN from the different VPN options available.
Step 2: Sign Up and create your account on the app. The main use of a VPN is to mask your IP and give you a new server for internet surfing. So, once you log in, NordVPN will find the closest server for you.
The automatic connect was made to United States - the closest server
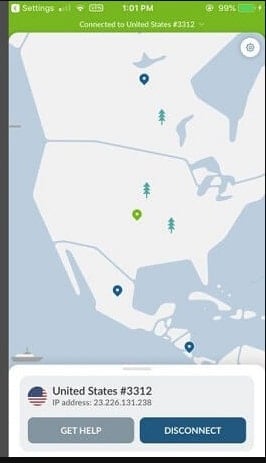
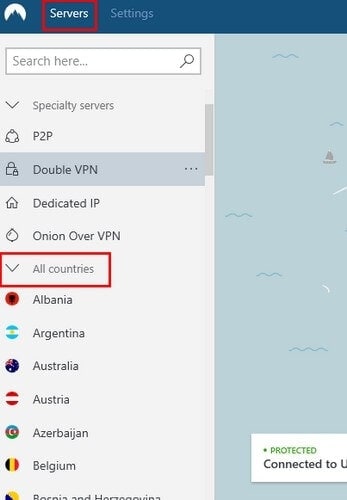
Step 3: In case you want to change to a specific country, You can go to ‘More Options’ and then choose Servers. Then go to All Countries and choose the country of your choice. Once you launch Spotify, the same will reflect there too.
The VPN works for all kinds of mobiles and it is very convenient to use. This is a good way to mask your IP address completely, so that no one can track your location change activity either. You can change servers several times a day to access content from across the world.
Conclusion
If you know the right way to do it, changing Spotify Location After Moving to Another Country is no big deal. You have several tools that will assist you in the job. Unless you are faking your location, you can change location directly from Spotify Account Overview too. But if you want to Change Location in Spotify for more benefits, then you can use the tools we have mentioned to get the job done. You can cut down the premium payment prices, listen to exotic music from across the world and also stay up to date with the podcast releases too.
Also read:
- [New] Expert Recommendations High-Quality Mac Video Grabber Tools
- [Updated] 2024 Approved From Live to Video Key Techniques in Gaming Recordings
- [Updated] In 2024, Filmmaker's Toolkit Making Compelling YouTube Trailers
- Amplifi HD Unveiled: A Game-Changer for Wi-Fi Coverage, Ending the Dead Zone Dilemamo
- Efficient Windows 11 Recorders to Ace Your Content for 2024
- Fire Stick and Mobile Internet Combo: The Perfect Tutorial for Hitch-Free Viewing
- How to Exit Android Factory Mode On Samsung Galaxy F34 5G? | Dr.fone
- How to Use Pokémon Emerald Master Ball Cheat On Samsung Galaxy A15 5G | Dr.fone
- How to use Snapchat Location Spoofer to Protect Your Privacy On Lava Blaze Pro 5G? | Dr.fone
- How to use Snapchat Location Spoofer to Protect Your Privacy On Xiaomi Redmi Note 12 4G? | Dr.fone
- In 2024, Planning to Use a Pokemon Go Joystick on Samsung Galaxy M54 5G? | Dr.fone
- In 2024, Ways to trade pokemon go from far away On Xiaomi Civi 3? | Dr.fone
- Troubleshooting the Missing d3dx9_25.dll Error on Your PC
- Ultimate guide to get the meltan box pokemon go For Vivo Y27 4G | Dr.fone
- Unlocking Your Facebook, Even When Codes Are Gone
- Upgrade Your Favourite Games on a Mac with These Essential Techniques
- Title: How to Use Life360 on Windows PC For Itel A60? | Dr.fone
- Author: Nova
- Created at : 2025-01-11 07:38:24
- Updated at : 2025-01-17 01:09:21
- Link: https://change-location.techidaily.com/how-to-use-life360-on-windows-pc-for-itel-a60-drfone-by-drfone-virtual-android/
- License: This work is licensed under CC BY-NC-SA 4.0.