
How To Teleport Your GPS Location On Vivo T2 5G? | Dr.fone
How To Teleport Your GPS Location On Vivo T2 5G?
While playing games like Pokemon Go, you are in desperate need of finding more Pokémon. If so, changing your location is a necessity that needs to be figured out. For that, teleporting the GPS location of the Vivo T2 5G device is the optimal solution. To carry this out, Wondershare Dr.Fone - Virtual Location provides a perfect system for fake locations.
Part 1: Teleport to Anywhere in the World (Teleport Mode)
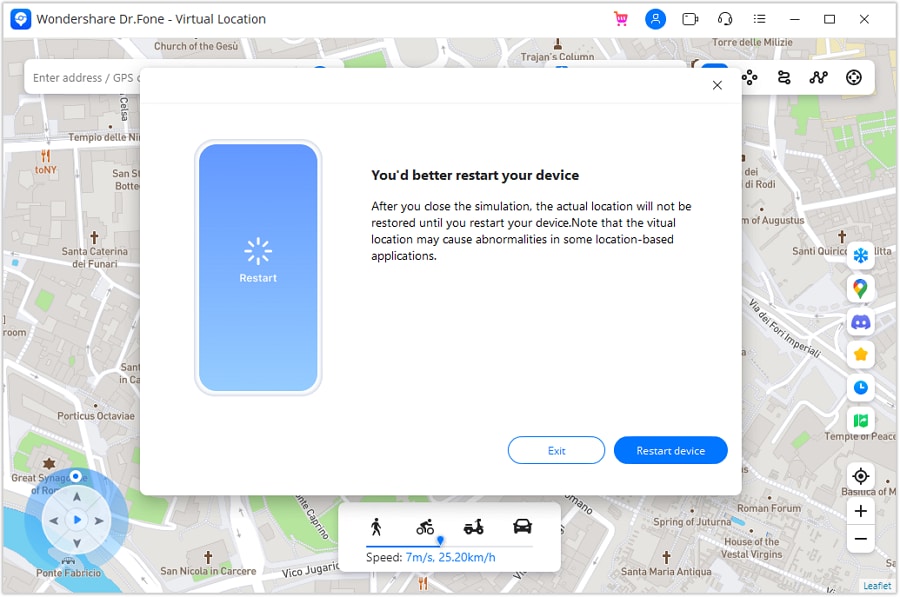
Note: Once you teleport or move to a virtual place, you can restore to the actual location by restarting the Vivo T2 5G device. You will see a prompt that reminds you to restart your device to restore the location of the connected device when you close the Virtual Location. Click Restart Device and close the program.
* Dr.Fone Mac version still has the old interface, but it does not affect the use of Dr.Fone function, we will update it as soon as possible.
The Teleport Mode offered in Virtual Location is a great way to change the location of iOS/Android devices. If you wish to show a different location to someone else, the best way is to use this mode on Virtual Location. This can be done by following the steps described below:
Step 1Activate Teleport Mode
Once you have connected your smartphone, continue to select the Teleport Mode option from the top-right section. The particular icon is represented by the first icon from the left in that section.

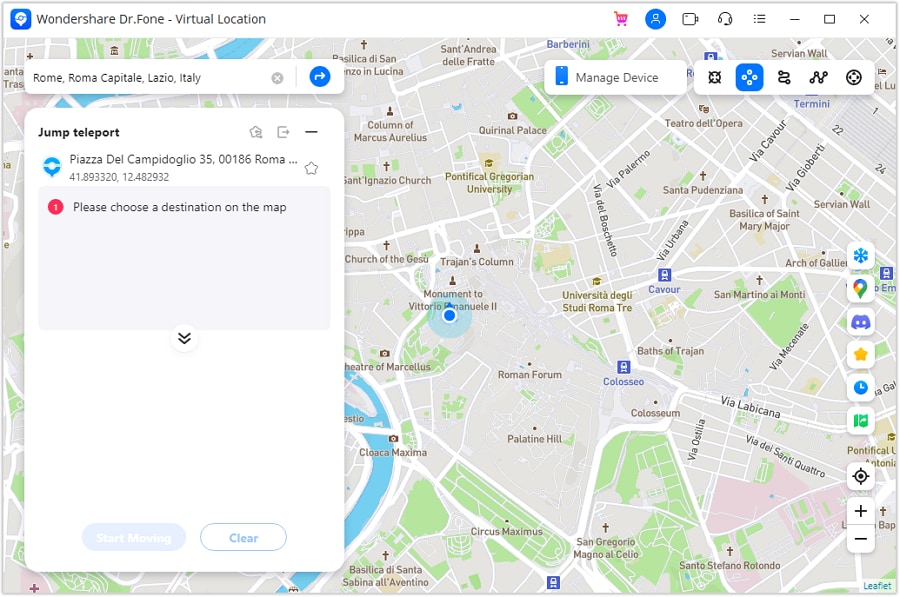
Step 2Add Location To Teleport
After activating Teleport Mode, click the search bar on the top-left to type in the location where you want to shift. After adding the location, hit Enter to proceed.

Note: If you can’t find your current location when searching spots on the map, you can click the Current Virtual Location icon on the right sidebar to show your current virtual location.
Step 3Confirm the Location For Teleporting
You will be directed to the particular, and the map will display it for confirmation. If you are willing to teleport to this specific location, click Move Here.

Step 4Location Successfully Changed On Computer
The location of the smartphone will be instantly changed to the selected location and will be displayed on the map.

Step 5Location Changed On the Smartphone
Open your smartphone and access its maps application. Look into the current location of the Vivo T2 5G device and verify it to be the same as the changed location on the computer.

Part 2: Instantaneous Movement Between Multiple Points (Jump Teleport Mode)
Wondershare Dr.Fone - Virtual Location also allows the movement of the smartphone device between multiple places with the Jump Teleport Mode. If you want to make your location spoofing look realistic, the steps below will be beneficial:
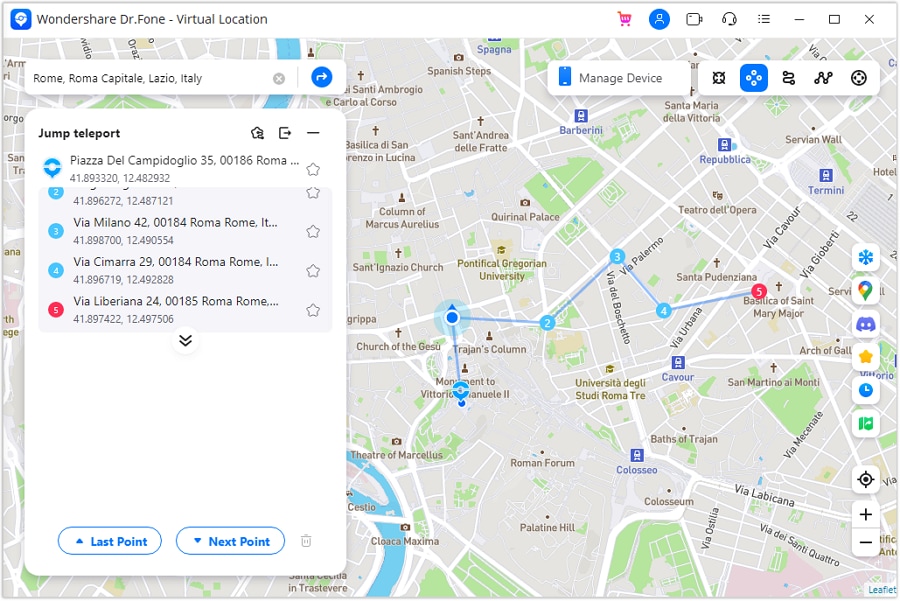
Step 1Activate Jump Teleport Mode
You will have to first access the Jump Teleport Mode option from the second icon from the left in the top-right section. This can be done after teleporting the location of the smartphone device.
Step 2Set Spots to Jump Teleport
Continue to select the spots you want to pass one by one on the map by simply tapping on them with your mouse. After selecting multiple spots, click the Start Moving button at the bottom of the left panel to start the movement.

Step 3Change Location Between Set Spots
As prescribed, you can propagate amongst the set spots with the Jump Teleport Mode. Use the Next Point and Last Point buttons to shift your location.
How to Stop Google Chrome from Tracking Your Location On Vivo T2 5G?
Do you know your web browser is continually sharing your actual location online? You might not have noticed, but the number of websites using your location has increased. As you are well aware of the dangers of the internet, it doesn’t make sense to turn your Chrome into a beacon for ill-intentioned people. Luckily, it is possible to fake a location on Chrome with the right tool.
Are you wondering how to fake the browser location or which tool to use? You can get all your answers by reading this article till the end.

Part 1: How Does Chrome Know Your Location?
Before discussing Google Chrome’s fake location, it is important to know how Chrome detects your physical location. Google Chrome uses many ways to pinpoint your exact location, like your IP address, GPS, Wi-Fi, Bluetooth, and Cell Tower data. Every internet connection has an IP address bound to a location that enables Chrome to identify your location.
Similarly, GPS location can easily be tracked if your phone device has it enabled. All the Wi-Fi and Bluetooth connections around you also have location information embedded in them. They can help Chrome track you as long as your device can detect them. If you use cell data, Google Chrome can also track you through cell towers.
Part 2: How to Hide Location Services in Chrome?
If you are worried about Google Chrome detecting your physical location and sharing it with websites and apps, you can hide it easily. The process of hiding your location on Google Chrome is simple, even if you are using multiple devices. Below is the step-by-step process of hiding location services in Google Chrome on computer, Android, and iOS devices.
Method 1: For Laptop and Desktop PCs
Step 1: Launch Google Chrome on your computer and click the “Three Dots” icon to open the Google Chrome Settings. Here, tap “Privacy and Security” from the left sidebar and select “Site Settings.”

Step 2: Navigate to “Permissions” and click on “Location.” To hide the location on Google Chrome, select the “Don’t allow sites to see your location” option.

Method 2: For iPhone or iPad
Step 1: Navigate to “Settings” on your iPhone and open it. Scroll down until you find the “Chrome” app option and select it.

Step 2: Press “Location” on the next screen to open the location options for Google Chrome. Here, choose “Never” to stop Google Chrome from detecting your location.

Method 3: For Android
Step 1: Open Google Chrome on your Vivo T2 5G, press the “Three-Dots” icon, and tap “Settings” from the options.

Step 2: In Chrome Settings, press “Site Settings.” Now select “Location” and hide your location by toggling off the “Location” option.

One way to protect your privacy and stop websites from tracking your location is to turn off the location, but it has many disadvantages. If you have turned off your location, you can’t use any location base service like food delivery, e-shopping, ride-sharing, etc. That’s why it is better to use a fake location on your browser. Below we have explained four methods for Chrome fake location.
Method 1. Best Tool to Fake Chrome Location On iOS and Android Phones
The easiest and quickest way to fake your location on Google Chrome is to use Dr.Fone - Virtual Location . Since smartphones contain a wide range of apps that require location access, it provides a stable way to fake Chrome locations on Android and iOS phones. No website or app will be able to detect that you are using a fake location when using Dr.Fone - Virtual Location for faking GPS location.
Key Features
- Dr.Fone - Virtual Location can be used for any social media app like Facebook, Twitter, or Instagram with a fake location.
- With the help of this tool, you can also spoof real-time tracking apps like Life360 to protect your privacy.
- If you are an iPhone user, you don’t have to jailbreak your iPhone to spoof your device’s location.
How to Fake Chrome Location On iOS/Android Phones via Dr.Fone - Virtual Location
Faking your Chrome location with Dr.Fone - Virtual Location is very straightforward. You only need the Dr.Fone mobile toolkit and a USB cable to connect your Vivo T2 5G. Follow these steps to spoof Chrome location on Android and iOS phones:
Step 1: Connect Your Android/iOS Device to Your Computer
Connect your Android or iOS phone to your computer using a USB cable. Launch the Dr.Fone robust toolkit on your computer and select “Virtual Location.”

Step 2: Activate the Teleport Mode
Press “Get Started” on the next page to open the map window. First, select your actual location by pressing the “Center On” icon from the right sidebar. Afterward, click on the “Teleport” icon from the top right corner to activate the Teleport Mode.
Step 3: Add the Desired Fake Location
Once the Teleport Mode is activated, add your desired location and press “Go.” Your desired location will open on the map. Select it, and a pop-up window will appear where you need to press “Move Here.” With that, your Android or iPhone’s Chrome location has been changed.
Method 2. Manually Change Your Location Using Google Chrome DevTools
It is also possible to fake browser location on Chrome using the Google Chrome Developer Tools. It is a built-in feature of Chrome and can be used to manually change or turn off your browser’s location. Follow these steps for changing location on Chrome with DevTools:
Step 1: After opening Google Chrome, click the three-dots icon from the top right corner. It will open the Chrome menu where you need to select “Developer Tools” after clicking “More Tools.”

Step 2: A window will open on the right side with all the developing tools you can use in Chrome. Click on the three-dots icon located near “Console” in the bottom left corner of the window. Choose “Sensors” from the pop-up menu.

Step 3: Access the newly selected “Sensor” option, and here you can change the browser’s location by either selecting a Google’s pre-set location or adding your desired location manually. Once the location is selected or added, your browser’s location will change.

Limitations
- The interface of the Google Chrome DevTools can be very confusing and overwhelming for non-technical users.
- Apart from pre-added locations, it can be hard to add a specific location as your fake location.
Method 3. Fake Your Location Using Chrome Extension
Many fake location Chrome extensions are available on Google Chrome which can be used to alter your location on Chrome. You can find these extensions on Google Chrome Web Store and add them directly to your browser. Below we have explained the steps for using such an extension “Location Guard “ to fake your location on Google Chrome:
Step 1: Open the “Location Guard” on Chrome Web Store and click “Add to Chrome” to add it to your browser. Once the “Location Guard” extension is added, open it and press “Options.”

Step 2: In the options, you can choose different options like Privacy Levels, Protection Area, and Time for Location Cache. It is recommended you choose a higher level for more protection.

Step 3: You can also use the “Fixed Location” feature to set up a fake location as a permanent location for your browser. The fixed location can be added by using the market or clicking on the desired place on the map.

Limitations
- Location Guard doesn’t protect your IP address. It means some websites can still detect your real location using the IP address.
- The app is not updated for quite a while, that’s why the map of the fixed location feature is quite restricted.
Method 4. Spoof Your IP Using a VPN Server
Another way you can fool websites and your browser by displaying a fake location online is to use a VPN server. VPNs fake your IP address to fool websites and apps into detecting your location. NordVPN is a VPN that can be used to spoof your IP by following these steps:
Step 1: Download and install NordVPN on your computer or phone and log in using your account. If you don’t have a NordVPN account, you must create one first.
Step 2: If you want to just change the location of your device, you can select “Quick Connect.” Using it will enable the program to automatically find the most suited fake location for you.

Step 3: You can also choose the desired location as your fake Chrome location in NordVPN. To do that, scroll down the list of countries and locations and choose your desired locations to connect to.
Limitations
- NordVPN can only spoof your IP address and will not work for geo-restricted applications.
- Using a VPN usually affects your internet speed and can make browsing slower and more difficult.
Part 4: FAQs
1.What is Geolocation?
Geolocation is a term used for the process of pinpointing the location of a device connected to the internet. The location can be determined using methods like IP address, GPS, and mobile tower data. Apps and websites commonly use it to provide location-based services.
2.What is the HTML5 Geolocation API?
The HTML5 Geolocation API is a browser API used to determine a user’s geographical location. Developers use it to build location-aware websites and apps that use users’ locations as the basis for providing their services. It can detect location through GPS, Wi-Fi, Bluetooth, IP addresses, etc.
3.Why should you hide or spoof your Location?
Hiding or spoofing your location protects your privacy and stop application and websites from tracking you. It also allows you to access geo-restricted apps and play location-based games. You can also fake your location to get the latest updates of your favorite apps.
Conclusion
The fact that Google Chrome in your devices can track your location with an accuracy of up to 20 meters is very unsettling for users. Even when you try to be careful in granting location permissions to apps and websites, many can still bypass this by adding location access requirements in terms and conditions.
That’s why having a tool like Dr.Fone - Virtual Location to fake GPS online is essential nowadays. It can ensure your privacy and helps in protecting you from the dangers of the internet.
Thinking About Changing Your Netflix Region Without a VPN On Vivo T2 5G?
Netflix is easily one of the most popular streaming apps available today. It offers a huge library of movies, TV shows, documentaries, and more. However, the content you want to watch on Netflix depends on the country where you live.
The traditional method of circumventing region-locked content on Netflix is simply utilizing a VPN. You can also change Netflix country restrictions without it, but it will require a bit of work. If you’re interested to know how to change the Netflix region without a VPN, follow our quick article below to learn more.

Part 1: Netflix and Geo-Restrictions
Netflix offers subscribers a wide range of content, but their library varies per region due to licensing and copyright agreements. The service price sometimes costs less in other countries, which is why using VPNs to save money on subscriptions are highly popular.
Using VPNs and other methods to change your region is not illegal, but it violates Netflix’s Terms of Use. If you’re caught using VPNs or other means to bypass their geo-restrictions, Netflix can suspend or terminate your account. This is why you should always take caution when navigating the streaming giant’s Terms of Use.
Part 2: Will Netflix Ban My Account If I Use a VPN?
If you’re wondering if Netflix bans accounts that use VPN, the answer is “No, they don’t”. On the other hand, Netflix will block access to content if it detects that you’re connected to VPN. If this happens, simply turn off your VPN or try connecting to different servers on your VPN and retry.
Part 3: Can You Change Your Netflix Region Without a VPN?
There are multiple ways to change your location on Netflix without a VPN, whether you’re on your computer, iPhone, or Android. You can use a smart DNS service, a Proxy Server, or a Tor browser to connect to a country you want to access. Follow our guide below to change country on Netflix now without a VPN.
Method 1: Using a Smart DNS
Utilizing Smart DNS to change country on Netflix without VPN actually works in the same way. This is because Smart DNS re-routes your connection through a server in a different country. Keep in mind that Smart DNS is still a service and will require a subscription from a Smart DNS provider.
Step 1: Find and select a DNS Server address from different online DNS providers. In this example, you’ll see using SurfShark .
Step 2: Register your IP address on your selected provider and obtain the appropriate DNS Server Address on your account.
Step 3: Open Networking settings on your computer, iPhone, PlayStation, or Xbox and find DNS Settings (the image below is an example for the Windows system).
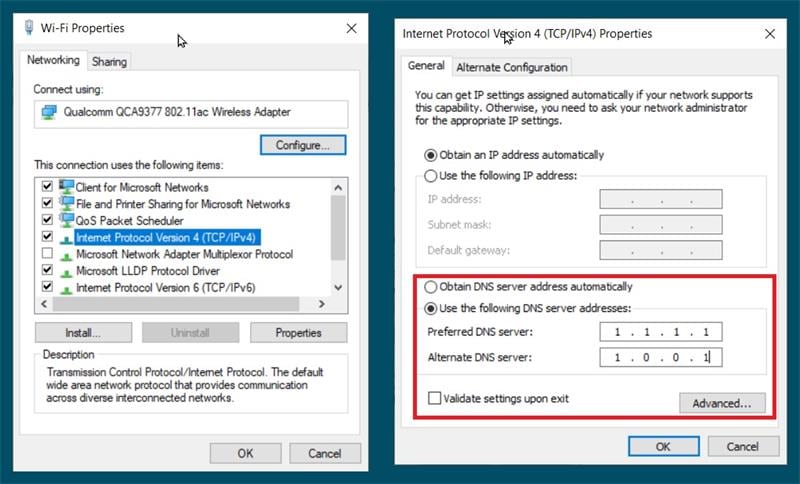
Step 4: Input your DNS Server address. Click Ok once done and restart your computer. The DNS address should activate once you reconnect to the internet.
Pros
- DNS servers are faster than a usual internet connection, so you can enjoy streaming at high connection speeds.
- DNS Servers don’t encrypt your traffic or hide your IP address.
Cons
- DNS doesn’t carry your information, as the server side will only see the IP address where the query came from, which hackers can manipulate.
Method 2: Using a Proxy Server
Proxy Servers work the same as VPNs as it routes traffic to a third-party server. However, like DNS, Proxy Servers don’t encrypt data but can mask your IP address. Here are the steps to watch NetFlix with a Proxy Server.
Step 1: Search for Proxy Settings on your computer.
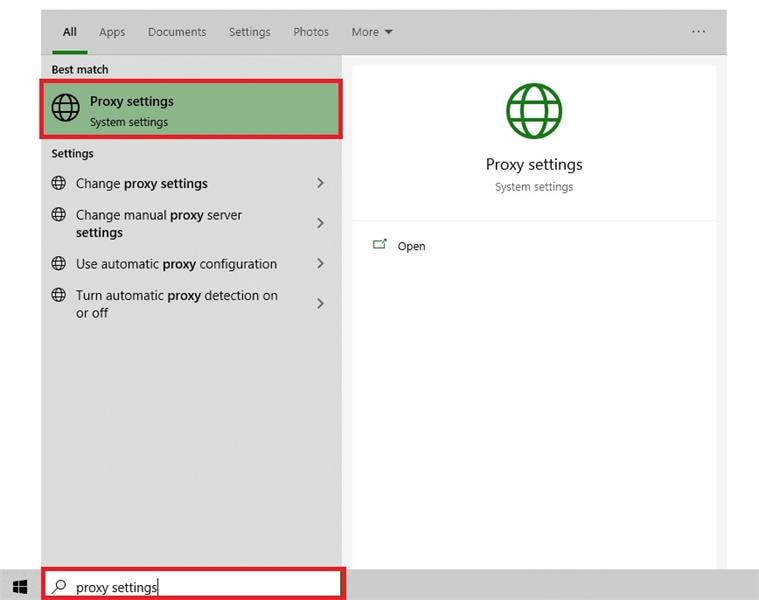
Step 2: Choose between Automatic or Manual proxy setup.
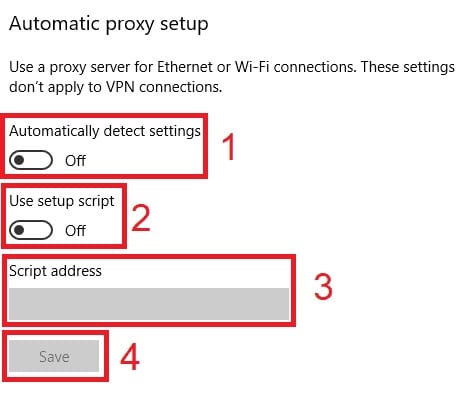
Step 3A: For Automatic proxy setup, turn on Automatically detect settings and Use setup script. Afterward, enter the Script address and click Save.
Step 3B: For Manual proxy setup, click Use a proxy server. Input Address and Port numbers. Click Save afterward.

Note
To change Proxy on mobile phones, change your phone’s proxy settings. Your Netflix app will automatically copy your phone’s proxy settings if done correctly.
Pros
- Proxy Servers mask your IP address retaining anonymity.
- Proxies improve web browsing performance, especially when downloading large files.
Cons
- Proxy Servers don’t encrypt data.
Method 3: Using a Tor Browser
For the unfamiliar, Tor is an open-source network that encrypts your connection while stopping trackers from following your activity. Here are the steps to start using Tor Browser to watch Netflix without a VPN.
Step 1: Download and install Tor Browser.

Step 2: Launch Tor Browser and click Connect.
Step 3: Go to Netflix.com and log in to your account.
Note
Tor Browser is available across all major platforms, including Windows, macOS, Linux, and Android.
Pros
- Tor is completely free to use.
- Your browsing history automatically gets deleted.
Cons
- You can’t control the region you have access to, so your Netflix content is not guaranteed to have what you’re looking for.
Conclusion
Changing your Netflix region with or without a VPN certainly has its perks. This is because you can watch your favorite series unavailable to your country to maximize your streaming access. Choosing a country with a lower subscription price also saves you money.
While it’s not illegal to change your Netflix region, it does violate the streaming giant’s Terms of Use. You should always research and know the pros and cons when circumventing Netflix’s terms so your account doesn’t get suspended or terminated.
Dr.Fone - Virtual Location
1-Click Location Changer for both iOS and Android
- Teleport from one location to another across the world from the comfort of your home.
- With just a few selections on your computer, you can make members of your circle believe you’re anywhere you want.
- Stimulate and imitate movement and set the speed and stops you take along the way.
- Compatible with both iOS and Android systems.
- Work with location-based apps, like Pokemon Go , Snapchat , Instagram , Facebook , etc.
3981454 people have downloaded it
Also read:
- [New] Capture Every Pixel of PC Gaming Bliss (6 Ways)
- [New] In 2024, A Step-by-Step Approach to Mastering Free YouTube Video Transcription
- [New] In 2024, The Dark Side of Digital Content Profitability
- 2024 Approved The Premier Screen Recording Software Roundup
- 3 Effective Troubleshooting Tips for When Your iPhone Contact List Isn't Responding
- 9 Mind-Blowing Tricks to Hatch Eggs in Pokemon Go Without Walking On Vivo Y78t | Dr.fone
- How to Exit Android Factory Mode On Tecno Pop 8? | Dr.fone
- How To Teleport Your GPS Location On Honor 90 GT? | Dr.fone
- In 2024, 15 Best Strongest Pokémon To Use in Pokémon GO PvP Leagues For Vivo V27e | Dr.fone
- Mastering TikTok Videos Editing Hacks Revealed
- Where Is the Best Place to Catch Dratini On Samsung Galaxy M14 4G | Dr.fone
- Title: How To Teleport Your GPS Location On Vivo T2 5G? | Dr.fone
- Author: Nova
- Created at : 2025-01-14 08:25:54
- Updated at : 2025-01-16 18:21:39
- Link: https://change-location.techidaily.com/how-to-teleport-your-gps-location-on-vivo-t2-5g-drfone-by-drfone-virtual-android/
- License: This work is licensed under CC BY-NC-SA 4.0.