
:max_bytes(150000):strip_icc():format(webp)/TwitterVideoDownload-5b605aaac9e77c002c3a42f3.jpg)
How to Stop Life360 from Tracking You On Itel P40+? | Dr.fone
How to Stop Life360 from Tracking You On Itel P40+?
This is the era of smartphones, and most of the people in the world own a smartphone. The advancement in technology brings many apps, including child surveillance apps for smartphones. The apps like Life360 helps parents to track their teenagers and children. But, on the other hand, for some teenagers or adults, Life360 invades their privacy, and they are not like 24*7 tracking by the app.
![]()
This is where spoofing Life360 comes handy. No matter whether you own an iPhone or Android, you can spoof Life360 with the right tricks and tools. In this article, we will discuss the different ways to stop Life360 from tracking you. But, before that, let’s take a look at what is Life360.
What is Life360?
Life360 is basically a tracking app that you can use to share your location with friends or to track your teenager. Also, with this app, you can also do chit-chatting with your friends and family members via the in-app chat feature.
Life360 supports both iOS and Android devices. To use, you will need to install it on your device and have to turn on location services so the members in your group name can track you.
But as we said before, it is quite uncomfortable to know that someone is tracking you everywhere. So, if you want to hide location on Life360, then this article to know the amazing tricks to stop Life360 from tracking you.
Part 1: Turn Off Location on Life360
![]()
You can turn off the location to stop the Life360 tracking feature. But, with this, keep the background app refresh off. Follow the following steps to turn off the location on life360.
- Open the Life360 on your phone and go to ‘Settings’ in the lower right corner
- You will see a circle switcher on the screen, select the circle you want to stop sharing location
- Now, click on ‘Location Sharing’ and toggle off to turn off the location setting
- Now, you can see on the map that “Location Sharing Paused.”
Note: If you ever press the Check In button, it will update your location in Life360 even if it is turned off. Further, if you press the Help Alert button, this will also turn on the location-sharing feature.
Part 2: Fake Location Apps to Spoofing Life360
The best way to stop Life360 from tracking you is to use fake GPS apps on Android and iOS. There are many fake location apps that you can install in your device to spoof Life360 without any risk to your device.
2.1 How to spoof life 360 iPhone
To spoof GPS on the iPhone is tricky, and it requires reliable as well as safest tools like Dr.Fone – Virtual Location .
![]()
This tool is specially designed for iOS users that help to spoof location without causing any risk to your data. The best thing is that it is very easy to use and easy to install, as well. Also, in Dr.Fone – Virtual Location (iOS), you can teleport anywhere and can customize your speed. With just one click, you are able to spoof Life360 and other location-based apps.
Here are the few steps that you will need to follow to use Dr.Fone. Take a look!
- First, you will need to download it from the official site on your PC or system.

- After this, install it and launch it. Now connect your iOS device to the system with the USB cable and click on the “get started” button.

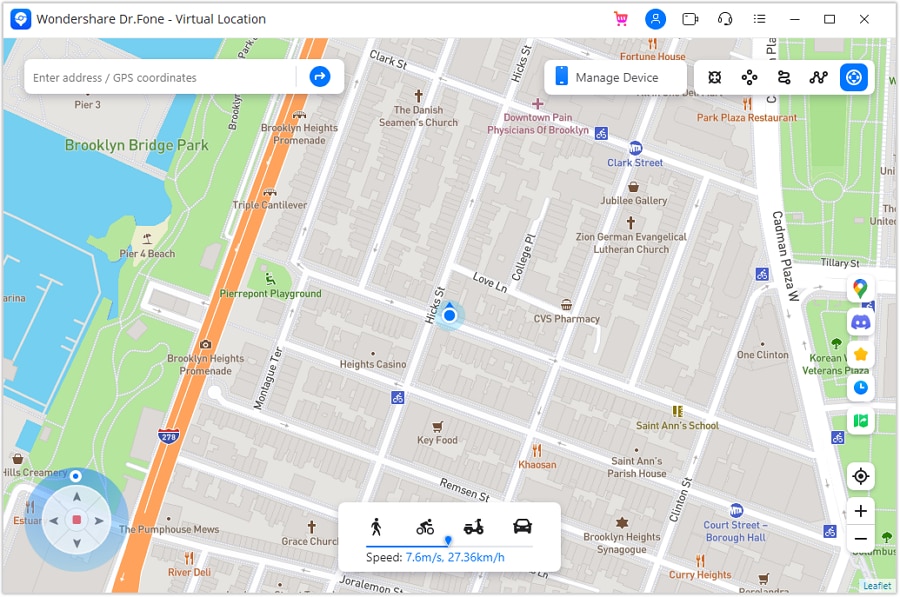
- Now you will see a map interface with your current location.
- On the map, you can select teleport mode from the top right corner and can search for the desired location.

- After a search for the desired location, click on the “move here” button.
- Finally, you are ready to spoof to any location in Life360.
Dr.Fone - Virtual Location
1-Click Location Changer for both iOS and Android
- Teleport from one location to another across the world from the comfort of your home.
- With just a few selections on your computer, you can make members of your circle believe you’re anywhere you want.
- Stimulate and imitate movement and set the speed and stops you take along the way.
- Compatible with both iOS and Android systems.
- Work with location-based apps, like Pokemon Go , Snapchat , Instagram , Facebook , etc.
3981454 people have downloaded it
2.2 How To Fake Life360 Location On Android
To spoof Life360 on Android, you can install ant fake location app on your device. There are many fake GPS apps available for Android, some of which are free, and some are paid.
But, before using the app, you will need to enable the developer option and need to allow mock location feature of android devices. For this, go to about phone under settings and look for the build number. Once you found the build number, tap on it seven times to enable the developer option.
![]()
Now, follow the following steps to install any fake GPS on Android.
- Open Google Play Store and search for the fake location app
- Now, from the list, install any app that suits you it can be free or paid
- Now, launch the fake GPS on your device by following the process
- After this, go back to the settings of the phone and look for enable developer
- Under enable developer option go to allow mock location app and select the app you installed from the list
- Now open the app, and fill your desired location on the map. It is simple to spoof Life360 on Android
Part 3: Use a Burner Phone for Life360 Fake Location
The burner is a phone on which you can install Life360 and can put it in one place while going out with another phone. It is a great trick to stop Life360 from tracking you. The only thing is that you should need to have two phones.
For the burner, you can use any device with Google play store or App store, and it can be an old phone as well.
Conclusion
Life360 is a very helpful app for parents and friends group, but still, it becomes irritating sometime to know that people are tracking you. Therefore, you can use tricks to hide your current location from Life360. There are many ways that you can apply Life360 fake location, but if you own iPhone, it needs a reliable tool. Dr.Fone - Virtual Location (iOS) is best to spoof Life360 without putting your device’s security at risk. Try it once!
How To Simulate GPS Movement With Location Spoofer On Itel P40+?
When you are playing location-based games like Pokemon Go, you might need to simulate GPS movement to catch more Pokemon. To do this, you can use the GPS movement feature of Wondershare Dr.Fone - Virtual Location . This feature allows you to simulate GPS movement between two or multiple spots on the map. Here’s how you can do it:
Part 1: Simulate Movement Along a Route (One-Stop Route)
You can set up a one-stop route when mocking locations fake with Dr.Fone - Virtual Location. This particular feature helps users to set up looping or round trips within a specific location. To perform the steps for simulating movement, look ahead for a better understanding:
Step 1Access One-Stop Route Function
Once you launch Wondershare Dr.Fone - Virtual Location and connect your smartphone successfully, proceed to select the One-Stop Route function from the top-right section. The function is represented by the third icon from the left in the section. While you have already teleported to another location or are using your current location, you can tap anywhere on the map to set your destination location.

Step 2Define Simulation Parameters
Enter a number to define how many times you want to go back and forth, and select whether you want a Round trip or a Loop trip. Drag the slider on the speed option to set how fast you want to walk. Proceed to click Move Here on the bottom to start the movement simulation.

Step 3Start Simulation Movement
The respective simulation starts, and you can see your position is moving on the map with the speed you set. If you wish to hold the simulation, click Pause or tap Clear to revert to your original state.

Part 2: Simulate Movement Along a Route (Multi-Stop Route)
You can try the multi-stop mode if you want to pass by multiple places along a route on the map. Learn how it is done when you are trying to **spoof location on Android/**iOS:
Step 1Start Multi-Stop Route and Set Parameters
Activate the Multi-Stop Route mode from the top-right section next to the One-Stop Route mode. After activating the mode, set multiple spots on the map by clicking your required place. Define the number of trips and speed. Click Start Moving to initiate the process.
Note: Select the spots along a specific road to prevent the game developer from thinking you are cheating.

Step 2View Multi-Stop Route Movement
As the simulation starts, click Pause at any instance where you want to stop the simulation. You can also Clear all settings if required.

Part 3: Use Joystick for More Flexible GPS Control (Joystick Movement)
Dr.Fone has integrated the joystick feature into the Virtual Location program to spare 90% of the labor for GPS control. You can always find the joystick on the lower left part in teleport mode. And you can also click the joystick button in the upper right (the 5th one) to use the joystick feature.
The joystick, like one-stop route or multi-stop route modes, aims to facilitate GPS movement on the map. But what’s better? The joystick lets you move on the map by changing directions in real time. Here are the two main scenes where you will definitely love the joystick.
- Automatic GPS movement: Click the Start button in the middle, and the automatic movement starts. Then just change the directions as you like by 1) clicking the left or right arrows, 2) dragging the spot around the circle, 3) pressing keys A and D on the keyboard, or 4) pressing keys Left and Right on the keyboard.
- Manual GPS movement: Move forward by constantly clicking the Up arrow in the program and long-pressing the key W or Up on the keyboard. Reverse by constantly clicking the Down arrow, or long-pressing the key S or Down on the keyboard. You can also tweak the directions using the four ways above before moving forward or reverse.
How to Change Google Play Location On Itel P40+
Google Account has unlimited advantages as it provides quick access to multiple platforms like Google Drive, Google Calendar, and Google Play Store. By accessing these platforms, users can increase their functionality to ease their daily tasks. For example, Google Play Store offers tons of apps and tools in every category that millions of people install on their devices.
However, some featured apps on the Play Store are restricted region-wise, and some users cannot download them. This article will guide you on how to change the country in Play Store to access all the apps.
Part 1: What Should We Know Before Changing Google Account Location?
By changing the country on Google Play Store, you can install some unavailable apps in your region. You can quickly enjoy the applications and services on your phone by simply changing the country’s location. Before knowing how to change location on Google, you should know some essential aspects.
Warnings About Changing your Location
- Often, users are deprived of some services and features apps if they are not available in the newly chosen region.
- Changing the Google Play Store location is easy, but you can only change the settings once a year. This depicts that you can change the location settings of your Google Account after 365 days.
- After changing the country’s location, you won’t be able to utilize the previous Google Play balance of the old country.
- Once you have changed your country’s server location in settings, the Google Play Store takes 48 hours to change the location.
Part 2: How to Change Google Account Location?
This section will offer easy ways to change play store country and location on Google in every circumstance. By doing so, you can easily install restricted applications in your region.
How to Change Location on Google on Android
Situation 1: How to Change Country in Google Play Store on Android
Through your Itel P40+s, you can change the location on both Google Play Store and Google Account easily. To know more details about how to change the country in Google Play Store, read the following guidelines:
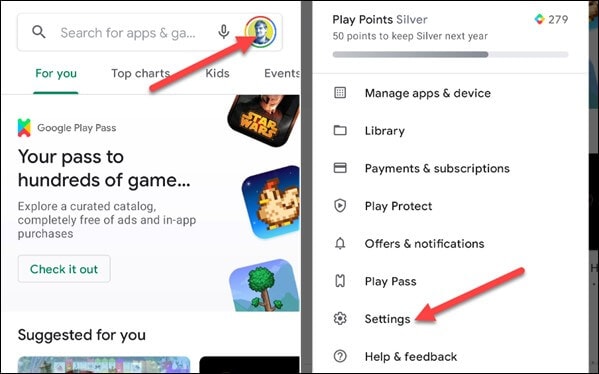
Step 1: Open your Google Play Store from your Itel P40+. Navigate to the profile icon from the corner and select “Settings” from the displayed menu.
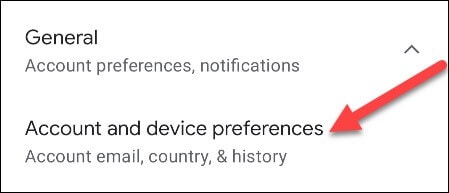
Step 2: Tap on the “General” section to locate the option of “Account and Device Preferences.” Afterward, find the “Country and Profiles” option by scrolling down. From there, you can see your current country location.
Step 3: Now click on “Switch to the Country Play Store” to change the location. For verification, click on “Continue” when a pop-up message appears on your screen asking if you want to change the location.

Step 4: Now, you will be automatically assisted in changing the payment methods of the new country. However, if you don’t come across the option to change the country, either you have already changed the country location within a year or your IP address is not synchronized with your new country.
Situation 2: How to Change Google Account Location on Android
In this particular situation, you don’t have to change the Play Store country; instead, you can only change the Google location on your Itel P40+. We will recommend the VPN Proxy Master Lite , which works effortlessly to change Google‘s location. This tool flawlessly hides your IP address so that you can easily use any country’s location to access all the applications and services. Moreover, it’s highly secured and well-protected so that no virus can harm your Itel P40+.
To use this powerful VPN tool, we have jotted down some basic steps through which you can change the location on your phone easily:
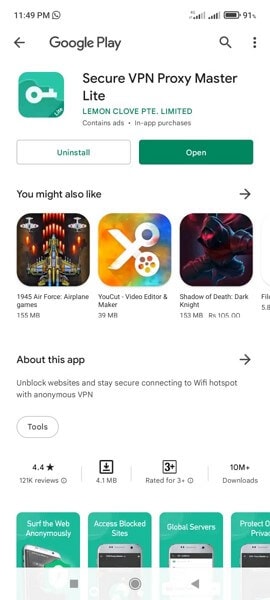
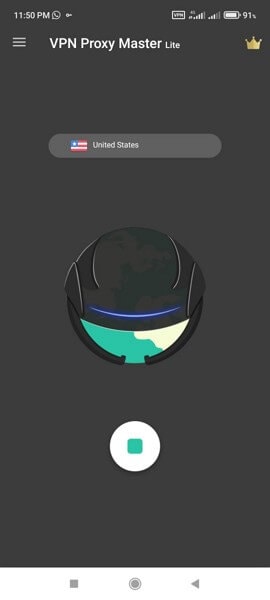
Step 1: Start installing VPN Proxy Master Lite on your Itel P40+ from your Google Play Store. Once this app is successfully installed, open this app to proceed.
Step 2: After opening this app, tap on the country’s name list displayed above the picture of Earth. Tap on that list to view all the available countries.

Step 3: Select any country from the displayed list by tapping on it. Meanwhile, make sure that your phone is connected to a strong internet connection. This tool will automatically change your Google location by tapping on the country’s name.
How to Change Location on Computer
Situation 1: How to Change Country in Google Play Store on Computer
In this situation, we will help you change the country’s location on your Google Play Store through your computer. Just follow the below-given steps.
Step 1: Start by navigating to your PC’s browser and then open Google Play . Once done, click on the “Settings” displayed on top of your screen.
Step 2: After opening the settings menu, go to “Payments and Profile” and locate the option of “Country/Region.” Proceed by tapping the edit icon next to it.
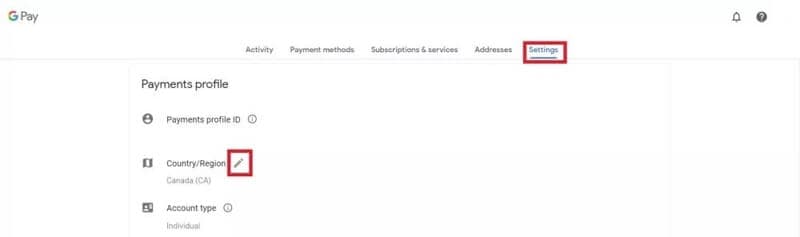
Step 3: To connect with the new country’s location, tap on the option “Create a new profile.” Afterward, you can see the on-screen instructions on your computer, so follow them to complete the process. Once done, Google Play will change the location after 48 hours, and you can search for the applications you want to install.

Situation 2: How to Change Google Account Location on Computer
If you want to change Google location on your computer without changing country on Google Play Store, use ExpressVPN by downloading it. This tool is a well-trusted platform and offers an instant way to change Google location easily. In addition, you can rely on its platform to connect with more than 94 countries worldwide by changing the location anytime you want.
Moreover, the process is fast and fully secured to protect your computer from unwanted bugs. To change the location using ExpressVPN, the steps are:
Step 1: Begin launching ExpressVPN on your computer and open its interface. Once done, turn on the VPN button and tap on the “Location Bar” to change the location.
Step 2: You can explore regions by either navigating to the “Recommended” or “All Locations” tab. Select the location you want to change with from the displayed list.
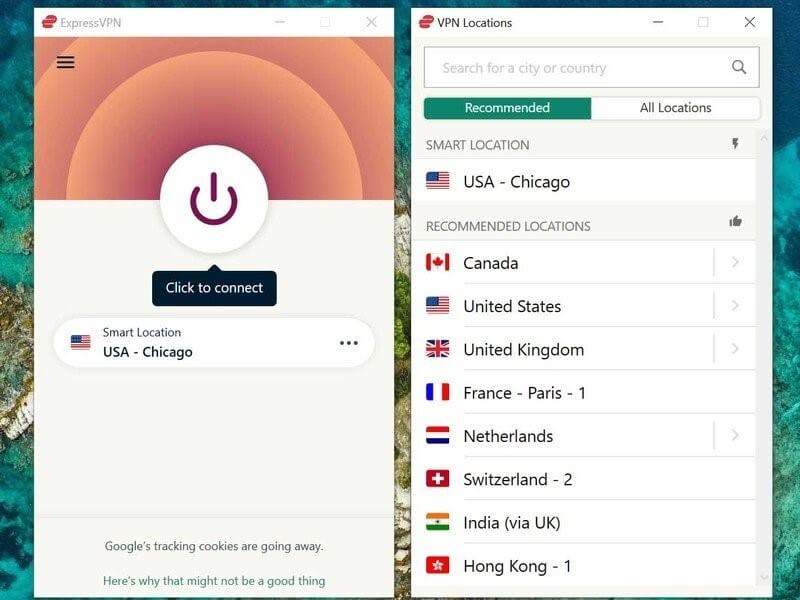
Step 3: After clicking on any country’s location, your computer’s Google Account location will be automatically changed.
Part 3: The Most Effective Way to Fake Location on iOS and Android
We have mentioned methods to change Play Store country manually and through VPN, but they still have a few limitations. Once you change the country’s location on Google Play manually, the Play Store requires 48 hours to accept this modification. Moreover, you can only change the country’s server location once a year. With VPN, many country servers are unreachable, and some servers can be reached only through a paid version. This makes the process expensive and time taking.
To avoid these hurdles and chaos, we recommend you to use Dr.Fone – Virtual Location to fake your location on both Android and iOS devices. This tool works in every situation and allows users to travel the globe through their phones free of cost. You can also travel with an exact GPS location just with a single click. Hence, this tool will work amazingly in faking your location without requiring you to change Google Play country’s location.
Dr.Fone - Virtual Location
1-Click Location Changer for both iOS and Android
- Teleport from one location to another across the world from the comfort of your home.
- Fake location on your phone with a few clicks.
- Support most mainstreaming apps and geo-based games, including Pokemon Go, Snapchat, Tinder, and so on.
- Compatible with both iOS and Android systems.
3981454 people have downloaded it
To change country Google Play using Dr.Fone - Virtual Location, here are the steps:
Step 1: Choose Virtual Location Feature
Begin with launching the tool of Dr.Fone on your computer. Open its interface and tap on the “Virtual Location” option from the home page.
Step 2: Connect your Phone
Now connect your smartphone to the phone with the help of a USB cable. Once done, click on “Get Started” to proceed further.
Step 3: Find your Current Location
After connecting your phone, you will be able to see your current location on the new window. If not, tap on the “Center On” icon displayed on the right side to find your current location.
Step 4: Enable Teleport Mode
Tap on the first icon displayed on the top right to enable the teleport mode. Now enter the location you want to navigate the search box and click on “Go” to continue.

Step 5: Change Location
A notification will pop up for confirmation once you have entered a new location. Tap on “Move here” to proceed. Once done, your new location will be set on your smartphone automatically. Now head back to Google Play Store and search for the applications you want to access.

 safe & secure
Conclusion
There are plenty of ways to execute Google One change location across various platforms to execute Google One change location. For example, people usually change Play Store country to access restricted applications in their region. This article will offer a detailed guide for changing Google location through manual and VPN means. However, to avoid any hassle, we recommend Dr.Fone - Virtual Location to change the location of your smartphone and Google Play instantly and conveniently.
Also read:
- How to Exit Android Factory Mode On Tecno Pop 7 Pro? | Dr.fone
- In 2024, Catch or Beat Sleeping Snorlax on Pokemon Go For Vivo Y78+ (T1) Edition | Dr.fone
- How Do You Get Sun Stone Evolutions in Pokémon For Vivo Y36? | Dr.fone
- In 2024, Detailed guide of ispoofer for pogo installation On Samsung Galaxy A05s | Dr.fone
- How does the stardust trade cost In pokemon go On Samsung Galaxy F54 5G? | Dr.fone
- Detailed guide of ispoofer for pogo installation On Samsung Galaxy A34 5G | Dr.fone
- How to Fix Pokemon Go Route Not Working On Samsung Galaxy XCover 6 Pro Tactical Edition? | Dr.fone
- In 2024, Which Pokémon can Evolve with a Moon Stone For Samsung Galaxy M54 5G? | Dr.fone
- How Can I Catch the Regional Pokémon without Traveling On Samsung Galaxy S23 Tactical Edition | Dr.fone
- In 2024, Best Pokemons for PVP Matches in Pokemon Go For Vivo Y36 | Dr.fone
- 3 Ways for Android Pokemon Go Spoofing On Vivo Y36 | Dr.fone
- How PGSharp Save You from Ban While Spoofing Pokemon Go On Vivo Y36? | Dr.fone
- In 2024, How to Use Pokémon Emerald Master Ball Cheat On Samsung Galaxy A24 | Dr.fone
- Full Guide to Catch 100 IV Pokémon Using a Map On Vivo Y36 | Dr.fone
- In 2024, A Working Guide For Pachirisu Pokemon Go Map On Samsung Galaxy A54 5G | Dr.fone
- In 2024, Detailed guide of ispoofer for pogo installation On Samsung Galaxy S23 Tactical Edition | Dr.fone
- How to Use Pokémon Emerald Master Ball Cheat On Samsung Galaxy M54 5G | Dr.fone
- In 2024, The Best iSpoofer Alternative to Try On Vivo Y36 | Dr.fone
- Title: How to Stop Life360 from Tracking You On Itel P40+? | Dr.fone
- Author: Nova
- Created at : 2024-04-07 02:12:02
- Updated at : 2024-04-08 02:12:02
- Link: https://change-location.techidaily.com/how-to-stop-life360-from-tracking-you-on-itel-p40plus-drfone-by-drfone-virtual-android/
- License: This work is licensed under CC BY-NC-SA 4.0.
