
How to Fix Error 495 While Download/Updating Android Apps On Vivo V29e | Dr.fone
How to Fix Error 495 While Download/Updating Android Apps On Vivo V29e
Error 495 is a common error that occurs while downloading or updating apps from Google Play Store. This error is usually caused by a problem with the Google Play Store, and it can be fixed by clearing the cache and data of the Google Play Store app. If you are experiencing this error, follow the steps below to fix it.
In this article, you will learn why the Android error 495 pops up, possible solutions to bypass, as well as a dedicated repair tool to radically fix error 495.
We always like to explore every new feature or the features that already exist on our devices. We have a tendency to be the master of our device and want to know every bit of the handset. Unexpected errors ruin that experience and it is just frustrating to experience these errors. And the worst part is that we have no idea where we are wrong or what we did that led to the error. Same is the case with the error 495 which occurs due to downloading or updating of Android Apps. You may have spent countless hours on the internet to find the right solution for error code 495 but even after following many of the most guaranteed steps sometimes the error still doesn’t go away.
However, this article will provide you various methods to get rid of the Error 495 play store problem that you face and you will not have to depend on any other sources for your solution.
Reasons for Google play error 495
Android Apps are most commonly downloaded from the Google Play Store with the help of Wi-Fi or Cellular Data. One may come across many types of errors. Mostly the errors come in during the download or update or installing time. Error 495 occurs when the user isn’t being able to download or install an app over Wi-Fi, but the user is able to do the same thing over cellular data.
Technically speaking, the issue is caused when the connection to the Google Play servers, where the app is hosted, times out. Which is unable to resolve by itself.
Also, there could be another reason that it cannot sync with the servers.
Now that we know the possible reasons for the error 495, let us also know how to get rid of it in the sections below.
Solution 1: One Click to Fix error 495 by Android Repair
Tried several methods to make the error 495 disappear, but nothing works? Well, many people have experienced the same frustration. The root cause is that something is wrong with the Android system. You need to have your Android system repaired to fix error 495 in this situation.
Note: Having your Android system repaired may lose existing data on your Android. Backup the data on your Android before the Android repair.
Dr.Fone - System Repair (Android)
Best tool for fundamental Android repair in one click
- Fixes all Android system issues like error 495, system UI not working, etc.
- One click for Android repair. No special technics needed.
- Supports all the new Vivo V29e devices like Galaxy Note 8, S8, S9, etc.
- Step-by-step on-screen instructions provided to fix error 495 without any hassle.
3,390,486 people have downloaded it
With Dr.Fone - System Repair (Android) , you can easily fix error 495 in few steps. Here is how:
- Download, install, and launch Dr.Fone - System Repair (Android). Connect your Android to your computer with a USB cable.

- Select the option “Repair” > “Android Repair”, and click “Start”.

- Select the Vivo V29e device information like brand, name, model, etc., and confirm your selection by typing in “000000”.

- Press the stated keys to boot your Android in download mode to download the firmware as instructed.

- After the firmware is downloaded, the program will automatically start to repair your Android.

Solution 2: Clear the Google Service Framework cache to Fix error 495
Step 1:
Go to the “settings” of your device. Once the series of sections comes up, tap on the “APPS” section.
Step 2:
Click on ‘All Apps’ or ‘Swipe to All’ and the open the section named “Google Services Framework App”
 .
.
STEP 3:
Open “App Details” and the screen shown in the image should come up on your device. As shown in the image, follow the three steps. First, tap on “Force Stop” and then second, tap on the “Clear Data” option and finally go ahead and tap on the “Clear Cache” option.
Following the above steps should solve your problem of Google Play Error 495. And you can enjoy back to using the apps which you couldn’t download or update due to the Error 495.
Solution 3: Reset App Preference in Google play Store to Fix error 495
STEP 1:
Go to the settings section in your device. It will be differently placed for different devices and different users.

STEP 2:
Once the Settings section is open. A lot of further sections will pop up. No find the section named “Application Manager” or “Apps”. After locating it, tap on that section.

STEP 3:
Now go ahead and tap or slide to a section named “ALL”.
STEP 4:
After reaching the “ALL” section tap the touch button to open menu/properties and choose an option named “Reset Apps” or “Reset App Preferences”.
There’s no need to be alarmed because on clicking the reset option, the apps won’t be deleted but it is only going to re-set them. And hence solving the Error 495 created in the Google Play.

Solution 4: Fix Error Code 495 by installing a VPN app
The Error code 495 can be easily removed in another interesting way too. On downloading a Virtual Private Network (VPN) and then operating the play store automatically solves the error 495.
STEP 1:
Install Hideman VPN (using any other VPN will also make it work) from Google Play store. (If the error persists for this app too then download it from a different app store or by using a third-party store).
STEP 2:
Now open the app and select the United States as the country of connection and press the option named Connect.
STEP 3:
Open Google Play Store and Download any app without the Error Code 495 coming in and bothering.
This fix will work for most of the Google Play Errors and not just only The Error Code 495.
Solution 5: Remove your Google Account & Reconfigure it to fix error 495
Removing the Google account and re-configuring it is a very common method adopted to get rid of the Error 495. Adopt the following steps to complete this method.
STEP 1:
Go to the “Settings” section of your device. Like it was mentioned before, different devices and different users will have the placement of the settings section in a different place.

STEP 2:
Go to the accounts section in the settings tab.

STEP 3:
In the accounts section tap on the Google Account part
STEP 4:
Inside The Google section, there’ll be an option called “Remove Account”. Tap on that section, to remove your google account.

STEP 5:
Now go ahead and re-enter/ re-register your Google account and check if the Error 495 still persists.
Now you have completed all the steps and your problem should be solved.
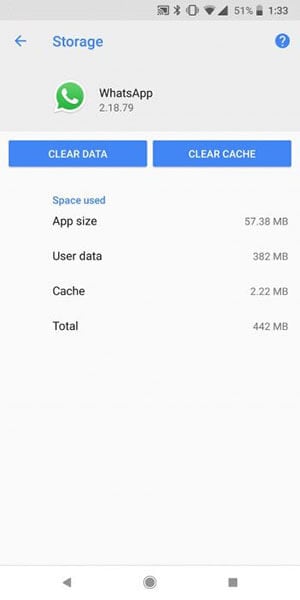
Solution 6: Fix error code 495 by Removing your Google Play Store Data & Cache
One of the best and most accurate methods in the series of various steps in eradicating the Error Code 495 in Google Play Store is by removing the Google play Store Data and Cache. In order to do so follow the steps mentioned below. After following the steps it is guaranteed that the Error code 495 will be done with and you won’t experience any such problems in the future.
STEP 1:
Go to the “Settings” section into your mobile device. The settings can be accessed by scrolling down and pulling down the drop-down menu and most likely the settings app will be on the top-right corner. Otherwise, it will be found after opening the app drawer.

STEP 2:
Once after opening the settings section, select the “Installed apps” or the “Apps” section.

STEP 3:
Find the “Google Play Store” section and select that too.
STEP 4:
Tap on the “Clear data” & “Clear Cache”.

Doing the above steps will clear your caches of the Google Play Store. Now you have a new google Play store.
Hence in this article, we got to know about the error 495 and the possible solutions to it as well. Also, this article explains how Error code 495 can be removed by 5 different ways. These are the best ways by which you can remove or get rid of the Error Code 495. In case one of the method fails, use the other one to rectify this recurring error 495 on your Vivo V29e.
6 Fixes to Unfortunately WhatsApp has stopped Error Popups On Vivo V29e
Ever seen a wheel going on without cog? Similarly, WhatsApp has become the cog of our lives. Be it in the professional era or personal (gossips, oomph) stuffs, it is a crucial engaging kind of application. WhatsApp is the slow poison yet a useful tool used worldwide after call logs or messages. Imagining a day without is enough to put someone off. And if one has recently faced a problem in WhatsApp crashing or not opening, then it is enough to give a heart break. It can be due to Cache memory piled up, storage running out of space, WhatsApp components getting corrupted. In such a case, resolving the problem by using an effective solution is very important! Don’t worry and wander as we will provide impeccable range of fixes to bid bye to WhatsApp stopping problem.
Cause 1: WhatsApp-related Firmware Components went wrong
You should start fixing the WhatsApp crashing issue with fixing the Android firmware. This is because the Android firmware components are many times the hidden culprit behind the problem of why a particular app stops working. And to fix these components in one click, you need Dr.Fone - System Repair (Android). It is one of the safest tools around in the market and works efficiently with Android system issues. It promises to bring your device back to normal and healthy state. Here are the benefits you get with this amazing tool.
Dr.Fone - System Repair (Android)
Android repair tool to fix firmware component issues
- Fixes all kinds of Android system issues with ease
- Supports 1000+ Android device in a hassle-free way
- Really easy to use and free from any virus infection
- One needn’t to be a tech pro to use this tool
- Can be downloaded for free and repairs the Vivo V29e device in few easy steps
4,388,871 people have downloaded it
Step 1: Download Dr.Fone Tool
To start repairing, go to the official website of Dr.Fone - System Repair (Android) and download it. Install it and then open the tool on your PC. To proceed, look for the “System Repair” tab and click on it.
Step 2: Choose the Right Tab
As the next step, you need to take the help of USB cable and then plug your device to the computer. Once connected appropriately, make sure to click on the “Android Repair” tab from the left panel.
Step 3: Enter Details
Next will be the information screen. Simply enter the model, brand and other details. Check everything once and click on “Next”.

Step 4: Enter Download Mode
Subsequently, you need to go along with the onscreen instructions. This will boot your device in the download mode. The step is necessary to download the firmware. When you follow the steps, you need to click “Next”. The program will then start downloading the firmware.

Step 5: Repair Android
Now, you just have to sit back and relax. The program will begin to repair your device. Wait until you get the notification for completion.
Cause 2: Cache conflict
The purpose of Cache in a device is to keep the track of frequently used data and information of an application. And when there are the files or data that are corrupted in the cache, this might raise the “Unfortunately WhatsApp has stopped” error. Therefore, you need to clear the WhatsApp data if the above method went futile. Here are the steps.
- Open “Settings” and go to “App Manager” or “Apps & Notifications” or “Applications”.
- Now, from the list of all applications, choose “WhatsApp”.
- Click on “Storage” and tap “Clear Data”.
Cause 3: WhatsApp components corruption
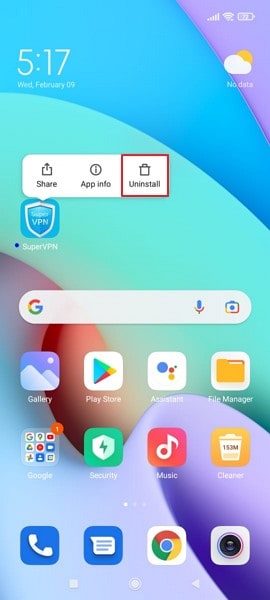
A lot of times, the WhatsApp crashes due to the corrupted components of WhatsApp. In such case, all you need to do is uninstall and install the WhatsApp again. This is how you do it.
- Uninstall the app right away from your Homescreen or from the “Settings” > “Applications” > “All” > “WhatsApp” > “Uninstall” (for some phones).
- Go to “Play Store” and search “WhatsApp” on the search bar.
- Tap on it and start downloading followed by installing it.

Cause 4: Not Enough Storage on your Phone
Insufficient storage could be the other reason why for your WhatsApp has stopped. When your device starts running out of space, some apps may not be able to operate properly for their functions take up space in the Vivo V29e device. And probably WhatsApp is one of them. If the space is the case with you, we suggest you the following two things to go with.
- Firstly, go to Settings and check the storage. Make sure it is enough i.e. at least 100 to 200MB.
- Secondly, start eliminating the apps that are no longer needed. This will indeed create more space in your device and will let your WhatsApp wok properly.
Cause 5: Gmail Account no longer valid or hacked
It is a well-known fact that Android device and Gmail account go hand in hand. To run the Vivo V29e device smoothly, it is always asked to enter your Gmail address for further configurations. And when WhatsApp stops on your device, the reason might be your Gmail account. Most probably it is not valid now or maybe hacked. If this is the case, we suggest you to log out and log in with some another Gmail account.
- Log out by opening “Settings” and tap on “Accounts”.
- Choose your Google account and tap on “REMOVE ACCOUNT”.
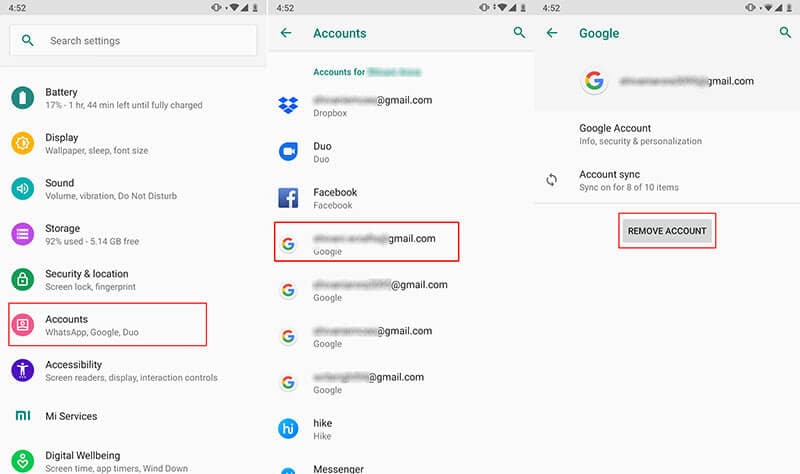
Now, you can login again and check if WhatsApp works or not.
Cause 6: WhatsApp Incompatible with your Android Phone
If still nothing works and your WhatsApp keeps stopping, most likely the reason is the incompatibility of your WhatsApp with your device. In such case, the thing that comes to your rescue is mod WhatsApp version like GBWhatsApp. It is a mod app which is similar to WhatsApp but in a more modified way. With this, a user gets more functionalities and customizable settings when compared to WhatsApp.
If you’re wondering how you can find this app and install, you should keep reading.
To find GBWhatsApp:
Since you can look for this mod app on the Play Store, here are some of the other secure places from where you can download apk file for this GBWhatsApp. Note down these websites to get GBWhatsApp downloaded if WhatsApp has stopped.
- Latest Mod APKs
- UptoDown
- Android APKs Free
- Soft Alien
- OpenTechInfo
To Install GBWhatsApp:
Now that you have decided where to download the apk file, these are the following steps that you should follow to install it on your phone. Please have a look:
- Firstly, open “Settings” on your device and go to “Security”. Turn the “Unknown Sources” option. Doing this will let you install the apps from other locations than Play Store.

- Using the browser on your phone, download the app from any of the aforementioned website.
- Launch the GBWhatsApp apk and follow the onscreen instruction in order to install. You need to go in a similar way as you do in mormal WhatsApp app.
- Simply proceed with entering your name, country and contact number. The app will verify your account. You are now ready to use this app.

Top 10 Fixes for Phone Keep Disconnecting from Wi-Fi On Vivo V29e
The revolutionized world is about the internet, online life, and social media. You can get all the information you need from the internet. You are a click away from booking tickets, buying groceries, calling your loved ones, or even you can handle office meetings with the internet.

Since everything revolves around the internet, it’s annoying if your WI-FI disconnects. You might question yourself why does my Wi-Fi keep disconnecting from the phone? To know the answer, read the article below.
Part 1: Why Does Your Phone Keep Disconnecting from WiFi?
Is your phone frequently getting disconnected from Wi-Fi? Or the internet service is lagging? We have a few options from which you can inspect your problem. Not all internet issues arise from the service provider, as some issues are because of the Vivo V29e devices that are using the internet. Some of these issues are discussed below for your assistance:
- Router Problems
If the internet provider is doing their job right, the router might not deliver you the right thing. Like other electronic devices, they can also misbehave. This can happen because the router is faulty, or it can happen because the firmware is outdated.
- Out of Wi-Fi Range
Why does My Vivo V29e keep disconnecting from Wi-Fi? It is because you might be out of range! The router’s placement is very important. The router transmits frequencies that have a limited range. If you are moving out of the range, the internet automatically disconnects.
- Wi-Fi Signals Getting Blocked
The signals from the router can dissipate from any other electronic device nearby. Signals like radio and microwaves can interfere with signal strength.
- Devices Connected with Router
Commonly, a house has around a dozen devices connected to the internet router. People do not think that the router has limited connection slots. It is unable to entertain a specific number of requests for service facilitation. The router has limitations; the service quality will drop if the limitations are exceeded. This drop in quality can also cause internet disconnection from devices.
- Unstable Internet
If your Vivo V29e gets disconnected frequently, then this disconnection is due to unstable internet, but apart from the above-mentioned problems, there is another reason for internet disconnection.
Sometimes, the internet is stable, but it still disconnects. This is because the internet service provider might not send the best quality internet you have acquired it for. If your internet is stable and the phone still keeps disconnecting, then head onto the next part that will share the top 10 fixes to sort out this issue.
Part 2: 10 Ways to Fix Wi-Fi Keep Disconnecting on Phone
As we have mentioned earlier if your Wi-Fi is stable, but it keeps disconnecting from Vivo V29e S22 or other Android phones, the coming section of this article is for you. We will provide you with 10 solutions with complete assistance to fix the “Wi-fi keeps disconnecting Android“ issue.
Fix 1: Restart Your Phone
If the Wi-Fi keeps disconnecting from your Vivo V29e, but the internet is stable, then you should try to fix the issue by restarting your phone. Sometimes, it’s the phone that’s causing a problem, so to resolve it, you can follow the steps given below:
Step 1: Firstly, unlock your phone. Now, press the Power button and hold it for a few seconds.
Step 2: Now, select the ‘Reboot’ option to resolve the issue from the options on the screen.

Fix 2: Check Router Settings
If your Android keeps disconnecting from Wi-Fi, you can also fix the problem by checking the router settings. This is because your phone might be blocked from connecting to the network, and if this is the scenario, your phone will never maintain the connection. You should check the Router’s admin panel or app to remove your phone from the blocklist.
Fix 3: Reconnect to Network
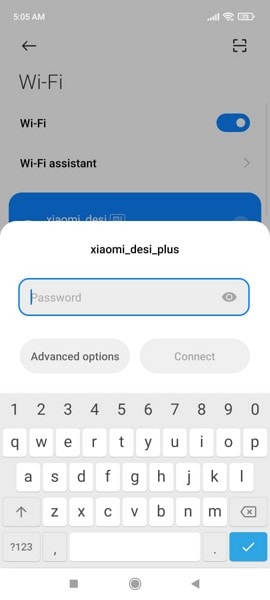
To fix the annoying problem that your Wi-Fi keeps disconnecting, you should try forgetting the network and then reconnecting to it. This could be done easily by following the steps below:
Step 1: First, you need to open the Wi-Fi settings menu. This could be done by pressing and holding the Wi-Fi option from the drop-down menu of your phone until the settings open up.

Step 2: A list of all the Wi-Fi networks will appear on the screen. Select the network that is causing trouble from that list and hit the ‘Forget Network’ option.
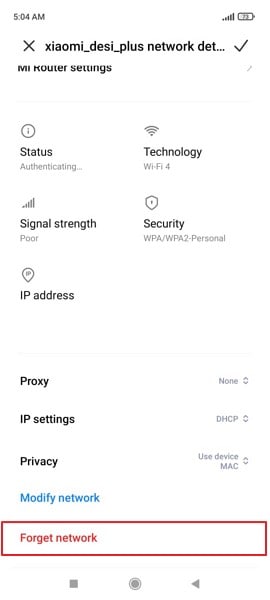
Step 3: After that, you should reconnect to this Wi-Fi network by selecting it from the Wi-Fi list and entering its password.
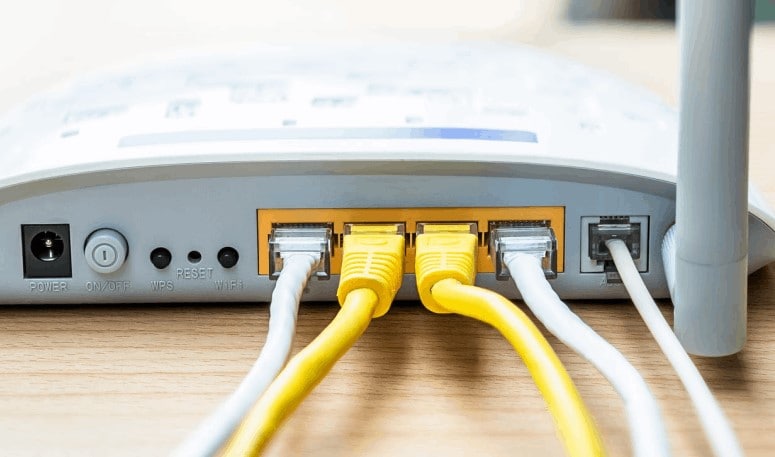
Fix 4: Restart Your Router
As we discussed, to restart your phone, you can also restart the router to get rid of the problem. For this, hit the restart button on the router to get a fresh start. If the Vivo V29e device has no button, disconnect the power supply and plug it back in to connect again. Most internet issues are resolved by restarting the router.
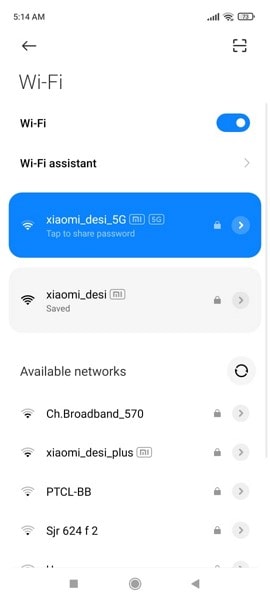
Fix 5: Forget Old Networks
The problem that your Wi-Fi keeps disconnecting can also occur because of the list of networks you have connected to. Having yourselves connected to different set of networks could turn out to be quite problematic in the process. In the process of finding and switching to the best network, your device’s Wi-Fi will continually disconnect and reconnect with the nearby networks. To finish this irritating issue, you should remove and forget all the extra networks that you connected previously.
Step 1: You should start by pressing and holding the Wi-Fi option from the drop-down menu on your phone until the Wi-Fi settings screen appears.

Step 2: You will see a list of all the Wi-Fi networks you have connected to previously. One by one, select each network and hit the ‘Forget Network’ button to remove it.
Fix 6. Check Recently Installed Applications
Sometimes, different installed applications can also cause trouble. If your Wi-Fi was fine, but suddenly it started disconnecting, then don’t forget to check the recently installed apps. This is because with not knowing the damage it can cause, you might have installed some VPNs, connections boosters, or firewalls. You can try and disable them but if that doesn’t resolve the problem, then uninstall the app.
Step 1: For uninstalling the problematic application, you have to select it and hold it. You will see a pop-up menu of multiple options; choose the option of ‘Uninstall’ to remove the app from the phone.
Fix 7: Reset Network Settings on your Phone
It’s annoying that your Wi-Fi keeps disconnecting while you are working or studying. Android users can easily get over this problem by resetting the network settings. The steps for this fix are as follows:
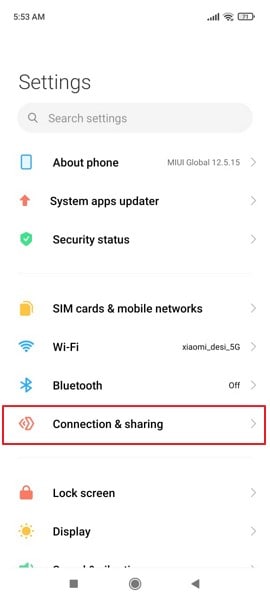
Step 1: For resetting the network, start by opening the ‘Settings’ menu on your phone. Then, scroll down, look for the ‘Connection & Sharing’ option, and select it.
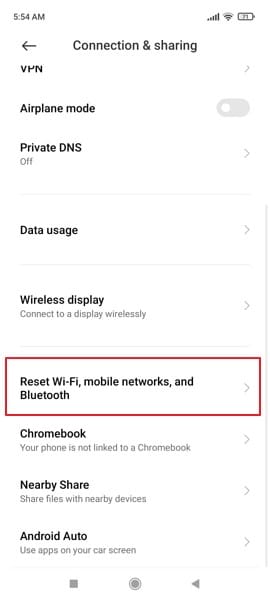
Step 2: As you progress onto a new screen, you will find the option of “Reset Wi-Fi, Mobile Networks, and Bluetooth” in the menu. Select the option to lead to the next window.
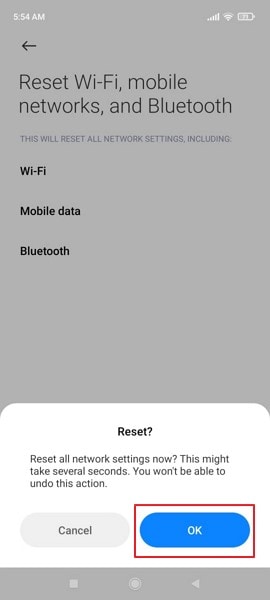
Step 3: Click on the option of “Reset Settings” present on the bottom of the next screen that shows up. Provide confirmation of resetting these settings by inserting your device’s PIN, if any.

Step 4: After providing the appropriate clearances, you will be asked for another confirmation of resetting the Vivo V29e device’s networks to default. Click “OK” to execute.
Fix 8: Check Routers Range
If your Wi-Fi automatically disconnects and connects again while you are roaming in the house, then it is because of the router’s range; you should check it. For this, you can consider changing and modifying your AP (Access Point) band on your router.
Although the 5GHz frequency band is recognized for providing better network speeds, this band has a shorter range as compared to the 2.4GHz band, which has a better coverage of area. You can easily shift your router’s range through its configuration page. It is considered optimal to utilize the 2.4GHz frequency band for better ranges.

Fix 9: Stay Connected while Asleep
Most Android phones have a battery-saving feature. This feature disables the network connections to save the battery of the phone. If this is why the Wi-Fi keeps disconnecting, follow the steps shared below to fix it:
Step 1: Start by opening the ‘Settings’ menu on your phone. Then scroll down until you find the ‘Battery’ option and open it.

Step 2: Then, from the battery screen, hit the ‘More Battery Settings’ options. Then, you will see the ‘Stay Connected while Asleep’ option; turn it on.

Fix 10: Upgrade Router Firmware
If none of the above-shared fixes work, the last fix to resolve the problem is upgrading your router firmware. For this, you should contact any professional who knows network operations as upgrading router firmware takes time and requires knowledge.
Wi-Fi Stay Connected
The article above has discussed 10 solutions that offer a comprehensive toolkit to tackle the persistent issue of Wi-Fi keeps turning off Android. By toggling Airplane Mode, restarting your device, adjusting settings, and updating firmware, among other steps, you can effectively address and resolve this connectivity problem. With these solutions at your disposal, you can regain a stable and uninterrupted Wi-Fi experience on your Vivo V29e.
Also read:
- [New] Charting a Course Through Websites of YouTube Affiliates for 2024
- [Updated] Curtail Unrequested YouTube Content Streams for 2024
- [Updated] Ghoul Gags Generator
- [Updated] Perfect Your Content Discover These Top 8 Mobile Editors
- 2024 Approved Navigating Windows 8 Movie Maker Like a Pro
- From Unwrapped to Personalized Perfection 10 Leading Shopping Platforms for 2024
- In 2024, Best Pokemons for PVP Matches in Pokemon Go For Vivo Y55s 5G (2023) | Dr.fone
- In 2024, The Comprehensible Guide to Earnings as a YouTube Channel
- In 2024, What is the best Pokemon for pokemon pvp ranking On Samsung Galaxy S24 Ultra? | Dr.fone
- Pokémon Go Cooldown Chart On Samsung Galaxy A14 4G | Dr.fone
- Pokemon Go Error 12 Failed to Detect Location On Vivo Y200? | Dr.fone
- Reasons why Pokémon GPS does not Work On Samsung Galaxy M34 5G? | Dr.fone
- The Genesis of Apple's M1 An Insight
- Title: How to Fix Error 495 While Download/Updating Android Apps On Vivo V29e | Dr.fone
- Author: Nova
- Created at : 2025-02-27 04:57:53
- Updated at : 2025-03-03 00:11:39
- Link: https://change-location.techidaily.com/how-to-fix-error-495-while-downloadupdating-android-apps-on-vivo-v29e-drfone-by-drfone-fix-android-problems-fix-android-problems/
- License: This work is licensed under CC BY-NC-SA 4.0.