
How to Fix Error 495 While Download/Updating Android Apps On Vivo V27 Pro | Dr.fone
How to Fix Error 495 While Download/Updating Android Apps On Vivo V27 Pro
Error 495 is a common error that occurs while downloading or updating apps from Google Play Store. This error is usually caused by a problem with the Google Play Store, and it can be fixed by clearing the cache and data of the Google Play Store app. If you are experiencing this error, follow the steps below to fix it.
In this article, you will learn why the Android error 495 pops up, possible solutions to bypass, as well as a dedicated repair tool to radically fix error 495.
We always like to explore every new feature or the features that already exist on our devices. We have a tendency to be the master of our device and want to know every bit of the handset. Unexpected errors ruin that experience and it is just frustrating to experience these errors. And the worst part is that we have no idea where we are wrong or what we did that led to the error. Same is the case with the error 495 which occurs due to downloading or updating of Android Apps. You may have spent countless hours on the internet to find the right solution for error code 495 but even after following many of the most guaranteed steps sometimes the error still doesn’t go away.
However, this article will provide you various methods to get rid of the Error 495 play store problem that you face and you will not have to depend on any other sources for your solution.
Reasons for Google play error 495
Android Apps are most commonly downloaded from the Google Play Store with the help of Wi-Fi or Cellular Data. One may come across many types of errors. Mostly the errors come in during the download or update or installing time. Error 495 occurs when the user isn’t being able to download or install an app over Wi-Fi, but the user is able to do the same thing over cellular data.
Technically speaking, the issue is caused when the connection to the Google Play servers, where the app is hosted, times out. Which is unable to resolve by itself.
Also, there could be another reason that it cannot sync with the servers.
Now that we know the possible reasons for the error 495, let us also know how to get rid of it in the sections below.
Solution 1: One Click to Fix error 495 by Android Repair
Tried several methods to make the error 495 disappear, but nothing works? Well, many people have experienced the same frustration. The root cause is that something is wrong with the Android system. You need to have your Android system repaired to fix error 495 in this situation.
Note: Having your Android system repaired may lose existing data on your Android. Backup the data on your Android before the Android repair.
Dr.Fone - System Repair (Android)
Best tool for fundamental Android repair in one click
- Fixes all Android system issues like error 495, system UI not working, etc.
- One click for Android repair. No special technics needed.
- Supports all the new Vivo V27 Pro devices like Galaxy Note 8, S8, S9, etc.
- Step-by-step on-screen instructions provided to fix error 495 without any hassle.
3,390,486 people have downloaded it
With Dr.Fone - System Repair (Android) , you can easily fix error 495 in few steps. Here is how:
- Download, install, and launch Dr.Fone - System Repair (Android). Connect your Android to your computer with a USB cable.

- Select the option “Repair” > “Android Repair”, and click “Start”.

- Select the Vivo V27 Pro device information like brand, name, model, etc., and confirm your selection by typing in “000000”.

- Press the stated keys to boot your Android in download mode to download the firmware as instructed.

- After the firmware is downloaded, the program will automatically start to repair your Android.

Solution 2: Clear the Google Service Framework cache to Fix error 495
Step 1:
Go to the “settings” of your device. Once the series of sections comes up, tap on the “APPS” section.
Step 2:
Click on ‘All Apps’ or ‘Swipe to All’ and the open the section named “Google Services Framework App”
 .
.
STEP 3:
Open “App Details” and the screen shown in the image should come up on your device. As shown in the image, follow the three steps. First, tap on “Force Stop” and then second, tap on the “Clear Data” option and finally go ahead and tap on the “Clear Cache” option.
Following the above steps should solve your problem of Google Play Error 495. And you can enjoy back to using the apps which you couldn’t download or update due to the Error 495.
Solution 3: Reset App Preference in Google play Store to Fix error 495
STEP 1:
Go to the settings section in your device. It will be differently placed for different devices and different users.

STEP 2:
Once the Settings section is open. A lot of further sections will pop up. No find the section named “Application Manager” or “Apps”. After locating it, tap on that section.

STEP 3:
Now go ahead and tap or slide to a section named “ALL”.
STEP 4:
After reaching the “ALL” section tap the touch button to open menu/properties and choose an option named “Reset Apps” or “Reset App Preferences”.
There’s no need to be alarmed because on clicking the reset option, the apps won’t be deleted but it is only going to re-set them. And hence solving the Error 495 created in the Google Play.

Solution 4: Fix Error Code 495 by installing a VPN app
The Error code 495 can be easily removed in another interesting way too. On downloading a Virtual Private Network (VPN) and then operating the play store automatically solves the error 495.
STEP 1:
Install Hideman VPN (using any other VPN will also make it work) from Google Play store. (If the error persists for this app too then download it from a different app store or by using a third-party store).
STEP 2:
Now open the app and select the United States as the country of connection and press the option named Connect.
STEP 3:
Open Google Play Store and Download any app without the Error Code 495 coming in and bothering.
This fix will work for most of the Google Play Errors and not just only The Error Code 495.
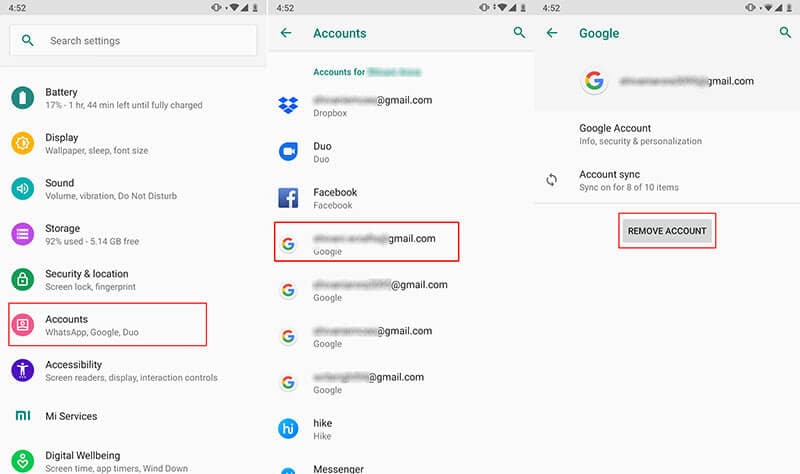
Solution 5: Remove your Google Account & Reconfigure it to fix error 495
Removing the Google account and re-configuring it is a very common method adopted to get rid of the Error 495. Adopt the following steps to complete this method.
STEP 1:
Go to the “Settings” section of your device. Like it was mentioned before, different devices and different users will have the placement of the settings section in a different place.

STEP 2:
Go to the accounts section in the settings tab.

STEP 3:
In the accounts section tap on the Google Account part
STEP 4:
Inside The Google section, there’ll be an option called “Remove Account”. Tap on that section, to remove your google account.

STEP 5:
Now go ahead and re-enter/ re-register your Google account and check if the Error 495 still persists.
Now you have completed all the steps and your problem should be solved.
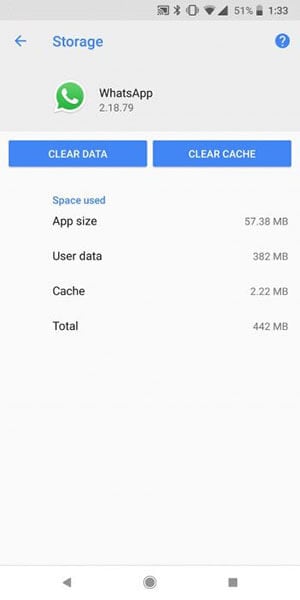
Solution 6: Fix error code 495 by Removing your Google Play Store Data & Cache
One of the best and most accurate methods in the series of various steps in eradicating the Error Code 495 in Google Play Store is by removing the Google play Store Data and Cache. In order to do so follow the steps mentioned below. After following the steps it is guaranteed that the Error code 495 will be done with and you won’t experience any such problems in the future.
STEP 1:
Go to the “Settings” section into your mobile device. The settings can be accessed by scrolling down and pulling down the drop-down menu and most likely the settings app will be on the top-right corner. Otherwise, it will be found after opening the app drawer.

STEP 2:
Once after opening the settings section, select the “Installed apps” or the “Apps” section.

STEP 3:
Find the “Google Play Store” section and select that too.
STEP 4:
Tap on the “Clear data” & “Clear Cache”.

Doing the above steps will clear your caches of the Google Play Store. Now you have a new google Play store.
Hence in this article, we got to know about the error 495 and the possible solutions to it as well. Also, this article explains how Error code 495 can be removed by 5 different ways. These are the best ways by which you can remove or get rid of the Error Code 495. In case one of the method fails, use the other one to rectify this recurring error 495 on your Vivo V27 Pro.
6 Fixes to Unfortunately WhatsApp has stopped Error Popups On Vivo V27 Pro
Ever seen a wheel going on without cog? Similarly, WhatsApp has become the cog of our lives. Be it in the professional era or personal (gossips, oomph) stuffs, it is a crucial engaging kind of application. WhatsApp is the slow poison yet a useful tool used worldwide after call logs or messages. Imagining a day without is enough to put someone off. And if one has recently faced a problem in WhatsApp crashing or not opening, then it is enough to give a heart break. It can be due to Cache memory piled up, storage running out of space, WhatsApp components getting corrupted. In such a case, resolving the problem by using an effective solution is very important! Don’t worry and wander as we will provide impeccable range of fixes to bid bye to WhatsApp stopping problem.
Cause 1: WhatsApp-related Firmware Components went wrong
You should start fixing the WhatsApp crashing issue with fixing the Android firmware. This is because the Android firmware components are many times the hidden culprit behind the problem of why a particular app stops working. And to fix these components in one click, you need Dr.Fone - System Repair (Android). It is one of the safest tools around in the market and works efficiently with Android system issues. It promises to bring your device back to normal and healthy state. Here are the benefits you get with this amazing tool.
Dr.Fone - System Repair (Android)
Android repair tool to fix firmware component issues
- Fixes all kinds of Android system issues with ease
- Supports 1000+ Android device in a hassle-free way
- Really easy to use and free from any virus infection
- One needn’t to be a tech pro to use this tool
- Can be downloaded for free and repairs the Vivo V27 Pro device in few easy steps
4,388,871 people have downloaded it
Step 1: Download Dr.Fone Tool
To start repairing, go to the official website of Dr.Fone - System Repair (Android) and download it. Install it and then open the tool on your PC. To proceed, look for the “System Repair” tab and click on it.
Step 2: Choose the Right Tab
As the next step, you need to take the help of USB cable and then plug your device to the computer. Once connected appropriately, make sure to click on the “Android Repair” tab from the left panel.
Step 3: Enter Details
Next will be the information screen. Simply enter the model, brand and other details. Check everything once and click on “Next”.

Step 4: Enter Download Mode
Subsequently, you need to go along with the onscreen instructions. This will boot your device in the download mode. The step is necessary to download the firmware. When you follow the steps, you need to click “Next”. The program will then start downloading the firmware.

Step 5: Repair Android
Now, you just have to sit back and relax. The program will begin to repair your device. Wait until you get the notification for completion.
Cause 2: Cache conflict
The purpose of Cache in a device is to keep the track of frequently used data and information of an application. And when there are the files or data that are corrupted in the cache, this might raise the “Unfortunately WhatsApp has stopped” error. Therefore, you need to clear the WhatsApp data if the above method went futile. Here are the steps.
- Open “Settings” and go to “App Manager” or “Apps & Notifications” or “Applications”.
- Now, from the list of all applications, choose “WhatsApp”.
- Click on “Storage” and tap “Clear Data”.
Cause 3: WhatsApp components corruption
A lot of times, the WhatsApp crashes due to the corrupted components of WhatsApp. In such case, all you need to do is uninstall and install the WhatsApp again. This is how you do it.
- Uninstall the app right away from your Homescreen or from the “Settings” > “Applications” > “All” > “WhatsApp” > “Uninstall” (for some phones).
- Go to “Play Store” and search “WhatsApp” on the search bar.
- Tap on it and start downloading followed by installing it.

Cause 4: Not Enough Storage on your Phone
Insufficient storage could be the other reason why for your WhatsApp has stopped. When your device starts running out of space, some apps may not be able to operate properly for their functions take up space in the Vivo V27 Pro device. And probably WhatsApp is one of them. If the space is the case with you, we suggest you the following two things to go with.
- Firstly, go to Settings and check the storage. Make sure it is enough i.e. at least 100 to 200MB.
- Secondly, start eliminating the apps that are no longer needed. This will indeed create more space in your device and will let your WhatsApp wok properly.
Cause 5: Gmail Account no longer valid or hacked
It is a well-known fact that Android device and Gmail account go hand in hand. To run the Vivo V27 Pro device smoothly, it is always asked to enter your Gmail address for further configurations. And when WhatsApp stops on your device, the reason might be your Gmail account. Most probably it is not valid now or maybe hacked. If this is the case, we suggest you to log out and log in with some another Gmail account.
- Log out by opening “Settings” and tap on “Accounts”.
- Choose your Google account and tap on “REMOVE ACCOUNT”.
Now, you can login again and check if WhatsApp works or not.
Cause 6: WhatsApp Incompatible with your Android Phone
If still nothing works and your WhatsApp keeps stopping, most likely the reason is the incompatibility of your WhatsApp with your device. In such case, the thing that comes to your rescue is mod WhatsApp version like GBWhatsApp. It is a mod app which is similar to WhatsApp but in a more modified way. With this, a user gets more functionalities and customizable settings when compared to WhatsApp.
If you’re wondering how you can find this app and install, you should keep reading.
To find GBWhatsApp:
Since you can look for this mod app on the Play Store, here are some of the other secure places from where you can download apk file for this GBWhatsApp. Note down these websites to get GBWhatsApp downloaded if WhatsApp has stopped.
- Latest Mod APKs
- UptoDown
- Android APKs Free
- Soft Alien
- OpenTechInfo
To Install GBWhatsApp:
Now that you have decided where to download the apk file, these are the following steps that you should follow to install it on your phone. Please have a look:
- Firstly, open “Settings” on your device and go to “Security”. Turn the “Unknown Sources” option. Doing this will let you install the apps from other locations than Play Store.

- Using the browser on your phone, download the app from any of the aforementioned website.
- Launch the GBWhatsApp apk and follow the onscreen instruction in order to install. You need to go in a similar way as you do in mormal WhatsApp app.
- Simply proceed with entering your name, country and contact number. The app will verify your account. You are now ready to use this app.

Vivo V27 Pro Camera Not Working Unexpected Error? Fix It Now
For all its glory and goodness, the Android OS often has its users pulling their hair in frustration at just how buggy the OS can be at times. So, if you’re having one of those days today, we are here to help. Camera app is one of the most used apps on smartphones today. People only launch the app when they want to take a photo, for everything else there’s a dedicated photo gallery app. What happens when you launch the camera app only to realize it threw an error and you missed your photo moment? Don’t throw the phone, not yet. Let us help you out.

Part I: Why Is Android Camera Not Working?
There are a few reasons why the camera app is not working on your Vivo V27 Pro.
Low Memory
Camera app does rely heavily on system resources, so in case you have too many apps open and for some reason the OS is not able to manage the resources appropriately for the camera app to function as it should, you will get a camera error.
Low Storage
The camera app needs storage space to save the photos it takes. So, in case your phone is running low on storage space, the camera app would likely malfunction as it would have no way to store the photos it would be taking.
General Bugs And Glitches
OS bugs and general glitches within the OS and the camera app can cause camera not working issue anytime during everyday operation. This is part and parcel of any technology.
Hardware Issues
In the rarest cases, there might have developed an actual hardware issue with the camera system on your Vivo V27 Pro. The likely culprit is misuse and abuse, such as a dropped phone or maybe the phone was too hot for extended periods of time, causing hardware issues.
Part II: How To Fix Android Camera Not Working Issue?
So, how to get the Android camera not working problem solved? There are a few ways you can try fixing the camera not working issue on your Vivo V27 Pro right where you are, without needing to take the Vivo V27 Pro device to the manufacturer’s service center.
II.I: Restart The Handset
One of the first things to do any time an app or your phone or tablet does not work like it should, restarting the Vivo V27 Pro device refreshes everything just enough to resolve most commonly occurring issues.

Use the power button on your smartphone to restart your Android handset and see if this resolves the issue.
II.II: Close And Relaunch The Camera App
If the camera app (or any app for that matter) has been in the background for a while and then it is brought to the foreground, there are always chances of it crashing for any reason, or not working as expected. So, closing the app completely and relaunching it is recommended.
Step 1: Launch the app switcher on your specific Android device the way your device manufacturer suggests you to. Usually, it is a swipe up and hold gesture to get into the app switcher.

Step 2: Next, you can choose to close just the camera app or, better yet, close all apps by tapping the Close All button. Flicking any app upwards (quick upward swipe) is how you close an app. If there is no Close All button anywhere, repeat the gesture for all open apps.
II.III: Check App Permissions
These days, thanks to strides in the privacy initiatives, apps need permissions before they can function the way they do. Most of the times, apps such as camera do have the necessary permissions, but sometimes it is possible that the permissions are set incorrectly. To check if the camera app has the requisite permissions, do the following:
Step 1: Go to Settings > Apps > Camera > Permissions.

Step 2: Tap Camera.

Step 3: See if the selected option is Allow Only While Using This App. If not, select it.
II.IV: Clear The Camera App Cache
Clearing the camera app cache is sometimes helpful. To do that:
Step 1: Go to Settings > Apps > Camera and tap Storage Usage.

Step 2: Tap Clear Cache.

II.V: Clear The Photo Gallery App Cache
The camera app is closely tied to the photo gallery app that comes baked in into Android OS. That is because photos that the camera app takes are stored in the photo gallery app. Consequently, if there were any issues in the photo gallery app, that could lead to the camera app not working on Android problem. Here’s how to clear the photo gallery app cache:
Step 1: Go to Settings > Apps > Photos > Storage Usage.

Step 2: Tap Clear Cache.
II.VI: Check For App Updates
This does not happen always, but sometimes, with known bugs and issues, there may be an update released that fixes those bugs and issues that prevent some users from using a given app reliably. Checking for updates is a good step to make sure that your camera app is updated to the latest version possible.
Step 1: Go to Play Store and tap your profile picture on the right.

Step 2: Tap Manage Apps and Device.

Step 3: If there are updates available, Tap Update All to update all apps.
II.VII: Cool The Phone Down
We do not realize the immense power that is packed into the thin smartphone form factor these days. If you have been using the phone to video chat for a while now, you might not realize that the phone has become hot, especially if you are using a desk stand. Same for shooting high-resolution videos; the phone does get quite hot shooting high-resolution videos.
If this is the case, close all apps and let the phone cool down. You might even want to shut the phone off to help cool it faster.
II.VIII: Nudge The Camera System
You may want to tap your camera system (the lenses and surrounding area) gently to see if that gets the camera working. In case it did, this is indicative of a hardware issue, and you should get it checked at the service center at your earliest convenience.
II.IX: Fix Android Camera Not Working Issue In One Click (With Dr.Fone)
Now, if the above fixes have not worked, you might want to repair your Android OS once before you make that appointment with the service centre. And, we have just the app to help you fix your camera not working on Android problem quickly.
Wondershare Dr.Fone is a multi-module app that works on both Windows and macOS and is the only app you will ever need to resolve nearly all of your smartphone and tablet issues that you are likely to encounter. Need to take backups? Dr.Fone Phone Backup has you covered with the ability to take and restore even selective backups, and to any location such as your computer or an external disk as well. Want to transfer WhatsApp chats to a new phone? Use WhatsApp Transfer to do just that! Bought a new phone? Use Phone Transfer to transfer contents from old phone to new, and then use Dr.Fone Data Eraser to securely wipe your old phone before giving it away!
Today, we will use Dr.Fone’s System Repair (Android) module to fix Android camera not working issue quickly.
Download Dr.Fone here.
 safe & secure
Step 1: Launch Dr.Fone app on your PC or Mac.
Step 2: Click System Repair module and then Android.

Step 3: For now, don’t bother with the scenarios given and click Start to go to the next screen.
Step 4: Your Android device will be detected by Dr.Fone. If anything seems incorrect, use the dropdown options to change it, and click Next.
Step 5: Your phone needs to be put into Download mode before it can be repaired. Follow the instructions shown onscreen and click Next.

Step 6: Dr.Fone automatically downloads the most recent firmware for your device and when it is ready, waits for your input. Click Fix Now to start the repair process.

Step 7: You will need to enter a 6-digit code (digit zero, six times – 000000) to confirm and begin the repair process.
When the repair is complete, Dr.Fone shows the final screen as below:

safe & secure
Conclusion
The camera app on your smartphone is one of the most important apps you use. This is not a game; this is an app that makes previous memories possible for you. So, when you get any of those incorrigible errors that are impossible to make sense of, what do you do? This guide gives you 9 fixes to fix Android camera not working error quickly and easily.
Also read:
- [Updated] 2024 Approved A Beginner’s Guide to Mastering Windows 11 Movie Maker Effortlessly
- [Updated] Pro Photoshop Power Top 10 Canva Design Secrets for 2024
- Fixing dnssd.dll Misplacement or Loss Error in Windows 10
- Full Guide to Catch 100 IV Pokémon Using a Map On Vivo X Fold 2 | Dr.fone
- Guide: Disabling Auto-Screen Activation by Android Notification Alerts
- How to Fix Android.Process.Media Has Stopped on Vivo Y100 5G | Dr.fone
- How to Fix It Honor X9b Wont Turn On | Dr.fone
- How to Get and Use Pokemon Go Promo Codes On Samsung Galaxy M14 4G | Dr.fone
- In 2024, Full Tutorial to Bypass Your Infinix Hot 40 Face Lock?
- In 2024, Navigating the Dangers of Fabricated Followers on Feed
- In 2024, Pokemon Go No GPS Signal? Heres Every Possible Solution On Samsung Galaxy F14 5G | Dr.fone
- List of Pokémon Go Joysticks On Vivo T2 Pro 5G | Dr.fone
- Smartwatch Showdown: Navigating Features and Performance of the Apple Watch Ultra Vs. Series N
- The Ultimate Guide to Effortless Zooming on Snapchat
- Title: How to Fix Error 495 While Download/Updating Android Apps On Vivo V27 Pro | Dr.fone
- Author: Nova
- Created at : 2025-02-25 04:51:23
- Updated at : 2025-03-02 18:34:19
- Link: https://change-location.techidaily.com/how-to-fix-error-495-while-downloadupdating-android-apps-on-vivo-v27-pro-drfone-by-drfone-fix-android-problems-fix-android-problems/
- License: This work is licensed under CC BY-NC-SA 4.0.