
How to Fix Error 495 While Download/Updating Android Apps On Poco C51 | Dr.fone
How to Fix Error 495 While Download/Updating Android Apps On Poco C51
Error 495 is a common error that occurs while downloading or updating apps from Google Play Store. This error is usually caused by a problem with the Google Play Store, and it can be fixed by clearing the cache and data of the Google Play Store app. If you are experiencing this error, follow the steps below to fix it.
In this article, you will learn why the Android error 495 pops up, possible solutions to bypass, as well as a dedicated repair tool to radically fix error 495.
We always like to explore every new feature or the features that already exist on our devices. We have a tendency to be the master of our device and want to know every bit of the handset. Unexpected errors ruin that experience and it is just frustrating to experience these errors. And the worst part is that we have no idea where we are wrong or what we did that led to the error. Same is the case with the error 495 which occurs due to downloading or updating of Android Apps. You may have spent countless hours on the internet to find the right solution for error code 495 but even after following many of the most guaranteed steps sometimes the error still doesn’t go away.
However, this article will provide you various methods to get rid of the Error 495 play store problem that you face and you will not have to depend on any other sources for your solution.
Reasons for Google play error 495
Android Apps are most commonly downloaded from the Google Play Store with the help of Wi-Fi or Cellular Data. One may come across many types of errors. Mostly the errors come in during the download or update or installing time. Error 495 occurs when the user isn’t being able to download or install an app over Wi-Fi, but the user is able to do the same thing over cellular data.
Technically speaking, the issue is caused when the connection to the Google Play servers, where the app is hosted, times out. Which is unable to resolve by itself.
Also, there could be another reason that it cannot sync with the servers.
Now that we know the possible reasons for the error 495, let us also know how to get rid of it in the sections below.
Solution 1: One Click to Fix error 495 by Android Repair
Tried several methods to make the error 495 disappear, but nothing works? Well, many people have experienced the same frustration. The root cause is that something is wrong with the Android system. You need to have your Android system repaired to fix error 495 in this situation.
Note: Having your Android system repaired may lose existing data on your Android. Backup the data on your Android before the Android repair.
Dr.Fone - System Repair (Android)
Best tool for fundamental Android repair in one click
- Fixes all Android system issues like error 495, system UI not working, etc.
- One click for Android repair. No special technics needed.
- Supports all the new Poco C51 devices like Galaxy Note 8, S8, S9, etc.
- Step-by-step on-screen instructions provided to fix error 495 without any hassle.
3,390,486 people have downloaded it
With Dr.Fone - System Repair (Android) , you can easily fix error 495 in few steps. Here is how:
- Download, install, and launch Dr.Fone - System Repair (Android). Connect your Android to your computer with a USB cable.

- Select the option “Repair” > “Android Repair”, and click “Start”.

- Select the Poco C51 device information like brand, name, model, etc., and confirm your selection by typing in “000000”.

- Press the stated keys to boot your Android in download mode to download the firmware as instructed.

- After the firmware is downloaded, the program will automatically start to repair your Android.

Solution 2: Clear the Google Service Framework cache to Fix error 495
Step 1:
Go to the “settings” of your device. Once the series of sections comes up, tap on the “APPS” section.
Step 2:
Click on ‘All Apps’ or ‘Swipe to All’ and the open the section named “Google Services Framework App”
 .
.
STEP 3:
Open “App Details” and the screen shown in the image should come up on your device. As shown in the image, follow the three steps. First, tap on “Force Stop” and then second, tap on the “Clear Data” option and finally go ahead and tap on the “Clear Cache” option.
Following the above steps should solve your problem of Google Play Error 495. And you can enjoy back to using the apps which you couldn’t download or update due to the Error 495.
Solution 3: Reset App Preference in Google play Store to Fix error 495
STEP 1:
Go to the settings section in your device. It will be differently placed for different devices and different users.

STEP 2:
Once the Settings section is open. A lot of further sections will pop up. No find the section named “Application Manager” or “Apps”. After locating it, tap on that section.

STEP 3:
Now go ahead and tap or slide to a section named “ALL”.
STEP 4:
After reaching the “ALL” section tap the touch button to open menu/properties and choose an option named “Reset Apps” or “Reset App Preferences”.
There’s no need to be alarmed because on clicking the reset option, the apps won’t be deleted but it is only going to re-set them. And hence solving the Error 495 created in the Google Play.

Solution 4: Fix Error Code 495 by installing a VPN app
The Error code 495 can be easily removed in another interesting way too. On downloading a Virtual Private Network (VPN) and then operating the play store automatically solves the error 495.
STEP 1:
Install Hideman VPN (using any other VPN will also make it work) from Google Play store. (If the error persists for this app too then download it from a different app store or by using a third-party store).
STEP 2:
Now open the app and select the United States as the country of connection and press the option named Connect.
STEP 3:
Open Google Play Store and Download any app without the Error Code 495 coming in and bothering.
This fix will work for most of the Google Play Errors and not just only The Error Code 495.
Solution 5: Remove your Google Account & Reconfigure it to fix error 495
Removing the Google account and re-configuring it is a very common method adopted to get rid of the Error 495. Adopt the following steps to complete this method.
STEP 1:
Go to the “Settings” section of your device. Like it was mentioned before, different devices and different users will have the placement of the settings section in a different place.

STEP 2:
Go to the accounts section in the settings tab.

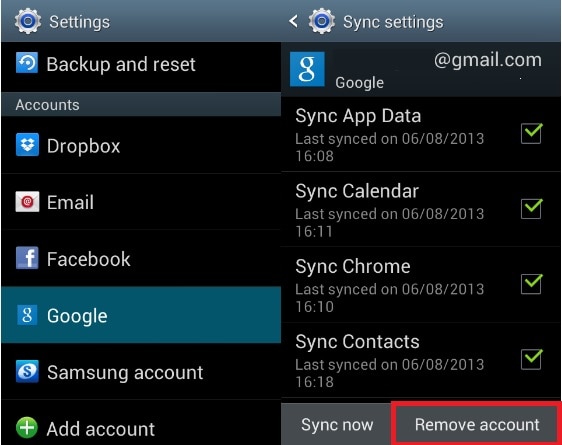
STEP 3:
In the accounts section tap on the Google Account part
STEP 4:
Inside The Google section, there’ll be an option called “Remove Account”. Tap on that section, to remove your google account.

STEP 5:
Now go ahead and re-enter/ re-register your Google account and check if the Error 495 still persists.
Now you have completed all the steps and your problem should be solved.
Solution 6: Fix error code 495 by Removing your Google Play Store Data & Cache
One of the best and most accurate methods in the series of various steps in eradicating the Error Code 495 in Google Play Store is by removing the Google play Store Data and Cache. In order to do so follow the steps mentioned below. After following the steps it is guaranteed that the Error code 495 will be done with and you won’t experience any such problems in the future.
STEP 1:
Go to the “Settings” section into your mobile device. The settings can be accessed by scrolling down and pulling down the drop-down menu and most likely the settings app will be on the top-right corner. Otherwise, it will be found after opening the app drawer.

STEP 2:
Once after opening the settings section, select the “Installed apps” or the “Apps” section.

STEP 3:
Find the “Google Play Store” section and select that too.
STEP 4:
Tap on the “Clear data” & “Clear Cache”.

Doing the above steps will clear your caches of the Google Play Store. Now you have a new google Play store.
Hence in this article, we got to know about the error 495 and the possible solutions to it as well. Also, this article explains how Error code 495 can be removed by 5 different ways. These are the best ways by which you can remove or get rid of the Error Code 495. In case one of the method fails, use the other one to rectify this recurring error 495 on your Poco C51.
Full Solutions to Fix Error Code 920 In Google Play on Poco C51
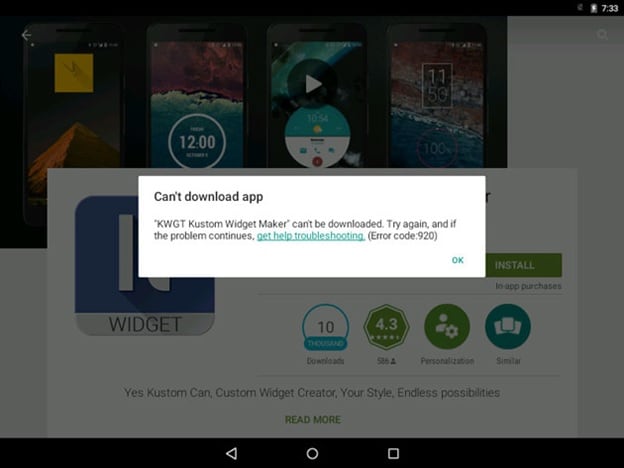
If you are using an Android device, you might have encountered the error code 920 in Google Play Store. This error usually occurs when you are trying to download or update an app from the Google Play Store. The error code 920 can be quite frustrating, as it prevents you from downloading or updating your favorite apps. However, there are several ways to fix this error and get your apps back up and running. In this article, we will show you some of the best solutions to fix error code 920 in Google Play Store on Poco C51.
Trust me, once you face an error it’s frustrating until you find a solution to it. Almost 90 % of the time we search on the internet for an appropriate solution. But finding a legitimate solution can be hard. Most websites just upload only one method to solve an error. And most times that one single method may not be enough for us. And again we are back to Square one trying to figure out what’s wrong and where we screwed up. Most people face an error 920 on play store. It’s frustrating to get the play store error 920.And not everyone knows what the error 920 is. Rest assured, this article will provide you four methods to get rid of the error 920 problems you face and you will not have to depend on any other further sources for finding out what play store error 920 is or find any other method to get rid of the error 920 on play store.
- (i) Re-installing the application
- (ii) Switching off and turning the wifi (cellular data) on
- (iii) Clearing the cache and data of Google Play Store
- (iv) Removing and adding back your Google account
Part 1: What is Error Code 920?
Sometimes people think that they have endangered the fate of humanity because of the error that is being displayed (Just Kidding). Don’t worry you haven’t crashed any server or did any damage to your device but you just gave your device a lot of work. Before you got this error you were downloading a lot of apps right. Well, that’s the exact reason why you came up with this error in the first place. There are various reasons behind this error code 920, however, the prominent ones are –
- a. Too much load on your data connection.
- b. The cache is not cleaned. Thus the connection is getting hampered due to overload.
- c. Network connection is not stable.
There are a lot of Android users out there and the error 920 on play store doesn’t have a unique solution. You’ll have to try out a bunch of them and find out what works for your device. So one of the given four methods below is definitely going to work on your device.
Part 2: 5 Solutions to fix error 920
METHOD 1: Fix Error Code 920 By Android Repair
If you’re writing a lot of data to your device in one go, this can sometimes overload your phone which can cause data corruption. This could have happened if you try the method above and then still encounter the play store error 920.
If this is the case, there’s a solution known as Dr.Fone - System Repair that can help. This is an industry-leading package that has everything you need to get your device running as it should be.
Dr.Fone - System Repair (Android)
Easiest Fix to Error Code 920
- Easy operation with no technical knowledge required
- Simple, one-click play store error 920 fix
- Clean and simple to understand user-interface
- Supports various Poco C51 devices, including the latest Poco C51 S9/S8
- The #1 Android repair software in the world
3,545,081 people have downloaded it
If this is the answer you’re looking for to help you fix your error code 920 problems, here’s a step by step guide on how to use it;
Note: please note that this method may erase all personal data on your device, so make sure you’ve backed up your device before continuing.
Step #1 Head over to the Dr.Fone website and download the Repair software for your Windows computer.
Step #2 Once installed, open the software and select the ‘System Repair’ option from the main menu.
Then connect your Poco C51 using the official cable and select the ‘Android Repair’ option.
Step #3 On the next screen, insert your device information to ensure you’re downloading the correct firmware.

Step #4 Put your phone into Download mode by following the onscreen instructions.
Dr.Fone will now download your firmware and automatically install it onto your device. Your phone will then reset, and you’ll be ready to use it without experiencing that annoying error 920 play store code!
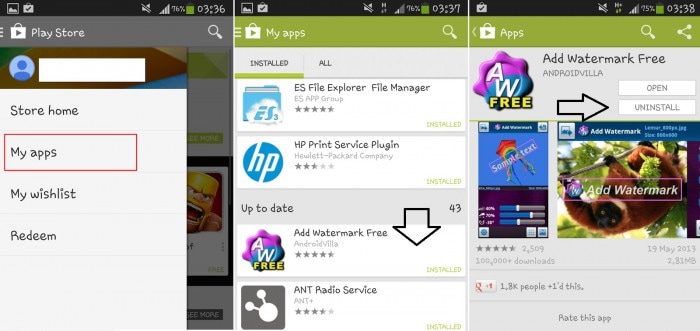
METHOD 2: Re-installing the application
This is the first thing that you want to try before going on to the more advanced one. In fact, this is the first thing I’d recommend you to try if you come up with an Error code 920. Just try this whenever you get any error.
Step 1 - Go to the application that you got the error with.
Step 2 - Open that application download page on the Play store.
Step 3 - Uninstall it or even uninstall all the update (If the error came when you were updating the application).
Step 4 - Now you clear the task manager and try installing it once again. If the play store error 920 doesn’t come then you have solved the problem and now wasn’t that easy. So it’s always best to try this step before doing anything else.
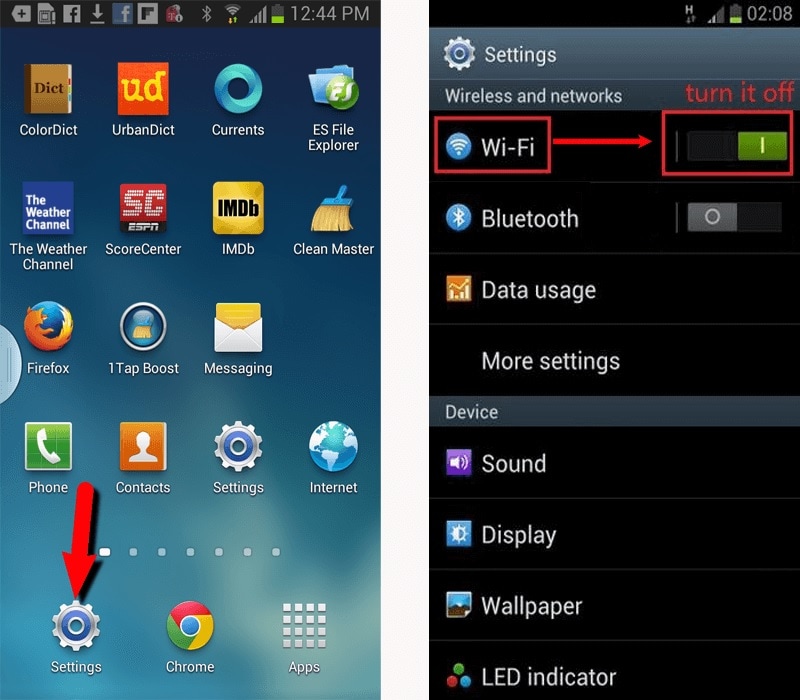
METHOD 3: Switching off and turning the wifi (cellular data) on
This is another basic method in solving the play store error 920. This error comes in when you have given too many tasks to download.
Step 1 - To remove that load Just turn your wifi off and then turn your wifi on (the same goes with your cellular data).
Step 2 - Now after doing this go to your Play Store application and download the application that you were going to download. Now your Play Store Error 920 won’t be bothering you anymore.
METHOD 4: Clearing the cache and data of Google Play Store
This is a little more complicated (complicated as in you will need to do a little more than the previous two methods). What you need to do is clear the cache and clear the data of the play store. This will get rid of the error code 920 the next time you download or update any application from the Google Play store.
Step 1 – Go to settings of your device.
Step 2 – Now find “Applications” option under the settings menu. Here you can find “Google Play Store” option. Open it.
Step 3 – Now, at the bottom, you can find “Clear Cache” option. Tap on it and your all cache will be cleared.
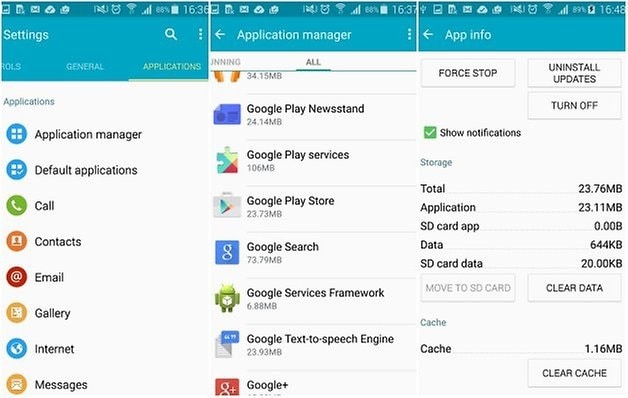
After doing this step clear your task manager (delete all recent applications). Go to play store and resume your download or update.
METHOD 5: Removing and adding back your Google account
It is best if you follow the order of the methods mentioned. Like, try each method in the given order until you get rid of the play store error 920. If you reach here then you truly must be in a desperate position to get rid of this error. The best and guaranteed way is to delete your Google account from your phone. By deleting what is meant here is to temporarily remove your account and the adding it in again. What this does is it kind of resets your play store details and it eradicates the error code 920. To do this you need to
Step 1 - go to Settings of your Mobile.
Step 2- Now, find “Accounts” and then go to “Google Accounts”.
Step 3 - In that section find the account you use for the play store or the account that you were using while the error came in. Once you tap on your specific account you’ll find an option to remove the account. Tap on it.
Step 4 - Now you have successfully removed your account and after that re-add your account. After entering your email id and password and hence adding your account. Go back to the play store and find the application that you were downloading or updating when the error code 920 came in. Now re-install it or update it back again. This time you won’t be faced with the play store error 920.
Again it is best if you follow the methods as illustrated above for removing error code 920 and this might have solved your problem by now. If now, you go for a complete factory reset, do it only at the extreme stage as this will delete all your personal data.
Play Store error 920 is a pretty common error and its solutions are also very easy. Please do ensure that you follow each and every step in sync so that you can get the best result out of these methods and get over with the error code 920 on Google play store.
Poco C51 Not Receiving Texts? 10 Hassle-Free Solutions Here
If you are using an Poco C51, you might have encountered the issue of not receiving texts. This issue can be quite frustrating, as it prevents you from staying connected with your friends and family. However, there are several ways to fix this issue and get your texts back up and running. In this article, we will show you some of the best solutions to fix the issue of not receiving texts on Poco C51.
It is very common that the Android messaging app is not working on many devices especially broken devices . People often encounter this issue in Poco C51 phones, even the latest ones.
You might find lots of people online stating I can’t receive text messages on Android. And usually, people don’t find a legit solution for this issue. If you are also experiencing this sort of issue on your Poco C51s, then don’t panic. We have a series of methods that can supposedly fix the problem. But at first, we will learn what the main reasons this problem arises are and how do you know that it is consistent not some random error.
Take a look at the sections below, and you will learn all possible things regarding the messaging application on your phone.
Part 0. Symptoms and Causes of Android Not Receiving Texts
The most common symptoms that would clarify that your Android messaging service is not working right are given below:
- You will stop receiving any texts all of a sudden.
- You can’t send or receive a text message.
- Whenever you try to text someone, the message sent failed notification pop up on the screen.
The reasons why your Android is not receiving texts are given below:
- Network issue
- Insufficient memory
- Mis-configuration of device settings
- Switching of devices
- A glitch in the messaging app
- Software issue
- Carrier problem with the registered network.
Apart from all these reasons, some additional causes are also there that can lead to this issue.
Part 1: One-click to Fix Android not Receiving Texts by Android System Repair
If you are not willing to waste your precious time fixing the message problem, then you can switch to the top-rated Android repair tool, i.e., Dr.Fone - System Repair (Android) . With this software, you can easily fix issues like the black screen of death, crashing apps, can’t receive text messages on Android, or failed download. If you have no idea what is causing the message app problem, you can simply think of repairing the whole Android system.
You surely need to try the software as it can perform the following tasks:
Dr.Fone - System Repair (Android)
Android repair tool to fix Android Not Receiving Texts
- Fix the Android system without technical knowledge.
- Complete Android repair tool for all brands and models.
- Simple and Easy Repair procedure
- 100% guarantee that the problem will be fixed.
- Also available for iOS devices.
3981454 people have downloaded it
You can download and install the software on your system and use it to fix any issue. Then follow the steps given below:
Step 1: Launch the application and choose the System Repair option from the main interface. Connect your Poco C51 to the computer and choose the Android Repair mode, and hit the Start button to begin.
Step 2: You will have to provide information about your device, including the brand, name, model, country, and carrier. In between, you will be notified that your device repair might erase the existing data of your device.
Step 3: Agree with the conditions and hit the Next button. The software will download the firmware package automatically. It might take a while to finish the download, and when it is finished, the repair process will be initiated automatically.
It won’t take long, and your Poco C51 will be repaired. Now you will be able to receive and send text messages without any hassle.
Part 2: Remove and Insert the SIM
The easiest thing that you can try if your Poco C51 is not receiving any text messages is because the SIM is not inserted right. If your SIM card is inserted wrong, then it is obvious you can’t receive text messages on Android. Simply take out the SIM card, see how it must be inserted, and do it correctly. Once the SIM is inserted in the right way, you will receive the pending text messages immediately unless there is another issue preventing it.
Part 3: Check Network Connection
Another simple method that you can try if you are not receiving text messages on Poco C51 phone is to check your network connection. Usually, you can see the bar on the top of the screen. Maybe the problem exists because you have no signal strength at the moment.
Part 4: Consult your Carrier about the Data Plan
Maybe you are unable to get messages on your Poco C51s because your existing data plan has expired. You can directly contact your Carrier about the issues where your Poco C51 is not receiving texts. If your plan has expired, then you might have to renew it immediately. If not, then try out other fixes to resolve this issue.
Part 5: Try the SIM card in Another Phone or Slot
Sometimes, people complain that Poco C51 is not receiving texts from iPhone, and it might be because of the SIM card issue. So, the best thing you can try is to remove the SIM from your current phone and insert it into another phone.
When you are offline the message is saved on the server and just about when you get online, the text messages are delivered. If it is the SIM issue, then you will not get the message unless you contact your network operator.
Part 6: Clear the Cache of Messaging App
In smartphones, the memory space often gets filled up with cache. And not everyone remembers that they have to clear the cache from time to time. The accumulated cache can also lead to this issue. So, if your Android messaging app is not working, you have to clear the cache memory.
Step 1: Open the Settings and go to Apps. Find the Messages app from the list and tap to open it. There you will see the storage occupied by the app along with the cache.
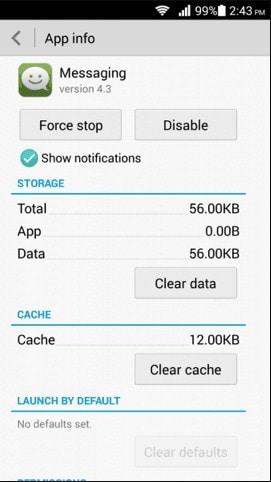
Step 2: Click on the Clear Cache button and wait as the Poco C51 device free up the memory of your device.
Once the cache is cleared, you can also clear the data if you want to and you’ll instantly receive the text messages on your phone.
Part 7: Delete Useless Messages to Free Up Space
Sometimes, if you are not receiving text messages on Poco C51, it means that you need to clean up the clutter of useless messages from your phone and SIM both. The phone messages can be deleted directly from your phone. But the SIM card messages needed to be deleted separately. The SIM cards don’t have enough memory to hold plenty of messages. Therefore, once the storage is full, you will stop receiving messages entirely.
Step 1: Open the messages app and open settings. Look for an option that says “Manage SIM Card Messages”. Sometimes, you can find this option under Advanced Settings.
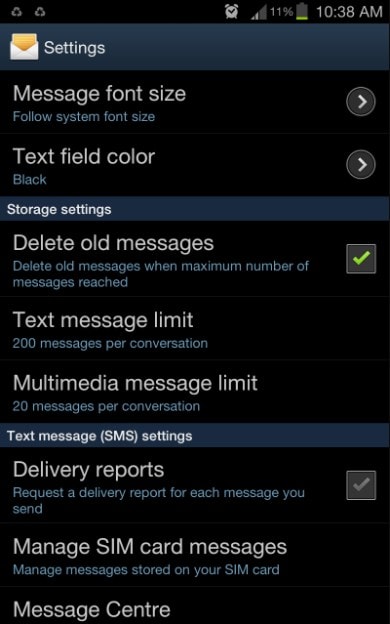
Step 2: There, you will see the existing messages on the SIM. You can either delete all the messages or perform a selective deletion to free up space.
Part 8: Try a Third-party Messaging App
If you can’t receive messages on your default app, then you can try installing a third-party messaging app. Nowadays, most people use social media messaging apps like WhatsApp, Skype, etc. for messaging. So, if somehow, the Android is not receiving texts, then the new apps can help you to send and receive messages with a non-native network.
Further Reading: 15 Best Free Chat Apps in 2022. Chat Now!
Part 9: Ensure your Phone is Fully Charged
Another possible fix to this problem might be your phone’s battery percentage. Sometimes, when the Android is in power saving mode, it disables the default apps too. As a result, you can’t even receive text messages on Android. So, when you plug in the charger, the power saving mode will be disabled, and you will get your text messages.
Part 10: Ensure It’s Not An iMessage From iPhone
If the Poco C51 phone is not receiving texts from iPhone, then this might be a different issue. Usually, there is an option on the iPhone where they can send texts as iMessage and simple messages. If the iPhone user sends the text as iMessage, then it will not show up on the Android device. To resolve this, you have to follow the steps below:
Taking the iPhone in hand makes sure that you are connected to a network. Open settings and scroll to look for the Message option. Toggle the bar next to the iMessage option to turn it off.
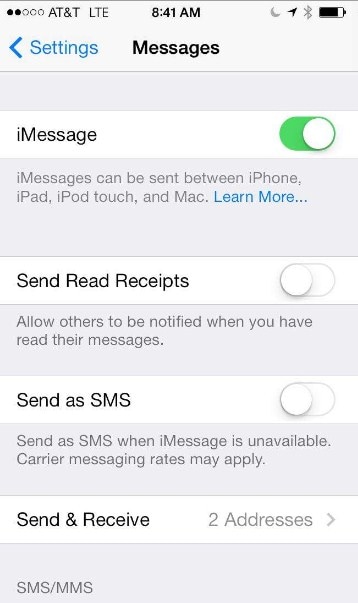
If the FaceTime option is also on, you might have to deactivate that too to send messages and calls as regular ones.
Part 11: Update Your Android
Updating the operating system to the latest Android version can fix some system errors which may cause the “Android not receiving texts” issue because the latest version always brings a better user experience and fix the know bugs.
Conclusion
Now you know several methods that can work if the Android messaging app is not working. If you experience this kind of issue with your Poco C51, then you are most likely to resolve them with these fixes. If none of the solutions seem to fix the issue, then you can take the help of Dr. Fone - System Repair (Android) feature. With this tool, you can resolve all kinds of working issues on your device.
Also read:
- [New] In 2024, YouTube Snippets Guide Essential Insights Unveiled
- [New] Miniature Mastery in the Social Sphere Who Wins with YouTube Shorts or TikToks for 2024
- [New] MKV Mastery Best Mac App Compilation for 2024
- 4 solution to get rid of pokemon fail to detect location On Vivo V29e | Dr.fone
- 4 solution to get rid of pokemon fail to detect location On Vivo V30 Pro | Dr.fone
- 7 Fixes for Unfortunately, Phone Has Stopped on Infinix Hot 30i | Dr.fone
- Direct Driver Intervention in Vista Operating System
- Emerging Leadership in the Age of Generative AI: How New Software Management Positions Are Shaping Up | ZDNet
- Full Guide to Catch 100 IV Pokémon Using a Map On Vivo V29 | Dr.fone
- How PGSharp Save You from Ban While Spoofing Pokemon Go On Samsung Galaxy A34 5G? | Dr.fone
- How To Change Xiaomi Redmi Note 12T Pro Lock Screen Password?
- How to Fix Android App Not Installed Error on Tecno Spark 20 Pro Quickly? | Dr.fone
- How to Fix Error 495 While Download/Updating Android Apps On Itel A60s | Dr.fone
- How To Use Special Features - Virtual Location On Samsung Galaxy A34 5G? | Dr.fone
- In 2024, Step-by-Step Tutorial How To Bypass Nokia C12 FRP
- Title: How to Fix Error 495 While Download/Updating Android Apps On Poco C51 | Dr.fone
- Author: Nova
- Created at : 2025-03-01 03:14:00
- Updated at : 2025-03-02 18:35:22
- Link: https://change-location.techidaily.com/how-to-fix-error-495-while-downloadupdating-android-apps-on-poco-c51-drfone-by-drfone-fix-android-problems-fix-android-problems/
- License: This work is licensed under CC BY-NC-SA 4.0.