
How to Fix Error 495 While Download/Updating Android Apps On Google Pixel 8 Pro | Dr.fone
How to Fix Error 495 While Download/Updating Android Apps On Google Pixel 8 Pro
Error 495 is a common error that occurs while downloading or updating apps from Google Play Store. This error is usually caused by a problem with the Google Play Store, and it can be fixed by clearing the cache and data of the Google Play Store app. If you are experiencing this error, follow the steps below to fix it.
In this article, you will learn why the Android error 495 pops up, possible solutions to bypass, as well as a dedicated repair tool to radically fix error 495.
We always like to explore every new feature or the features that already exist on our devices. We have a tendency to be the master of our device and want to know every bit of the handset. Unexpected errors ruin that experience and it is just frustrating to experience these errors. And the worst part is that we have no idea where we are wrong or what we did that led to the error. Same is the case with the error 495 which occurs due to downloading or updating of Android Apps. You may have spent countless hours on the internet to find the right solution for error code 495 but even after following many of the most guaranteed steps sometimes the error still doesn’t go away.
However, this article will provide you various methods to get rid of the Error 495 play store problem that you face and you will not have to depend on any other sources for your solution.
Reasons for Google play error 495
Android Apps are most commonly downloaded from the Google Play Store with the help of Wi-Fi or Cellular Data. One may come across many types of errors. Mostly the errors come in during the download or update or installing time. Error 495 occurs when the user isn’t being able to download or install an app over Wi-Fi, but the user is able to do the same thing over cellular data.
Technically speaking, the issue is caused when the connection to the Google Play servers, where the app is hosted, times out. Which is unable to resolve by itself.
Also, there could be another reason that it cannot sync with the servers.
Now that we know the possible reasons for the error 495, let us also know how to get rid of it in the sections below.
Solution 1: One Click to Fix error 495 by Android Repair
Tried several methods to make the error 495 disappear, but nothing works? Well, many people have experienced the same frustration. The root cause is that something is wrong with the Android system. You need to have your Android system repaired to fix error 495 in this situation.
Note: Having your Android system repaired may lose existing data on your Android. Backup the data on your Android before the Android repair.
Dr.Fone - System Repair (Android)
Best tool for fundamental Android repair in one click
- Fixes all Android system issues like error 495, system UI not working, etc.
- One click for Android repair. No special technics needed.
- Supports all the new Google Pixel 8 Pro devices like Galaxy Note 8, S8, S9, etc.
- Step-by-step on-screen instructions provided to fix error 495 without any hassle.
3,390,486 people have downloaded it
With Dr.Fone - System Repair (Android) , you can easily fix error 495 in few steps. Here is how:
- Download, install, and launch Dr.Fone - System Repair (Android). Connect your Android to your computer with a USB cable.


- Select the option “Repair” > “Android Repair”, and click “Start”.

- Select the Google Pixel 8 Pro device information like brand, name, model, etc., and confirm your selection by typing in “000000”.

- Press the stated keys to boot your Android in download mode to download the firmware as instructed.

- After the firmware is downloaded, the program will automatically start to repair your Android.

Step 1:
Go to the “settings” of your device. Once the series of sections comes up, tap on the “APPS” section.
Step 2:
Click on ‘All Apps’ or ‘Swipe to All’ and the open the section named “Google Services Framework App”
 .
.
STEP 3:
Open “App Details” and the screen shown in the image should come up on your device. As shown in the image, follow the three steps. First, tap on “Force Stop” and then second, tap on the “Clear Data” option and finally go ahead and tap on the “Clear Cache” option.
Following the above steps should solve your problem of Google Play Error 495. And you can enjoy back to using the apps which you couldn’t download or update due to the Error 495.
Solution 3: Reset App Preference in Google play Store to Fix error 495
STEP 1:
Go to the settings section in your device. It will be differently placed for different devices and different users.


STEP 2:
Once the Settings section is open. A lot of further sections will pop up. No find the section named “Application Manager” or “Apps”. After locating it, tap on that section.

STEP 3:
Now go ahead and tap or slide to a section named “ALL”.
STEP 4:
After reaching the “ALL” section tap the touch button to open menu/properties and choose an option named “Reset Apps” or “Reset App Preferences”.
There’s no need to be alarmed because on clicking the reset option, the apps won’t be deleted but it is only going to re-set them. And hence solving the Error 495 created in the Google Play.

 PDF application, powered by AI-based OCR, for unified workflows with both digital and scanned documents.
 Solution 4: Fix Error Code 495 by installing a VPN app
The Error code 495 can be easily removed in another interesting way too. On downloading a Virtual Private Network (VPN) and then operating the play store automatically solves the error 495.
STEP 1:
Install Hideman VPN (using any other VPN will also make it work) from Google Play store. (If the error persists for this app too then download it from a different app store or by using a third-party store).
STEP 2:
Now open the app and select the United States as the country of connection and press the option named Connect.
STEP 3:
Open Google Play Store and Download any app without the Error Code 495 coming in and bothering.
This fix will work for most of the Google Play Errors and not just only The Error Code 495.
Solution 5: Remove your Google Account & Reconfigure it to fix error 495
Removing the Google account and re-configuring it is a very common method adopted to get rid of the Error 495. Adopt the following steps to complete this method.
STEP 1:
Go to the “Settings” section of your device. Like it was mentioned before, different devices and different users will have the placement of the settings section in a different place.

STEP 2:
Go to the accounts section in the settings tab.

STEP 3:
In the accounts section tap on the Google Account part
STEP 4:
Inside The Google section, there’ll be an option called “Remove Account”. Tap on that section, to remove your google account.

STEP 5:
Now go ahead and re-enter/ re-register your Google account and check if the Error 495 still persists.
Now you have completed all the steps and your problem should be solved.
Solution 6: Fix error code 495 by Removing your Google Play Store Data & Cache
One of the best and most accurate methods in the series of various steps in eradicating the Error Code 495 in Google Play Store is by removing the Google play Store Data and Cache. In order to do so follow the steps mentioned below. After following the steps it is guaranteed that the Error code 495 will be done with and you won’t experience any such problems in the future.
STEP 1:
Go to the “Settings” section into your mobile device. The settings can be accessed by scrolling down and pulling down the drop-down menu and most likely the settings app will be on the top-right corner. Otherwise, it will be found after opening the app drawer.


STEP 2:
Once after opening the settings section, select the “Installed apps” or the “Apps” section.

STEP 3:
Find the “Google Play Store” section and select that too.
STEP 4:
Tap on the “Clear data” & “Clear Cache”.

Doing the above steps will clear your caches of the Google Play Store. Now you have a new google Play store.
Hence in this article, we got to know about the error 495 and the possible solutions to it as well. Also, this article explains how Error code 495 can be removed by 5 different ways. These are the best ways by which you can remove or get rid of the Error Code 495. In case one of the method fails, use the other one to rectify this recurring error 495 on your Google Pixel 8 Pro.
Gmail Not Working on Google Pixel 8 Pro: 7 Common Problems & Fixes
Ever since Android is introduced, it has almost eliminated the need of computers to work through Gmail. Gmail carries much importance especially when you’re a working person. A lot of work is done through mails on daily basis. But maybe today is not your lucky day. Maybe Gmail is giving you a hard time today. Is it? Is your Gmail not responding or keeps stopping you from going further? Well! There is no need to be bothered anymore. We are discussing some of the general Gmail problems along with their fixes. So, if your Gmail is not working on Android, you can go through this article and find the relevant solution.
Problem 1: Gmail App not responding or keeps crashing
First and foremost, the most common situation people meet with is when there Gmail keeps crashing. Or simply, it doesn’t respond at all. When you open it, it stuck for a few seconds and then you have to close it. It seriously is an annoying issue. If your Gmail is also not responding or crashing and you aren’t able to work properly, following are the solution you can follow.

Clear Cache
The first thing you can do to fix Gmail not responding issue is to clear the cache of Gmail. This has higher chance to get the issue resolved. To do this:
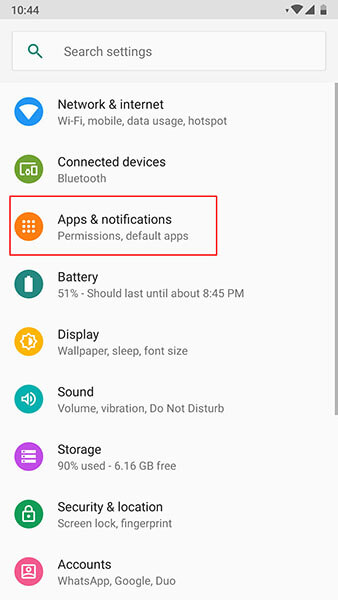
- Go to “Settings” and look for “Apps & Notifications”. Please note that the option may vary in some Android phone like it maybe “Application” or “App Manager”. So, don’t panic and look for the option carefully.
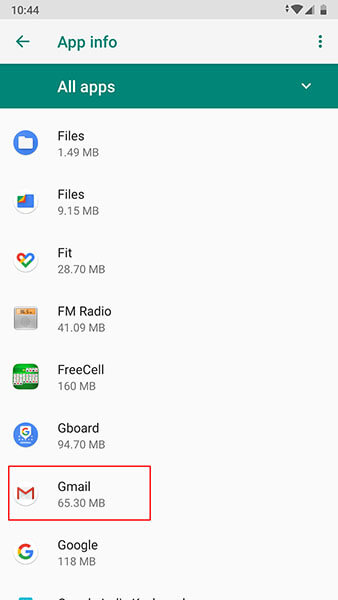
Now, from the apps list, search “Gmail” and tap on it.
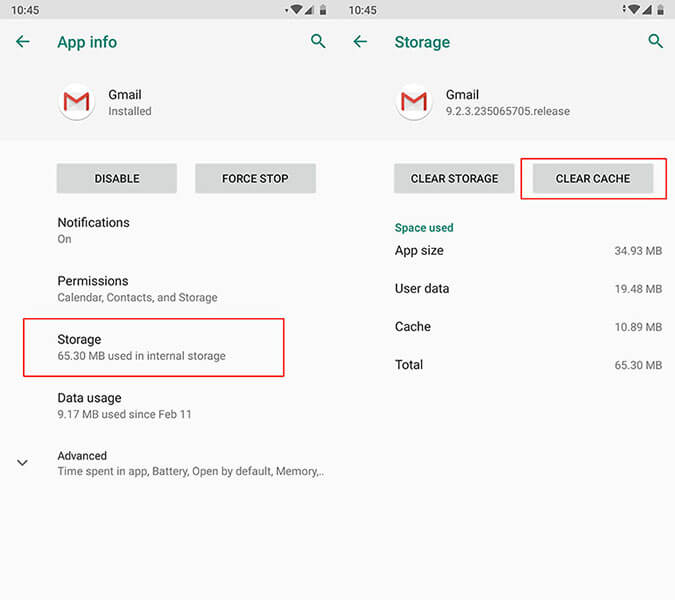
Go to “Storage” followed by “Clear Cache”.
Restart the Google Pixel 8 Pro device
Restarting the Google Pixel 8 Pro device in the first place simply resolves many problems and so in the instance when Gmail keeps stopping. Simply long press the power button of your device and restart the Google Pixel 8 Pro device. See of the problem gets vanished or not.
Factory Reset the Google Pixel 8 Pro device
The next option that you can try is resetting your device. This will lead to data loss so we suggest you to take backup firstly and then proceed with this method.
Hit on “Settings” and search for “Backup & Reset” option.
Tap on “Reset” or “Erase all data” (the option name again may vary).

If unfortunately the above solutions don’t work, there is a requirement to flash the stock Android ROM again. Before you wonder how, there is a professional one-click tool that can surely be of assistance. It is Dr.Fone - System Repair (Android) . The tool takes special care of the Android phones and fixes almost every system issues with ease. It takes no special technical skills and performs efficiently.
Problem 2: Gmail won’t sync between all ends
The next most common problem where people get stuck with is when there Gmail won’t sync. Here are the solutions to this particular problem.
Make Space in the Phone
When Gmail stops syncing, one of the things that can save you is clearing the storage. It is the space that maybe the culprit and therefore the syncing don’t work at all. We would like to suggest you removing the unwanted apps to clear the storage or deleting the downloaded files. You can also transfer the important files to your computer and make the space vacant.
Check Gmail Sync Settings
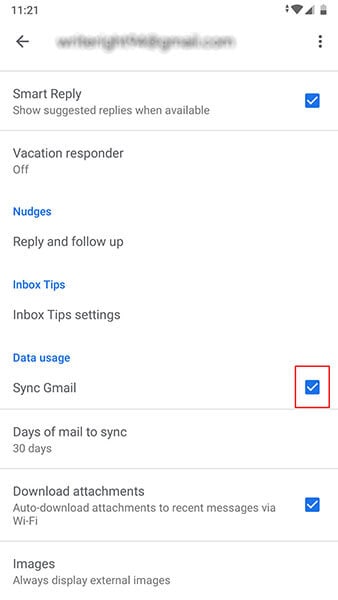
When still the Gmail not working issue persists and you can’t sync, make sure to check the Gmal sync settings. For this, follow the steps below:
- Launch the Gmail app and tap on the menu icon (three horizontal lines).
- Tap “Settings” and choose your account.

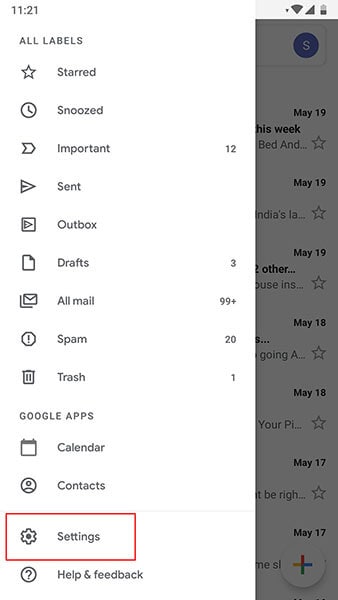
- Check the box next to “Sync Gmail” if it’s not checked.
Restart the Google Pixel 8 Pro device
Again, restarting can also be helpful in this situation. When you boot the Google Pixel 8 Pro device again, check if your Gmail can sync or not.
Problem 3: Gmail won’t load
In case you are using the Gmail over your web browser and it has tested your patience in loading, here are the solutions that could prove to be fruitful for you. Please check these out.
Ensure to Use Gmail Supported Browser
First of all, you need to make sure that the browser you are using works with Gmail or not. Gmail can smoothly perform in Google Chrome, Firefox, Safari, Internet Explorer and Microsoft Edge. However, the browsers should be updated. So, please make sure that these browsers are running on the latest versions. Moreover, in case you use Chromebook, don’t forget to update the operating system in order to let it support Gmail.
 The Tube Sites Submitter is a fast and efficient tool for anyone who needs to upload videos quickly, easily and automatically to hundreds of tube sites in mere minutes .
 Clear Cache of web browser
If you tried the above method but to no avail, try to clear the cache and cookies of the web browser. But by doing so, the browser history will be removed. As well as, the records of the websites you previously enjoyed will also be lost.
Check browser extensions or add-ons
If not the above one, try this tip. It encourages you to check your browser extensions. Perhaps these are interfering with the Gmail and due to this conflict, Gmail won’t load. You can either turn off these extensions and plug-ins temporarily or make use of the incognito mode of the browser where there are no such things like extensions and plug-ins.

Problem 4: Gmail can’t send or receive
Gmail also gives you problem in sending or receive mails and messages. And to troubleshoot such issue, following are the solutions mentioned.

Check the Latest Version of Gmail
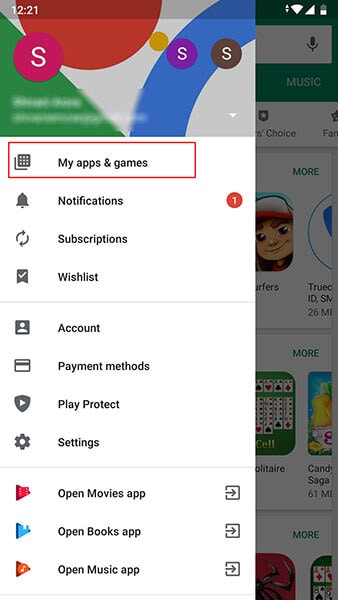
This issue is likely to emerge when you are using an outdated version of Gmail. And therefore, the first solution says you to check if the Gmail update is available. You can go to the Play Store and from the “My apps & games” option, you can see if Gmail needs to be updated or not.

Verify Internet Connection
Another thing that carries weight while you can send or receive mails is the internet connection. As we all know that Gmail won’t respond if the Google Pixel 8 Pro device is not connected to the internet. Therefore, you are advised to turn off Wi-Fi and then enable it again. Also, please ensure to switch to Wi-Fi if you are using the cellular data. This may hamper the process and stop you from receiving or sending mails.
 Glarysoft File Recovery Pro Annually - Helps to recover your lost file/data, even permanently deleted data.
Remove you Account and Add Again
If still Gmail keeps stopping you to go ahead, make sure to once sign out from it. To do this:
- Open your Gmail app and go to “Manage accounts on this device”.

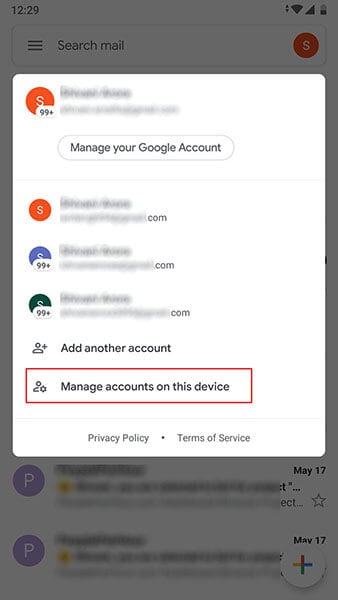
- Now, tap on the account you are working with. Tap on “REMOVE ACCOUNT” thereafter. After this, you can again sign in and then check if the problem is gone or not.

 HD Video Converter Factory Pro
Problem 5: Stuck in sending
Now, here is another annoying problem that doesn’t let Gmail working on Android properly. This problem addresses the situation where users send a mail but it gets stuck on sending. If this is the problem that you are going through, the following solutions will help you.
Try Alternative Gmail Address
First of all, if Gmail is not working due to stuck in sending issue, we advise you to make use of some other Gmail address to send the mail. If the problem still occurs, jump to the next solution.
Check Network Connection
As already mentioned, be sure of an active internet connection while working with Gmail. When you are not using a stable connection, it may lead to stuck on sending, Gmail crashing and many other issues. You can fix the issue by doing these three things:
- Most importantly, use only Wi-Fi rather than cellular data if you want a smoother process.
- Turn off Wi-Fi and then turn it on again after nearly 5 seconds. Do the same with the router. Plug it out and the plug in.
- Lastly, turn on Airplane mode and after a few seconds, turn it off again.
Now try to send the mail and see if things are still the same or not.
Check Attachments
Large attachments can also be the reason for this issue. We would here like to suggest you to check the attachments you are sending. If these are not so important, you can remove them and send the mail. Or if it is not possible to send the mail without attachments, compressing the files can be a solution.
Problem 6: “Account not synced” issue
Many times, the users get the error that says “Account not synced” while they try to work with Gmail. And this is the 6th problem we are introducing. The ways mentioned below will assist to get out of the trouble.
Make Space in the Phone
When Gmail stops to further the process by prompting “Accounts not synced” issue, be sure that your Google Pixel 8 Pro has some storage in it. If not, create it straight away. As we also mentioned in one of the above solutions, you can either delete the unnecessary files or transfer the important files to the PC to make the space in the phone. Go along with this tip and see if it works.
Check Gmail Sync Settings
As another solution, check Gmail sync settings to get the issue fixed.
- Simply open Gmail and hit the menu icon which is three horizontal lines on the top.
- Go to “Settings” and choose your account.

- See the tiny box beside “Sync Gmail” and check it if it is not.
Restart the Google Pixel 8 Pro device
If the above method went futile, simply restart your device. Take help of the Power button on your device. Long press it and from the options, restart it. This will hopefully work for you.
Problem 7: Gmail app running slow
The last problem that you may face is the slow-going Gmail app. In simple words, you may experience that Gmail app is operating extremely slowly. To fix this, following solutions will help you.


Restart the Phone
It is a universal method to fix minor Android system issues. And here too, we would like you to restart your Google Pixel 8 Pro in the first place when you find that Gmail is not responding due to the sluggish behavior.
Clear Storage of Device
Usually all the apps start running slow when the Google Pixel 8 Pro device is not having sufficient space. As the apps need space to function quickly and appropriately, having the Google Pixel 8 Pro device on low storage can prove to be a bad luck for Gmail. So, make sure you wipe out the items you no longer needed on your device and create some room so that the Gmail responds nicely and won’t be running slow anymore.
Update Gmail App
As the last tip that will indeed help you is to update the Gmail app. Until you update the app when required, Gmail keeps stopping you from working and you will definitely get frustrated. Therefore, go to Play Store and look for the Gmail update. If it is available, welcome it with smile and bid farewell to the problem of slow running Gmail.
What if your problem still doesn’t get resolved after following these 3 tips? Well! If that is the case, we will again recommend you to make use of an expert one-click tool to flash the stock Android ROM.
Dr.Fone - System Repair (Android) is going to help you serving the purpose. This mighty tool possesses huge success rate and one can rely on it for its simplicity and security. It is designed to work with numerous problem related to Android system. So, no matter if your Gmail keeps crashing or keeps stopping, it has the solution for everything.
Dr.Fone - System Repair
Fix all Gmail issues caused by Android system:
- Gmail app corruption or not opening
- Gmail app crashing or stopping
- Gmail app not responding
How to Flash Dead Google Pixel 8 Pro Safely
- Fix malfunctioning Android to normal in one click.
- Highest success rate to fix all Android issues.
- Step-by-step guidance through the fixing process.
- No skills required to operate this program.
A phone is considered to be dead when it becomes completely unresponsive and refuses to switch on. Similarly, an Android phone is said to be dead when it does not boot up. You may try to switch it on several times by pressing the power button but in vain. You will see no sign of the phone’s logo or anything like a welcome screen. The Android phone’s screen remains black and does not illuminate when you try to turn it on. Interestingly, even when you charge this dead device, it does not show that it is getting charged.
Many people regard this as a battery issue, and many think of it as a temporary software crash. Some users also seem to believe that this is because of a virus attack. However, if you are looking for ways that tell how to fix a dead Android phone, you must understand that a dead phone or device can be cured by flashing custom firmware safely. If you are keen to know how to flash a dead Android phone or how to flash dead Android phones using PC, here are ways to help you.
Given below are eight techniques to flash your Google Pixel 8 Pro safely, depending upon which phone you are using. It may seem time-consuming and tedious, but we can assure you that it works. So, move ahead and read on to learn about flashing new firmware, your Google Pixel 8 Pro, MTK Android, and Google Pixel 8 Pro safely.
 safe & secure
Part 1: Can a Dead Phone Be Flashed?
Flashing a dead Android phone might be skeptical for many users who have been in such a situation. Although it is possible to flash a dead Android phone, it is essential to be aware of the reasons that lead you into such a situation. Before a remedy, diagnosing the problem is a necessity for retaining the Google Pixel 8 Pro device.
From battery issues to physical damage to the Google Pixel 8 Pro device, there can be many reasons your Google Pixel 8 Pro died. The reasons for a dead Android phone are not restricted to these points. There can be software-related issues or firmware issues that might cause such havoc on your Android.
Part 2: How to flash Google Pixel 8 Pro in one click
While you are worried about how to flash Google Pixel 8 Pro instantly with a single click, Dr.Fone - System Repair (Android) swiftly makes its way with a galore of options for you. This amazing tool from Wondershare can fix a plethora of Android system issues such as crashing of apps, black screen of death, failed system update, etc. Moreover, it can also get your device out of boot loop, unresponsive bricked Android mobiles as well as stuck at the Google Pixel 8 Pro logo.
Dr.Fone - System Repair (Android)
One-click solution to flash Google Pixel 8 Pro
- The high success rate in fixing Google Pixel 8 Pro Android devices.
- All the latest Google Pixel 8 Pro devices are supported by this software.
- One-click operation of this tool helps you how to flash Google Pixel 8 Pro easily.
- Being very intuitive, it doesn’t need you to be tech-savvy to use this software.
- It is one of its kind and the first one-click Android repair software on the market.
3981454 people have downloaded it
Step-by-step Tutorial
We are going to explain how to flash a dead Android phone using a PC using Dr.Fone - System Repair (Android)
Note: Before you understand how to flash Dead Android phone, take a backup of your data and then proceed to avoid any data loss.
Phase 1: Prepare your Google Pixel 8 Pro
Step 1: Once you have downloaded and installed Dr.Fone, launch it. From the main menu, tap on ‘System Repair’ and get your Google Pixel 8 Pro connected to it.
 Power Tools add-on for Google Sheets, Lifetime subscription
Step 2: Click ‘Android Repair’ from the available options, and then press the ‘Start’ button to fix the Dead Android phone by flashing it.
Step 3: On the Google Pixel 8 Pro device information screen, pick the appropriate device brand, name, model, and other details followed by tapping the ‘Next’ button.

Phase 2: Put the Android device in Download mode to start repair.
Step 1: It is essential to boot your Google Pixel 8 Pro in Download mode before repairing.
- If the Google Pixel 8 Pro device has a ‘Home’ button: Turn it off and then hold down the ‘Volume Down’, ‘Home’, and ‘Power’ buttons altogether for 5-10 seconds. Un-hold all of them and hit the ‘Volume Up’ button for entering ‘Download’ mode.
- In the absence of a ‘Home’ button: Switch off the Android device and hold the ‘Volume Down’, ‘Bixby’, and ‘Power’ buttons for 5 to 10 seconds, then release them. Hit the ‘Volume Up’ button for entering the ‘Download’ mode.

Step 2: Press the ‘Next’ button for initiating firmware download.

Step 3: Once the firmware gets downloaded and verified Dr.Fone - System Repair (Android) starts to flash your Dead Android phone. All the Android system issues will be fixed soon after.

safe & secure
Part 3: How to flash Google Pixel 8 Pro dead phone with Odin?
In this segment, we will learn how to fix the dead Android phone, i.e., Google Pixel 8 Pro phones using Odin software. Odin is software used internally by Google Pixel 8 Pro to generally unblock devices and perform a more utility-based job, namely, flashing new firmware in place of the old one. There are different variants available, so choose the one which is supported by your Galaxy phone. Here is a step-by-step explanation of how to flash dead Android phone (Google Pixel 8 Pro) using Odin software.
Step 1: Install the driver software on the computer. You can find the best driver software for your device and PC on the official Google Pixel 8 Pro website. You may also download Google Pixel 8 Pro Kies on your PC. Once you have downloaded and installed the driver software, restart the PC.
Step 2: Now download suitable firmware for your device in the form of a zip folder that you can open and store on your desktop.

Make sure the file is .bin, .tar, or .tar.md5 only as these are the only file types recognized by Odin.


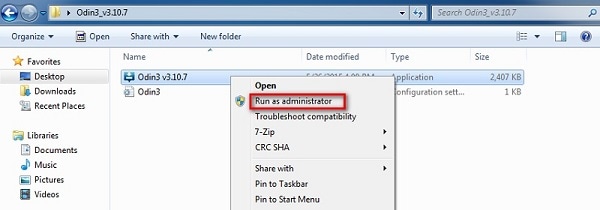
Step 3: In this step, download the latest version of Odin on your PC and move it to the desktop, and then right-click on the downloaded Odin file to select “Run as Administrator”.


 DEX 3 RE is Easy-To-Use DJ Mixing Software for MAC and Windows Designed for Today’s Versatile DJ.
Mix from your own library of music, iTunes or use the Pulselocker subsciprtion service for in-app access to over 44 million songs. Use with over 85 supported DJ controllers or mix with a keyboard and mouse.
DEX 3 RE is everything you need without the clutter - the perfect 2-deck mixing software solution for mobile DJs or hard-core hobbiests.
PCDJ DEX 3 RE (DJ Software for Win & MAC - Product Activation For 3 Machines)
Step 4: Now, boot your dead device to Download Mode by pressing the power, volume down, and home button together. When the phone vibrates, release the power button only.

Step 5: Gently press the volume up button, and you will see the Download Mode Screen.

Step 6: Now, you may use a USB to connect your Google Pixel 8 Pro to the PC. Odin will recognize your device, and in the Odin window, you will see a message saying “Added”.

Step 7: In this step, find the tar.md5 file you downloaded by clicking on “PDA” or “AP” on the Odin window and then click “Start”.
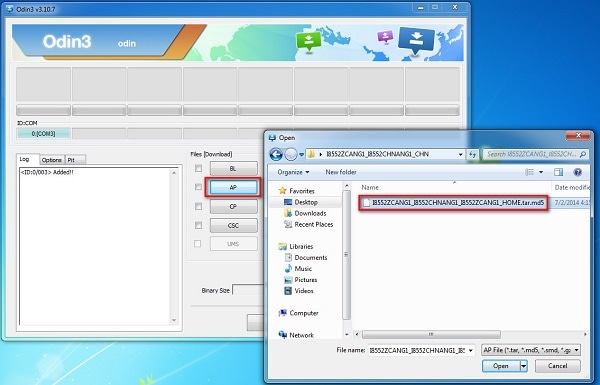
Finally, once the flashing process is complete, your Google Pixel 8 Pro phone will reboot and start normally, and you may see a “Pass” or “Reset” message on the Odin window on the PC.
Part 4: How to flash MTK Android dead phone with SP Flash tool?
SP Flash tool, also known as SmartPhone Flash tool is a popular freeware tool used to flash custom ROM or firmware in MTK Android phones. It is a very successful tool and is extremely easy to use.
Let us look at the steps given below to learn how to flash dead Android phones using PC with the help of the SP Flash tool.
Step 1: To start with, download and install the MTK driver on your PC and then download the ROM/firmware you wish to use for flashing purposes.
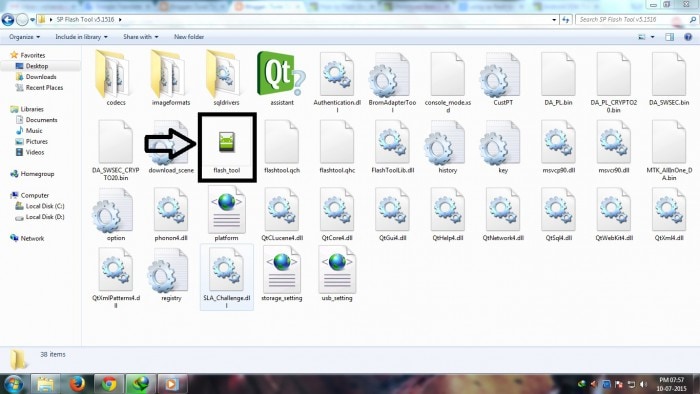
Step 2: Once done, you should download the SP Flash tool and extract it on your PC and move on to launch the Flash_tool.exe file to open the SP Flash tool window.
Step 3: Now, on the SP Flash tool window, click on “Download” and select “Scatter-loading”.

Step 4: The last step would be to locate the file downloaded by you and click “Open” and then finally, select “Download” on the SP Flash tool window.

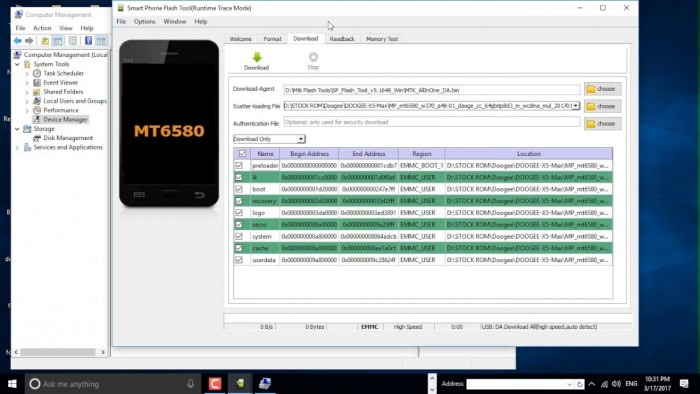
After completing the above steps, connect your dead device to the PC with a USB cable and wait for it to get recognized. The flashing process will take a few minutes to finish and then you will see a green circle indicating “OK Download”.
That’s it! Now simply disconnect your phone and wait for it to reboot.
Part 5: How to flash Google Pixel 8 Pro dead phone with the Phoenix tool?
Phoenix tool, better known as PhoenixSuit, is a tool similar to the SP False tool and Odin. It works very well with Google Pixel 8 Pro and is the best answer to “How to fix dead Android phone?”, “How to flash dead Android phone using PC?”, etc.
Let’s look at the steps of flashing the Google Pixel 8 Pro dead phone with the Phoenix tool.
First, download and install the Google Pixel 8 Pro PC Suite driver on your PC. Then you will need to download the PhoenixSuit tool and then launch it.

Now, on the toolbar, click “Tools” and select “Data Package Download” from the drop-down list.

Then move to download the firmware for your dead Google Pixel 8 Pro and save it in a new Folder. Once done, go back to the Phoenix tool window and click on “File” and select “Open Product”.

Simply, feed in the details and then click “OK”.

After this, click on “Flashing” and select “Firmware update” and then browse to select the appropriate product code and then click “OK” again.
Then move on to select “Dead Phone USB Flashing” from the Firmware Update Box.

Lastly, just click on “Refurbish” and connect your phone to the PC using a USB cable.
That was it, the flashing process may take up to a few minutes after which your dead Google Pixel 8 Pro will restart automatically.
Part 6: How to flash a dead phone that won’t turn on via factory reset?
Using tools for flashing Android devices can be a solution; however, it is heavily restricted to the Google Pixel 8 Pro device models. For a generalized solution, there can be other options that you can go with. Factory resetting an Android device by putting it in Recovery Mode is one way. To know how to flash a dead Android phone using factory reset, go through the steps featured below:
Step 1: To initiate the process, you will have to put your Google Pixel 8 Pro in Recovery Mode. Generally, Android phones are put in Recovery Mode by holding the “Power” and “Volume Up” keys for a few seconds after turning them off. The key combinations can vary according to your Google Pixel 8 Pro.
Step 2: As the Android boot menu opens on your screen, use the “Volume Down” and “Volume Up” keys to scroll up and down the menu. On accessing the “Wipe Data/Factory Reset” option, use the “Power” key to select the particular option.
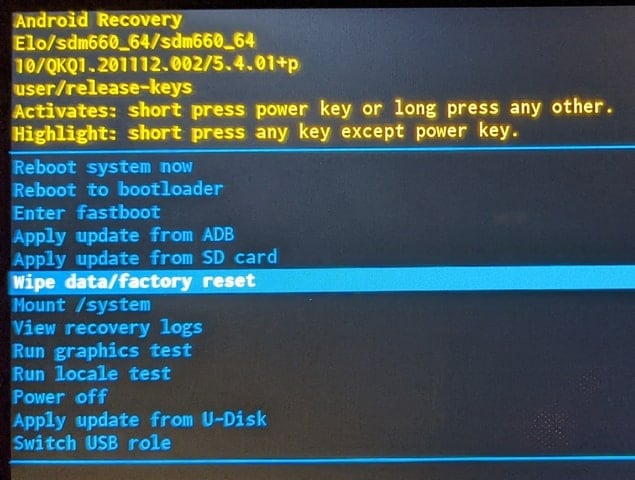
Step 3: Continue to select the “Yes” option for confirming the factory reset of the Android device. The phone will automatically reboot after successfully factory resetting.
Part 7: How to flash a dead Android phone by checking screen faulty
The screen of your Google Pixel 8 Pro may be faulty, due to which it is not launching. While seeking the right way of how to fix a dead Android phone, you can force restart your phone using the Volume buttons according to your device model.
If the Android vibrates on restarting and the screen does not lighten up, the problem can be directed to a hardware fault. The screen is broken and needs physical assistance to resolve the issue.

Part 8: How to fix a dead Android phone by changing the battery
Another solution that can help you fix the dead Android phone is changing its battery. The battery of an Android device can last up to 3 years. When its capacity drops to a bare minimum, it is best to change the battery of your Android. Upon trying to restart your Google Pixel 8 Pro, if it does not, you might need to replace your battery. All Android phone batteries are removable, which should be regulated with proper supervision.
Part 9: How to repair dead Android phone by contacting official support
If you are unable to discover any proper solution for how to flash dead Android phones, you might have to consult the respective customer support of the Android phone manufacturers. Consult customer support to discover why the phone is dead and how it can be flashed. The respective personnel will assist you in resolving the issue, which might require monetary input from your side.
Conclusion
A dead Android phone might be the cause of worry, but the techniques given above to flash your dead Android device safely are very helpful. These methods have been tried and tested by users all over the world and thus, we recommend them to you. If your phone is dead or has become unresponsive, do not panic. Depending on your phone’s brand, here are ways to guide you on how to fix the dead Android phone and how to flash dead Android phone using PC.
It has been observed that Wondershare Dr.Fone – System Repair (Android) assists in the best way. Resolve all your concerns involving your dead Android phone and flash it to make it operable again.
Carefully follow the instructions given, and you will be able to reboot your dead Android phone successfully.
- Title: How to Fix Error 495 While Download/Updating Android Apps On Google Pixel 8 Pro | Dr.fone
- Author: Nova
- Created at : 2024-07-19 22:56:23
- Updated at : 2024-07-20 22:56:23
- Link: https://change-location.techidaily.com/how-to-fix-error-495-while-downloadupdating-android-apps-on-google-pixel-8-pro-drfone-by-drfone-fix-android-problems-fix-android-problems/
- License: This work is licensed under CC BY-NC-SA 4.0.