How to Fix Android.Process.Media Has Stopped on Samsung Galaxy M34 | Dr.fone
How to Fix Android.Process.Media Has Stopped on Samsung Galaxy M34
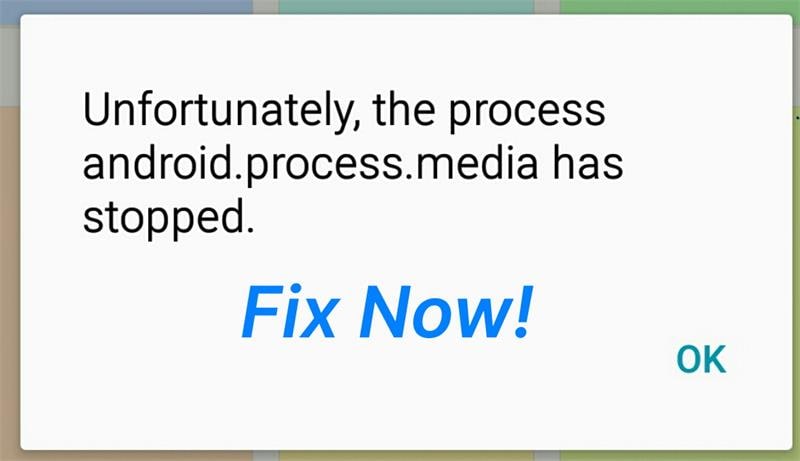
Like any other technological system, Android is not without its fair share of problems. One of the most common issues that Android users face is the android.process.media error. If you have encountered this problem lately, you don’t need to worry, this article will clearly explain what exactly causes this error and how to fix it safely.
Part 1. Why this error pops up?
There are several reasons why this error can occur repeatedly and it is worth noting the various reasons why this happens so that you can avoid the problem in the future. Some of the most common ones include:
- 1. Moving from one custom ROM to another can cause this error to occur
- 2. A failed firmware upgrade may also be to blame
- 3. A virus attack can also result in this error among many others
- 4. Restoring apps via a Titanium backup is also a major cause
- 5. Failure of certain apps such as the download manager and the media storage

Part 2. Back up your Android Data First
It is always a good idea to back up your data especially before embarking on any attempt to fix any problem with your device. This way you will always have your data with you just in case something goes wrong and you lose all your data. Wondershare Dr.Fone will help you easily back up your Samsung Galaxy M34. The application will allow you to back up your device with a few clicks and you can restore what you want from your backup .
Wondershare Dr.Fone
Flexibly Back up and Restore Android Data
- One-click to back up Android data to the computer.
- Preview and selectively restore the backup to any Android device.
- Supports 8000+ Android devices.
- There is no data lost during backup, export, or restore.
4,503,800 people have downloaded it
Follow the steps below to learn how to back up your phone in steps.
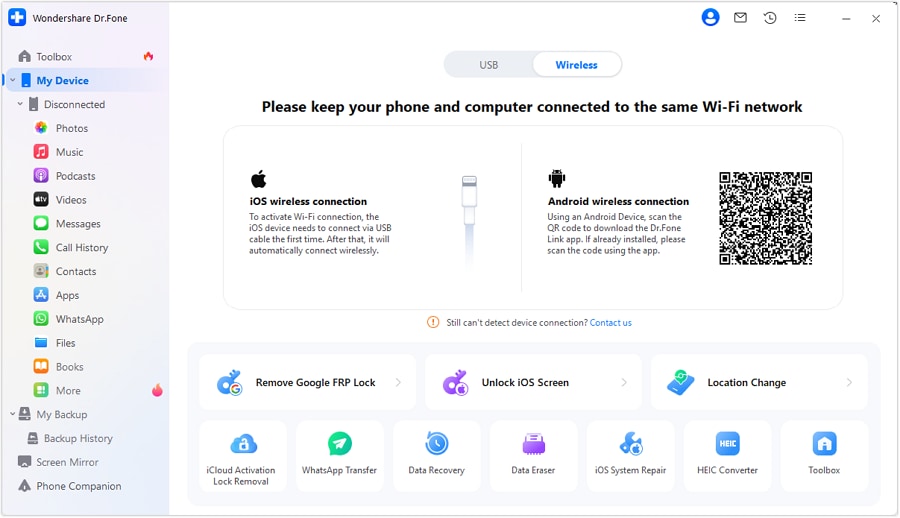
Step 1. Download, install, and run the program
Click the “Start Download” button above to get the software installed on your computer. Then run it. The primary window of the software looks like below.
Step 2. Connect your device
Then connect your Samsung Galaxy M34 to the computer and make sure that it can be recognized by your computer. Then click on “My Backup” on Dr.Fone.
 Video Converter Factory Pro
Step 3. Begin to backup
When your device is displayed on the window of the program, click “Back Up Now “ to begin. The rest will be done by the program.

 safe & secure
Part 3. How to Fix “Android. Process. Media” Error
With a full backup of your Samsung Galaxy M34, you can now embark on a mission to fix the error. There are several methods to clear this error. We have outlined three of the most effective solutions here.
Method 1: Ensure app and system updates
Updates often include patches for known issues and vulnerabilities. Ensuring that both apps and the system are up to date can resolve many potential problems.
Step 1: Visit the Google Play Store to check for available app updates.
Step 2: In “Settings,” go to “System” > “Software Update” to check for system updates.
Method 2: Reset app preferences
App preference settings might sometimes lead to conflicts or anomalies. Resetting these settings can revert apps to their default state, resolving potential issues.
Step 1: Go to “Settings” on your device.
Step 2: Access “Apps.”
Step 3: Tap the menu icon in the upper-right corner and select “Reset App Preferences.”
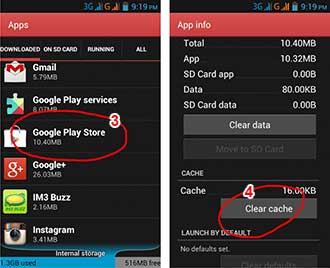
Method 3: Clear the cache and data on your device
Step 1: Go to Settings> Applications> Manage Applications and find the Google Services framework.
Step 2: Next, find Google Play from the same Manage Applications page.
Step 3: Tap on it and then Tap on clear cache.
Step 4: Press the back button to go back to the Google Services framework and then choose Force stop > clear cache > OK
Step 5: Next you need to open Google Play and when presented with an error, click OK
Step 6: Turn off the Samsung Galaxy M34 device and then turn it back on. Go to the Google Services framework again and turn it on to see if the issue has been resolved.
Method 4: Check Google Sync & Media Storage settings
Step 1: Go to Settings > Accounts and Personal> Google Sync and uncheck all the checkboxes to stop the Google Synchronization.
Step 2: Disable and Clear all Media Storage data by going to Settings> Apps> All Apps. Find the Media Storage> Clear Data> Disable
Step 3: Use the same method as above to clear the Download Manager data
Step 4: Turn off your device and then turn it on
This Should clear the error message for good.
Method 5: Boot your device into safe mode
Safe mode can temporarily disable third-party apps, allowing only core system apps. This detects if a third-party app causes the “Android process media keeps stopping” error. If the problem disappears in safe mode, a third-party app might be the cause. Uninstalling it can restore normal function. If the problem persists in safe mode, a deeper system issue might exist, needing further investigation or support.
Method 6: Fix the error by using a dedicated repair tool
Dr.Fone - System Repair (Android)
Fix Android process media has stopped issue in one click
- Fix all Android system issues like black screen of death, won’t turn on, system UI not working, etc.
- Industry’s 1st tool for one-click Android repair. Without any data loss.
- Supports all the new Samsung Galaxy M34 devices like Galaxy S8, S9, S22, etc.
- Step-by-step instructions provided. No technical skills required.
4,989,253 people have downloaded it
Step 1. Connect your Samsung Galaxy M34
After launching Dr.Fone, click on “System Repair” from the main window.

Then connect your Samsung Galaxy M34 with the correct cable and choose “Android” > click “Start”.

In the Samsung Galaxy M34 device information interface, remember to select the correct information. Then confirm the warning and click “Next”.

To confirm the Android repair may erase all data on your device, you need to type in “000000” to proceed.

Step 2. Repair your Samsung Galaxy M34 in Download mode.
Read and follow the guide here to boot your Samsung Galaxy M34 in Download mode.

Then click “Next” to start downloading the firmware.
 SwifDoo PDF Perpetual (1 PC) Free upgrade. No monthly fees ever.

It may take a while, so you could have a cup of coffee to wait for the repair process completed.


safe & secure

Method 7: Factory Reset your device
If the above steps fail, you might need to perform a factory reset. A factory reset restores the Samsung Galaxy M34 device to its initial state, which can eliminate many problems, but it will also erase all data. Ensure you back up your important data before proceeding.
Method 8: Seek Manufacturer Support
If the problem persists after trying the above steps, it could be related to specific device or software issues. It’s advisable to contact your device manufacturer’s support team for more detailed guidance and assistance.
It is our hope that when faced with this fairly common error, you will not panic. This is a fairly mild issue that can easily be fixed as we have seen above.
safe & secure
Full Guide: How To Fix Connection Is Not Private on Samsung Galaxy M34
Are you encountering the “your connection is not private” issue on your phone? We found many Android users have increasingly expressed their frustrations with this recurring problem while browsing on the internet.
Usually, you can just reload the page to fix the error. But in case it doesn’t help, you may need to look for more advanced solutions. In the following discussion, we will delve into why this “your connection is not private” on Android happens and explore solutions that work for you.
Part 1: Addressing Your Connection Is Not Private on Android
First of all, what does “your connection is not private” on Android mean? To answer this question, it’s essential to understand that this error is often associated with Secure Socket Layer (SSL) protocol issues.
SSL is a cryptographic protocol created to establish a secure communication channel over the internet. Its primary purpose is to ensure the confidentiality and integrity of data exchanged between a user’s device and a website’s server.
The error message appears when there’s a problem with the SSL/TLS (Transport Layer Security) certificate of the website you are trying to access. This certificate is a digital document that authenticates the website and encrypts the data transmitted between the user’s device and the server.

Some common factors that could trigger the “your connection is not private” on Chrome Android error:
- Expired or invalid SSL certificate of the website;
Certificates are issued for a specific period, and if the website owner fails to renew it in time, your browser will detect it as not secure.
- There is a mismatch between the domain on the certificate and the actual domain you are trying to visit;
This discrepancy might occur due to a misconfiguration on the website or, in some cases, due to a man-in-the-middle attack where a third party intercepts the communication between your device and the server.
- No HTTPS enforcement;
Another reason for the issue is if the installed SSL certificate doesn’t turn on the “force HTTPS” option. This means visitors might be using the non-secure HTTP version of the site instead of the safe URL.
So, the error serves as a warning to users, indicating that the connection may not be secure and sensitive information could be at risk.
Browsers, including those on Android devices, prioritize user safety and privacy. They will block access to potentially compromised websites to prevent data theft or unauthorized access. That’s why when you get the “your connection is not private” message on Android, you can’t access the website.
Part 2: What The Error Codes in “Your Connection Is Not Private” Mean
When “your connection is not private” on Chrome Android error shows up, it often comes along with specific error codes that can indicate the root cause of the issue. Understanding these error codes is crucial for troubleshooting and resolving the problem effectively.
- ERR_CERT_SYMANTEC_LEGACY: Unsupported Symantec-issued certificate
This error code indicates that the website you are attempting to access is equipped with an unsupported Symantec-issued certificate. Symantec, a prominent Certificate Authority, had faced concerns about the security of its certificate issuance processes.
As a result, major browsers, including Google Chrome, no longer support certificates issued by Symantec. If you encounter this error, it implies that the website’s SSL certificate is outdated and needs to be updated with a certificate from a trusted Certificate Authority.
- NET::ERR_CERT_AUTHORITY_INVALID: Unauthenticated SSL certificate
The presence of this error code suggests that the SSL certificate of the website cannot be authenticated by your browser. This could occur if the certificate is self-signed or issued by an unrecognized Certificate Authority.
- NET::ERR_CERT_DATE_INVALID: Date and time mismatch
This error code points to a discrepancy between your Samsung Galaxy M34’s date and time settings and the information on the website’s SSL certificate, as they have expiration dates. If the date and time settings on your device are incorrect, it may prevent the certificate from being validated. Correcting your device’s date and time settings should resolve this issue.
- SSL certificate error: Generic or unspecified problem
This is a more generic error message that indicates a problem with the website’s SSL certificate without specifying the exact nature of the issue. It could indicate various issues, such as an expired certificate, a misconfiguration in the certificate chain, or other SSL-related problems.
 vMix HD - Software based live production. vMix HD includes everything in vMix Basic HD plus 1000 inputs, Video List, 4 Overlay Channels, and 1 vMix Call
Part 3: How To Fix Your Connection Is Not Private on Android
Encountering the “your connection is not private” error on Android can be a frustrating experience. Fortunately, there are various methods to address and fix this issue, depending on its underlying cause.
In this section, we will explore some effective solutions to help you regain a secure and private connection.

Method 1: Clear your cache
When you use the internet, web browsers store information about your online activities in cached data and cookies to speed things up. However, having too much of this data can cause problems instead. It might even stop your browser from connecting securely.
So, clearing your browser cache and data can be a quick and simple “your connection is not private” Android fix. Follow the steps here:
- Step 1: Open and launch Chrome.
- Step 2: Access the Menu (the three dots button) to open the Settings. Select Privacy and Security > Clear Browsing Data.
- Step 3: Opt for the “All Time” option and click “Clear Data” to erase your cache.

After successfully clearing your browser cache and data, revisit the website to check if the problem persists.

Method 2: Repair the Android system
Addressing the “your connection is not private” to fix on Android involves examining both the Samsung Galaxy M34 device and the website. If clearing browser data doesn’t help, there might be an issue with your Android system. One solution is to use the Wondershare Dr.Fone system repair tool to fix the issues safely.
How to perform system repair with Dr.Fone:
- Step 1. Open the Repair Tool
Start by launching Wondershare Dr.Fone on your computer. Go to the Toolbox section and connect your Samsung Galaxy M34. Choose System Repair and pick Android as your device type.

safe & secure
4,322,863 people have downloaded it
- Step 2. Begin Repair
Click Start on the new screen to kick off the repair. Since you’re dealing with a connection private issue on Android, select System Damage.
- Step 3. Fill in the Samsung Galaxy M34 device Details
The platform will detect your Samsung Galaxy M34’s brand. Confirm the Name, Model, Country, and Carrier. If your device is unlocked, choose OPEN in the Carrier section. Agree to the warning, click Next, and proceed with the repair.
- Step 4. Activate Download Mode
Follow the instructions to put your Samsung Galaxy M34 into Download Mode. Once in Download Mode, you will start downloading the firmware.
- Step 5. Confirm Installation
Remember, the repair may erase data. It’s advisable to back up your data first before starting the repair. Enter “000000” to confirm the repair process, shown by a progress bar.
When done, click Done if your Android starts properly. If not, click Try Again to repeat the process.

Method 3: Check and fix the date and time on your Android
Since the error code “NET::ERR_CERT_DATE_INVALID” indicates a mismatch between the date and time on your device and your browser, you need to adjust the date and time settings on your Android to fix it.
The specific steps can vary based on your Android model, but the general approach involves locating the “date and time” settings on your phone. How to fix the date and time on Android to bypass “your connection is not private” on Chrome Android:
- Step 1: Go to your Samsung Galaxy M34’s Settings > Date & Time.
- Step 2: Switch on the “Automatic Date & Time” to sync with the network-provided time.

Method 4: Perform factory reset
If nothing else works, there might be malware on your phone causing trouble. It’s crucial to eliminate this threat before further damage occurs. The recommended action is to perform a factory reset on your phone.
However, keep in mind that this process can result in data loss, so it’s essential to back up your data beforehand. Follow the steps to perform a factory reset on Android:
- Step 1: Go to your Android Settings.
- Step 2: Select Backup and Reset > Factory data reset. Then, opt to erase all data.
 The BootIt Collection covers multi-booting, partitioning, and disk imaging on traditional PC’s using the standard BIOS and newer PC’s using UEFI. The collection includes BootIt Bare Metal (BIBM) for standard BIOS systems and BootIt UEFI (BIU) for UEFI system.
Most of the time, you won’t need to go to the extreme of a factory reset. The simpler solutions mentioned earlier should take care of the Security Certificate Error on your Android.
Conclusion
By now, you should have a good grasp of the “Your Connection Is Not Private” problem on Android. This issue typically arises from complications with the SSL certificate of the website, designed to ensure a secure connection.
When you see the error message, it often comes with specific codes that indicate the underlying problem. Several methods can be employed to fix the “Your Connection Is Not Private” on Android. Clearing the browser cache, repairing the Android system using tools like Dr.Fone, checking and fixing date and time settings, and performing a factory reset as a last resort are among the solutions.
By prioritizing user safety and following the step-by-step approach in this guide, you can navigate and resolve this common internet browsing challenge on your Samsung Galaxy M34s.
Reasons for Samsung Galaxy M34 Stuck on Startup Screen and Ways To Fix Them
There are many reasons why phones get stuck on the boot screen. It could be something as simple as physical damage or more complicated related to software problems. Having your phone stuck on the logo screen, or boot screen is annoying, and it is no surprise that people will find ways to fix this issue when encountered.

This article will share the possible reasons why your phone is stuck on the boot screen. This article will share three possible reasons for this problem and three valuable tips to help fix this issue. If all else fails, there is an application that is recommended and is sure to solve your issue in no time. Keep on reading to find out more!
It is not uncommon for phones to be stuck on the startup screen, but finding out why this happens is tricky. This section identified some of the top reasons your cellphone could have gotten stuck on the startup screen.
Physical Damage to the Phone
If you accidentally dropped your phone or knocked it on a hard surface, you could have damaged the internal hardware of your phone. This could affect your phone’s ability to reboot and result in your phone being stuck on the boot screen.
If you are 100% certain that your phone has gone through physical damage, you should seek professional help to have your phone repaired or checked. It is advised not to fix this problem yourself as your phone’s internal parts are complicated and delicate. Look for an official phone repair store and get your phone fixed for issues like your phone getting stuck on the logo.
Liquid Damage
It is not common for your phone to expose to water. Rain or water splashes are unavoidable; sometimes, your phone gets wet. Little exposure to water on the surfaces of your phone is fine. However, if you fall into a pool with your phone or drop it in a puddle of water, your phone will likely suffer from liquid damage.
Even the tiniest water droplet that seeped into your phone could damage the internal hardware of your device, often leaving you with your phone stuck on the boot screen. The first thing to do when you accidentally submerge your phone in the water is to check if the water has damaged your phone.
For iPhone users, look for the water damage indicator. If you see that it has turned from white to red, it has suffered from water damage. You have two options if your phone has suffered liquid damage. One is dismantling your phone and letting it dry for at least 48 hours. Two is bringing your phone to a repair shop to fix it.

Software Issues
Software issues are probably the most common reason your phone is stuck on the logo screen. Eight times out of ten, software issues are either caused by a failed software update, using an older version of the operating system, or having a jailbroken phone. When the software does not successfully update, the phone will have no operating system, as the old system was erased before the new software was installed.
The older operating system is also not desired as your phone typically will send periodic updates to make sure your phone is up-to-date and free from bugs. Running applications on an older operating system might lead to issues like the phone being stuck on the boot screen or the logo. Hence, updating your phone to the latest software version would be better.
Part 2. 3 Helpful Ways To Fix Phones Stuck on Boot Screen
After understanding the common problems on why your phone is stuck on the startup screen page, here are three easy solutions to try solving yourself at home.
Hard reboot your phone
To quickly fix any of your phone issues, especially when stuck on the startup screen, perform a hard reboot. The term hard reboot means turning your device off and on again. You might think this is a simple option, but this is a tried and tested method that might work on a minor glitch that results in your smartphone getting stuck on the startup screen page.
Here is an example of performing a hard reboot for an Android phone such as Samsung Galaxy M34. Preess and hold the Power and Volume Down buttons simultaneously for more than 7 seconds to perform the hard reboot.

Put your phone in recovery mode
If a hard reboot does not work, a natural next step is to try going into recovery mode. The recovery mode is specially designed to solve any software-related issues. It is important to note that entering recovery mode will delete all your corrupted files and replace them with a functional operating system. Hence, back up all your files to ensure you retain all your information.
Here is a step-by-step process for putting your Samsung Galaxy M34 or Redmi smartphone in recovery mode.
Step 1: Tap and press the Power button to switch off your Samsung Galaxy M34/Redmi phone
Step 2:Hold the Volume Up and the Power buttons at the same time, then release the keys when the Main menu of Recovery mode appears on the screen.
Step 3: You can use the volumes buttons to navigate up and down and press the Power key to confirm the selection.
Factory Reset
If you do not want to attempt recovery mode, you can try resolving the issue of your phone being stuck on the startup screen through Factory Reset. Factory Reset, also called Hard Reset, erases all information and data on your device. As a result, it will return to the settings and recover the data it used to have when leaving the factory.
Here is an example of putting your Samsang smartphone into the Factory Reset DFU mode.
Step 1: Open the Settings application on your phone and tap General Management.
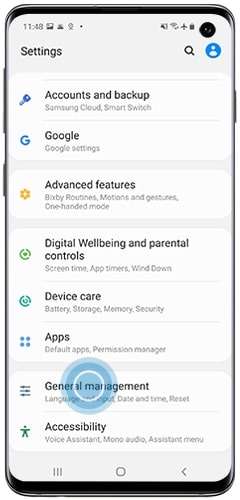
Step 2: Go to Reset > Factory data reset.
Step 3: Swipe to and tap Reset.
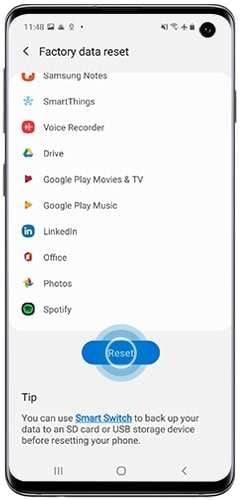
Note: Before carrying out a factory reset, you need to input the password of your Samsung Galaxy M34 Account.
 PDF application, powered by AI-based OCR, for unified workflows with both digital and scanned documents.
 Bonus Tip: Best App To Solve Phone Stuck on Boot Screen
If all the solutions above do not work and you do not want to perform a factory reset on your phone, one option is to use an application called Wondershare Dr.Fone. It is one of the most effective phone recovery solutions and can help to bring your phone back to a state like it was brand new. Being stuck on the startup screen page will be a problem of the past.
The following steps will show you how to use Dr.Fone to perform system repair on your phone.
Step 1: To the Dr.Fone application using the link above and click on System Repair.
Step 2: Depending on the Samsung Galaxy M34 device you are using, choose either Android or iPhone.
Step 3: In the next window, select the issue you are facing and click Start.
Step 4: Choose the corresponding Brand, Name, Model, Country, and Carrier from each drop-down menu and click Next.
Tip: Make sure the information you input is accurate, as it will affect the system repair if the information is inaccurate.
Step 5: Connect your device to your computer and follow the instructions on the screen to enter Download mode. Click on Next to proceed to the next step.
Step 6: Wait for the process to complete, and a new firmware will be updated on your device. Power on your phone and check if the issue still exists.
Frequently Asked Questions
The following are interesting and frequently asked questions about how to solve boot loops.
- What is a boot loop?
A boot loop describes a process when Your Samsung Galaxy M34 stays stuck in a circle of rebooting. When your phone is stuck on the startup screen, one of the strategies you will try is to restart your device. However, when your phone gets stuck in a boot loop, it is your device’s way of trying to turn it off and on again to fix the issue.
Since there is an issue with the booting process, it will keep running into the same error repeatedly, calling the boot loop. When trapped in a boot loop, your device will keep turning off and on. Most boot loop issues are software-related, such as a wrong system update.
- How do you fix a boot loop?
When stuck in a boot loop, there are different troubleshooting methods for other devices. For Android phones, force your phone into its Recovery mode; from there, you can restore a previous backup. This backup could be from when the boot loop did not exist, so recovery to that backup could quickly solve the problem.
For iPhones, it is the same concept as the Android, restore your phone to the previous backup. You can use iTunes to restore a previously stored backup on your computer.
- How to prevent a boot loop?
A boot loop typically starts when there is a change to your system before a reboot cycle. Most issues are software-related, such as having to do a system upgrade gone wrong or a problem that doesn’t mesh. One way to prevent this is to perform a software or system upgrade constantly. Make your phone juiced to prevent it from turning off mid-way when updating.
safe & secure
3,405,439 people have downloaded it
Conclusion
This article summarizes some of the possible reasons why your phone is stuck on the boot screen. It demonstrated three useful strategies to overcome your phone stuck in the boot with ease. However, if all the above methods do not work, why not try Dr.Fone-System Repair?
Dr.Fone-System Repair repairs the operating system issues and fixes the issue with your phone. Once you power on your phone again, you can rest assured that it will be like new.
- Title: How to Fix Android.Process.Media Has Stopped on Samsung Galaxy M34 | Dr.fone
- Author: Nova
- Created at : 2024-07-19 22:53:32
- Updated at : 2024-07-20 22:53:32
- Link: https://change-location.techidaily.com/how-to-fix-androidprocessmedia-has-stopped-on-samsung-galaxy-m34-drfone-by-drfone-fix-android-problems-fix-android-problems/
- License: This work is licensed under CC BY-NC-SA 4.0.