
How to Fix Android.Process.Media Has Stopped on Poco C51 | Dr.fone
How to Fix Android.Process.Media Has Stopped on Poco C51
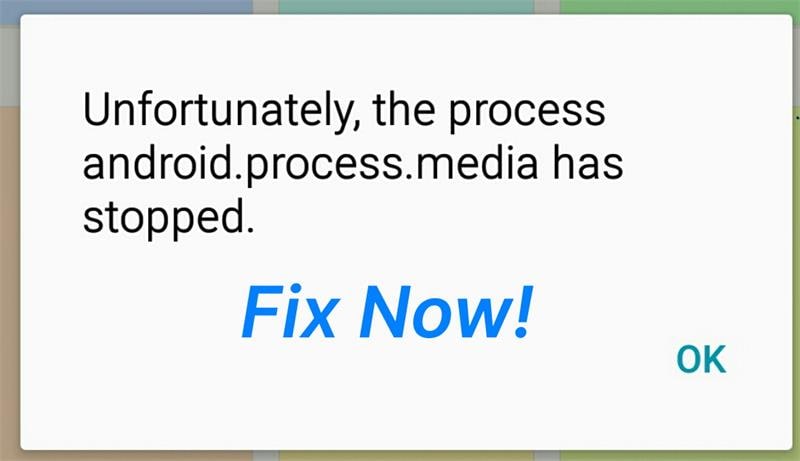
Like any other technological system, Android is not without its fair share of problems. One of the most common issues that Android users face is the android.process.media error. If you have encountered this problem lately, you don’t need to worry, this article will clearly explain what exactly causes this error and how to fix it safely.

Part 1. Why this error pops up?
There are several reasons why this error can occur repeatedly and it is worth noting the various reasons why this happens so that you can avoid the problem in the future. Some of the most common ones include:
- 1. Moving from one custom ROM to another can cause this error to occur
- 2. A failed firmware upgrade may also be to blame
- 3. A virus attack can also result in this error among many others
- 4. Restoring apps via a Titanium backup is also a major cause
- 5. Failure of certain apps such as the download manager and the media storage
Part 2. Back up your Android Data First
It is always a good idea to back up your data especially before embarking on any attempt to fix any problem with your device. This way you will always have your data with you just in case something goes wrong and you lose all your data. Wondershare Dr.Fone will help you easily back up your Poco C51. The application will allow you to back up your device with a few clicks and you can restore what you want from your backup .
Wondershare Dr.Fone
Flexibly Back up and Restore Android Data
- One-click to back up Android data to the computer.
- Preview and selectively restore the backup to any Android device.
- Supports 8000+ Android devices.
- There is no data lost during backup, export, or restore.
4,503,800 people have downloaded it
Follow the steps below to learn how to back up your phone in steps.
Step 1. Download, install, and run the program
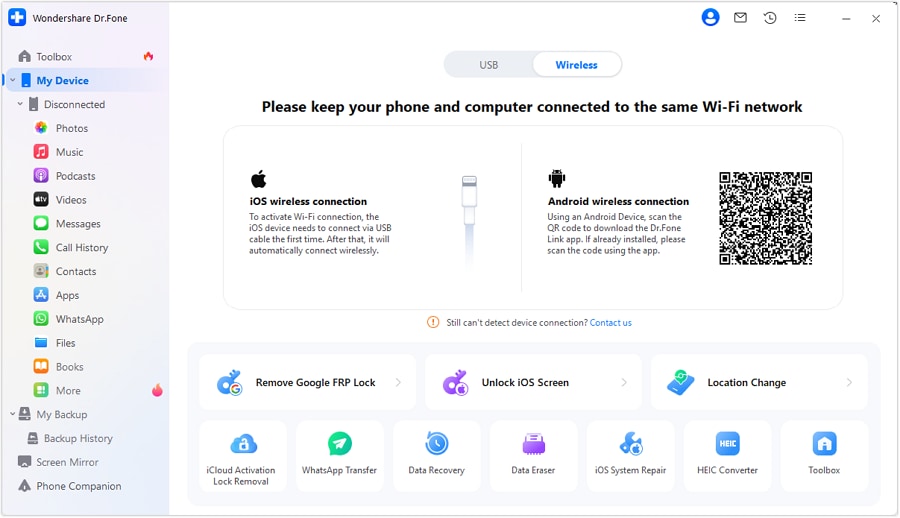
Click the “Start Download” button above to get the software installed on your computer. Then run it. The primary window of the software looks like below.
Step 2. Connect your device
Then connect your Poco C51 to the computer and make sure that it can be recognized by your computer. Then click on “My Backup” on Dr.Fone.

Step 3. Begin to backup
When your device is displayed on the window of the program, click “Back Up Now “ to begin. The rest will be done by the program.

 safe & secure
Part 3. How to Fix “Android. Process. Media” Error
With a full backup of your Poco C51, you can now embark on a mission to fix the error. There are several methods to clear this error. We have outlined three of the most effective solutions here.
Method 1: Ensure app and system updates
Updates often include patches for known issues and vulnerabilities. Ensuring that both apps and the system are up to date can resolve many potential problems.
Step 1: Visit the Google Play Store to check for available app updates.
Step 2: In “Settings,” go to “System” > “Software Update” to check for system updates.
Method 2: Reset app preferences
App preference settings might sometimes lead to conflicts or anomalies. Resetting these settings can revert apps to their default state, resolving potential issues.
Step 1: Go to “Settings” on your device.
Step 2: Access “Apps.”
Step 3: Tap the menu icon in the upper-right corner and select “Reset App Preferences.”
Method 3: Clear the cache and data on your device
Step 1: Go to Settings> Applications> Manage Applications and find the Google Services framework.
Step 2: Next, find Google Play from the same Manage Applications page.
Step 3: Tap on it and then Tap on clear cache.
Step 4: Press the back button to go back to the Google Services framework and then choose Force stop > clear cache > OK
Step 5: Next you need to open Google Play and when presented with an error, click OK
Step 6: Turn off the Poco C51 device and then turn it back on. Go to the Google Services framework again and turn it on to see if the issue has been resolved.
Method 4: Check Google Sync & Media Storage settings
Step 1: Go to Settings > Accounts and Personal> Google Sync and uncheck all the checkboxes to stop the Google Synchronization.
Step 2: Disable and Clear all Media Storage data by going to Settings> Apps> All Apps. Find the Media Storage> Clear Data> Disable
Step 3: Use the same method as above to clear the Download Manager data
Step 4: Turn off your device and then turn it on
This Should clear the error message for good.
Method 5: Boot your device into safe mode
Safe mode can temporarily disable third-party apps, allowing only core system apps. This detects if a third-party app causes the “Android process media keeps stopping” error. If the problem disappears in safe mode, a third-party app might be the cause. Uninstalling it can restore normal function. If the problem persists in safe mode, a deeper system issue might exist, needing further investigation or support.
Method 6: Fix the error by using a dedicated repair tool
Dr.Fone - System Repair (Android)
Fix Android process media has stopped issue in one click
- Fix all Android system issues like black screen of death, won’t turn on, system UI not working, etc.
- Industry’s 1st tool for one-click Android repair. Without any data loss.
- Supports all the new Poco C51 devices like Galaxy S8, S9, S22, etc.
- Step-by-step instructions provided. No technical skills required.
4,989,253 people have downloaded it
Step 1. Connect your Poco C51
After launching Dr.Fone, click on “System Repair” from the main window.

Then connect your Poco C51 with the correct cable and choose “Android” > click “Start”.

In the Poco C51 device information interface, remember to select the correct information. Then confirm the warning and click “Next”.

To confirm the Android repair may erase all data on your device, you need to type in “000000” to proceed.

Step 2. Repair your Poco C51 in Download mode.
Read and follow the guide here to boot your Poco C51 in Download mode.

Then click “Next” to start downloading the firmware.
 PCDJ DEX 3 for Windows & MAC is the total entertainment DJ software solution, offering audio, video, and karaoke mixing ability. Automatic beat-sync, smart looping, 4 decks, DJ MIDI controller support, Karaoke Streaming and much more.
It may take a while, so you could have a cup of coffee to wait for the repair process completed.

safe & secure
Method 7: Factory Reset your device
If the above steps fail, you might need to perform a factory reset. A factory reset restores the Poco C51 device to its initial state, which can eliminate many problems, but it will also erase all data. Ensure you back up your important data before proceeding.
.png) Kanto Player Professional
Kanto Player ProfessionalMethod 8: Seek Manufacturer Support
If the problem persists after trying the above steps, it could be related to specific device or software issues. It’s advisable to contact your device manufacturer’s support team for more detailed guidance and assistance.
It is our hope that when faced with this fairly common error, you will not panic. This is a fairly mild issue that can easily be fixed as we have seen above.
safe & secure

How to Fix Error 495 While Download/Updating Android Apps On Poco C51
Error 495 is a common error that occurs while downloading or updating apps from Google Play Store. This error is usually caused by a problem with the Google Play Store, and it can be fixed by clearing the cache and data of the Google Play Store app. If you are experiencing this error, follow the steps below to fix it.
In this article, you will learn why the Android error 495 pops up, possible solutions to bypass, as well as a dedicated repair tool to radically fix error 495.
We always like to explore every new feature or the features that already exist on our devices. We have a tendency to be the master of our device and want to know every bit of the handset. Unexpected errors ruin that experience and it is just frustrating to experience these errors. And the worst part is that we have no idea where we are wrong or what we did that led to the error. Same is the case with the error 495 which occurs due to downloading or updating of Android Apps. You may have spent countless hours on the internet to find the right solution for error code 495 but even after following many of the most guaranteed steps sometimes the error still doesn’t go away.
However, this article will provide you various methods to get rid of the Error 495 play store problem that you face and you will not have to depend on any other sources for your solution.
Reasons for Google play error 495
Android Apps are most commonly downloaded from the Google Play Store with the help of Wi-Fi or Cellular Data. One may come across many types of errors. Mostly the errors come in during the download or update or installing time. Error 495 occurs when the user isn’t being able to download or install an app over Wi-Fi, but the user is able to do the same thing over cellular data.
Technically speaking, the issue is caused when the connection to the Google Play servers, where the app is hosted, times out. Which is unable to resolve by itself.
Also, there could be another reason that it cannot sync with the servers.
Now that we know the possible reasons for the error 495, let us also know how to get rid of it in the sections below.
Solution 1: One Click to Fix error 495 by Android Repair
Tried several methods to make the error 495 disappear, but nothing works? Well, many people have experienced the same frustration. The root cause is that something is wrong with the Android system. You need to have your Android system repaired to fix error 495 in this situation.
Note: Having your Android system repaired may lose existing data on your Android. Backup the data on your Android before the Android repair.
 KoolReport Pro is an advanced solution for creating data reports and dashboards in PHP. Equipped with all extended packages , KoolReport Pro is able to connect to various datasources, perform advanced data analysis, construct stunning charts and graphs and export your beautiful work to PDF, Excel, JPG or other formats. Plus, it includes powerful built-in reports such as pivot report and drill-down report which will save your time in building ones.
 It will help you to write dynamic data reports easily, to construct intuitive dashboards or to build a whole business intelligence cockpit.
KoolReport Pro package goes with Full Source Code, Royal Free, ONE (1) Year Priority Support, ONE (1) Year Free Upgrade and 30-Days Money Back Guarantee.
Developer License allows Single Developer to create Unlimited Reports, deploy on Unlimited Servers and able deliver the work to Unlimited Clients.
Dr.Fone - System Repair (Android)
Best tool for fundamental Android repair in one click
- Fixes all Android system issues like error 495, system UI not working, etc.
- One click for Android repair. No special technics needed.
- Supports all the new Poco C51 devices like Galaxy Note 8, S8, S9, etc.
- Step-by-step on-screen instructions provided to fix error 495 without any hassle.
3,390,486 people have downloaded it
With Dr.Fone - System Repair (Android) , you can easily fix error 495 in few steps. Here is how:
- Download, install, and launch Dr.Fone - System Repair (Android). Connect your Android to your computer with a USB cable.
- Select the option “Repair” > “Android Repair”, and click “Start”.
- Select the Poco C51 device information like brand, name, model, etc., and confirm your selection by typing in “000000”.
- Press the stated keys to boot your Android in download mode to download the firmware as instructed.
- After the firmware is downloaded, the program will automatically start to repair your Android.

Solution 2: Clear the Google Service Framework cache to Fix error 495
Step 1:
Go to the “settings” of your device. Once the series of sections comes up, tap on the “APPS” section.
Step 2:
Click on ‘All Apps’ or ‘Swipe to All’ and the open the section named “Google Services Framework App”
 .
.
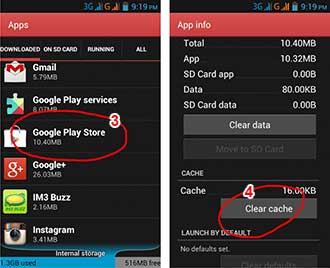
STEP 3:
Open “App Details” and the screen shown in the image should come up on your device. As shown in the image, follow the three steps. First, tap on “Force Stop” and then second, tap on the “Clear Data” option and finally go ahead and tap on the “Clear Cache” option.
Following the above steps should solve your problem of Google Play Error 495. And you can enjoy back to using the apps which you couldn’t download or update due to the Error 495.
Solution 3: Reset App Preference in Google play Store to Fix error 495
STEP 1:
Go to the settings section in your device. It will be differently placed for different devices and different users.

STEP 2:
Once the Settings section is open. A lot of further sections will pop up. No find the section named “Application Manager” or “Apps”. After locating it, tap on that section.

STEP 3:
Now go ahead and tap or slide to a section named “ALL”.
STEP 4:
After reaching the “ALL” section tap the touch button to open menu/properties and choose an option named “Reset Apps” or “Reset App Preferences”.
There’s no need to be alarmed because on clicking the reset option, the apps won’t be deleted but it is only going to re-set them. And hence solving the Error 495 created in the Google Play.

Solution 4: Fix Error Code 495 by installing a VPN app
The Error code 495 can be easily removed in another interesting way too. On downloading a Virtual Private Network (VPN) and then operating the play store automatically solves the error 495.
STEP 1:
Install Hideman VPN (using any other VPN will also make it work) from Google Play store. (If the error persists for this app too then download it from a different app store or by using a third-party store).
STEP 2:
Now open the app and select the United States as the country of connection and press the option named Connect.
STEP 3:
Open Google Play Store and Download any app without the Error Code 495 coming in and bothering.
This fix will work for most of the Google Play Errors and not just only The Error Code 495.
Solution 5: Remove your Google Account & Reconfigure it to fix error 495
Removing the Google account and re-configuring it is a very common method adopted to get rid of the Error 495. Adopt the following steps to complete this method.
STEP 1:
Go to the “Settings” section of your device. Like it was mentioned before, different devices and different users will have the placement of the settings section in a different place.
 Lyric Video Creator Professional Version

STEP 2:
Go to the accounts section in the settings tab.

STEP 3:
In the accounts section tap on the Google Account part
STEP 4:
Inside The Google section, there’ll be an option called “Remove Account”. Tap on that section, to remove your google account.

STEP 5:
Now go ahead and re-enter/ re-register your Google account and check if the Error 495 still persists.
Now you have completed all the steps and your problem should be solved.
Solution 6: Fix error code 495 by Removing your Google Play Store Data & Cache
One of the best and most accurate methods in the series of various steps in eradicating the Error Code 495 in Google Play Store is by removing the Google play Store Data and Cache. In order to do so follow the steps mentioned below. After following the steps it is guaranteed that the Error code 495 will be done with and you won’t experience any such problems in the future.
STEP 1:
Go to the “Settings” section into your mobile device. The settings can be accessed by scrolling down and pulling down the drop-down menu and most likely the settings app will be on the top-right corner. Otherwise, it will be found after opening the app drawer.

STEP 2:
Once after opening the settings section, select the “Installed apps” or the “Apps” section.

STEP 3:
Find the “Google Play Store” section and select that too.
STEP 4:
Tap on the “Clear data” & “Clear Cache”.

Doing the above steps will clear your caches of the Google Play Store. Now you have a new google Play store.
Hence in this article, we got to know about the error 495 and the possible solutions to it as well. Also, this article explains how Error code 495 can be removed by 5 different ways. These are the best ways by which you can remove or get rid of the Error Code 495. In case one of the method fails, use the other one to rectify this recurring error 495 on your Poco C51.

Stuck at Android System Recovery Of Poco C51 ? Fix It Easily
In this article, you will learn what is Android system recovery, and how to fix Android stuck at system recovery step by step. To get out of Android system recovery more easily, you need this Android repair tool.
You know your Poco C51 is stuck in recovery mode when you cannot turn on the Poco C51 device. If you try to turn it on, it shows a message that says, “Android System Recover.” This situation can be quite debilitating for most Android users. Most of the time, you don’t know whether you have lost all of your important Android data. It is even more worrying because of the fact that you cannot turn on your device at all, especially when you don’t know how to fix it.
Part 1. What is Android System Recovery?
Despite all the worry that surrounds an unwanted Android system recovery screen, it is actually a feature that can be quite helpful to your Poco C51 when it’s needed. It can be useful when you want to hard reset the Android device without having to access the settings. This can be very useful if your device is not working very well or if your touch screen is experiencing problems. It can also be very helpful when you are having a problem accessing the settings on your device.
For these reasons, it is actually a good thing, although when it does happen unexpectedly, you may want to know how to fix it.
Part 2. How to get to Android System recovery
Now that you know how useful the Android System can be, you may want to know how to utilize this feature to get out of some of the problems we mentioned above. Here’s how you can safely get to the Android recovery system on your Poco C51.
Step 1: Hold down the power key and then select “Power Off” from the options on the screen. If, however, your screen is unresponsive, keep holding the power key for several seconds until the Poco C51 device is completely turned off.


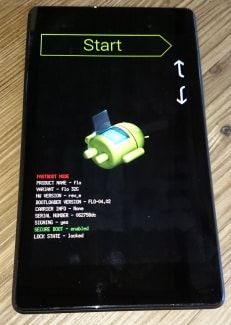
Step 2: Next, you need to hold down the Power and the Volume Key. You should able to see the Android image and a bunch of information about your device. There should also be a “Start” at the top right corner of the screen.
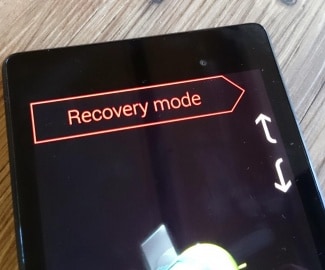
Step 3: Press the Volume up and Volume down keys and use the Power key to select menu options. Press the Volume down key twice to see “Recovery Mode” in red at the top of the screen. Press the Power key to select it.
 SwifDoo PDF Perpetual (2-PC) Free upgrade. No monthly fees ever.
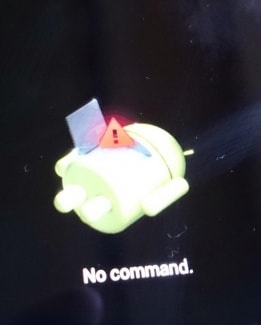
Step 4: The white Google logo will appear immediately followed by the Android logo again as well as the words “No Command” at the bottom of the screen.
Step 5: Finally, press and hold both the Power and the Volume up Key for around 3 seconds and then let go of the Volume up Key but keep holding the Power Key. You should see the Android system recovery options at the top of the screen. Use the Volume keys to highlight and the Power key to select the one you want.


Part 3. Android Stuck at System Recovery? How to fix in one click?
Sometimes during the System Recovery process, the process can glitch, and you’ll lose data on your device, rendering it unusable. However, another solution to fix this is to repair your device using the Dr.Fone - System Repair tool.
Dr.Fone - System Repair (Android)
One-stop solution to fix Android stuck at System recovery
- It’s the #1 software for PC-based Android repair
- It’s easy to use with no technical experience required
- Supports all latest Poco C51 devices
- Easy, one-click fix Android stuck at system recovery
3981454 people have downloaded it
Here’s a step by step guide on how to use it yourself;
Note: Be aware that this process can erase all your personal files on your device, so ensure you’ve backed up your Poco C51 before continuing.
Step #1 Head over to the Dr.Fone website and download the software for your Windows computer.
Once installed on your computer, open onto the main menu and connect your Poco C51 using the official USB cable. Select the System Repair option.
Step #2 Select the ‘Android Repair’ option from the next screen.
Insert your device information, including the brand, carrier details, model and country and region you’re in to ensure you’re downloading the correct firmware.
Step #3 Follow the onscreen instructions on how to put your device in Download Mode.
Your device should already be in this mode but follow the instructions to make sure. There are methods available for devices, both with and without home buttons.
Step #4 The firmware will now start downloading. You’ll be able to track this process in the window.
Ensure your device, and your computer stays connected the entire time, and make sure your internet connection remains stable.
After downloading, the software will automatically start to repair your device by installing the firmware. Again, you can track the progress of this on the screen, and you’ll need to ensure your device remains connected throughout.
You’ll be notified when the operation is complete and when you’re able to disconnect your phone and use it as normal, free from it being stuck on the Android system recovery screen!
Part 4. Android Stuck at System Recovery? How to fix in a common way?
If, however, your device is stuck on system recovery mode, here’s how you can easily get it out of system recovery. The process is slightly different for different Android devices, so you should check your device’s manual before attempting this process.
Step 1: Power off the Poco C51 device, and just to be sure, take out the battery to ensure that the Poco C51 device is fully turned off. Then reinsert the battery.
Step 2: Press and hold down the Home button, Power Button, and the Volume up Key simultaneously until the Poco C51 device vibrates.
Step 3: Once you feel the vibration, release the power button but continue to hold down the Home and Volume up Key. The Android recovery screen will display. Release the Volume up and Home buttons.
Step 4: Press the Volume down key to select the “Wipe Data/ Factory Reset option and then press the Power button to select it.
Step 5: Next, you need to press the Volume down button to highlight “Delete All User Data” and then press the Power button to select it. The device will reset and present the “Reboot System Now” option.
Step 6: Finally, press the Power button to reboot the phone in normal mode.
Part 5. Backup and Restore Android System
Losing data on your Poco C51 is a common occurrence, and since Android devices don’t really have an automatic full backup solution, it is important to know how to backup and restore your device system. Here’s how to easily do that.
Step 1: Enter the recovery mode on your Poco C51, as described in Part 2 above. Use the Volume and Power keys to select the “Backup & Restore” option on the screen.
Step 2: Tap on the backup option or use the Volume and Power keys if your screen is unresponsive. This will begin backing up your system to the SD card.
Step 3: After the process is complete, choose “Reboot” to restart the Poco C51 device.
Step 4: You can then simply check Recovery > backup directory on your SD card. You can rename it to easily find it later during the restore process.
To restore the system from the backup created, follow these simple steps.
Step 1: Once again, enter recovery mode as described in part 2 above and then choose Backup & Restore from the menu list.
Step 2: Press “Restore” to begin the recovery process from the Backup file we created
Step 3: You will be notified when the system restore is complete.
Android system recovery mode can be quite useful, especially when your system is unresponsive. As we have also seen, it is important to know how to get into and out of System Recovery mode if you are going to backup and restore your Android system. It is also quite easy to do both of these things.
- Title: How to Fix Android.Process.Media Has Stopped on Poco C51 | Dr.fone
- Author: Nova
- Created at : 2024-07-19 22:52:13
- Updated at : 2024-07-20 22:52:13
- Link: https://change-location.techidaily.com/how-to-fix-androidprocessmedia-has-stopped-on-poco-c51-drfone-by-drfone-fix-android-problems-fix-android-problems/
- License: This work is licensed under CC BY-NC-SA 4.0.