
How to Fix Android.Process.Media Has Stopped on Nokia G310 | Dr.fone
How to Fix Android.Process.Media Has Stopped on Nokia G310
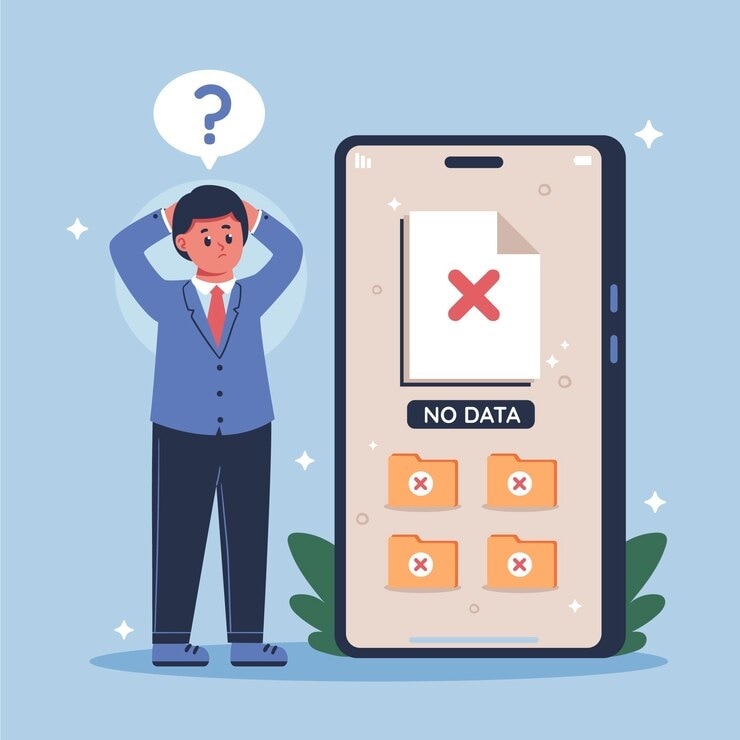
Like any other technological system, Android is not without its fair share of problems. One of the most common issues that Android users face is the android.process.media error. If you have encountered this problem lately, you don’t need to worry, this article will clearly explain what exactly causes this error and how to fix it safely.
 Forex Robotron Gold Package
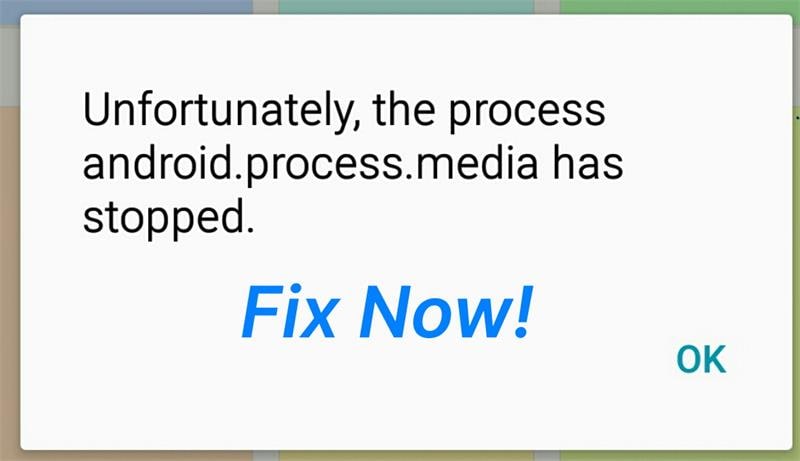

Part 1. Why this error pops up?
There are several reasons why this error can occur repeatedly and it is worth noting the various reasons why this happens so that you can avoid the problem in the future. Some of the most common ones include:
- 1. Moving from one custom ROM to another can cause this error to occur
- 2. A failed firmware upgrade may also be to blame
- 3. A virus attack can also result in this error among many others
- 4. Restoring apps via a Titanium backup is also a major cause
- 5. Failure of certain apps such as the download manager and the media storage

Part 2. Back up your Android Data First
It is always a good idea to back up your data especially before embarking on any attempt to fix any problem with your device. This way you will always have your data with you just in case something goes wrong and you lose all your data. Wondershare Dr.Fone will help you easily back up your Nokia G310. The application will allow you to back up your device with a few clicks and you can restore what you want from your backup .
Wondershare Dr.Fone
Flexibly Back up and Restore Android Data
- One-click to back up Android data to the computer.
- Preview and selectively restore the backup to any Android device.
- Supports 8000+ Android devices.
- There is no data lost during backup, export, or restore.
4,503,800 people have downloaded it
Follow the steps below to learn how to back up your phone in steps.
Step 1. Download, install, and run the program
Click the “Start Download” button above to get the software installed on your computer. Then run it. The primary window of the software looks like below.
Step 2. Connect your device
Then connect your Nokia G310 to the computer and make sure that it can be recognized by your computer. Then click on “My Backup” on Dr.Fone.

Step 3. Begin to backup
When your device is displayed on the window of the program, click “Back Up Now “ to begin. The rest will be done by the program.


 safe & secure
Part 3. How to Fix “Android. Process. Media” Error
With a full backup of your Nokia G310, you can now embark on a mission to fix the error. There are several methods to clear this error. We have outlined three of the most effective solutions here.
Method 1: Ensure app and system updates
Updates often include patches for known issues and vulnerabilities. Ensuring that both apps and the system are up to date can resolve many potential problems.
Step 1: Visit the Google Play Store to check for available app updates.
Step 2: In “Settings,” go to “System” > “Software Update” to check for system updates.
Method 2: Reset app preferences
App preference settings might sometimes lead to conflicts or anomalies. Resetting these settings can revert apps to their default state, resolving potential issues.
Step 1: Go to “Settings” on your device.
Step 2: Access “Apps.”
Step 3: Tap the menu icon in the upper-right corner and select “Reset App Preferences.”
Method 3: Clear the cache and data on your device
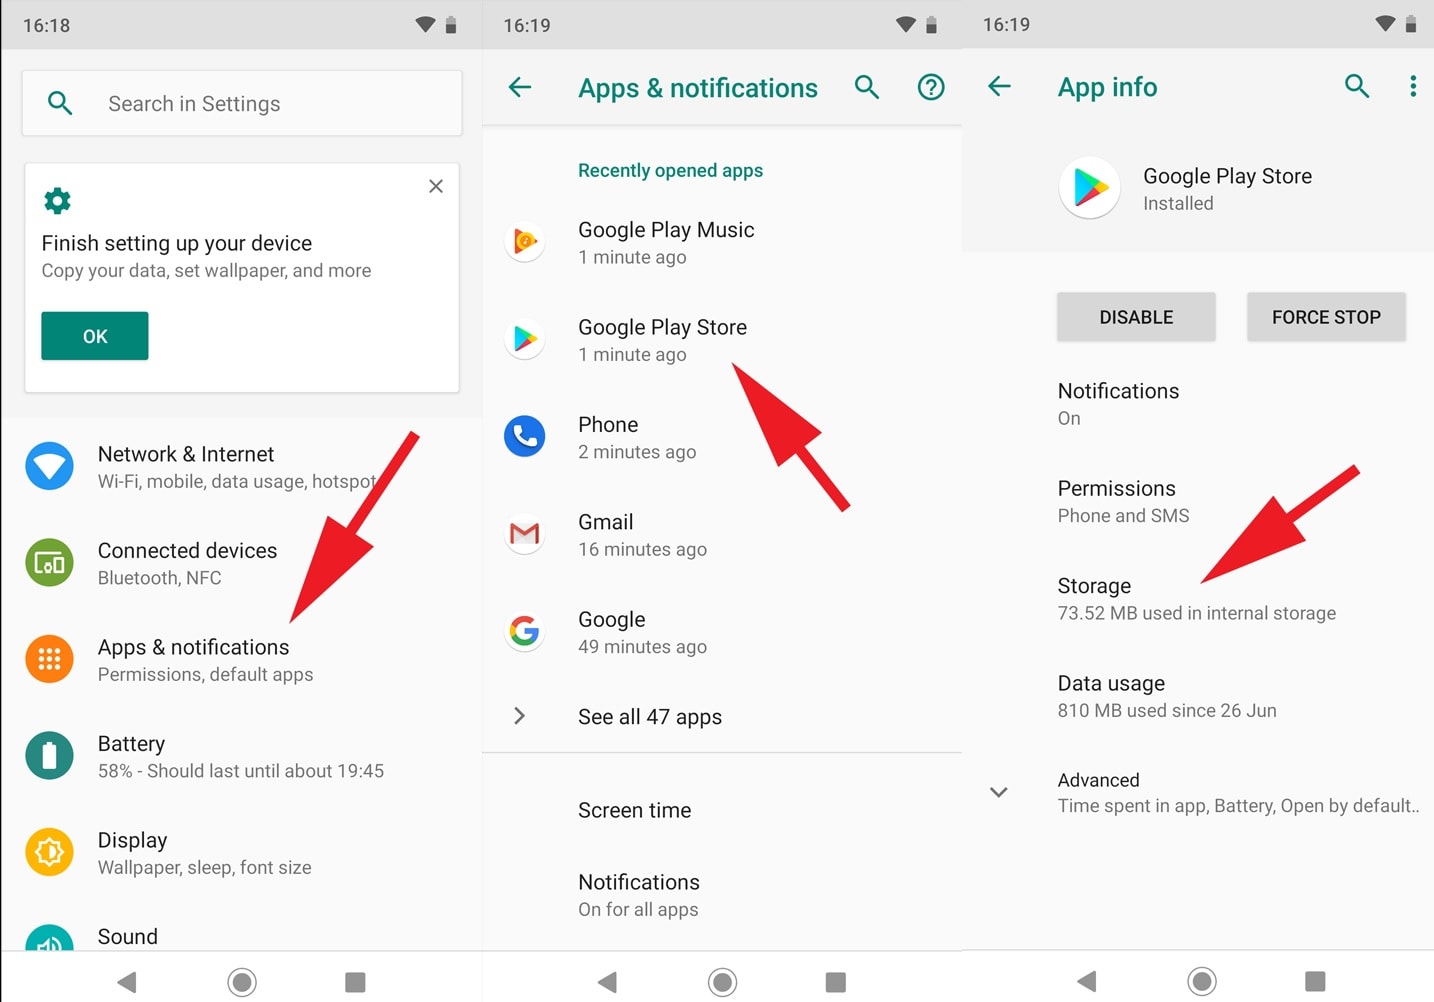
Step 1: Go to Settings> Applications> Manage Applications and find the Google Services framework.
Step 2: Next, find Google Play from the same Manage Applications page.
Step 3: Tap on it and then Tap on clear cache.
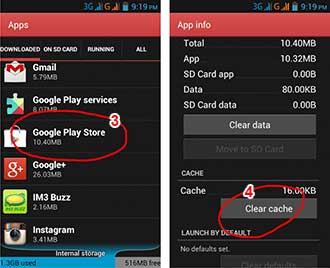
Step 4: Press the back button to go back to the Google Services framework and then choose Force stop > clear cache > OK
Step 5: Next you need to open Google Play and when presented with an error, click OK
Step 6: Turn off the Nokia G310 device and then turn it back on. Go to the Google Services framework again and turn it on to see if the issue has been resolved.
Method 4: Check Google Sync & Media Storage settings
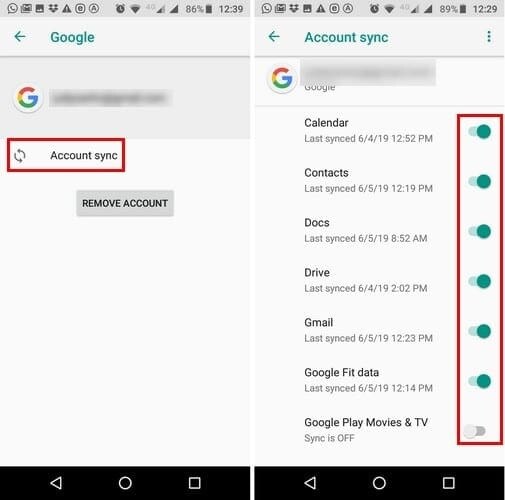
Step 1: Go to Settings > Accounts and Personal> Google Sync and uncheck all the checkboxes to stop the Google Synchronization.
Step 2: Disable and Clear all Media Storage data by going to Settings> Apps> All Apps. Find the Media Storage> Clear Data> Disable
Step 3: Use the same method as above to clear the Download Manager data
Step 4: Turn off your device and then turn it on
This Should clear the error message for good.
Method 5: Boot your device into safe mode
Safe mode can temporarily disable third-party apps, allowing only core system apps. This detects if a third-party app causes the “Android process media keeps stopping” error. If the problem disappears in safe mode, a third-party app might be the cause. Uninstalling it can restore normal function. If the problem persists in safe mode, a deeper system issue might exist, needing further investigation or support.
Method 6: Fix the error by using a dedicated repair tool
### [Dr.Fone - System Repair (Android)](https://tools.techidaily.com/wondershare/drfone/android-repair/)Fix Android process media has stopped issue in one click
- Fix all Android system issues like black screen of death, won’t turn on, system UI not working, etc.
- Industry’s 1st tool for one-click Android repair. Without any data loss.
- Supports all the new Nokia G310 devices like Galaxy S8, S9, S22, etc.
- Step-by-step instructions provided. No technical skills required.
4,989,253 people have downloaded it
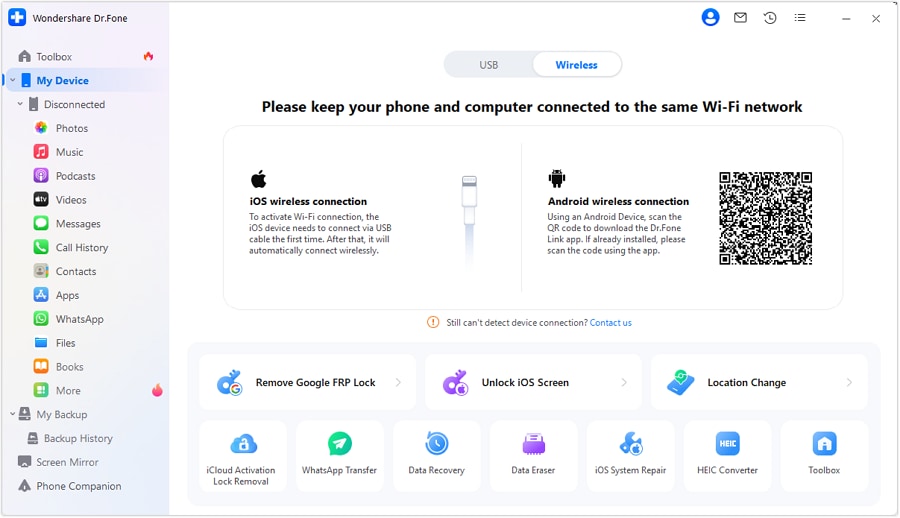
Step 1. Connect your Nokia G310
After launching Dr.Fone, click on “System Repair” from the main window.

Then connect your Nokia G310 with the correct cable and choose “Android” > click “Start”.

In the Nokia G310 device information interface, remember to select the correct information. Then confirm the warning and click “Next”.

To confirm the Android repair may erase all data on your device, you need to type in “000000” to proceed.

Step 2. Repair your Nokia G310 in Download mode.
Read and follow the guide here to boot your Nokia G310 in Download mode.

Then click “Next” to start downloading the firmware.


It may take a while, so you could have a cup of coffee to wait for the repair process completed.


safe & secure
Method 7: Factory Reset your device
If the above steps fail, you might need to perform a factory reset. A factory reset restores the Nokia G310 device to its initial state, which can eliminate many problems, but it will also erase all data. Ensure you back up your important data before proceeding.
Method 8: Seek Manufacturer Support
If the problem persists after trying the above steps, it could be related to specific device or software issues. It’s advisable to contact your device manufacturer’s support team for more detailed guidance and assistance.
It is our hope that when faced with this fairly common error, you will not panic. This is a fairly mild issue that can easily be fixed as we have seen above.
safe & secure
Want to Uninstall Google Play Service from Nokia G310? Here is How
In this article, you will learn the pros and cons of uninstalling Google Play services, as well as a free root tool to help you do this.
Acts as a one-stop destination to download various kinds of apps from the Play Store. The Play service also provides a way to manage these apps without much hassle. From uninstalling to updating an app, all of this can be done with Google Play service. Nevertheless, there are times when users wish to uninstall Google Play services. To start with, it takes a lot of storage and makes it pretty tough for users to manage their devices. To help you, we will let you know how to uninstall Google Play Store in this informative post.
Part 1: Reason you might want to get rid of Google Play Service
Before we proceed and discuss different ways on how to update Play Store after uninstalling updates, it is important to cover the basics. We have heard plenty of users who wish to uninstall Google Play services, but are not sure of the repercussions. One of the main reasons is that it consumes a lot of space on phone’s storage. Not just that, it only consumes plenty of battery as well.
If your device is giving the insufficient storage warning, then you need to start by clearing your phone’s data. It is observed that the Google Play Service accumulates most of the data in a device. This leads to users looking for different ways to how to uninstall Google Play Store.
Part 2: What will it affect to uninstall Google Play Service?
If you think that Google Play Service only provides a platform to download new apps, then you are wrong. It provides several other functions that might alter the way you use your smartphone. It is linked with other essential Google services as well, like Google Maps, Gmail, Google Music, etc. After uninstalling the Google Play Service, you might face trouble using various essential apps.
Furthermore, it might tamper with the overall functionality of your device as well. For instance, you could encounter network issues, messaging problems, app crashing, and more. Since the Play Service is closely associated with Android system, it might have a prominent effect on your phone. If you have a rooted device, then you can easily install custom ROM and resolve these issues. Though, for a non-rooted device, overcoming these problems could be a big hurdle.

Part 3: How to disable Google Play Service?
By now, you already know all the repercussions of getting rid of Google Play Services permanently. Before you learn how to update Play Store after uninstalling updates, be sure whether you wish to uninstall Google Play Services or not. You can also choose to simply disable the services as well. If you face any severe issue afterward, then you can always enable the services manually.
To disable the Google Play Services, just go to your phone’s Settings > Applications > All and open Google Play Services. You will get to know about the app’s detail and a few other options here. Just tap on the “Disable” button. It will generate another pop-up message. Confirm it by tapping on the “Ok” button. This will disable Google Play Services on your device. Later, you can follow the same drill to enable it as well.

Now when you know how to uninstall Google Play Store on your device, you can easily customize it. Get rid of any kind of problem you are facing due to lack of storage or battery issues related to Google Play services after following these instructions. Feel free to drop a comment below if you face any setback while following this tutorial.
Strategies for Apps That Won’t Download From Play Store On Nokia G310
The frustration of apps not downloading in the Google Play Store can annoy users. A seamless download experience is crucial for user satisfaction and app success. When you encounter such issues, they disrupt the interaction expected from your device.
The inconvenience can impact user trust and the overall perception of an app’s reliability. Addressing these challenges is crucial to maintaining a satisfied user experience and ensuring the success of apps on the platform. Explore the article below to learn what to do when apps not downloading from the Play Store issue appears.
Part I. 7 Usual Reasons Behind Apps Not Downloading in Google Play Store
The reasons below collectively contribute to the frustration users experience when apps are unable to download from the Play Store:
Connectivity Issues
Slow or unstable internet connections can interfere with the download process. It often leads to failed or delayed app installations. You will experience frustration when faced with connectivity issues, impacting your ability to access desired apps.
![]() FX PRO (Gold Robot + Silver Robot(Basic Package))
FX PRO (Gold Robot + Silver Robot(Basic Package))
Insufficient Storage
Limited available storage on the Nokia G310 device prevents the installation of new apps. Users may find it challenging to manage their storage effectively. It can hinder the expansion of your app library and impact the overall device functionality.
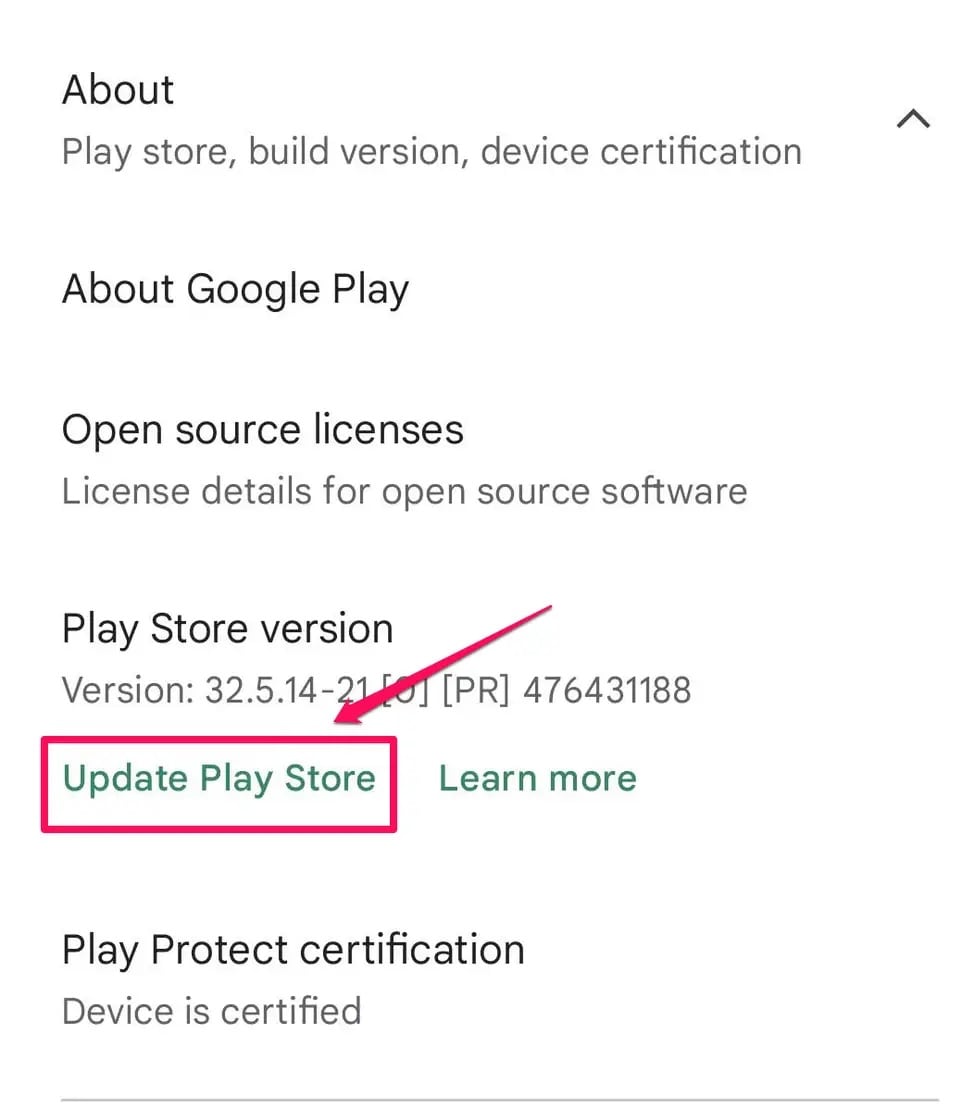
Outdated Play Store Version
Running an outdated version of the Play Store can cause compatibility issues with the newest versions of apps. You’ll miss out on new features and improvements, affecting the overall user experience and the efficiency of the Play Store.
Google Account Authentication Problems
Issues with verifying Google accounts can restrict access to the Play Store. It prevents you from downloading or updating apps. Authentication problems pose a significant barrier, impacting your ability to stay current with app versions.
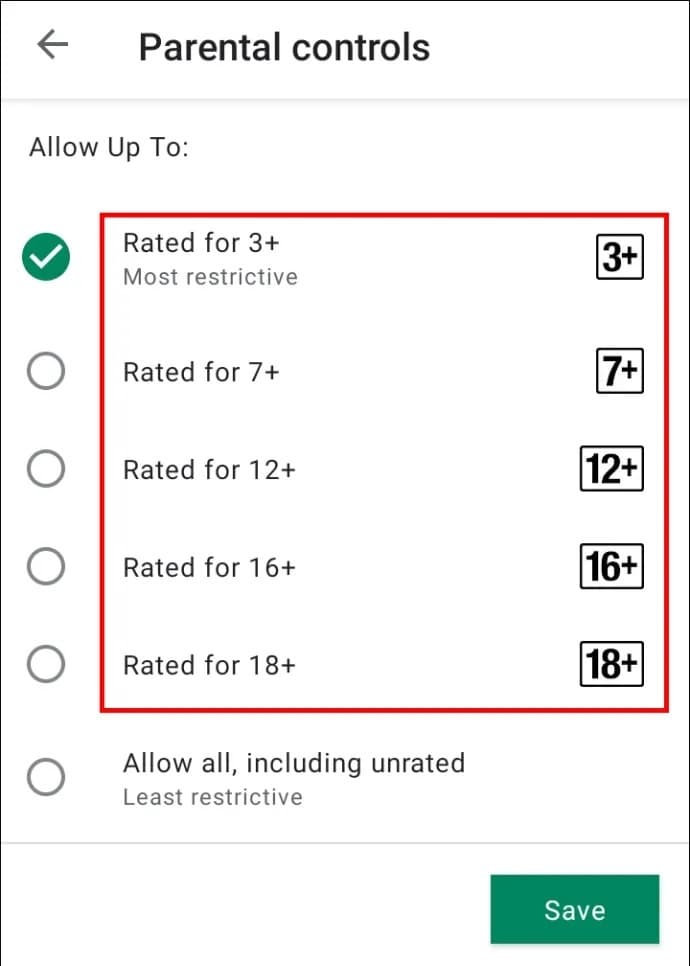
App Download Restrictions
Device settings or parental controls may impose restrictions on certain app downloads. You may encounter limitations in accessing specific apps. It can affect the Nokia G310 device’s versatility.
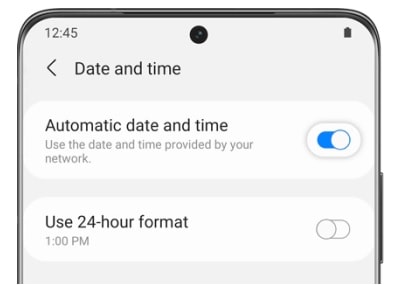
Incorrect Date and Time Settings
Inaccurate date and time settings on the Nokia G310 device can disrupt the Play Store’s functionality. You’ll face obstacles in downloading apps due to authentication errors or syncing issues. It can have a negative impact on the overall user experience.
Play Store Bugs and Glitches
Technical issues within the Play Store, such as bugs or glitches, can lead to failed downloads. You may encounter unexpected errors, causing uncertainty and potential distrust in the reliability of the app platform.
If you encounter any of these issues, having a reliable tool to fix them is essential. Wondershare Dr.Fone - System Repair offers a solution if you cannot download from the Play Store. The platform ensures you can download apps again with a high success rate in minutes.
Part II. Having a Third-Party Tool Is Essential To Safeguard Your Apps
Dr.Fone - System Repair is a dependable alternative offering a comprehensive solution to various Android-related problems. Its key features set it apart, making it an essential asset for users facing app download challenges.
safe & secure
4,307,222 people have downloaded it
Key Features
The summarized points show why Dr.Fone is a flexible and powerful tool for Android users with various phone models.
Supports up to 1000+ Android Models
Dr.Fone System Repair boasts compatibility with a vast range of Android models. It provides a universal solution for users regardless of their device. The extensive support ensures that users with diverse Android devices can rely on the tool for effective issue resolution.
Fixes All Kinds of Android Problems in Minutes
The tool is designed to address a wide array of Android problems. Whether it’s connectivity issues, authentication problems, or glitches within the Play Store, Dr.Fone - System Repair solves these issues within minutes. Its efficiency in tackling diverse problems makes it a valuable asset for users seeking a quick and reliable solution.
High Success Rate Without Data Loss
One of the standout features of Dr.Fone - System Repair is its high success rate in problem resolution without causing data loss. You can have confidence that your apps and important data remain intact throughout the repair process. It ensures a smooth solution and maintains the integrity of the user’s device and data.
When grappling with persistent issues hindering app downloads on the Google Play Store, having a reliable third-party tool becomes essential to safeguard your apps and ensure a seamless user experience. The next section will show you how to use the platform to fix the apps not downloading in the Google Play Store problem.
Part III. First Choice: Use Dr.Fone - System Repair for App Downloading Issues
Using Dr.Fone - System Repair to resolve app downloading issues is straightforward. Here are three simple steps to effectively address app-related challenges:
**Note:**It is highly recommended that you back up your Android data before using Dr.Fone for Android repair.
- Step 1: Download and install Dr.Fone - System Repair on your computer. Launch the program and select System Repair from the available options.
safe & secure
3,143,540 people have downloaded it
- Step 2: Connect your Nokia G310 to the computer using a USB cable. Dr.Fone will detect your device, and you’ll be prompted to choose your device’s type. Select Android Repair.

- Step 3: Follow the on-screen instructions until the app downloads the correct firmware for your device. As it downloads, Dr.Fone will verify it and put your device details on display. You can install the firmware on your Nokia G310 by choosing Fix Now.

Step 4: Initiating the system repair process will be accompanied by a progress bar visible on the screen. Upon completion, a prompt window will emerge, presenting a completion message.
If you can download apps successfully, click Doneto close the tool.
If the problem persists, select TryAgain to rerun the process.
If you can’t download Dr.Fone for some reason, you can try these common fixes to try to resolve your app download issues on your device
Part IV. 8 Other Methods of Resolving Common App Downloading Issues
Here are 8 other methods to troubleshoot and resolve common app downloading problems:
Check Internet Connection
A stable internet connection is essential for downloading apps. Do an Internet signal check to ensure you are connected to a reliable Wi-Fi network or have a strong mobile data signal. If the connection is weak, consider switching to a more robust network.
Free Up Storage Space
Insufficient storage on your device can hinder app installations. Navigate to the Nokia G310 device settings, access the Storage section, and clear unnecessary files or apps. Creating more space ensures a smoother download experience.
 WonderFox DVD Ripper Pro
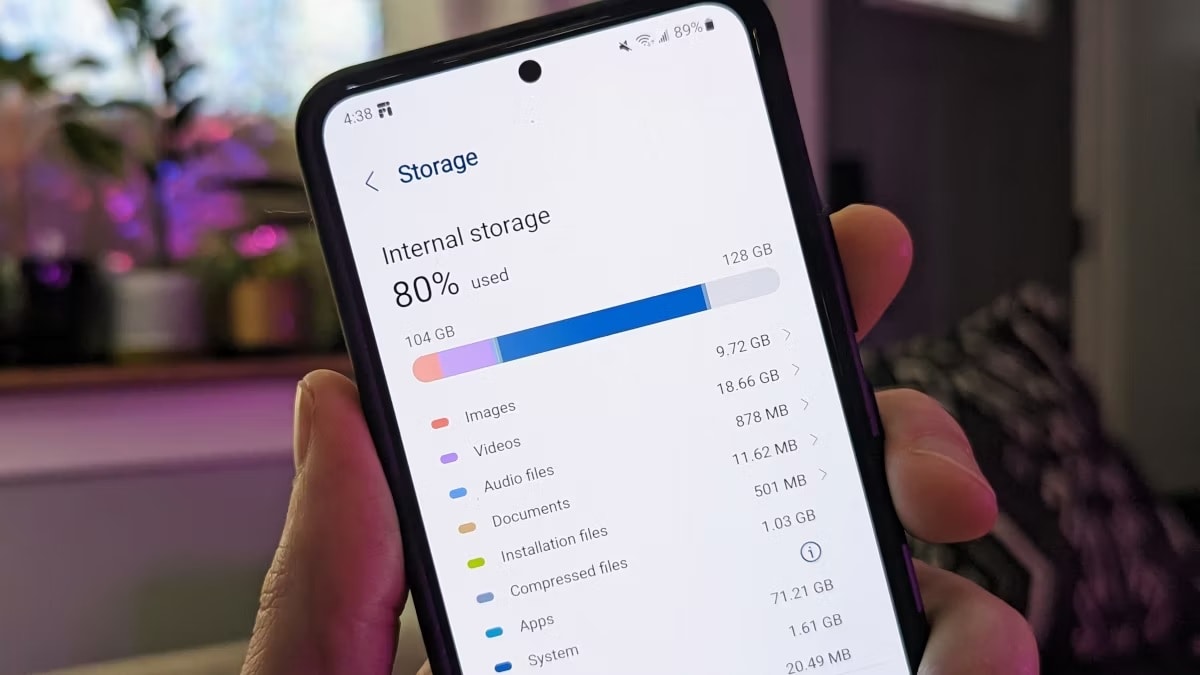
Update the Play Store
An outdated Play Store version may lead to compatibility issues. Open the Google Play Store, go to Settings, and tap the Play Store version. If an update is available, install it to ensure compatibility with the latest apps.
Clear Play Store Cache and Data
Cached data in the Play Store can sometimes cause download problems. Head to the Nokia G310 device settings and open Apps or Application Manager. Locate Google Play Store, and tap Storage. Clear both the cache and data to refresh the app.
Verify Google Account
Authentication issues with your Google account can prevent app downloads. Confirm that your Google account is properly verified. Go to the Nokia G310 device settings, select Accounts, and ensure your Google account is active and synced.
 Jet Profiler for MySQL, Enterprise Version: Jet Profiler for MySQL is real-time query performance and diagnostics tool for the MySQL database server. Its detailed query information, graphical interface and ease of use makes this a great tool for finding performance bottlenecks in your MySQL databases.
 Check Date and Time Settings
Incorrect date and time settings may disrupt the authentication process. Verify that your device’s date and time are set correctly. Enable automatic date and time settings to ensure accuracy.
 Allavsoft Batch Download Online Videos, Music Offline to MP4, MP3, MOV, etc format
 vMix HD - Software based live production. vMix HD includes everything in vMix Basic HD plus 1000 inputs, Video List, 4 Overlay Channels, and 1 vMix Call
Review Download Restrictions
Device settings or parental controls might impose restrictions on certain app downloads. Examine the download restrictions in the Nokia G310 device settings and adjust them accordingly to allow for the installation of desired apps.
Restart the Nokia G310 device
Sometimes, a simple restart can resolve various issues. Power off your device, wait a few seconds and then power it back on. This can help refresh system processes and eliminate temporary glitches.
Conclusion
Ensuring a smooth app download experience demands attention to various factors. From connectivity to storage management, each step contributes to resolving download challenges. The careful review of date/time settings and download restrictions further enhances the process when you cannot download from the Play Store.
For persistent issues, consider Dr.Fone - System Repair. The app is a viable option, providing a comprehensive approach. Embracing these measures ensures you can easily fix apps that won’t download from the Play Store. Having a reliable tool beside you also fosters an uninterrupted and enjoyable downloading journey from the Play Store.
- Title: How to Fix Android.Process.Media Has Stopped on Nokia G310 | Dr.fone
- Author: Nova
- Created at : 2024-07-19 22:51:01
- Updated at : 2024-07-20 22:51:01
- Link: https://change-location.techidaily.com/how-to-fix-androidprocessmedia-has-stopped-on-nokia-g310-drfone-by-drfone-fix-android-problems-fix-android-problems/
- License: This work is licensed under CC BY-NC-SA 4.0.