
How to Exit Android Factory Mode On Vivo X90S? | Dr.fone
How to Exit Android Factory Mode On Vivo X90S?
You’ve often heard that recovery mode will solve just about any problem your Vivo X90S is experiencing. This is mostly true and one of the components of Android’s recovery mode, factory mode or factory reset is one of the most efficient ways to solve various problems on your device. While factory mode is often a good thing, there are times when your device can enter factory mode on its own. Other times, you can safely enter factory mode but not know how to get out.
Fortunately for you, this article will explain all aspects of factory mode and especially how to safely exit factory mode.
Part 1. What is Android Factory Mode?
Factory mode or what is commonly known as factory reset is one of the options available for you when your Vivo X90S is in recovery mode. Several options are available for you once you enter Recovery mode on your device but few are as effective as the wipe data/ factory reset option. This option is useful in solving a whole host of problems that your device could be experiencing.
If you have been using your Vivo X90S for a while now and its performance to be less than ideal, a factory reset might be a good solution. That is however not the only problem a factory reset or factory mode can solve. It will also work for a number or Android errors that you may experience, problems caused by faulty firmware updates and also tweaks made on your device that may not have worked as expected.
It is however important to note that a factory reset or factory mode does often result in the loss of all your data. Therefore a backup is necessary to protect against this data loss risk.
Part 2. Backup your Android Device First
Before we can see how to safely enter and exit factory mode, it is important to have a full backup of your device. We mentioned that a factory mode will likely erase all the data on your device. A backup will ensure that you can get your phone back to its original state before the factory mode.
In order to do a full and complete backup of your device you need to have a tool that will not only ensure that you backup everything on your device but one that makes it easy for you to accomplish this. One of the best tools in the market is Dr.Fone - Backup & Resotre (Android) . This software is designed to enable you to create a full backup of your device.
Dr.Fone - Backup & Restore (Android)
Flexibly Backup and Restore Android Data
- Selectively backup Android data to computer with one click.
- Preview and restore backup to any Android devices.
- Supports 8000+ Android devices.
- There is no data lost during backup, export or restore.
3,428,803 people have downloaded it
Follow these very simple steps to use this MobileTrans Phone Transfer software to create a full backup of your device.
Step 1. Launch Dr.Fone on your computer and choose “Backup & Restore”
Run the software on your computer and you can see all features displayed in the primary window. Choose this one: Backup & Restore. It allows you to get your device backed up entirely with one click.


Step 2. Plug in with your device
Then plug in with your device to the computer. When your devic is detected, click on Backup.

Step 3. Select the file types to backup
The program will display all the file types it can support to backup. Just select the ones you would like to backup and hit Backup.

Step 4. Start backing up your device to the computer
After choosing the file’s type for backup, click “Backup” to begin backing up your device to your computer. It will take you a few minutes, depending on the storage of the data.

Note: You can use the feature of “Restore From Backup” to restore the backup file to your device, when you have the need later.
Part 3: One Click Solution to fix Android stuck in factory mode
From the above parts, you are well aware about what is factory mode. As we discussed, this mode fixes most troubles with Android devices.
But for situations when your Vivo X90S gets stuck in this very same factory mode, the most feasible solution for you is Dr.Fone - System Repair (Android) . This tool fixes all Android system issues including unresponsive or bricked device, stuck on Vivo X90S logo or factory mode or blue screen of death with a single click.
Dr.Fone - System Repair (Android)
One click fix to Android stuck in factory mode
- You can easily fix your Android stuck in factory mode with this tool.
- The one-click solution’s ease of operation is appreciable.
- It has carved a niche being the first Android repair tool in the market.
- You don’t need to be a pro in technology to use this program.
- It is compatible with all latest Vivo X90S devices like Galaxy S9.
3,645,867 people have downloaded it
In this part we will explain how to exit Android recovery mode using Dr.Fone - System Repair (Android) . Prior to proceeding, you got to remember that device backup is paramount to keep your data safe. This process might erase your Vivo X90S data.
Phase 1: Ready your device and connect it
Step 1: Installation completion needs to be followed by running Dr.Fone on your system. Over the program window, tap ‘Repair’ afterwards and get the Android device connected.
Step 2: Select the ‘Android Repair’ option from the list to fix Android stuck in factory modeissue. Hit the ‘Start’ button soon after.

Step 3: Select Android device details on the Vivo X90S device information window, followed by tapping the ‘Next’ button.


Step 4: Enter ‘000000’ for confirmation then proceed.


Phase 2: Get in ‘Download’ mode for repairing the Android device
Step 1: It’s important to put the Android device in ‘Download’ mode, here are the steps to do so –
- On a ‘Home’ button-less device – turn off the Vivo X90S device and push down the ‘Volume Down’, ‘Power’ and ‘Bixby’ buttons for about 10 seconds and un-hold. Now, hit the ‘Volume Up’ button to get into ‘Download’ mode.

- For a device with ‘Home’ button – switch it off and hold down the ‘Power’, ‘Volume Down’ and ‘Home’ buttons together for 10 seconds and release. Click the ‘Volume Up’ button for entering ‘Download’ mode.

Step 2: Press ‘Next’ for initiating firmware downloading.


Step 3: Dr.Fone –Repair (Android) starts Android repair as soon as download and verification of firmware is done. All Android issues along with Android stuck in factory mode will be fixed now.

Part 4. Common Solutions to Exit Factory Mode on Android
Having a backup of all your data will eliminate the risk of losing any of your data. You can now safely exit factory mode using one of the 2 methods below. These two methods will work on a rooted device.
Method 1: Using “ES File Explorer”
To use this method, you will need to have installed file explorer on your device.
Step 1: Open “ES File Explorer” and then press the icon on the top left corner
Step 2: Next, go to “Tools” and then turn on “Root Explorer”
Step 3: Go to Local> Device> efs> Factory App and then open factorymode as text in the “ES Note Editor” Turn it ON
Step 4: Open keystr as text in the “ES Note Editor” and change it to ON. Save it.
Step 5: Reboot the Vivo X90S device

Method 2: Using Terminal Emulator
Step 1: Install Terminal emulator
Step 2: Type “su”
Step 3: Then Type the following;
rm /efs/FactoryApp/keystr
rm /efs / FactoryApp/ Factorymode
Echo –n ON >> / efs/ FactoryApp/ keystr
Echo –n ON >> / efs/ FactoryApp/ factorymode
chown 1000.1000/ efs/FactoryApp/keystr
chown 1000.1000/ efs/FactoryApp/ factorymode
chmod 0744 / efs/FactoryApp/keystr
chmod 0744 / efs/ FactoryApp/ factorymode
reboot
You can also exit factory mode on unrooted device by going to Settings> Application manager> All and the search for Factory Test and “Clear Data”, “Clear Cache”
As much as factory mode can be a useful solution to a number of problems, it can be quite annoying when it pops up unexpectedly. Now you are equipped with 2 effective solutions to help you safely exit factory mode if ever you find yourself in this situation.
Effective Methods on How To Take Viruses Off Your Phone
Cell phones have become a part of a person’s daily life. It offers convenience and connectivity at your fingertips. Yet, these handy devices are prone to viruses when used carelessly. Viruses can infiltrate your phone through unverified downloads, unsecured networks, or malicious links. This can compromise your data and device performance.
In this article, you’ll explore practical methods on h ow to take a virus off your phone. From simple preventive measures to specific solutions, this guide aims to equip you with practical strategies, ensuring a safer and smoother mobile experience by safeguarding your phone against the perils of viruses.

Part 1: Why You Get Mobile Viruses in the First Place
Mobile viruses are tiny bugs that sneak into your phone and mess things up. They’re sneaky software programs designed to cause trouble, like stealing your info or making your phone act strange. Pesky viruses are usually acquired by accessing unverified links and downloading sketchy files. This is why it’s essential to be careful about what you access on the internet. It’s also a great habit to beware of the computers you’re connecting your phone to.
You might notice weird things happening on your phone when infected with a virus. It may suddenly slow down, show pop-ups you didn’t click, or run out of battery super-fast . These could be signs that your phone has a virus. Take note of these.


Here are some common ways viruses get into your phone:
- **Accessing sketchy links.**Clicking on strange or suspicious links in messages or emails is the number one virus source.
- **Downloading apps from unauthorized developers.**Getting apps from places other than the official app stores like Google Play or Apple Store can also be a gateway for trojan viruses. This is mainly because apps install files directly to your system when downloaded.
- Connecting to compromised computers. Watching out for viruses or malware when plugging your phone into a computer would be best.
- **Transferring malware files to your phone:**Moving files with viruses from a computer or another device to your phone.
Remember, these bugs can cause a lot of trouble, but staying careful while using your phone can help you avoid them!
Part 2: Different Methods To Take Viruses Off Your Phone
If your phone’s caught a virus, it’s time to remove those bugs. You might wonder about how you get a virus off your phone. Well, this section has you covered with 4 different methods you can use.
Method 1: Wondershare Dr. Fone’s System Repair
If you need a quick, professional, and safe solution, Wondershare Dr.Fone is here to save the day. Its System Repair feature is like a superhero—it swoops in and fixes the problem in a snap. This magic tool does the heavy lifting to remove viruses from your phone.
Here’s how you can use Dr. Fone’s System Repair feature:
- Step 1: Launch Dr.Fone. Choose System Repair in the Toolbox section. Ensure that your phone is connected.
 safe & secure
3,391,426 people have downloaded it
- Step 2: Choose either Android or iPhone. In this example, iPhone shall be selected. For Android devices, simply follow and mirror the prompts that will follow.

- Step 3: Select iOS Repair to proceed.
 Forex Robotron Gold Package
- Step 4: Choose either Standard Mode or Standard Repair. Standard Repair will not remove data from your device. However, for a sure fix, choose Standard Mode.

- Step 5: Put your device to Recovery Mode . Dr. Fone will provide on-screen instructions.

- Step 6: Click Download next to the iOS firmware you want to install.

- Step 7: After the firmware is downloaded, click Repair Now.

- Step 8: Once the process is completed, choose Done. Your phone should be virus-free by now.

Method 2: Using Safe Mode
Safe Mode is like a secret agent—it helps but with a downside. It turns off third-party apps, making your phone useful only for basic calls or texts. Use this method if any solutions in this section do not work. It’s especially handy if you use your phone before sending it to a technician. This way, you’ll learn how you can get a virus off your phone before actually letting a technician do it.
Generally, here’s how you can enter Safe Mode on Android Phones. Do check with your phone manufacturer’s official manual/guides on how to enter them:
- Step 1: Press and hold the power button. Wait for the power options to appear.
- Step 2: Tap and hold the Power Off button.
- Step 3: Tap on the prompt when you see the Reboot to safe mode option.

For iPhones, here’s how you can do it:
- Step 1: Power off your iPhone.
- Step 2: Hold the power button.
- Step 3: Hold the volume down button until you see the Apple logo.
- Step 4: Your phone should now be in safe mode.

Method 3: Downloading Anti-Virus Software
Anti-virus software works like a shield, protecting your phone from sneaky viruses and malware. Here are three recommended anti-virus apps that you should try out. They’re available on both the Google Play Store and App Store. So, regardless of what device you’re using, you’re sure to be safe with these:
- Avast Anti-virus – Mobile Security
- Norton 360: Online Security
- Bitdefender Mobile Security & Anti-virus
Method 4: Performing a Factory Reset
A Factory Reset is like a phone makeover—it wipes everything and starts fresh. But be cautious, as it erases all data!
Generally, the Factory Reset option should be in Settings > General & Backup and reset or under Settings > About phone for Android devices.

IOS devices should be under Settings > General > Transfer or Reset iPhone.

Remember, each method has its strengths and weaknesses. Dr.Fone is quick and effective, Safe Mode is limited but useful, anti-virus apps can protect, and a Factory Reset gives a clean slate. Try these methods to zap those viruses away!
Part 3: Handy Prevention Tips To Avoid Future Infections
To keep your phone safe from viruses, follow these easy tips that act as a shield against potential threats.
- **Regular software updates:**Keep your phone updated with the latest software. Updates often include security patches that protect your phone from new threats.
- **Cautious downloads:**Be careful when downloading apps or files. Stick to trusted sources like Google Play Store or Apple Store. Avoid clicking on suspicious links from unknown sources.
- **Secure networks:**Use secure Wi-Fi networks and limit public Wi-Fi use for sensitive activities. Public networks can expose your device to potential risks.
- **Anti-virus software:**Install a reliable anti-virus app and keep it updated. These apps constantly scan for and detect viruses, safeguarding your device against threats.
These simple yet crucial tips will fortify your phone’s defenses, reducing the likelihood of virus infections and ensuring a safer digital experience.
Conclusion
Viruses can make your phones act weird, but you have the tools to fight back. Keep your phone healthy by updating software, being cautious with downloads and links, using secure networks, and having an anti-virus app.
And, if you’re thinking, “**How do I get a virus off My Vivo X90S?**” then Wondershare Dr.Fone is a reliable hero. It’s quick and effective in clearing out those bugs. By staying aware and taking preventive steps, you can keep your phone safe and ensure a trouble-free experience. And if viruses strike, Dr. Fone’s got your back for an instant fix!

11 Ways to Fix it When My Vivo X90S Won’t Charge
What would you do if your phone or other device’s battery is draining? You will plug it into a power source. Right? What if you realize that your phone won’t charge? My phone won’t charge, and the Vivo X90S tablet won’t charge is a common problem.
Android devices are very prone to this problem, and hence Android device owners complain frequently that My Vivo X90S won’t charge even when it is plugged into a power source properly. The reason behind the phone won’t charge, or Vivo X90S tablet won’t charge are not very complicated and, therefore, can be dealt with by you sitting at home.
A charging problem can occur due to a temporary software crash. It is also possible that a corrupted device cache may be causing such a glitch. Another reason for phones not to charge normally or charge slowly is an inappropriate power source or defective charging cable and adapter. All these and many more problems will be cured in the 10 solutions to fix My Vivo X90S won’t charge error.
So if you’re still thinking about why won’t My Vivo X90S charge, read on to find out solutions to fix My Vivo X90S won’t charge problem.
Part 1. One-click solution to fix Android phone won’t charge
While you are upset over ‘why My Vivo X90S won’t charge?’, would you mind us helping you around?
Well, we have got Dr.Fone - System Repair (Android) at your fingertips to get rid of this annoying phone won’t charge issues (caused by system corruption). Whether the Vivo X90S device froze or became unresponsive, bricked, or got stuck on the Vivo X90S logo/blue screen of death or apps started crashing. It can fix every Android system problem.
Dr.Fone - System Repair (Android)
Easy-to-operate program to fix Android phone won’t charge
- As it supports all the latest Vivo X90S devices, it can even easily fix the Vivo X90S tablet won’t charge issue.
- With a single click, you can fix your entire Android system issues.
- The very first tool is available in the market for Android system repair.
- Without any technical knowledge, one can use this software.
- This tool is intuitive with a high success rate.
3981454 people have downloaded it
Note: When you are stressed over ‘why won’t My Vivo X90S charge’, we are ready to eliminate the tension and make things easier for you. But, before you start fixing the phone won’t charge the problem, make sure to back up the Android device . This fixing process might wipe out all the Vivo X90S device data.
Phase 1: Preparing and connecting the Android device
Step 1: Install and then run Dr.Fone - System Repair (Android), the ultimate Android repair software on your PC. Hit the ‘System Repair’ tab, followed by connecting your Vivo X90S.
Step 2: Tap on the ‘Android Repair’ option and then click ‘Start’ for moving ahead.
Step 3: Mention the detailed information about your Vivo X90S under the Vivo X90S device information section. Press ‘Next’ then on.
Phase 2: Get to ‘Download’ mode for repairing the Vivo X90S device
Step 1: It’s essential that you put the Android device under ‘Download’ mode to resolve the phone won’t charge the issue. Here comes how to do –
- With a ‘Home’ button device, switch off it before holding down the set of keys, including ‘Power’, ‘Volume Down’, and ‘Home’ key for 5-10 seconds. Let them go and hit the ‘Volume Up’ key for entering the ‘Download’ mode.
 vMix 4K - Software based live production. vMix 4K includes everything in vMix HD plus 4K support, PTZ control, External/Fullscreen output, 4 Virtual Outputs, 1 Replay, 4 vMix Call, and 2 Recorders.
- If the ‘Home’ button is not there, you got to turn down the Vivo X90S device and altogether hold down the ‘Volume Down’, ‘Bixby’, and ‘Power’ keys between 5-10 seconds. Soon after you release the keys, tap the ‘Volume Up’ button for entering the ‘Download’ mode.

Step 2: Click ‘Next’ to start downloading the Android firmware.

Step 3: Now, Dr.Fone - System Repair (Android) would verify the firmware and then start repairing the Android system on its own. It will ultimately fix your ‘why won’t My Vivo X90S charge’ trouble.
Part 2. 10 common ways to fix Android won’t charge
1. Check/replace charging cable
Charging cables fray or become defunct after prolonged usage. Therefore, it is advised to always use the Vivo X90S device’s original charging cable or purchase a good quality charging cord, which doesn’t damage your device or your adapter.
It is also very commonly observed that the charging end of the cable which gets connected to the charging port of the Vivo X90S device gets damaged and prevents the current from flowing to the phone/tablet.

2. Check/clean charging port
The charging port in your device is a small opening where the charging end of the cabbie is inserted for the current to flow to the phone/tablet. Very often, we notice that the charging port gets blocked with tiny particles of dirt. The charging port might also get clogged if dirt and dust get accumulated in it, preventing the sensors from receiving and forwarding the current to the Vivo X90S device.

The best way to take this problem is to clean the port with a blunt pin or a soft bristle unused toothbrush. Make sure you clean the port gently and do not damage it or its sensors.

3. Check/replace charging adapter
This method is fairly simple, and all you need to do is check whether or not the charging adapter is working properly as sometimes, the adapter itself is to be blamed for the charge. To make sure that you are not using a defective adapter, connect your charging cable/USB to another adapter. If your device charges normally, it means there is a problem is with your adapter, and you must replace it at the earliest to solve My Vivo X90S won’t charge the issue.

4. Try another power source
This technique is more like a quick trick. It means to switch from one power source to another or use a more efficient and suitable power source. Laptops and PCs charge slower than a direct power source, i.e., a wall socket. Sometimes, the charging speed is slower, and the battery is draining. In such a scenario, choose to charge your device by directly plugging it into a socket on the wall to never experience My Vivo X90S won’t charge problem.
5. Clear device Cache
Clearing Cache is a great technique as it cleans your device and all its partitions. By clearing the cache, all the unwanted data and files stored in your device get deleted, which may be causing glitches in the Vivo X90S device’s software, preventing it from recognizing the current.
Follow the steps given below to clear your device’s cache:
• Visit “Settings” and find “Storage”

• Now tap on “Cached Data”.
 PCDJ Karaoki is the complete professional karaoke software designed for KJs and karaoke venues. Karaoki includes an advanced automatic singer rotation list with singer history, key control, news ticker, next singers screen, a song book exporter and printer, a jukebox background music player and many other features designed so you can host karaoke shows faster and easier!
• Click “OK” to clear all unwanted cache from your device as shown above.
Try charging your phone after clearing the cache. If your phone doesn’t charge even now, do not worry. There are more ways to help you combat My Vivo X90S won’t charge problem.
6. Re-start/reboot your phone/tablet
Restarting your device to fix why won’t My Vivo X90S charge error is a very effective remedy. This method of rebooting your device not only fixes software glitches but other but also tackles other factors/operations that might be running in the background preventing your device from charging.
Restarting a device is simple and can be done by following the steps given below:
• Long press the power button of your device.
• From the options that appear, click on “Restart”/ “Reboot” as shown in the image below.

To restart your device, you may also press the power button for about 20-25 seconds for the phone/tablet to automatically reboot.
7. Download and install the Ampere App
The Ampere app can be downloaded from the Google Play Store. It is very helpful to fix the why won’t my charge error as it gives you real-time information about your device’s battery consumption, charging status, and other essential data.
If the App gives information in green color, it means all is wetland your device is charging normally, however, if the information before you is in orange, you need to take steps to fix the charging problem.


 Allavsoft Batch Download Online Videos, Music Offline to MP4, MP3, MOV, etc format
8. Install software updates
Installing your Android version updates is a good idea as the software is the interface that receives charge from the charging port sensors and gives a command for the phone/tablet to charge. People often continue to use older OS versions, which cause trouble and prevent the Vivo X90S device from charging.
To check for and install updates on your device, you must be connected to WiFi or a cellular network. Next, visit “Settings” and select “About device”. Now click on “Software Update”.

If there is an update available, you will be prompted to download it. Just follow the instructions given before you install a brand new Android OS version on your device.

9. Factory reset your device
Factory Reset is must be done after due deliberation. Remember to take a back-up of all your data and contents on the cloud or an external memory device, such as a pen drive before adopting this method because once you perform a factory reset on your device, all media, contents, data and other files are wiped out, including your device settings.
Follow the steps given below to factory reset your device:
• Visit “Settings” by clicking the settings icon as shown below.
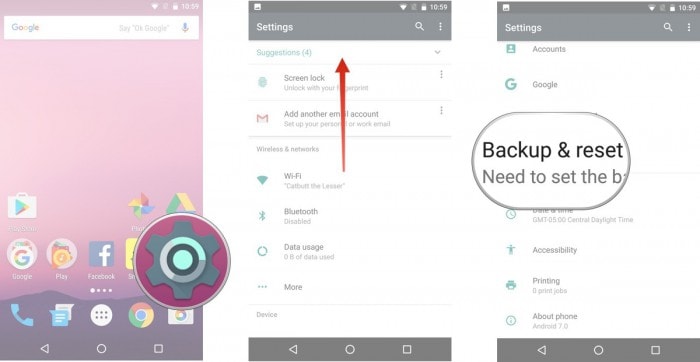
• Now select “Backup and Reset” and move on.
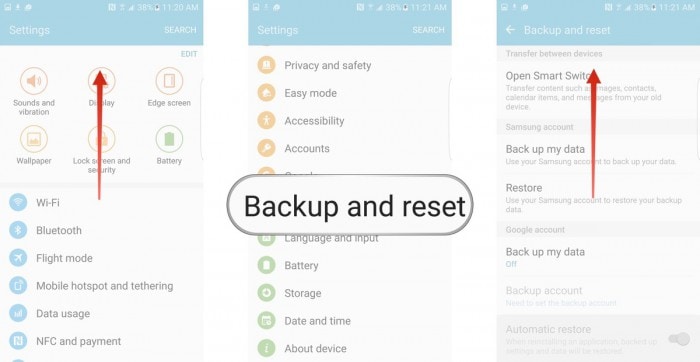
• In this step, select “Factory data reset” and then “Reset Device”.
• Finally, tap on “ERASE EVERYTHING” as shown below to Factory Reset your device.

Note: Once the factory reset process is complete, your device will automatically restart and you will have to set it up once again.
10. Replace your battery
This should be your last resort to fix My Vivo X90S won’t charge problem, and you should only attempt to replace your battery if none of the other techniques work. Also, please consult a technician before purchasing and installing a new battery in your device as different phones and tablets have a different type of battery requirements.

Finally, fixing the phone won’t charge the problem is simple, and therefore there is no need for you to worry as you are not the only one experiencing such an issue. Other Android users have tried, tested, and recommended the methods given above to solve why won’t My Vivo X90S charge or Vivo X90S tablet won’t charge error. So go ahead and try them out now.
- Title: How to Exit Android Factory Mode On Vivo X90S? | Dr.fone
- Author: Nova
- Created at : 2024-07-19 22:39:01
- Updated at : 2024-07-20 22:39:01
- Link: https://change-location.techidaily.com/how-to-exit-android-factory-mode-on-vivo-x90s-drfone-by-drfone-fix-android-problems-fix-android-problems/
- License: This work is licensed under CC BY-NC-SA 4.0.