
How to Exit Android Factory Mode On Samsung Galaxy F34 5G? | Dr.fone
How to Exit Android Factory Mode On Samsung Galaxy F34 5G?
You’ve often heard that recovery mode will solve just about any problem your Samsung Galaxy F34 5G is experiencing. This is mostly true and one of the components of Android’s recovery mode, factory mode or factory reset is one of the most efficient ways to solve various problems on your device. While factory mode is often a good thing, there are times when your device can enter factory mode on its own. Other times, you can safely enter factory mode but not know how to get out.
Fortunately for you, this article will explain all aspects of factory mode and especially how to safely exit factory mode.

Part 1. What is Android Factory Mode?
Factory mode or what is commonly known as factory reset is one of the options available for you when your Samsung Galaxy F34 5G is in recovery mode. Several options are available for you once you enter Recovery mode on your device but few are as effective as the wipe data/ factory reset option. This option is useful in solving a whole host of problems that your device could be experiencing.
If you have been using your Samsung Galaxy F34 5G for a while now and its performance to be less than ideal, a factory reset might be a good solution. That is however not the only problem a factory reset or factory mode can solve. It will also work for a number or Android errors that you may experience, problems caused by faulty firmware updates and also tweaks made on your device that may not have worked as expected.
It is however important to note that a factory reset or factory mode does often result in the loss of all your data. Therefore a backup is necessary to protect against this data loss risk.
Part 2. Backup your Android Device First
Before we can see how to safely enter and exit factory mode, it is important to have a full backup of your device. We mentioned that a factory mode will likely erase all the data on your device. A backup will ensure that you can get your phone back to its original state before the factory mode.
In order to do a full and complete backup of your device you need to have a tool that will not only ensure that you backup everything on your device but one that makes it easy for you to accomplish this. One of the best tools in the market is Dr.Fone - Backup & Resotre (Android) . This software is designed to enable you to create a full backup of your device.
Dr.Fone - Backup & Restore (Android)
Flexibly Backup and Restore Android Data
- Selectively backup Android data to computer with one click.
- Preview and restore backup to any Android devices.
- Supports 8000+ Android devices.
- There is no data lost during backup, export or restore.
3,428,803 people have downloaded it
Follow these very simple steps to use this MobileTrans Phone Transfer software to create a full backup of your device.
Step 1. Launch Dr.Fone on your computer and choose “Backup & Restore”
Run the software on your computer and you can see all features displayed in the primary window. Choose this one: Backup & Restore. It allows you to get your device backed up entirely with one click.

Step 2. Plug in with your device
Then plug in with your device to the computer. When your devic is detected, click on Backup.

Step 3. Select the file types to backup
The program will display all the file types it can support to backup. Just select the ones you would like to backup and hit Backup.

Step 4. Start backing up your device to the computer
After choosing the file’s type for backup, click “Backup” to begin backing up your device to your computer. It will take you a few minutes, depending on the storage of the data.
 Software Update Pro - Check and update software installed on your computer.

Note: You can use the feature of “Restore From Backup” to restore the backup file to your device, when you have the need later.
Part 3: One Click Solution to fix Android stuck in factory mode
From the above parts, you are well aware about what is factory mode. As we discussed, this mode fixes most troubles with Android devices.
But for situations when your Samsung Galaxy F34 5G gets stuck in this very same factory mode, the most feasible solution for you is Dr.Fone - System Repair (Android) . This tool fixes all Android system issues including unresponsive or bricked device, stuck on Samsung Galaxy F34 5G logo or factory mode or blue screen of death with a single click.
Dr.Fone - System Repair (Android)
One click fix to Android stuck in factory mode
- You can easily fix your Android stuck in factory mode with this tool.
- The one-click solution’s ease of operation is appreciable.
- It has carved a niche being the first Android repair tool in the market.
- You don’t need to be a pro in technology to use this program.
- It is compatible with all latest Samsung Galaxy F34 5G devices like Galaxy S9.
3,645,867 people have downloaded it
In this part we will explain how to exit Android recovery mode using Dr.Fone - System Repair (Android) . Prior to proceeding, you got to remember that device backup is paramount to keep your data safe. This process might erase your Samsung Galaxy F34 5G data.
Phase 1: Ready your device and connect it
Step 1: Installation completion needs to be followed by running Dr.Fone on your system. Over the program window, tap ‘Repair’ afterwards and get the Android device connected.
![]() FX PRO (Gold Robot + Silver Robot(Basic Package))
FX PRO (Gold Robot + Silver Robot(Basic Package))
Step 2: Select the ‘Android Repair’ option from the list to fix Android stuck in factory modeissue. Hit the ‘Start’ button soon after.

Step 3: Select Android device details on the Samsung Galaxy F34 5G device information window, followed by tapping the ‘Next’ button.
 Jet Profiler for MySQL, Enterprise Version: Jet Profiler for MySQL is real-time query performance and diagnostics tool for the MySQL database server. Its detailed query information, graphical interface and ease of use makes this a great tool for finding performance bottlenecks in your MySQL databases.
Step 4: Enter ‘000000’ for confirmation then proceed.

Phase 2: Get in ‘Download’ mode for repairing the Android device
Step 1: It’s important to put the Android device in ‘Download’ mode, here are the steps to do so –
- On a ‘Home’ button-less device – turn off the Samsung Galaxy F34 5G device and push down the ‘Volume Down’, ‘Power’ and ‘Bixby’ buttons for about 10 seconds and un-hold. Now, hit the ‘Volume Up’ button to get into ‘Download’ mode.

- For a device with ‘Home’ button – switch it off and hold down the ‘Power’, ‘Volume Down’ and ‘Home’ buttons together for 10 seconds and release. Click the ‘Volume Up’ button for entering ‘Download’ mode.
 PCDJ Karaoki is the complete professional karaoke software designed for KJs and karaoke venues. Karaoki includes an advanced automatic singer rotation list with singer history, key control, news ticker, next singers screen, a song book exporter and printer, a jukebox background music player and many other features designed so you can host karaoke shows faster and easier!
Step 2: Press ‘Next’ for initiating firmware downloading.

Step 3: Dr.Fone –Repair (Android) starts Android repair as soon as download and verification of firmware is done. All Android issues along with Android stuck in factory mode will be fixed now.


Part 4. Common Solutions to Exit Factory Mode on Android
Having a backup of all your data will eliminate the risk of losing any of your data. You can now safely exit factory mode using one of the 2 methods below. These two methods will work on a rooted device.
Method 1: Using “ES File Explorer”
To use this method, you will need to have installed file explorer on your device.
Step 1: Open “ES File Explorer” and then press the icon on the top left corner
Step 2: Next, go to “Tools” and then turn on “Root Explorer”
Step 3: Go to Local> Device> efs> Factory App and then open factorymode as text in the “ES Note Editor” Turn it ON
Step 4: Open keystr as text in the “ES Note Editor” and change it to ON. Save it.
Step 5: Reboot the Samsung Galaxy F34 5G device

Method 2: Using Terminal Emulator
Step 1: Install Terminal emulator
Step 2: Type “su”
Step 3: Then Type the following;
rm /efs/FactoryApp/keystr
rm /efs / FactoryApp/ Factorymode
Echo –n ON >> / efs/ FactoryApp/ keystr
Echo –n ON >> / efs/ FactoryApp/ factorymode
chown 1000.1000/ efs/FactoryApp/keystr
chown 1000.1000/ efs/FactoryApp/ factorymode
chmod 0744 / efs/FactoryApp/keystr
chmod 0744 / efs/ FactoryApp/ factorymode
reboot
You can also exit factory mode on unrooted device by going to Settings> Application manager> All and the search for Factory Test and “Clear Data”, “Clear Cache”
As much as factory mode can be a useful solution to a number of problems, it can be quite annoying when it pops up unexpectedly. Now you are equipped with 2 effective solutions to help you safely exit factory mode if ever you find yourself in this situation.
How To Fix Unresponsive Touch Screen on Samsung Galaxy F34 5G
With the increase in our reliance on smartphones, having touchscreen problems on your device can be annoying. Sometimes, it’s even more frustrating than a physically broken screen because you don’t know where the issue is coming from.
If your touchscreen is malfunctioning or doesn’t work correctly, you cannot interact with your device. On this page, you’ll learn general phone touch problems on Android and how to get rid of them. Now explore the article to learn more.


Part 1: Why Is My Android Experiencing Touch Screen Problems
Below are some of the most common reasons you’re experiencing touch problems on your Android smartphone.
- The touchscreen problemfreezes your phone, lags, or hangs.
- Some parts of the screen work fine, but some don’t.
- Your screen responds inaccurately (typing “a” gets you “q” or “z”).
- The touchscreen is automatically operating itself, resulting in ghost touch.
- It doesn’t respond to any taps, and the phone’s screen has stopped working.
- The device is physically damaged, or the screen is cracked or broken.
- Outdated devices are prone to the black/white/blue screen of death.
Part 2: Tips, Fixes, and Workarounds To Fix Your Samsung Galaxy F34 5G Touch Problems
If any of the outlined reasons above are the cause of your touch screen malfunctioning, here are some solutions to fix it.
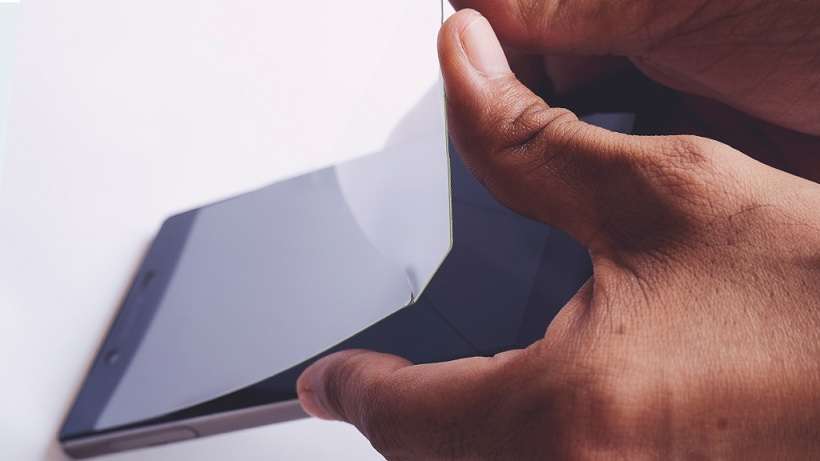
Method 1: Remove the Screen Protector and Phone Case
Some phone cases and screen protectors cause touch problems on your Android screen. This issue is prevalent if you recently changed your phone case or screen protector. It may be due to incompatibility, but you should remove them to see if your phone starts responding again.
Method 2: Clean Your Android Smartphone
A touchscreen malfunctioning can also be a sign of a dirty display. Since the screen relies on contact between your fingers and the touchpad to perform actions, this also applies to foreign particles such as dirt, debris, smudges, oil, and more. Clean your touchscreen with wipes or a soft cloth by gently wiping over the screen.
Method 3: Stop Using Your Android Device for a While
Touch problems also arise due to abnormal temperature changes. Your phone might experience ghost touch if it’s too cold or hot. For your screen to function correctly, it needs to be in a temperate environment. Remember to take breaks between phone usage, especially when the phone gets too hot. Avoid using your device under hot conditions, direct sunlight, or anything affecting your phone’s normal temperature.
Method 4: Restart Your Android
Performing a reboot sounds trivial with such a complicated issue. But sometimes, it’s often the most successful way to fix a touchscreen problem on an Android device. Restarting your Android shuts down and resets all background services, which may have led to your issue.
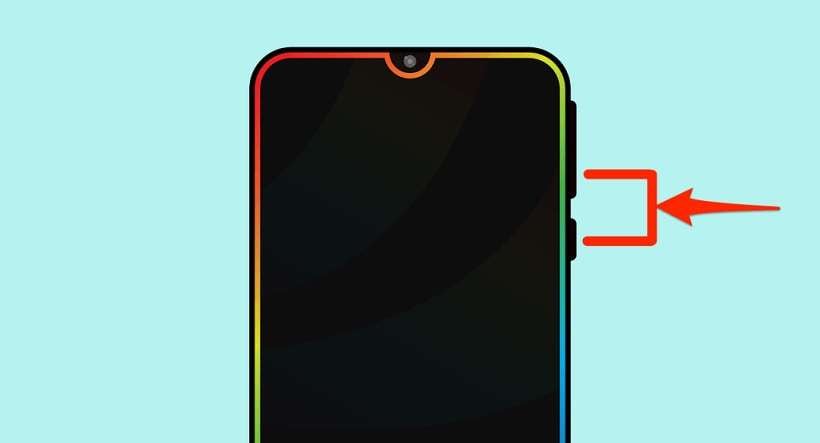
To restart your Android, press and hold the Power button for several seconds to switch off your phone. In other smartphones, you may need to hold down the Power button as well as the Volume Down button at the same time.
Method 5: Factory Data Reset Your Android
Before attempting to have your device checked for any hardware defects, you should try completing a Factory Reset. To do this, go to Settings > Backup and Reset. Next, tap on Factory data reset > Delete all.
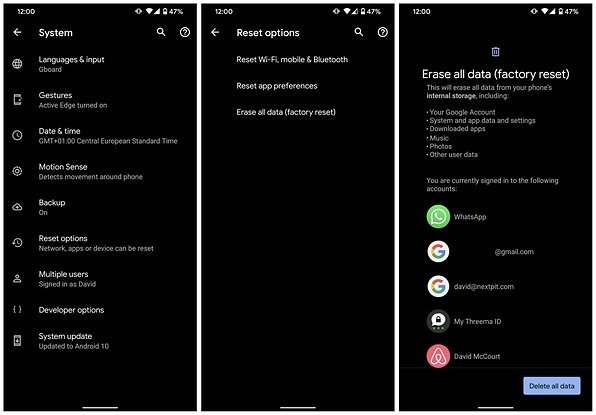
Performing a Factory Data Reset will erase all your data and restore your device to its factory default settings. Creating a backup before doing this step is recommended, as you will lose all your personal data once the process starts.
Method 6: Put Your Android into Recovery Mode
If all else fails, placing your Android into Recovery Mode should be a last resort. Doing this method works similarly to the method above. You should perform this method if the screen is unresponsive and only the buttons on your Android are functional. Here’s how.
Note
Placing your Android into Recovery Mode is different depending on your Android smartphone. Refer to your owner’s manual to see which method is right for your Samsung Galaxy F34 5G.
Step 1A: Press and hold the Power button and Volume Down buttons at the same time. Continue holding both buttons until the screen starts.
Step 1B: If your Samsung Galaxy F34 5G still has a Home button, press and hold the Home button and the Power button at the same time. Continue holding them until the screen starts.
Step 1C: If step 1A did not put your Android into Recovery Mode, press and hold the Power and Volume Up and Down buttons simultaneously. Continue pressing all three until the screen starts.

Step 2: Use the Volume buttons to navigate the choices, select Wipe data/factory reset, and confirm your choice with the Power button.
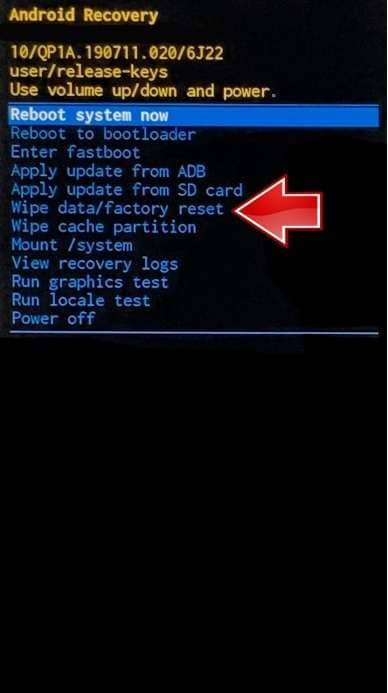
Step 3: Wait for the process to complete and for your Samsung Galaxy F34 5G to restart automatically.
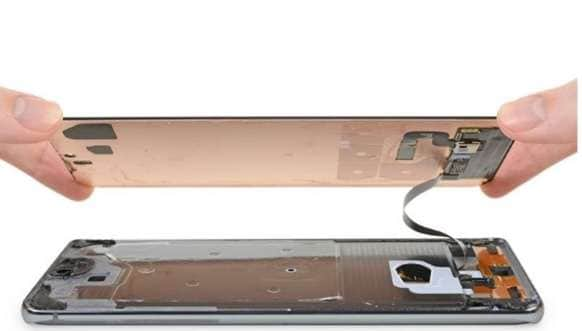
Method 7: Replace Your Android Touchscreen
If doing all the earlier workarounds and fixes couldn’t resolve the touchscreen problem, it could be the screen itself. While replacing the touchscreen yourself is possible if you have the technical know-how, it’s still best to bring it to a professional to prevent further damage. You should have your Samsung Galaxy F34 5G checked by a technician if the screen is getting weak, has water damage, or has failing screen components.
 “
“
Method 8: Bring it to an Authorized Service Center
Your phone touch problem might not be caused by the screen, even when you had it replaced. If your Android is still unresponsive, it’s best to bring your smartphone to an authorized service center or directly to the phone manufacturer, especially when all efforts are exhausted.
 WonderFox DVD Ripper Pro
Part 3: How To Fix Android Touch Problem With an Alternative
If all the general phone touch problems on your Samsung Galaxy F34 5G persist, you should strongly consider Wondershare Dr.Fone to do the job. The program can fix all Android system issues without any required skills. Problems caused by the operating system or software, such as the black screen of death, boot loop, ghost touch, and more, are done within less than 10 minutes with the program.
Key Features
Dr.Fone – System Repair (Android) has many features you can immediately take advantage of. Here are some of them below.
- Fix All Android Problems In Minutes
Wondershare Dr.Fone allows you to fix all touchscreen problems on your smartphone within less than 10 minutes. Moreover, it has a high success rate making it one of the most reliable tools available today.
- Supports up to 1000+ Android Models
The program supports almost all Samsung Galaxy F34 5G models and other Android devices, whether unlocked or from a carrier. Dr.Fone is equipped with all the proper firmware to flash your Samsung Galaxy F34 5G with just a few clicks. In addition, it has handy on-screen instructions to help you complete the whole process with ease.

Pros and Cons
Here are the pros and cons of using Dr.Fone – System Repair (Android) to know if you’re still undecided.
Pros
- The user interface is clutter-free, making it highly beginner-friendly.
- The fast processing time to fix your Samsung Galaxy F34 5G means you can do more in less time.
Cons
- The free version only works until you see if your Samsung Galaxy F34 5G is compatible with the app. You will be required to enter a valid license once you initiate the repair process.
- If you own an iOS device, you’ll have to get the iOS version.

How To Fix Black Phone Screen With Wondershare Dr.Fone
Follow the step-by-step guide below to start fixing general phone screen problems on Android using Wondershare Dr.Fone.
Step 1: Download and install Wondershare Dr.Fone on your computer. Next, launch the program and connect your Samsung Galaxy F34 5G to your computer.
Step 2: Click Start to initiate the setup on a new window. From there, select the Brand, Name, Model, Country, and Carrier of your Samsung Galaxy F34 5G and click Next.
Step 3: Follow the on-screen instructions on the main program window to initiate the repair process. After that, wait for your Android smartphone to return to its original state.
Part 4: FAQs
Here are some FAQs you should remember when experiencing phone touch problems.
1. Does a Cracked Screen Affect Touch on an Android?
If you continue using a smartphone with a cracked screen, there are several implications. Your device will be vulnerable to further damage and might develop touchscreen problems,and your sensors will gradually begin to malfunction. The capabilities of your device are also compromised the longer you delay repairing it. Moreover, a cracked screen can put your fingers at risk of injury due to potential glass splinters.
2. How Do I Temporarily Fix a Cracked Screen?
If you can’t take your cracked screen to a repair shop, apply a small amount of vegetable oil or petroleum jelly to the screen. Doing this will not fix the issue but will make the cracks less noticeable. On the other hand, you can also apply a screen protector to safeguard your phone against further damage. The screen protector slows down or prevents the cracks from getting worse.
3. Can I Use Dr.Fone for Free?
You can download and install Dr.Fone – System Repair (iOS) or (Android) for free to evaluate the program’s offerings. You can do the first few steps to see if the app supports your device. However, you need to get the full version and enter a valid license code to repair your smartphone.
 safe & secure
4,471,551 people have downloaded it
Conclusion
If the touchscreen is malfunctioning on your smartphone, one of the fixes above should help solve the problem. If it did not solve the issue, consider using Dr. Fone – System Repair for iOS or Android when you need an all-in-one solution to all your phone screen problems.
However, if your screen is broken or cracked, going to an authorized service center is still your best bet, especially when your screen urgently needs a replacement. Delaying it further may hurt your wallet in the long run, so it’s best to fix it as soon as possible.
Fixing Persistent Pandora Crashes on Samsung Galaxy F34 5G
Pandora, an app bringing music to our fingertips, is a beloved platform for streaming tunes on Android devices. Despite its popularity, users might encounter occasional hurdles with the app, such as unexpected hanging, lagging, or even crashing. These interruptions can disrupt our musical journey.
In this article, you’ll explore practical solutions to the problem of “why does Pandora keep stopping.” Following the steps and tips, you can regain smooth and uninterrupted access to your favorite tunes. Have a hassle-free and enjoyable music streaming experience with Pandora on your Samsung Galaxy F34 5G.
 Glarysoft File Recovery Pro Annually - Helps to recover your lost file/data, even permanently deleted data.
Part 1: Basic Troubleshooting and Fixes
Pandora, the music streaming app cherished by Android users, accompanies you on your musical journey. It offers an array of melodies at our fingertips. However, occasional crashes can disrupt this harmonious experience. This results in an annoying experience where Pandora keeps stopping on Android phones.
Crashes often result from glitches or bugs within the app’s code. These unexpected errors can cause Pandora to freeze, lag, or abruptly shut down, hindering its smooth operation. When faced with intermittent crashes, several basic fixes can help restore Pandora’s functionality:
- Closing the app. Simply closing and reopening Pandora might resolve transient issues.
- Restarting the phone. A reboot of your Samsung Galaxy F34 5G can clear temporary glitches affecting Pandora.
- Updating the app. Ensure you have the latest version of Pandora installed. Updating the app can rectify bugs from older versions.
- **Reinstalling the app.**If the problem persists, uninstall Pandora and reinstall it from the Google Play Store. This process can refresh the app’s data and settings, potentially resolving persistent issues.
If these basic fixes fail to address the continuous crashing of the Pandora app, or if the crashes persist over an extended period, the next section will provide advanced solutions. These initial troubleshooting steps aim to tackle common and temporary issues that could impede Pandora’s performance. If the problem persists, it might necessitate more intricate resolutions or further investigation into the app’s underlying technicalities.
Part 2: Causes Behind Constant Pandora App Crashes and Solutions
Several underlying factors might be at play when persistent crashes plague your Pandora app. This section explores these.
Poor Internet Connection
A stable internet connection is pivotal for seamless app functionality. Crashes in Pandora can stem from poor connectivity. Check your internet connection . Ensure you’re connected to a reliable network. Restart your router or switch between Wi-Fi and mobile data to troubleshoot connectivity issues.

Corrupted/Broken Devices
If you notice that all other apps are crashing , your device’s system may also have a problem. In this case, simple app reinstalls/restarts can fix the problem.
Thankfully, Wondershare Dr.Fone solves device corruption leading to app crashes. This powerful toolkit addresses deep-seated issues causing app crashes, such as corruption within the Samsung Galaxy F34 5G device that impacts Pandora’s performance. The Dr.Fone’s System Repair feature acts as a reset button for your Samsung Galaxy F34 5G, resolving underlying system-level problems that cause app crashes.
Here’s how you can use it to resolve the issue of why the Pandora app keeps crashing on Android. First, of course, ensure that your device is connected.
- Step 1: Launch Dr.Fone on your computer. Access System Repair.
 Forex Robotron Gold Package
safe & secure
4,851,928 people have downloaded it
- Step 2: Choose Android on the next page.

- Step 3: Click Start to initiate Android System Repair.
- Step 4: Check if the Samsung Galaxy F34 5G device details presented onscreen are correct. You may edit them accordingly for any mistakes.
- Step 5: Follow the onscreen instructions to place your phone into Download mode. Then, Dr.Fone will download the firmware.
- Step 6: After downloading, click Fix Now. Then, type in “000000” on the appearing window text box. Click Confirm.

- Step 7: Once finished, click Done. Your Pandora app should not crash once you reinstall it again by now.
Cache Buildup
Accumulated cache data can hamper app performance, leading to frequent crashes. Clear the cache of the Pandora app. Usually, you can see this option under Settings > Apps > Clear Data. Additionally, you can optimize your device’s RAM and storage space by deleting unnecessary files or closing unused apps.
 Glarysoft File Recovery Pro - Helps to recover your lost file/data, even permanently deleted data.

Device Compatibility Issues
Outdated system software can create compatibility issues, causing app instability. Ensure your device’s system software is up-to-date. Check for and install any pending system updates in your device’s settings. Updated software often includes bug fixes and improvements that can rectify compatibility-related crashes.
You can systematically troubleshoot and resolve the issues by addressing the potential culprits behind constant Pandora app crashes, ensuring a smoother and uninterrupted music streaming experience. If the problems persist, contacting Pandora support or seeking professional assistance might be advisable to delve deeper into the technical aspects of the app’s performance issues.
Part 3: What To Do if None of the Fixes Work
If the suggested fixes don’t work, and you still wonder “why does Pandora keeps stopping on Android,” then it might be time to take a look at these alternatives:
- **Consider trying other music streaming apps.**Explore alternative music streaming applications available on the Google Play Store. Several reliable options offer similar services to Pandora, providing an opportunity to continue enjoying music while bypassing the persistent app issues.
- **Contact customer support.**Reach out to Pandora’s customer support for tailored assistance. They may offer specific troubleshooting steps or insights into the app’s technical glitches.
- Consider a new phone. Upgrade to a new phone if the crashes persist despite troubleshooting, and your device is outdated or incompatible. This might help resolve the issue by providing a more stable environment for app usage.
Conclusion
In conclusion, navigating Pandora app crashes on your Samsung Galaxy F34 5G demands a systematic approach. Keeping regular maintenance, such as clearing cache, optimizing RAM, and ensuring timely device updates, can mitigate app crashes and uphold smooth performance. This way, you can resolve the issue of why Pandora keeps stopping.
When persistent issues arise, especially if other apps are affected similarly, Wondershare Dr.Fone emerges as a reliable solution. Its comprehensive toolkit, including System Repair, can effectively address deep-seated issues. By embracing proactive measures and leveraging Dr. Fone’s prowess, users can enhance their device’s performance and ensure an uninterrupted music streaming experience on Pandora and other apps.
Parental Control Software
safe & secure3,362,023 people have downloaded it
- Title: How to Exit Android Factory Mode On Samsung Galaxy F34 5G? | Dr.fone
- Author: Nova
- Created at : 2024-07-19 22:37:30
- Updated at : 2024-07-20 22:37:30
- Link: https://change-location.techidaily.com/how-to-exit-android-factory-mode-on-samsung-galaxy-f34-5g-drfone-by-drfone-fix-android-problems-fix-android-problems/
- License: This work is licensed under CC BY-NC-SA 4.0.