
How to Exit Android Factory Mode On Nokia C32? | Dr.fone
How to Exit Android Factory Mode On Nokia C32?
You’ve often heard that recovery mode will solve just about any problem your Nokia C32 is experiencing. This is mostly true and one of the components of Android’s recovery mode, factory mode or factory reset is one of the most efficient ways to solve various problems on your device. While factory mode is often a good thing, there are times when your device can enter factory mode on its own. Other times, you can safely enter factory mode but not know how to get out.
Fortunately for you, this article will explain all aspects of factory mode and especially how to safely exit factory mode.

Part 1. What is Android Factory Mode?
Factory mode or what is commonly known as factory reset is one of the options available for you when your Nokia C32 is in recovery mode. Several options are available for you once you enter Recovery mode on your device but few are as effective as the wipe data/ factory reset option. This option is useful in solving a whole host of problems that your device could be experiencing.
If you have been using your Nokia C32 for a while now and its performance to be less than ideal, a factory reset might be a good solution. That is however not the only problem a factory reset or factory mode can solve. It will also work for a number or Android errors that you may experience, problems caused by faulty firmware updates and also tweaks made on your device that may not have worked as expected.
It is however important to note that a factory reset or factory mode does often result in the loss of all your data. Therefore a backup is necessary to protect against this data loss risk.
Part 2. Backup your Android Device First
Before we can see how to safely enter and exit factory mode, it is important to have a full backup of your device. We mentioned that a factory mode will likely erase all the data on your device. A backup will ensure that you can get your phone back to its original state before the factory mode.
In order to do a full and complete backup of your device you need to have a tool that will not only ensure that you backup everything on your device but one that makes it easy for you to accomplish this. One of the best tools in the market is Dr.Fone - Backup & Resotre (Android) . This software is designed to enable you to create a full backup of your device.
Dr.Fone - Backup & Restore (Android)
Flexibly Backup and Restore Android Data
- Selectively backup Android data to computer with one click.
- Preview and restore backup to any Android devices.
- Supports 8000+ Android devices.
- There is no data lost during backup, export or restore.
3,428,803 people have downloaded it
Follow these very simple steps to use this MobileTrans Phone Transfer software to create a full backup of your device.

Step 1. Launch Dr.Fone on your computer and choose “Backup & Restore”
Run the software on your computer and you can see all features displayed in the primary window. Choose this one: Backup & Restore. It allows you to get your device backed up entirely with one click.

Step 2. Plug in with your device
Then plug in with your device to the computer. When your devic is detected, click on Backup.

Step 3. Select the file types to backup
The program will display all the file types it can support to backup. Just select the ones you would like to backup and hit Backup.

Step 4. Start backing up your device to the computer
After choosing the file’s type for backup, click “Backup” to begin backing up your device to your computer. It will take you a few minutes, depending on the storage of the data.

Note: You can use the feature of “Restore From Backup” to restore the backup file to your device, when you have the need later.
Part 3: One Click Solution to fix Android stuck in factory mode
From the above parts, you are well aware about what is factory mode. As we discussed, this mode fixes most troubles with Android devices.
But for situations when your Nokia C32 gets stuck in this very same factory mode, the most feasible solution for you is Dr.Fone - System Repair (Android) . This tool fixes all Android system issues including unresponsive or bricked device, stuck on Nokia C32 logo or factory mode or blue screen of death with a single click.
Dr.Fone - System Repair (Android)
One click fix to Android stuck in factory mode
- You can easily fix your Android stuck in factory mode with this tool.
- The one-click solution’s ease of operation is appreciable.
- It has carved a niche being the first Android repair tool in the market.
- You don’t need to be a pro in technology to use this program.
- It is compatible with all latest Nokia C32 devices like Galaxy S9.
3,645,867 people have downloaded it
In this part we will explain how to exit Android recovery mode using Dr.Fone - System Repair (Android) . Prior to proceeding, you got to remember that device backup is paramount to keep your data safe. This process might erase your Nokia C32 data.
Phase 1: Ready your device and connect it
Step 1: Installation completion needs to be followed by running Dr.Fone on your system. Over the program window, tap ‘Repair’ afterwards and get the Android device connected.

Step 2: Select the ‘Android Repair’ option from the list to fix Android stuck in factory modeissue. Hit the ‘Start’ button soon after.

Step 3: Select Android device details on the Nokia C32 device information window, followed by tapping the ‘Next’ button.

Step 4: Enter ‘000000’ for confirmation then proceed.

Phase 2: Get in ‘Download’ mode for repairing the Android device
Step 1: It’s important to put the Android device in ‘Download’ mode, here are the steps to do so –
- On a ‘Home’ button-less device – turn off the Nokia C32 device and push down the ‘Volume Down’, ‘Power’ and ‘Bixby’ buttons for about 10 seconds and un-hold. Now, hit the ‘Volume Up’ button to get into ‘Download’ mode.

- For a device with ‘Home’ button – switch it off and hold down the ‘Power’, ‘Volume Down’ and ‘Home’ buttons together for 10 seconds and release. Click the ‘Volume Up’ button for entering ‘Download’ mode.


Step 2: Press ‘Next’ for initiating firmware downloading.

Step 3: Dr.Fone –Repair (Android) starts Android repair as soon as download and verification of firmware is done. All Android issues along with Android stuck in factory mode will be fixed now.

Part 4. Common Solutions to Exit Factory Mode on Android
Having a backup of all your data will eliminate the risk of losing any of your data. You can now safely exit factory mode using one of the 2 methods below. These two methods will work on a rooted device.
Method 1: Using “ES File Explorer”
To use this method, you will need to have installed file explorer on your device.
Step 1: Open “ES File Explorer” and then press the icon on the top left corner
Step 2: Next, go to “Tools” and then turn on “Root Explorer”
Step 3: Go to Local> Device> efs> Factory App and then open factorymode as text in the “ES Note Editor” Turn it ON
Step 4: Open keystr as text in the “ES Note Editor” and change it to ON. Save it.
Step 5: Reboot the Nokia C32 device
 Glarysoft File Recovery Pro Annually - Helps to recover your lost file/data, even permanently deleted data.
Method 2: Using Terminal Emulator
Step 1: Install Terminal emulator
Step 2: Type “su”
Step 3: Then Type the following;
rm /efs/FactoryApp/keystr
rm /efs / FactoryApp/ Factorymode
Echo –n ON >> / efs/ FactoryApp/ keystr
Echo –n ON >> / efs/ FactoryApp/ factorymode
chown 1000.1000/ efs/FactoryApp/keystr
chown 1000.1000/ efs/FactoryApp/ factorymode
chmod 0744 / efs/FactoryApp/keystr
chmod 0744 / efs/ FactoryApp/ factorymode
reboot
You can also exit factory mode on unrooted device by going to Settings> Application manager> All and the search for Factory Test and “Clear Data”, “Clear Cache”
As much as factory mode can be a useful solution to a number of problems, it can be quite annoying when it pops up unexpectedly. Now you are equipped with 2 effective solutions to help you safely exit factory mode if ever you find yourself in this situation.
Ways to Unbrick Your Android Device: Various Ways for Recovery
When your Nokia C32 becomes unresponsive or frozen after mistakenly flashing a ROM or rooting, you are informed that the phone has been bricked. The most terrifying aspect will not just be gadget loss, but also data erasure. However, what exactly is a bricked phone, and, more importantly, how do you fix a bricked Android phone?
This article will explain what a bricked android phone is, why an Android phone becomes bricked, how to unbrick an Android phone without losing data and a third-party application you can use.
 Glarysoft File Recovery Pro - Helps to recover your lost file/data, even permanently deleted data.
Part 1. Causes of Bricked Phones
In everyday settings, our mobile devices have become our greatest friends, therefore breaking your phone is the last thing you want to do. There are different reasons why devices brick, and we must be familiar with them in order to comprehend the various techniques to repair bricked devices.
Here are some common reasons why your Nokia C32 is bricked:
- **Flashing Stock/Custom ROM:**It is possible that you installed an incompatible ROM in the Android phone, that the phone shuts off during the process, or that you have performed other errors that cause your phone to restart indefinitely or to become stuck at the starting screen.
- **Rooting an Android device:**You are unable to effectively root the Nokia C32 device.
- **Android firmware is being updated:**If the phone is interrupted when updating the Android firmware, it will be bricked.
- **Installing harmful applications:**You installed harmful programs on your Nokia C32, or the phone was infected with a virus.
Part 2. How to Fix a Bricked Phone
The first step is to establish how badly your device is bricked. In most cases, you will be working with soft bricks that are pretty simple to repair. If your phone is stuck in a boot loop or enters recovery mode every time you turn it on, you may have a soft brick.
To repair bricked Android phones and tablets, you must first thoroughly examine the Nokia C32 device’s state. Before you begin troubleshooting, determine the sort of bricking that your phone is experiencing. However, there is no specific software to unbrick your Nokia C32; you may need to learn the complexities of this issue or hire a professional to do it for you.
 safe & secure
Here are some simple methods for repairing bricked Android devices:
Method 1. Reboot the Phone in Safe Mode
Trying to reboot your android device in safe mode is the first and easiest thing you should try if your phone is bricked. Here’s how to do it:
- Step 1: Turn off your smartphone and press the Volume Up + Power button to enter recovery mode. Then, using the volume controls, navigate the menu and select Reboot system now.
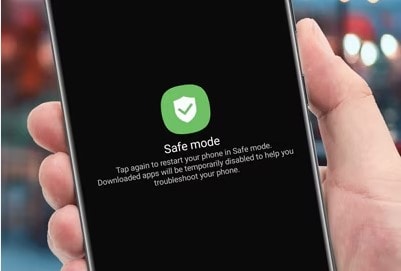
- Step 2: Select the highlighted option by pressing the Power button. After that, wait for your device to reset normally.
- Note: The steps for booting into recovery mode may change based on the manufacturer of your device. For further information, go to the user manual for your phone or tablet.
Method 2. Wipe the Cache Partition
This is the first indication that a user’s phone has gone bricked. The phone turned on automatically, however it became stuck or frozen on the logo screen. The issue might be caused by the undeleting of data and cache, which prevents the phone from displaying the home screen.
This issue, however, may be resolved by wiping the data and cache partitions in recovery mode. You must do the following to do this:
- Step 1: Turn off your smartphone and enter recovery mode by pressing the Power and Volume Down buttons simultaneously. Different devices have various approaches for entering recovery mode, so you may perform better.
- Step 2: After entering recovery mode, you should see the screen below. Remember to pick Advanced and then “Wipe Dalvik Cache” if your device is under Clockwork Mod recovery. Return to the main screen and select “Wipe Cache Partition” once more.

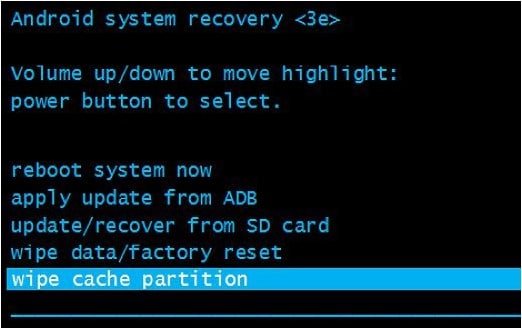
- Step 3: Finally, on your smartphone, choose the Reboot system immediately.
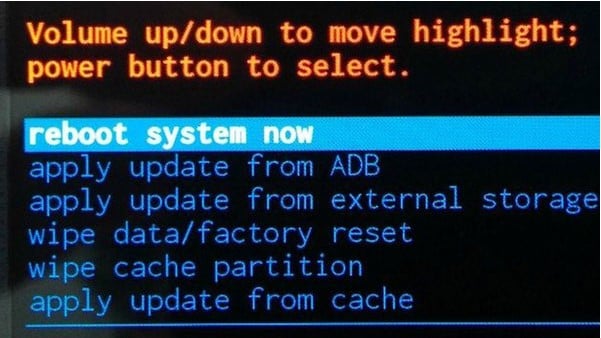
Method 3. Perform a Factory Reset
A factory reset can undo the alterations made to your device that resulted in the brick phone, but you will lose everything you have downloaded and installed in the process. Here’s how to restore a bricked Android phone to factory settings:
- Step 1: Boot your device into recovery mode (turn off your device, then press power button + volume up button).
- Step 2: Select “Wipe Data/“Factory Reset” then confirm the action. When the process is done, you’ll be returned to the recovery mode menu.
- Step 3: Select “Reboot System Now” to restart your device.
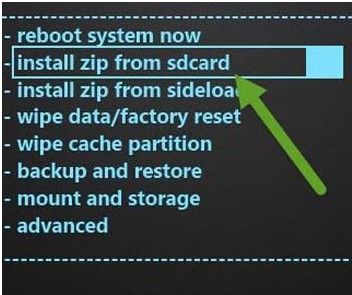
Method 4. Flash a Custom ROM
If you boot your phone directly into recovery mode, there’s a problem with the ROM you loaded. Then simply flash the following custom ROM on your phone:
- Step 1: Save the required ROM (in ZIP format) to an SD card. The SD card should then be inserted into your Nokia C32.
- Step 2: Click the “Install zip from sdcard” button. Then, select the ZIP file that contains the ROM. Finally, click the “reboot system now” button.
Method 5. Using Wondershare Dr.Fone to Fix bricked Android Devices
Wondershare Dr.Fone - Data Recovery is the first data recovery solution for any damaged Android smartphone in the globe. It offers one of the greatest recovery rates and can recover a variety of information like images, videos, contacts, messages, and call logs. The program is most effective with Nokia C32 smartphones.
While it is not an Android unbrick tool, it is a useful tool for retrieving data when your Nokia C32 becomes bricked. It is quite easy to use:
- Step 1: Launch Wondershare Dr.Fone and select “Data Recovery” > “Recover Android Data” from the menu. Then, select “****Recover from Broken Phone”.

- Step 2: Choose the file types you wish to recover. Click “Next” and then select the type of damage your phone is experiencing. Select “Touch screen not responsive, or cannot access the phone” or “Black/broken screen”.

- Step 3: Use the recovery wizard to enter your Android smartphone into Download Mode. Connect your Android handset to the computer after following the instructions to begin automatically analyzing your device.

- Step 4: The program will provide a list of all recoverable files, organized by file type. To preview the file, highlight it. Choose the files you wish to recover and then click “Recover” to save all the data you want to restore.

 safe & secure
 vMix Basic HD - Software based live production. vMix Basic HD includes 4 inputs, 3 cameras, streaming, recording, playlist.
Part 3. How to Prevent Bricking Your Phone
How to prevent a device from “bricking” itself and how to repair it if it does The delay is set by the MCU, but it should be long enough to allow the debug adapter to connect to the Nokia C32 device and halt it before the Nokia C32 device disables itself.
Here are some things to remember to prevent your device from bricking:
- Avoiding unofficial firmware updates: Installing unapproved OS firmware on your phone will most certainly violate any manufacturer’s warranty you have on it. Read the installation instructions for your unique phone model thoroughly and then carefully follow them, taking time and patience.
- **Being cautious when rooting or jail breaking:**Rooting and Jail breaking disables parts of the operating system’s built-in security mechanisms, which are part of what makes the operating system safe, and your data protected from exposure or damage.
- **Install an antivirus application on your device:**Mobile devices increase the danger of data leaks and breaches. As a result, antiviral software is beneficial on mobile phones. Mobile Device Management is an excellent choice for virus protection on your mobile device.
- Backup your phone data regularly: Backing up your phone safeguards your data in the event that you lose it, it is stolen, or it no longer works. When it comes time to replace your phone, having a backup makes it simple to restore your data to the new device. Furthermore, backing up your phone allows you to organize your data so that it is easier to access.
- Avoid installing apps from untrusted sources: Apps installed from unauthorized sources make your device and personal data more exposed to dangers such as Ransomware. So you should be wary of where you download applications.

Conclusion
It is certainly upsetting when your gadget bricks, but you may attempt the solutions listed above to resolve the issue. Meanwhile, if you want to solve the problem quickly and easily, you can try Wondershare Dr.Fone. It can not only help you repair your Android smartphone, but it can also help you extract data from a bricked device, recover data, and many more Android device solutions!
safe & secure
Why Is My Nokia C32 Offline? Troubleshooting Guide
Ever had your Nokia C32 claim it’s offline, leaving you scratching your head about where it went wrong? We get it; it’s confusing. That’s why this article is here to untangle the mystery.
In the following sections, we’re diving into the “why is My Nokia C32 offline” dilemma that many Android users face. We’ll break down the possible reasons behind this common issue and guide you through simple steps on how to fix it. By the end of the article, you’ll be able to get back to smooth internet surfing on your Nokia C32. Let’s get started.
Part 1: Why Does My Nokia C32 Say Offline?
When you encounter the “offline” error message, it can disrupt your usual smartphone activities. Suddenly, you find yourself unable to browse the internet, send or receive emails, or stay connected through instant messages.
It’s a frustrating scenario, but let’s break down the potential reasons why your phone might be displaying this offline status:
- Enabling Airplane mode
Why is My Nokia C32 showing offline? Well, one common culprit behind the “offline” message is the accidental activation of Airplane Mode on your Nokia C32. When Airplane Mode is enabled, it disconnects your phone from all wireless networks, rendering it unable to connect to the internet or cellular networks.
- Internet connection issues
Fluctuations in your signal strength or unexpected data loss can also be the culprit behind the “Why is My Nokia C32 offline?” problem. Android devices rely on stable internet connections, and disruptions, whether temporary or prolonged, can lead to this error.
- Glitches or bugs
Sometimes, glitches or bugs in Google apps installed on your Nokia C32 can mislead it into thinking it’s offline. Google Play Services or other related applications may encounter issues, causing the phone to display an “offline” message.
- Firewall restrictions
In some cases, a firewall on your Nokia C32 might be overly restrictive, preventing the Nokia C32 device from establishing a connection to the internet. This security measure, intended to protect your device, can sometimes go overboard and disrupt normal online functionality.
Now, you have understood the potential causes as the first step toward resolving the issue. Next, we’ll guide you through the process of troubleshooting and getting your Nokia C32 back online.

Part 2: How To Fix “Phone Offline” With Internet Connection Problem
Now that we’ve figured out why your phone says it’s offline, let’s tackle the issue head-on. If you’re facing problems like downloads that won’t start, Google Play stuck on “Loading…,” or web pages refusing to load, chances are it’s an internet connection issue causing the problem.
Here are some easy solutions to get your connection back.
Solution 1: Change connection to mobile data
Switching to mobile data can be a quick fix if your Wi-Fi is acting up. It ensures a change in your connection source and might resolve the “Phone offline” issue. Follow these easy steps to change your connection to mobile data:
- Step 1: Swipe down from the top of your screen to access the Quick Settings menu.
- Step 2: Tap the Wi-Fi icon to turn off the Wi-Fi connection.
- Step 3: Tap Mobile Data to turn it on.


Solution 2: On and off Airplane mode
Airplane Mode can sometimes cause connectivity confusion. Turning it off and on essentially resets your phone’s wireless connections, which might resolve the offline issue.
How to on and off Airplane mode on Android:
- Step 1: Swipe down from the top of your screen to access the Quick Settings menu.
- Step 2: Look for the Airplane Mode icon and tap the icon to turn on Airplane Mode.
- Step 3: Wait a few seconds, then tap it again to turn off the Airplane Mode. Now, check if your phone is now online.
 Forex Robotron Basic Package
Solution 3: Reset network settings
Resetting network settings can help eliminate any configuration glitches that might be causing the phone offline problem. It’s like giving your phone’s connection settings a fresh start.
To reset your network settings, the steps may differ depending on the phone model you are using. However, you can generally do so by looking for the “Network” settings.
- Step 1: Open your phone’s Settings > Connection & sharing.
- Step 2: Find and select “Reset Wi-Fi, mobile networks, and Bluetooth.”
- Step 3: Tap “Reset Settings” and confirm the action and allow your phone to reset.
- Step 4: Reconnect to your Wi-Fi and check if the issue persists.

Solution 4: Restart your Wi-Fi router
Sometimes, the problem might not be with your phone but rather with the Wi-Fi router. Restarting it can refresh the connection and potentially resolve the connectivity problem.
How to restart your Wi-Fi router:
- Step 1: Locate your Wi-Fi router.
- Step 2: Turn off the router using the power button or unplug it.
- Step 3: Wait for about 10–15 seconds before plugging the router back in or turning it on.
- Step 4: Allow the router to restart and establish a connection. Then, check if your phone still shows the “Phone Offline” message.
These solutions should cover the most common connectivity issues. If the problem persists, we’ll explore further steps in the following sections.
 PDF application, powered by AI-based OCR, for unified workflows with both digital and scanned documents.
 Part 3: How To Fix “Phone Offline” Despite Having an Internet Connection
Ever found it odd to receive the frustrating offline error message when you’re sure your internet connection is up and running? If you’ve double-checked your internet connection and your phone still says it’s offline, the issue may lie within your browser, apps, or device settings.
In this part, we’ll answer the question “**Why does My Nokia C32 say offline android?**” despite a seemingly functional internet connection. Then, let’s see other solutions on how to get your device back to its online, fully functional self.
Solution 1: Clear Google Chrome’s cache and data
Sometimes, the answer to “Why is my Android phone offline” can be attributed to a buildup of corrupted or outdated data in your browser’s cache. Clearing the cache and data for Google Chrome can resolve this issue, allowing for a fresh start and potentially eliminating the offline status.
How to clear your browser’s cache and data on Android:
- Step 1: Open the Settings > Apps > Manage Apps.
- Step 2: Locate and tap “Google Chrome” or your preferred browser in the list of installed apps.
- Step 3: Tap “Storage” and select “Clear Cache” to remove temporary files.
- Step 4: Choose “Clear Data” to delete app data. Confirm the action if prompted.
Now, restart Google Chrome and check if the offline error persists.


Solution 2: Re-install Google Chrome
If clearing the cache and data didn’t solve the offline issue, reinstalling Google Chrome can be the next step. A fresh installation can eliminate any underlying glitches or corrupted files that might be causing the persistent offline status.
How to re-install Google Chrome:
- Step 1: Visit the Google Play Store and search for Google Chrome.
- Step 2: Tap “Uninstall” to remove the app from your device.
- Step 3: Wait until it has finished uninstalling your app. Then, tap “Install” to start reinstalling the app.
- Step 4: Once the installation is complete, open Google Chrome and check if the offline error persists while browsing.


 vMix HD - Software based live production. vMix HD includes everything in vMix Basic HD plus 1000 inputs, Video List, 4 Overlay Channels, and 1 vMix Call
Solution 3: Repair the system to fix the phone showing offline
When persistent offline issues seem deeply rooted in your device’s system, a comprehensive system repair may be the solution. Wondershare Dr. Fone’s system repair tool is designed to address a range of system problems, providing a reliable way to fix any problem you have with your phone.
With Dr. Fone’s system repair tool, you can diagnose and resolve “Why is My Nokia C32 offline on Android,” ensuring a smooth and functional Android experience.
Key Features:
- Comprehensive system repair for any devices
- User-friendly interface
- Efficient problem diagnosis
How to use Dr. Fone’s system repair tool:
- Step 1: Open Dr.Fone’s system repair tool
Start by launching Wondershare Dr.Fone on your computer. Go to the Toolbox section and connect your Nokia C32. Choose System Repair and pick Android as your device type.
 safe & secure
3,189,324 people have downloaded it
- Step 2: Start the repair
Click Start on the new screen to kick off the repair. Since you’re dealing with an offline connection issue on Android, select System Damage.
- Step 3: Confirm your device details
The platform will detect your Nokia C32’s brand. Confirm the Name, Model, Country, and Carrier. If your device is unlocked, choose OPEN in the Carrier section. Agree to the warning, click Next, and proceed with the repair.
- Step 4: Download firmware.
Follow the instructions to put your Nokia C32 into Download Mode. Once in Download Mode, you will start downloading the firmware.
- Step 5: Confirm Installation
Remember, the repair may erase data. It’s advisable to back up your data first before starting the repair. Enter “000000” to confirm the repair process, shown by a progress bar. Click Done once it is completed and see if your Android is back online.
Conclusion
Dealing with the “Phone Offline” hiccup on your Nokia C32 can be a real headache. But fear not – we’ve covered a range of solutions to get you back online smoothly. From troubleshooting internet connection problems to addressing browser and app-related glitches, the solutions provided in this guide are designed to cater to a variety of scenarios. If you find it troublesome to try solutions one by one, then we recommend using Dr.Fone directly which is a full toolkit for your phone and can help resolve most device glitches one-off.
Remember, technology can sometimes be tricky. But with patience and the right guidance, you can overcome these challenges.
- Title: How to Exit Android Factory Mode On Nokia C32? | Dr.fone
- Author: Nova
- Created at : 2024-07-19 22:34:58
- Updated at : 2024-07-20 22:34:58
- Link: https://change-location.techidaily.com/how-to-exit-android-factory-mode-on-nokia-c32-drfone-by-drfone-fix-android-problems-fix-android-problems/
- License: This work is licensed under CC BY-NC-SA 4.0.