
Guide How To Unbrick a Bricked Realme 12 Pro+ 5G Phone | Dr.fone
Guide: How To Unbrick a Bricked Realme 12 Pro+ 5G Phone
Realme 12 Pro+ 5G phones are super popular thanks to their excellent features and affordable prices. But being so popular means people try to customize them with custom software. If you’re not careful, you might have a “bricked” Realme 12 Pro+ 5G phone. It won’t work at all. It will be more like a brick than a smartphone.
Don’t worry, though. This guide is here to help. It will show you how to unbrick your phone step by step. You’ll learn to bring your phone back to life and make it work again. So, get started on fixing your bricked Realme 12 Pro+ 5G phone by reading this article.
 EmEditor Professional (Lifetime License, non-store app)
Part 1. Common Reasons Why Realme 12 Pro+ 5G Phones Get Bricked
A bricked phone might sound like a techy term, but it’s pretty simple – when your Realme 12 Pro+ 5G phone turns into a lifeless block that won’t do anything. In this section, you’ll learn all about why this happens, so you can avoid these issues and keep your phone alive as long as possible.
- Trying to flash incompatible ROMs. Sometimes, people want their Realme 12 Pro+ 5G phones to run different software like a custom version of Android called a ROM. But if you use the correct ROM for your specific phone, it can mess things up nicely. Also, inexperience with ROM flashing can hard brickyour Realme 12 Pro+ 5G Be sure to follow guides and ask for community help online.
- Rooting mishaps/failures.“Rooting” means giving your phone superpowers, but if you mess up, it can go wrong. Your phone might not boot up, leaving you with a brick. Like the previous bullet, follow guides carefully, especially if inexperienced.
- Failed Firmware Updates. When your phone asks you to update its software, following the instructions carefully is essential. If you interrupt the process or something goes wrong, your phone could be bricked.
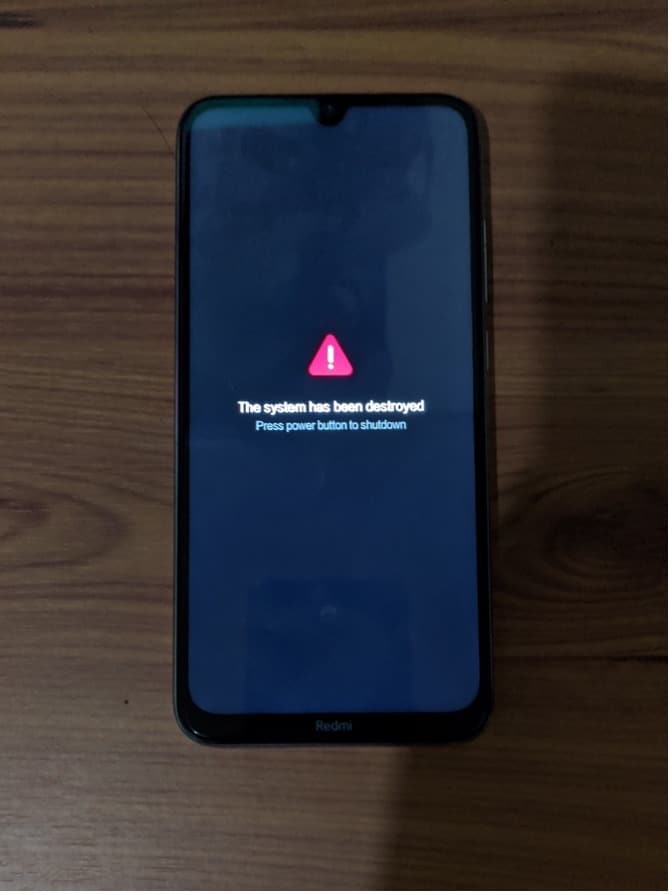
Now, you must know about soft and hard-bricking to learn how to diagnose your phone. Soft bricking is like a phone’s bad day – it might not start up. However, with the right help, you can fix it. Hard bricking is worse. It’s when your phone is a paperweight – it won’t turn on, respond, or do anything useful.

Part 2. Method 1: Use the Realme 12 Pro+ 5G Flash Tool To Recover Bricked Realme 12 Pro+ 5G Phones
Say you’ve accidentally bricked your Realme 12 Pro+ 5G phone due to rooting or ROM flashing. You might feel scared, but imagine having a magic wand that can fix your bricked phone. That’s what the Realme 12 Pro+ 5G Flash Tool is –a dedicated Realme 12 Pro+ 5G unbricking tool. It lets you install or flash different software onto your phone, giving it a fresh start. Most of the time, a simple firmware flash will unbrick your Realme 12 Pro+ 5G.
The Realme 12 Pro+ 5G Flash Tool is a superhero for various situations. Here are some scenarios where it can save the day:
- **Device Recovery.**If your phone is bricked or acting strange, the Flash Tool can help bring it back to life.
- Firmware Updates. You can use it to install official updates released by Realme 12 Pro+ 5G, ensuring your phone runs smoothly.
- **Device Customization.**Want a different look for your phone? The Flash Tool can help you install custom ROMs or themes.
- **Bug Fixes.**Got pesky bugs or glitches? The Flash Tool can replace corrupted software to make your phone behave.
- Performance Enhancement. If your phone feels sluggish, the Flash Tool can boost its speed by flashing a new OS.
How To Use the Realme 12 Pro+ 5G Flash Tool To Unbrick a Realme 12 Pro+ 5G Phone
Now that you know what the Realme 12 Pro+ 5G Flash Tool is all about, it’s time to learn how to use it. If you’ve bricked your Realme 12 Pro+ 5G phone, follow the steps below:
- Step 1. Download the Realme 12 Pro+ 5G Flash Tool and the stock firmware of your device on your computer.
- Step 2. Turn off your phone. Then, press and hold the Volume Down + Power Key simultaneously for 6-8 seconds. This will force your phone to enter the Fastboot mode.

- Step 3. Connect your phone to your computer using a cable when you see this screen flash.
 vMix HD - Software based live production. vMix HD includes everything in vMix Basic HD plus 1000 inputs, Video List, 4 Overlay Channels, and 1 vMix Call
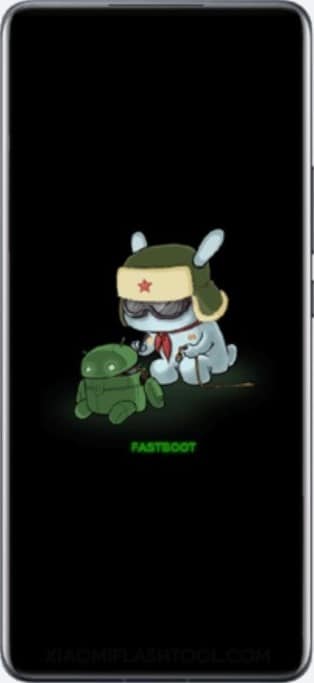
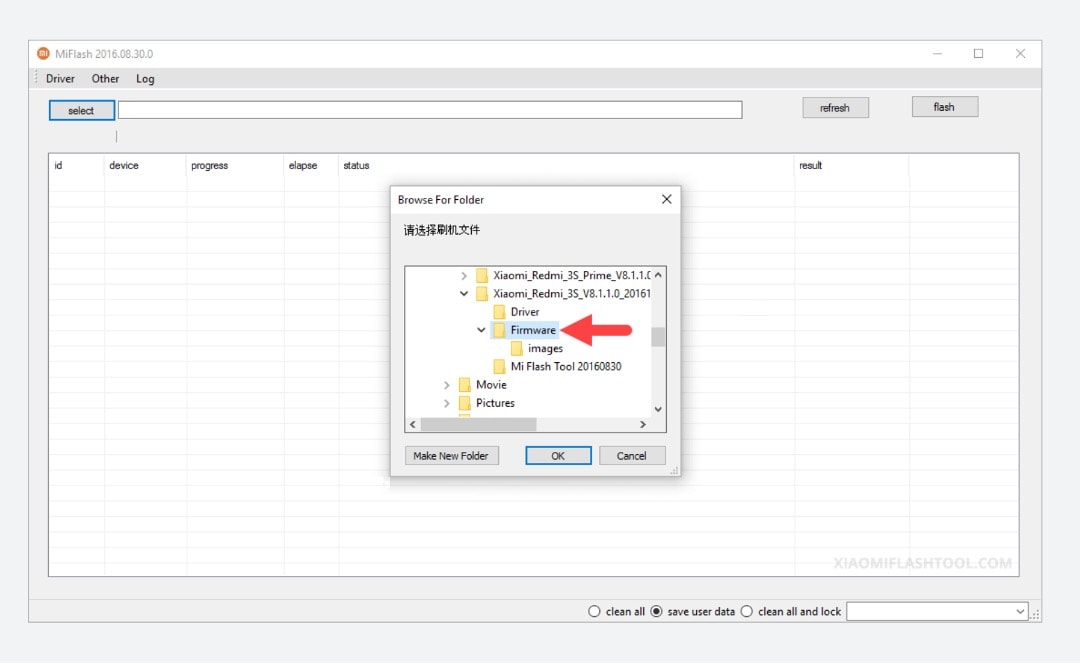
- Step 4. Using the Realme 12 Pro+ 5G Flash Tool, click Select. Then, locate the firmware files you downloaded earlier.
- Step 5. Click the refresh button until the flash tool recognizes your device. Then, click flash to replace the firmware. A text saying “success” should appear under the result column.

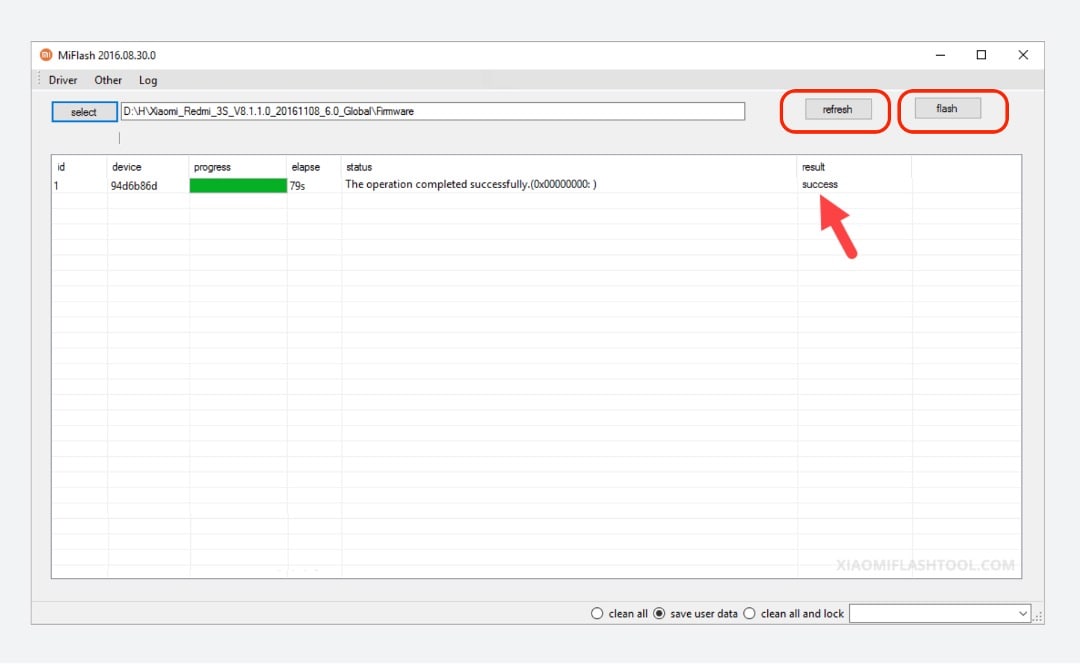
Congratulations! Your phone should be up and working after following these steps.
Part 3. Method 2: Wondershare Dr.Fone System Repair – Your One-Stop Shop for Unbricking Your Realme 12 Pro+ 5G Phone
If you gave the Realme 12 Pro+ 5G Flash Tool a shot and your phone is still not cooperating, don’t lose hope. Sometimes, the magic touch needs a slight variation. That’s where Dr.Fone comes into play. This dedicated software can work wonders when fixing various phone problems. It can even help in cases of bricked Realme 12 Pro+ 5G phones involving software or firmware issues.
![]()
Dr.Fone - System Repair (Android)
Repair Android System Errors without Any Trouble.
- Fix your Android to normal, no skills required.
- Fix various Android system issues, stuck in boot loop , black screen , or won’t turn on , looping on start, etc.
- The high success rate in resolving Android system issues.
- Compatible with a wide range of Android devices and OS versions
- User-friendly interface with easy-to-follow steps.
3981454 people have downloaded it

One of Dr.Fone’s most astonishing powers is its “System Repair” feature. This is where the real magic happens. If your Realme 12 Pro+ 5G phone is bricked, it can help repair the underlying software glitches that caused the issue. Moreover, Dr.Fone brings a toolbox of features to the table, making it more than just a one-trick pony. Here are its key features:
- **Data Recovery:**If you’ve lost precious data, Dr.Fone can help recover it, even from a bricked phone.
- **Data Transfer:**You can quickly move data between devices, even if one is unresponsive.
- **System Backup & Restore:**Fone can help you create a backup of your phone’s system and restore it when needed.
- **Unlocking Tools:**If you’re locked out of your phone, Dr.Fone can help you regain access.
How To Use Dr.Fone System Recovery Feature To Unbrick a Realme 12 Pro+ 5G Phone
Now that you know about Dr.Fone, it’s time to understand how to use it. Hopefully, it can save your bricked Realme 12 Pro+ 5G phone from its problems. Follow the steps below:
- Step 1. DownloadDr.Fone from its official website , and launch it on your computer. After entering the Toolbox menu from the left panel, click System Repair. Make sure that your Realme 12 Pro+ 5G phone is connected.
- Step 2. Select Android on the next screen.

- Step 3. Initiate the Android System Repair by clicking Start.

- Step 4. Confirm your device details. You can edit any details that might be wrong.

- Step 5. Put your phone into Download mode. Follow the guidelines for phones with or without home buttons. Your phone will begin downloading the dedicated firmware.

- Step 6. After downloading the firmware, verify and proceed with the installation by clicking Fix Now. Confirm firmware installation by typing “000000” into the text box in the appearing window. Click Confirm afterward.

- Step 7. After the process is finished, your phone should now be okay. Click Done.

Part 4. Best Practices/Tips Before Unbricking Your Phone
Before diving into the unbricking process, you must arm yourself with some tips and precautions to ensure your recovery journey is as smooth as possible. Here’s what you need to know:
- Backing Up Data: An Ounce of Prevention. Remember the golden rule: always back up your data before attempting any phone recovery. Unbricking might save your phone, but being safe is better than sorry.
- **Authentic Tools and Software: Stay on the Safe Side.**Using genuine and trustworthy tools is crucial when unbricking your Realme 12 Pro+ 5G This applies especially to Dr.Fone, which you should only download from the official website. Additionally, when recovering your phone’s software, use authentic Realme 12 Pro+ 5G ROMs (the operating system’s files).
- **Learning from Online Guides and Communities: Seek Guidance.**Navigating the unbricking process might seem daunting, but you’re not alone. There are many online guides, tutorials, and communities where people share their experiences and solutions.
Conclusion
So, there you have it – your guide to fixing a bricked Realme 12 Pro+ 5G phone. Remember, bricking happens when your phone stops working. You won’t be afraid when that happens, as you learned about the Realme 12 Pro+ 5G Flash Tool and Dr.Fone. They are your phone-saving superheroes that can unbrick even a hard-bricked Realme 12 Pro+ 5G phone.
As a parting reminder, always keep a tool ready for emergencies. For this, choose Dr.Fone. It’s a super tool for all your phone problems. Give it a shot and be confident with your phone wherever you go and whatever you do with it.
 safe & secure
3,052,835 people have downloaded it
My Videos Aren’t Playing on Realme 12 Pro+ 5G – What Can I Do?
There’s a reason Android holds over two-thirds of the mobile operating system market share. It’s a powerful OS that gives you the utmost freedom and flexibility, allowing you to customize your phone to suit your needs.
However, regardless of the capabilities of Android phones and the features that come with their OS, just like any other smartphone, they’re prone to glitches and annoying issues – especially with their video files.
You may encounter videos not playing on your Realme 12 Pro+ 5G more frequently than you like. Whether it’s video files you’ve recorded using your phone or files you’ve downloaded, this glitch can get pretty annoying pretty fast. Fortunately, there are several solutions you could try to fix it.
See what you can do if videos won’t play on your Android.
Why Are My Videos Not Playing On Android?
 LYRX is an easy-to-use karaoke software with the professional features karaoke hosts need to perform with precision. LYRX is karaoke show hosting software that supports all standard karaoke file types as well as HD video formats, and it’s truly fun to use.
Considering how most smartphone manufacturers tend to emphasize the unbelievable quality of their cameras, perfect night modes, seamless slow-motion recordings, superb resolution, and more, you’d expect all images and videos to function flawlessly on your Android. Unfortunately, that’s not always the case.
Occasionally, you could find that the videos you access from your gallery won’t play, sending you the message that “video cannot be played” or “can’t play video.” Other times, you might find that YouTube videos won’t load correctly or your downloaded videos won’t open in your media player.
There could be a wide variety of reasons that is happening, including:
- Corrupted video
- Corrupted SD card
- Outdated media player
- Outdated OS
- Incomplete download from the source
- Low storage
- Video downloaded from a suspicious source
An array of hardware and software issues could lead to you being unable to play videos on your Android. However, that doesn’t mean you should immediately send your device for repairs or delete the videos that won’t play. There might be a few better solutions you could try.
What You Can Do if Your Videos Aren’t Playing On Android Phone
Since there are many reasons for having problems with videos not playing on your Android, you could also try many solutions.
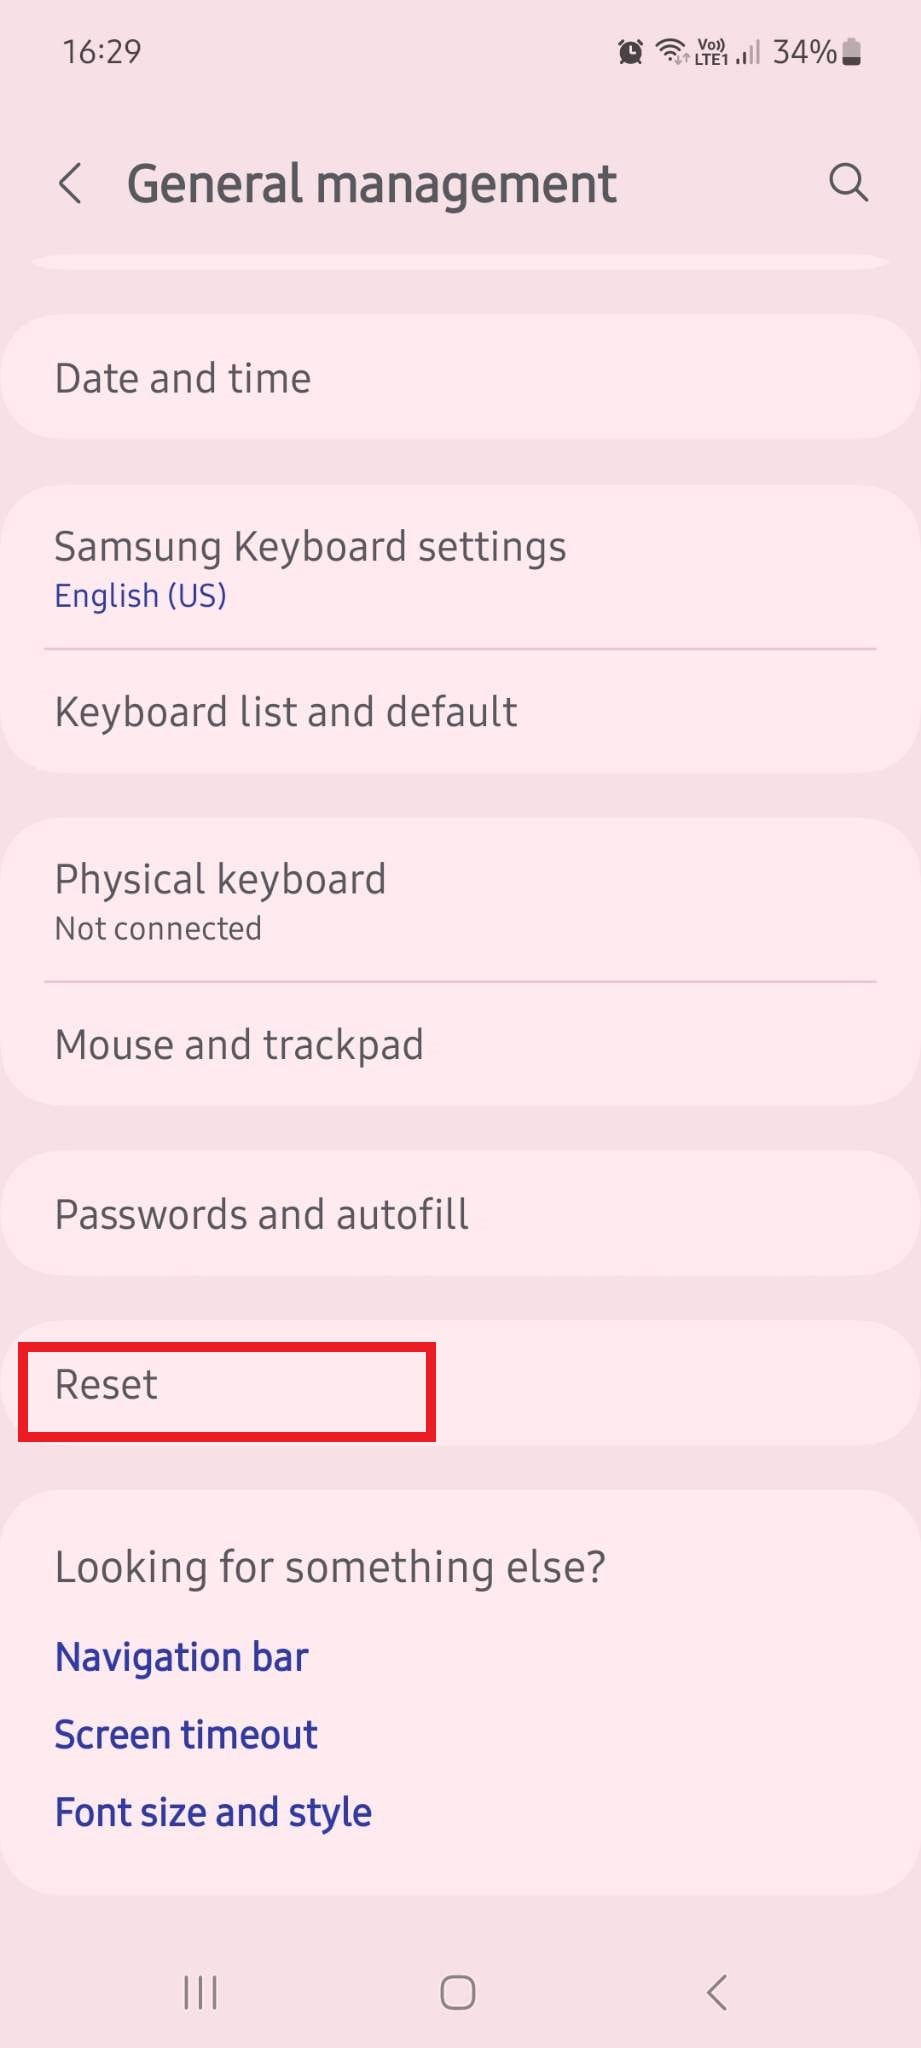
1. Do a Factory Reset

While a factory reset shouldn’t always be the first solution you go to, it can usually prove to be the most effective one.
A factory reset, aka a master reset or a hard reset, returns all your software configurations to the original state when the phone was first manufactured. In the process, all your data is lost – any photos and videos you have on your phone and the apps you’ve installed will be deleted. You’ll be logged out of all your accounts and won’t have access to your message history, contacts, and more.
While it seems like an extreme step, it can help fix any video issues you might encounter due to software bugs.
Though there could be slight variations between different phones, you can usually perform a factory reset by going to Settings > General Management > Reset > Factory data reset > Reset.

2. Restart Your Realme 12 Pro+ 5G
While a factory reset is all but guaranteed to fix the issues you’re encountering with your videos, sometimes a simple restart might do the trick just fine. A restart works by clearing your RAM (Random Access Memory).
In a nutshell, RAM stores short-term data that helps your processor complete tasks quickly. This data is always easily accessible, and it’s what helps your phone quickly open webpages and apps you’ve recently used.
Over time, however, your RAM can get filled with unnecessary data and data fragments, which, in turn, can confuse your processor.
Restarting your phone will clear your RAM and potentially eliminate any data fragments causing your videos to be unplayable.
3. Check the Video Format
As a general rule of thumb, the videos you capture should be in a format your device supports. However, the videos you’ve downloaded might not be. That’s why checking the files’ video format before trying other possible fixes is in your best interest.
If the format isn’t supported, installing the right video player with the necessary compatibility is the most straightforward fix. Some of the most popular video players for Android include VLC for Android, GOM Player, MX Player, Bsplayer, and RealPlayer. You can easily find all of them in the Google Play Store.
4. Check the Internet Connection
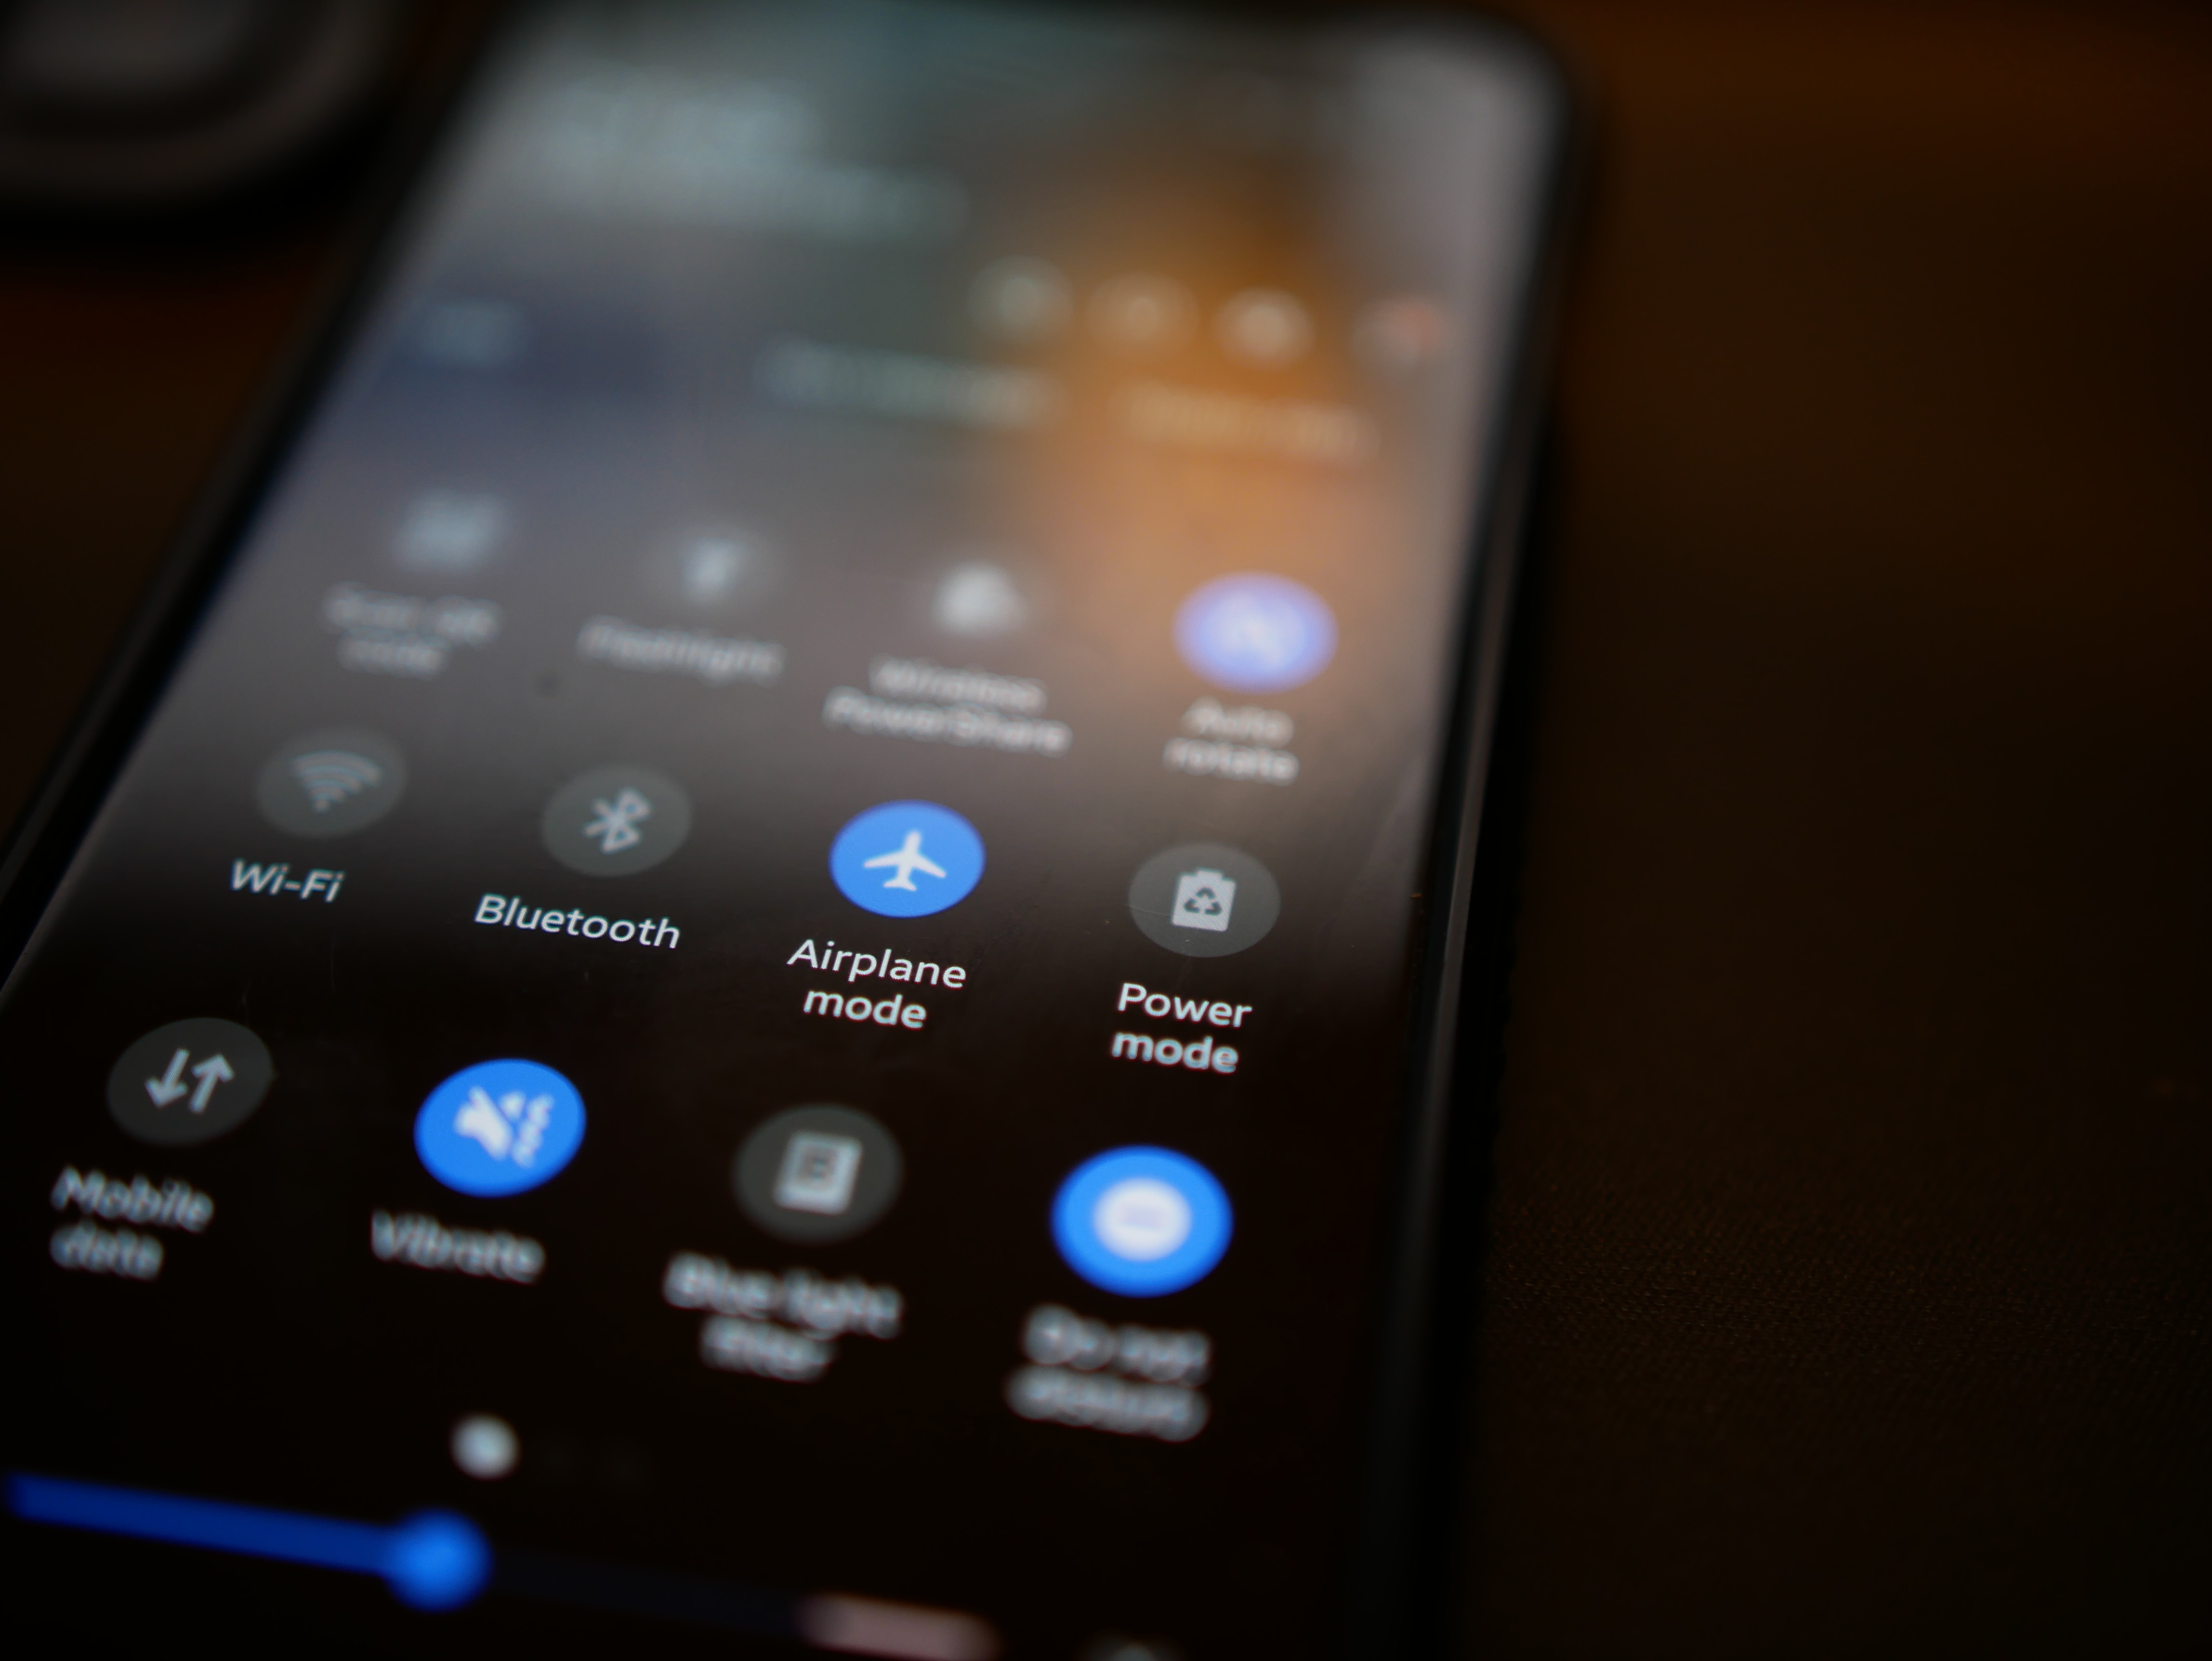
If you’re having problems playing downloaded or online videos, check your internet connection to see if there’s an issue there. If your internet’s down, any downloaded videos might not have downloaded correctly, and any online videos that haven’t been loaded will not play.
Make sure that you turn the Airplane mode off and your Wi-Fi on. Check the connection and test your internet speed to see if everything works properly.
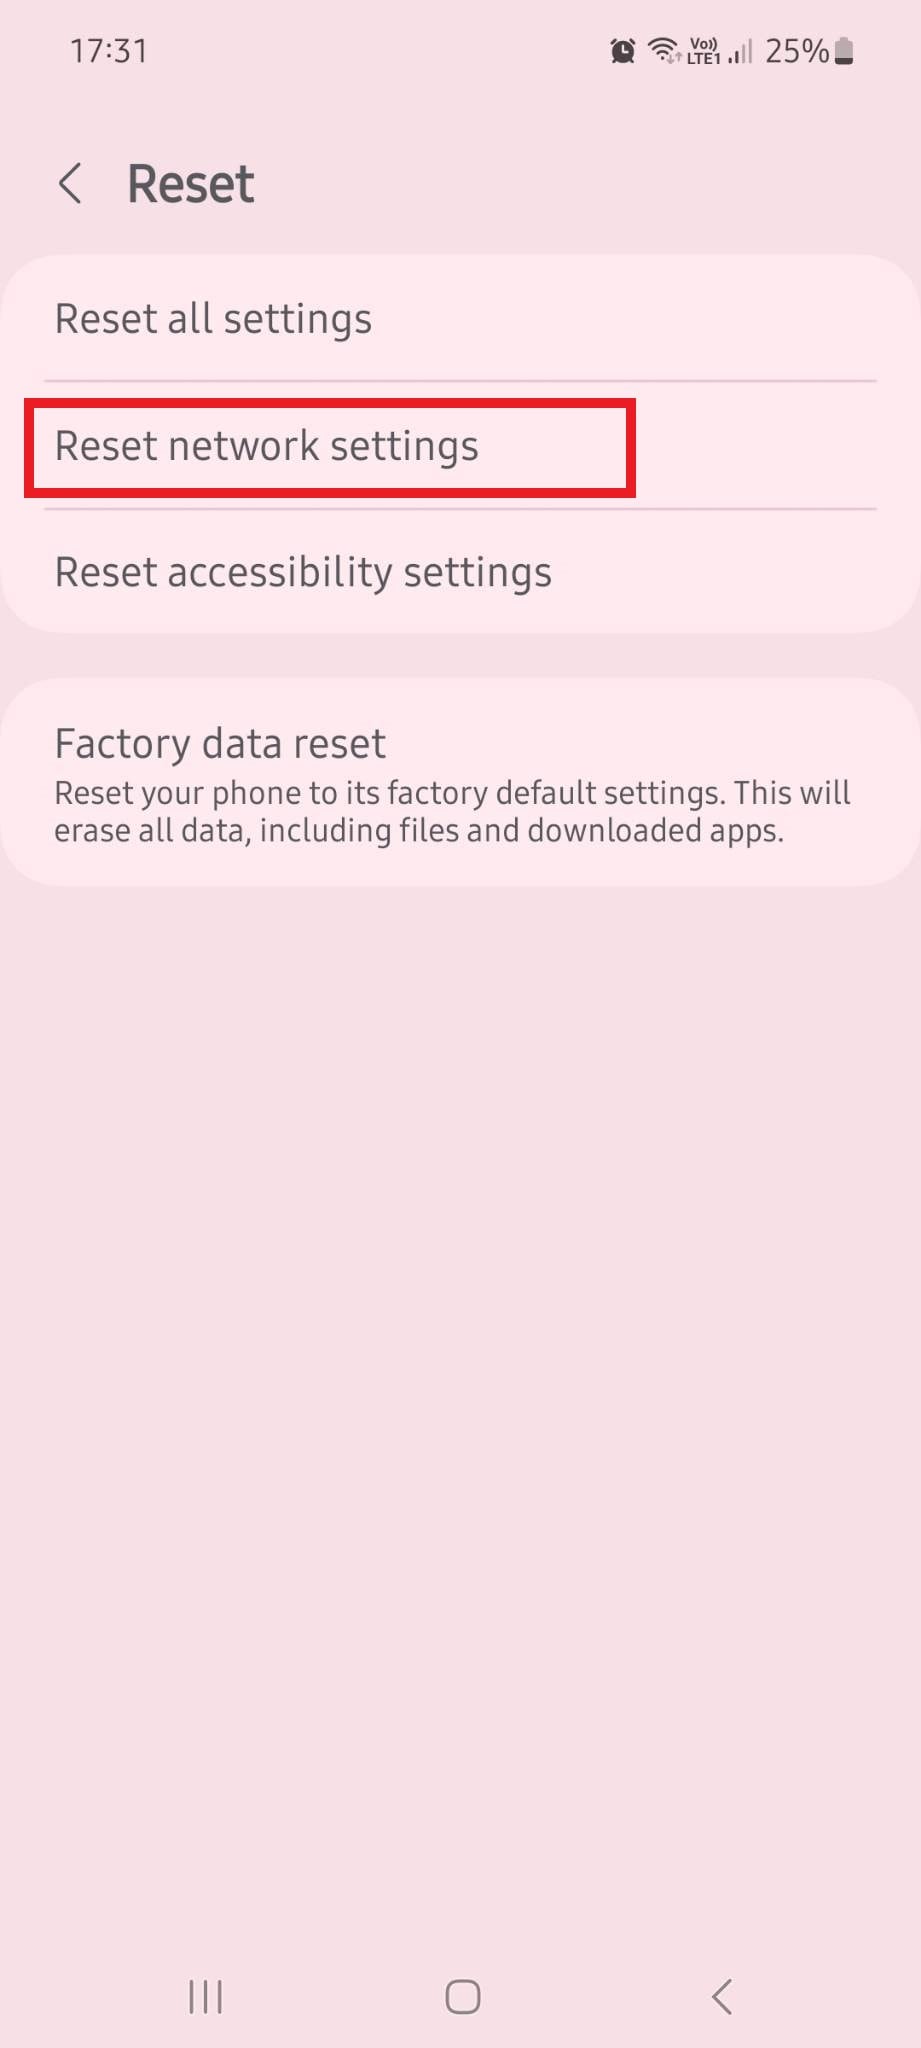
You might need a network reset if your phone can’t connect to a Wi-Fi network. The path might differ between Android devices, but you should be able to find the option for a network reset at the exact location of your factory reset. Go to Settings > General Management > Reset > Reset Network settings > Reset settings.
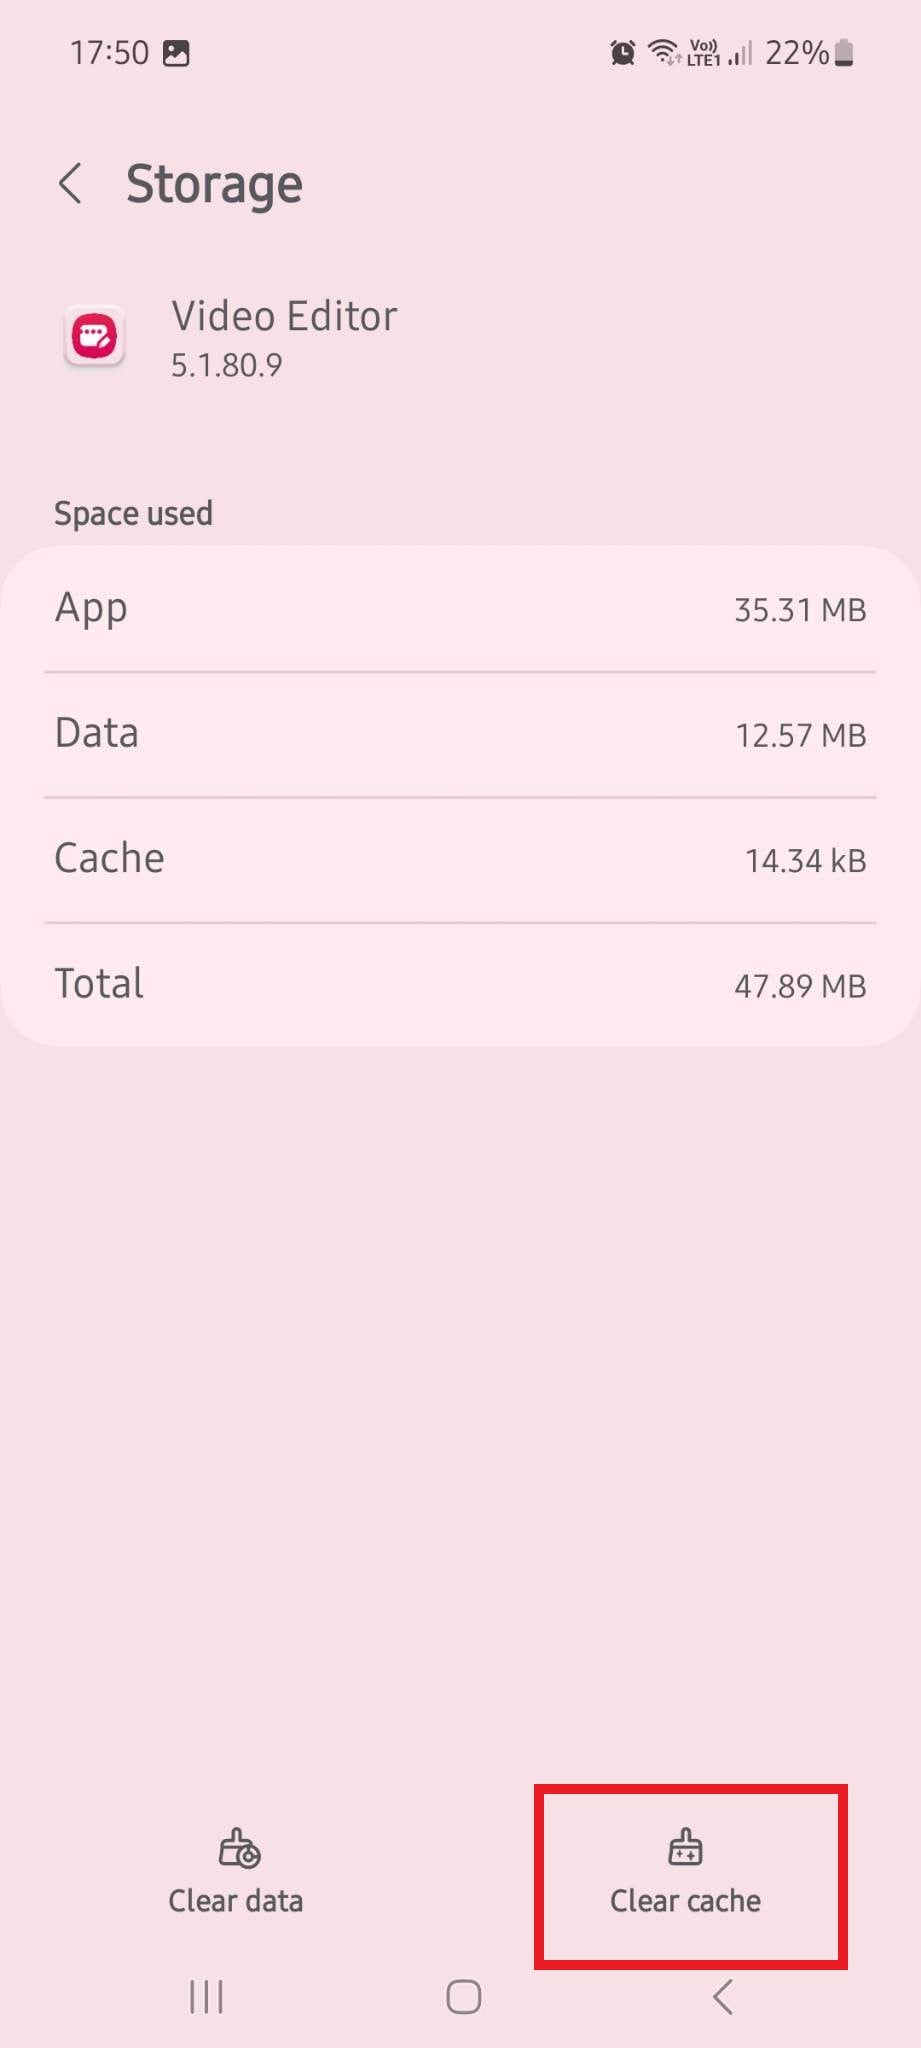
5. Clear the Cache
The cache stores a copy of your most commonly used data, helping decrease loading time and improve your phone’s performance. However, too much cache data can take up too much space and cause data corruption, preventing you from accessing some of your apps.
On average, you should clear your phone’s cache every few months to ensure that everything runs smoothly. If you encounter issues with your videos not playing on Android, clearing the cache could be just the fix you need.
To clear the cache from your apps, you’ll want to go to Settings > Apps. From there, select the app you want to remove the cache from, scroll down to Storage, then choose Clear Cache.
6. Update Android OS
An outdated Android OS is usually the culprit behind many bugs and glitches you may encounter on your phone. It can prevent you from playing video files, accessing apps, taking photos, and more. It can lead to data corruption and loss, expose you to malware and cyberattacks, and compromise phone performance.
Regularly updating your OS to its latest version is always in your best interest. It can solve the problem of your videos not playing and protect you and your sensitive data.
7. Repair Your Android OS

You might already have the latest version of Android OS, but that still doesn’t mean your OS is functioning as it should. Maybe your phone was interrupted while downloading or installing the new OS version. Maybe your phone had underlying OS issues, or you accidentally downloaded files you shouldn’t have. Whatever the case is, if your videos don’t play due to an OS problem, you’ll need to repair your OS.
The best way to do it is with a reliable Android OS repair solution like Wondershare Dr.Fone.
Fast, efficient, and powerful, Wondershare Dr.Fone can repair your Realme 12 Pro+ 5G in several simple steps:
- Step 1: Download and launch Wondershare Dr.Fone on your PC.
- Step 2: Go to Toolbox, then use a cable to connect your Realme 12 Pro+ 5G to your PC.
- Step 3: Select System Repair > Android.
- Step 4: In the new window, select Start.
- Step 5: Fill in information about your phone’s Brand, Name, Model, Country, and Carrier.
- Step 6: Agree with the warning and select Next.
- Step 7: Follow the on-screen instructions to put your device in Download Mode.
- Step 8: Wondershare Dr.Fone will automatically start downloading the necessary firmware, so wait for the process to finish.

- Step 9: When the download is complete, select Fix Now to install it.
- Step 10: Type 000000, then select Confirmto continue fixing your device.
- Step 11: Wait for the Repairing Nowprocess to finish.
- Step 12: Once the process is complete, click Done.
If the reason your videos wouldn’t play on your Realme 12 Pro+ 5G was a fault in the OS, everything should be functioning well after repairing your phone with Wondershare Dr.Fone.
Remember that repairing your device with Wondershare Dr.Fone might result in data loss. Back up all your essential data before fixing your OS using this software to stay safe.
8. Update the Video App
Sometimes, it’s not the outdated OS version causing issues but rather the out-of-date video app. Like OS updates, app and other software updates often contain fixes for common problems and security patches. Not every update is there simply to introduce new features.
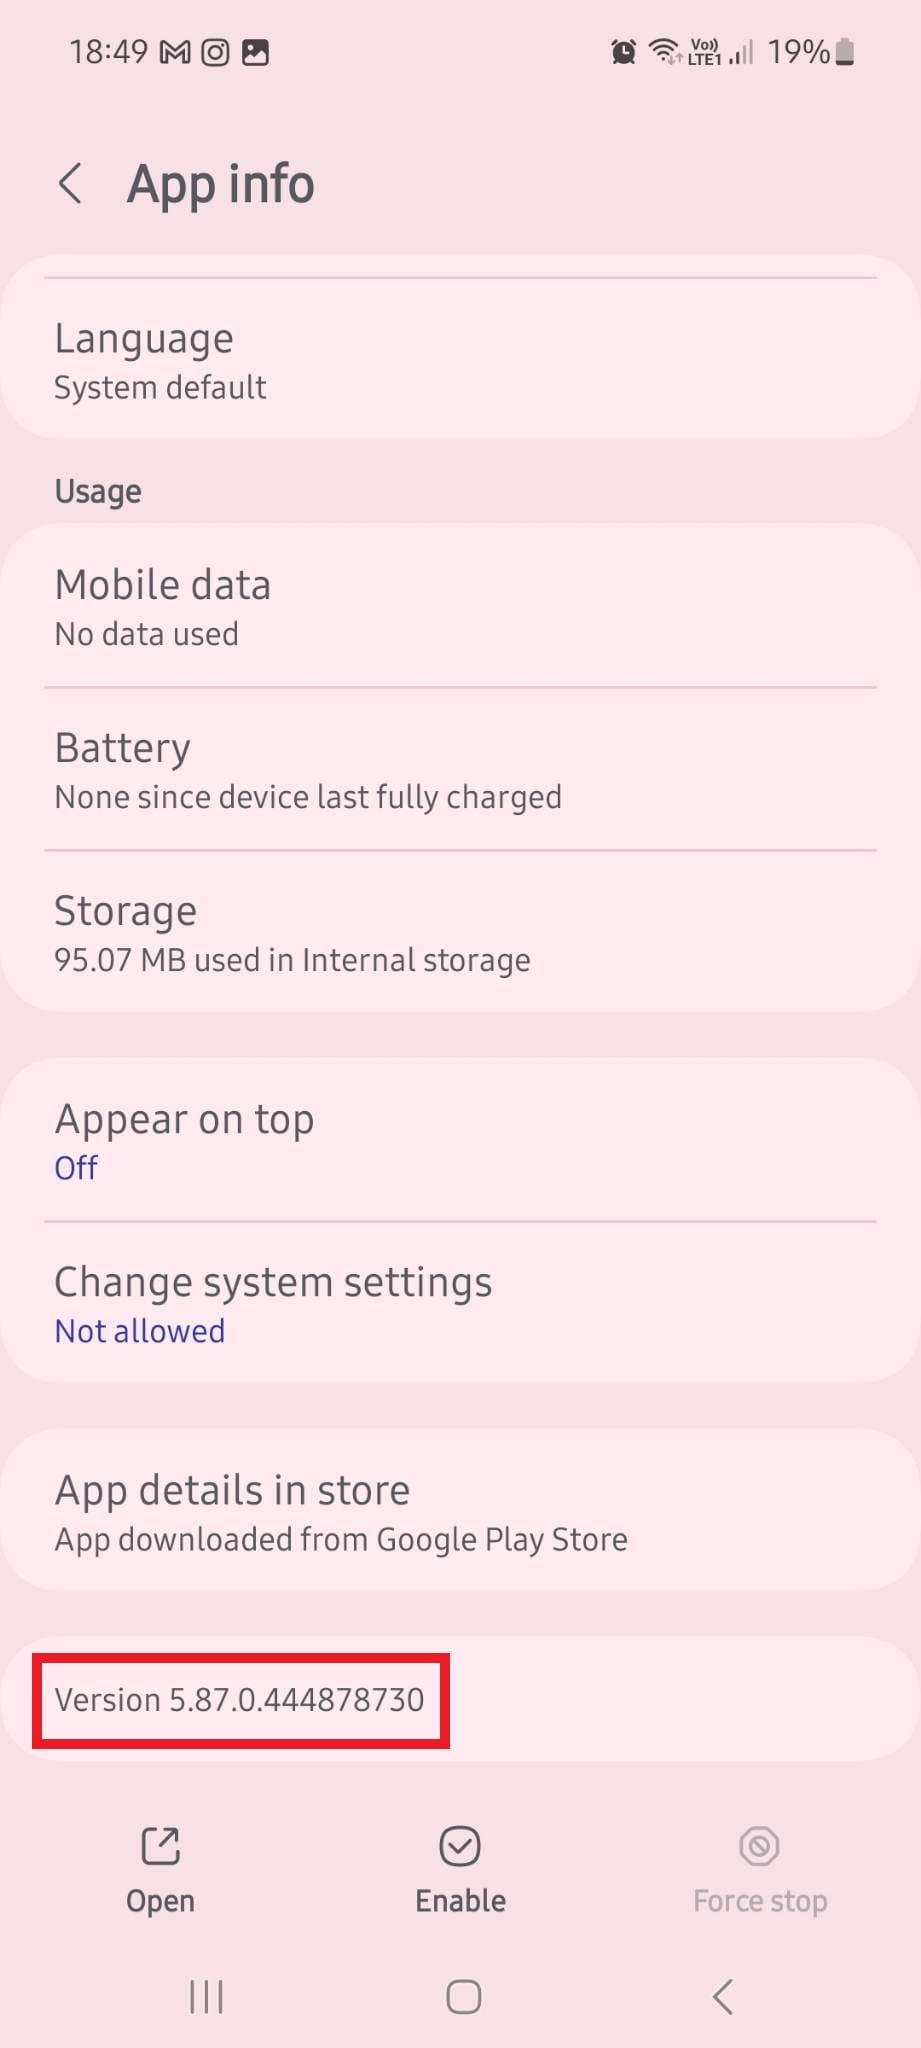
To check whether you’re using the latest version of your video player, go to Settings > Apps. Find your video player app, tap it, and scroll down to the bottom of the page to see the version installed on your phone.
9. Clear Cookies and Browsing Data
If online videos are causing problems, not your recorded or downloaded ones, you might be due for a quick cookie and browsing data clearing.
Cookies are usually there to improve the user experience, allowing you to load websites faster and enjoy improved performance. However, if your cookies and browsing data occupy too much space, they could pose problems.
You’ll first need to launch your mobile browser to clear cookies and browsing data. If you’re using Google Chrome, the process is simple and streamlined. Tap the three dots in the upper right corner and go to Settings. From there, go to Privacy and security > Clear browsing data > Clear data.
10. Reinstall Video Apps
If you still have issues with videos not playing on your Realme 12 Pro+ 5G, you could try deleting and reinstalling your video apps. Sometimes, simply updating the video app might still retain the glitch causing problems. However, if you delete it in its entirety and then install it again, the issue should be gone.
To uninstall the video app on your Android, go to Settings > Apps. Locate the app you want to delete, then tap Uninstall at the bottom of your screen.
To reinstall it again, go to the Google Play Store, search for the video app you want to have, then click Install.
safe & secure
4,974,400 people have downloaded it
Conclusion
Like other smartphones, Android devices occasionally encounter glitches when playing video files. In most instances, the solution can be as simple as restarting your device. In others, you might have to perform a full factory reset or use software like Wondershare Dr.Fone to repair your Android OS.
Whatever the case is, don’t despair. There’s usually a solution that can fix the problem and ensure your device works as expected.
![]() FX PRO (Gold Robot + Silver Robot(Basic Package))
FX PRO (Gold Robot + Silver Robot(Basic Package))
How To Fix Part of the Touch Screen Not Working on Realme 12 Pro+ 5G
You probably touch the screen of your phone hundreds of times per day. It’s no surprise that smartphone touchscreens are one of the most common components to fail, given their delicate glass construction. However, a part of the touch screen not working on your Realme 12 Pro+ 5G does not necessarily mean it is a hardware issue. There could be other reasons why your Android’s touch screen stopped responding.
If your phone’s touchscreen frequently fails to respond, there are several things you can try before calling a professional. This article will reveal those proven fixes you can easily perform independently.

Part 1. Why Is Part of My Screen Not Working
There are two possible causes as to why your phone’s touch screen is not working. One is the touch screen may have been damaged, and the other is the Realme 12 Pro+ 5G device may be experiencing technical difficulties.
If you drop your phone and it becomes stuck against something, the touch screen’s connectivity may fail. Only a part of the touch screen may sometimes become damaged and unresponsive. That may also occur when there is a technical failure, such as the phone hanging. A part of the touch screen not working can occur when malware is downloaded or when phone settings are changed.
Now, the problem can affect any Android phone, and users may encounter the following error messages on their respective phone models:
- Realme 12 Pro+ 5G P40 lite half touch screen not working
- Nexus touch screen not working
- LG screen is unresponsive to touch
- Realme 12 Pro+ 5G left side of the screen is not working
- Redmi’s whole screen is unresponsive to touch
Part 2. Different Types of Touch Screen Issues and What You Should Check Before Fixing
You may experience a variety of touch screens not working on Android issues:
- A certain part of the touch screen is not working.
- Your touches do not register on the touch screen.
- The touch screen incorrectly responds to your touch.
- Half touch screen is not working.
- The touch screen becomes frozen or hangs.
- The screen flashes, flickers, or remains blank.
- Theleft side of the phone screen is not working.
Before proceeding to how to fix an unresponsive touch screen on an Android device, you should complete the following steps:
- Examine the screen of your device. Check to see if it is cracked or chipped.
- If the screen is damaged, it must be replaced.
- Remove the Realme 12 Pro+ 5G device cover and screen protector if they are not damaged.
- If there is a sticker on the Realme 12 Pro+ 5G device screen, you must remove it.
- Before continuing, make sure your screen is spotless.
Part 3. How To Fix Part of the Touch Screen Not Working (No Physical Damage)
If you have already tried running the Realme 12 Pro+ 5G device in diagnostic mode and verified that it is not physically damaged, then the problem is most likely technical. If your Realme 12 Pro+ 5G’s screen is not responding to touches for technical reasons, follow the methods below to resolve the issue.
Restart Your Device
When your touch screen stops working, the first thing you should do is restart your device. The operation is known as soft resetting. You cannot turn your device off from the option on the screen because the touch screen is not responding. Here are the steps to take.
Step 1: Hold the “Power” button until the Realme 12 Pro+ 5G device turns off.
Tip: If you hold down the power button for a few seconds, you will see the “Power Off” and “Restart” options on the screen. You can’t use it because the entire screen isn’t responding. Hence, you should press and hold the “Power” button for as long as necessary.


Step 2: When the Realme 12 Pro+ 5G device turns off, wait a few seconds.
Step 3: Press and hold the “Power” button to restart the Realme 12 Pro+ 5G device.
Check to see if the Android auto touch screen is not working problem has been resolved. Otherwise, proceed with the following methods.
Turn On Safe Mode
You should switch to Safe mode whenever an application or piece of software causes a problem on your device. Only the most fundamental system components are loaded and used when operating in Safe mode.
If your touch screen is functional in safe mode, the issue is most likely internal. You can quickly fix the Android touchscreen issue by following the prompts given below to activate the safe mode:
Step 1: To force a restart, press and hold the Realme 12 Pro+ 5G device’s “Power” button for an extended period.
Step 2: Maintain pressure on the “Power” button. Take your finger off it once you see the manufacturer’s logo.
Step 3: When you let go of the “Power” button, press and hold the “Volume Down” button. After that, a “Safe Mode” label will appear in your screen’s lower-left corner.


Turn Off Developer Options
Every smartphone is bound to have limitations. However, smartphone makers include a “Developer Options” menu for advanced users. Here, restrictions are removed, and user preferences can be customized.
If you enable Developer Options on some Android devices, they may stop working properly. If you have recently activated Developer Options and your touchscreen is no longer responding as expected, you should disable it. To do so, follow the instructions below:
Step 1: Launch the Settings app on your device.
Step 2: Select the System menu item, which usually locates at the bottom of the screen.
Step 3: Tap the Advanced options menu, then select Developer Options.
Step 4: You will then find the switch to turn it on or off. Disable itby toggling the button off.


Step 5: Restart your device to check if the part of the touch screen not working issue has been resolved.
Reset Device to Factory Settings
Resetting your device to its factory settings will return it to its state when you first unboxed it. All your phone’s data and installed apps will be erased, including any malware on your device that may be causing the issue to occur. Here’s how to restore your device to factory settings:
Step 1: Since your touch screen is not working, you can factory reset it using Google’s Find My Device web service.
Step 2: Go to Find My Device from any device and sign in to the Google account associated with the damaged screen device.
Step 3: After successfully logging in, you will see your device’s name. Select the Erase Device option.

Step 4: Confirm by pressing the Erase Device button.
Tip: Since all your data will be removed, it’s recommended to back up your data first before resetting your device to factory settings.

Part 4. Fix Using a Third-Party App – Wondershare Dr.Fone
If you’ve exhausted all other options and still can’t fix your Android’s part of the touch screen not working issue, it’s time to resort to Dr.Fone – System Repair! It allows you to repair Android system issues with a single click.
Many users have reported exceptions on their Android devices, such as touch screen failure, black screen of death, system UI failure, app crashing, etc. And in this case, people should seek an Android repair tool.
Dr.Fone – System Repair has made it easier than ever for Android users experiencing technical issues with their device, including an unresponsive touch screen, among other system issues. The best part is that no data will be lost while repairing Android system issues.
Follow the steps given below on how to use Wondershare Dr.Fone System Repair for Android:
Step 1: Select the System Repair option from the main window after starting Dr. Fone.
Step 2: Connect your Realme 12 Pro+ 5G or tablet to the computer using the appropriate cable. Choose Android Repair from the three options shown on the left side of the screen.
Step 3: The device information screen will appear in the next window. There, input your device’s unified brand, name, model, country/region, and carrier information. Then click Next after you confirm the warning.
The Android repair procedure may wipe out all data on your device. To confirm and proceed, enter “000000”.
Note: It is strongly advised that you back up your Android data before attempting Android repair.
Step 4: Before repairing your Realme 12 Pro+ 5G, you must boot it into Download mode. To boot your Realme 12 Pro+ 5G or tablet into DFU mode, follow the steps below:
For a device that has a Home button:
- Turn off your phone or tablet.
- Hold the Volume Down, Home, and Power buttons for 5 to 10 seconds.
- To enter Download mode, release all the buttons and press the Volume Up button.
For a device that lacks a Home button:
- Turn off the Realme 12 Pro+ 5G device.
- Hold the Volume Down, Bixby, and Power buttons for 5 to 10 seconds.
- To enter Download mode, release all the buttons and press the Volume Up button.

Step 5: Then press the Next button. The program will then download the firmware. After downloading and verifying the firmware, the program will automatically repair your Realme 12 Pro+ 5G. And in a while, your Realme 12 Pro+ 5G’s system issues will be resolved.
 PDF application, powered by AI-based OCR, for unified workflows with both digital and scanned documents.
 Supported OS
Check Dr.Fone’s supported operating systems below before using the application to fix your mobile technical issues.
| Platform | Supported OS |
|---|---|
| Windows | Windows 11/10/8.1/8/7/Vista/XP |
| Mac | Mac 14/13/12/11/10.15/10.14/X/10.13/10.12/10.11/10.10/10.9/10.8 |
Key Features
Dr.Fone – System Repair is a data management and recovery tool that contains several toolkits in one program, each designed to repair a specific phone problem. Check out its key features below:
- One-click Android Repair Tool
- Troubleshoots and repairs a wide range of Android system problems, including black screen of death, Play Store not working, apps crashing, phone stuck in a boot loop, and bricked Android issues
- A high success rate for fixing Android system issues
- Fixes Android system back to normal
Pros
Here are the advantages of using Dr.Fone – System Repair:
- Highly intuitive UI/UX/. No need for any skill to operate it
- Provides a comprehensive set of toolkits, including advanced data recovery and system repair
- Data management is simple and seamless for both Android and iOS devices
- Data backup with Dr. Fone is simple and quick.
Cons
Check below to know Dr.Fone – System Repair’s limitations:
- Depending on the toolkit required, the program can be costly.
safe & secure
Conclusion
Fixing an Android part of the touch screen not working issue can be quickly done with just a few fixes you can do on your own. However, there may be times when the solutions provided above may not work, and the worst part is factory resetting your phone erases all your data.
That’s why Dr.Fone – System Repair might be your best solution. It has all the tools you need to keep your Realme 12 Pro+ 5G 100%. Not only that, but with Dr.Fone, you can repair your Android system issues without dealing with any data loss.
- Title: Guide How To Unbrick a Bricked Realme 12 Pro+ 5G Phone | Dr.fone
- Author: Nova
- Created at : 2024-07-19 22:08:36
- Updated at : 2024-07-20 22:08:36
- Link: https://change-location.techidaily.com/guide-how-to-unbrick-a-bricked-realme-12-proplus-5g-phone-drfone-by-drfone-fix-android-problems-fix-android-problems/
- License: This work is licensed under CC BY-NC-SA 4.0.