
Guide How To Unbrick a Bricked Nokia C12 Pro Phone | Dr.fone
Guide: How To Unbrick a Bricked Nokia C12 Pro Phone
Nokia C12 Pro phones are super popular thanks to their excellent features and affordable prices. But being so popular means people try to customize them with custom software. If you’re not careful, you might have a “bricked” Nokia C12 Pro phone. It won’t work at all. It will be more like a brick than a smartphone.
Don’t worry, though. This guide is here to help. It will show you how to unbrick your phone step by step. You’ll learn to bring your phone back to life and make it work again. So, get started on fixing your bricked Nokia C12 Pro phone by reading this article.
Part 1. Common Reasons Why Nokia C12 Pro Phones Get Bricked
A bricked phone might sound like a techy term, but it’s pretty simple – when your Nokia C12 Pro phone turns into a lifeless block that won’t do anything. In this section, you’ll learn all about why this happens, so you can avoid these issues and keep your phone alive as long as possible.

- Trying to flash incompatible ROMs. Sometimes, people want their Nokia C12 Pro phones to run different software like a custom version of Android called a ROM. But if you use the correct ROM for your specific phone, it can mess things up nicely. Also, inexperience with ROM flashing can hard brickyour Nokia C12 Pro Be sure to follow guides and ask for community help online.
- Rooting mishaps/failures.“Rooting” means giving your phone superpowers, but if you mess up, it can go wrong. Your phone might not boot up, leaving you with a brick. Like the previous bullet, follow guides carefully, especially if inexperienced.
- Failed Firmware Updates. When your phone asks you to update its software, following the instructions carefully is essential. If you interrupt the process or something goes wrong, your phone could be bricked.
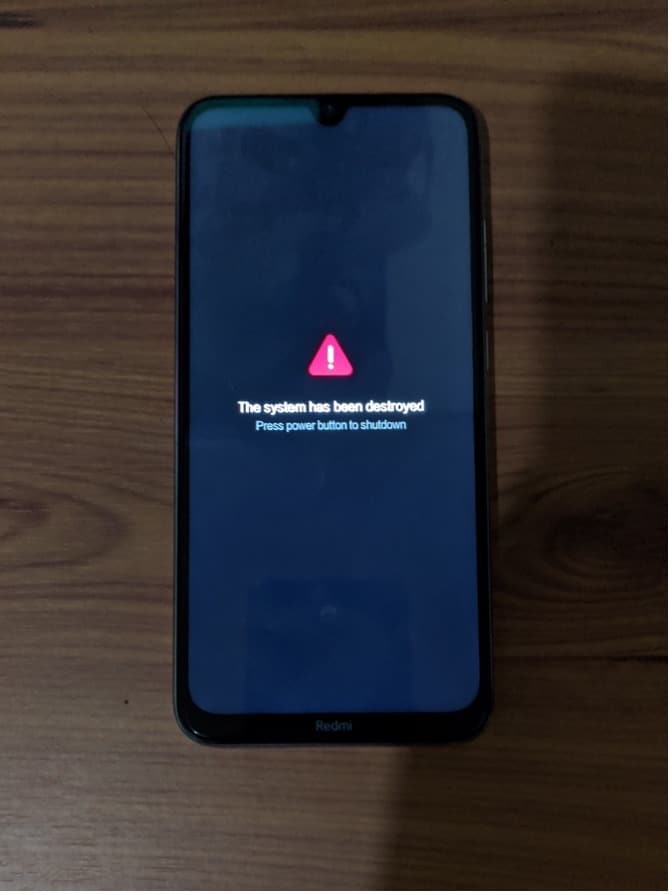
Now, you must know about soft and hard-bricking to learn how to diagnose your phone. Soft bricking is like a phone’s bad day – it might not start up. However, with the right help, you can fix it. Hard bricking is worse. It’s when your phone is a paperweight – it won’t turn on, respond, or do anything useful.

Part 2. Method 1: Use the Nokia C12 Pro Flash Tool
Say you’ve accidentally bricked your Nokia C12 Pro phone due to rooting or ROM flashing. You might feel scared, but imagine having a magic wand that can fix your bricked phone. That’s what the Nokia C12 Pro Flash Tool is –a dedicated Nokia C12 Pro unbricking tool. It lets you install or flash different software onto your phone, giving it a fresh start. Most of the time, a simple firmware flash will unbrick your Nokia C12 Pro.
The Nokia C12 Pro Flash Tool is a superhero for various situations. Here are some scenarios where it can save the day:
- **Device Recovery.**If your phone is bricked or acting strange, the Flash Tool can help bring it back to life.
- Firmware Updates. You can use it to install official updates released by Nokia C12 Pro, ensuring your phone runs smoothly.
- **Device Customization.**Want a different look for your phone? The Flash Tool can help you install custom ROMs or themes.
- **Bug Fixes.**Got pesky bugs or glitches? The Flash Tool can replace corrupted software to make your phone behave.
- Performance Enhancement. If your phone feels sluggish, the Flash Tool can boost its speed by flashing a new OS.
How To Use the Nokia C12 Pro Flash Tool To Unbrick a Nokia C12 Pro Phone
Now that you know what the Nokia C12 Pro Flash Tool is all about, it’s time to learn how to use it. If you’ve bricked your Nokia C12 Pro phone, follow the steps below:
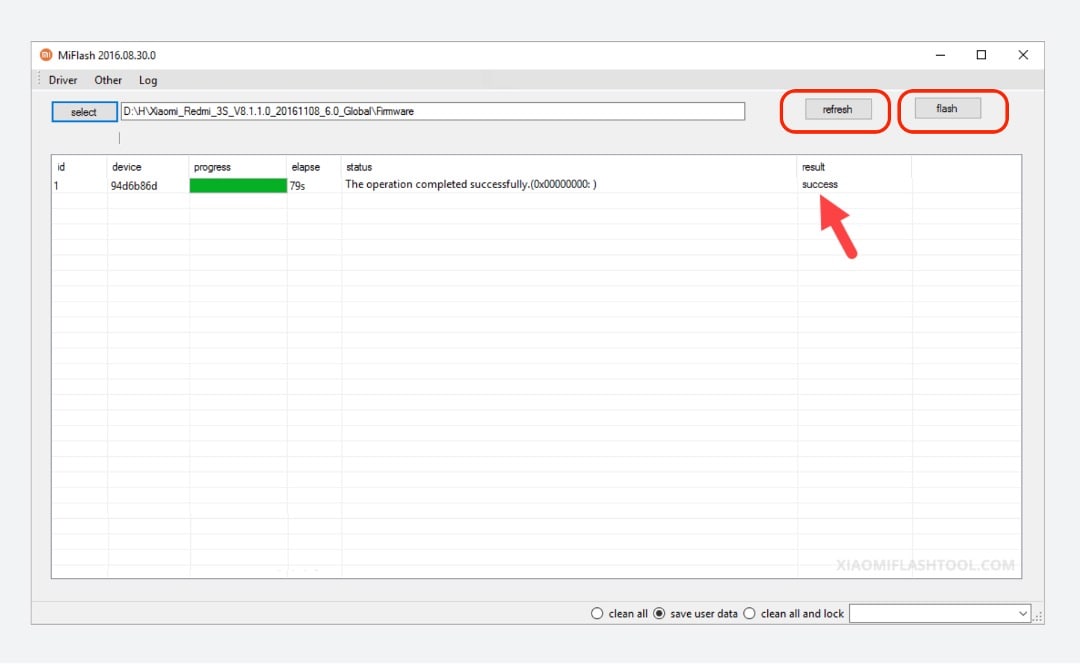
- Step 1. Download the Nokia C12 Pro Flash Tool and the stock firmware of your device on your computer.
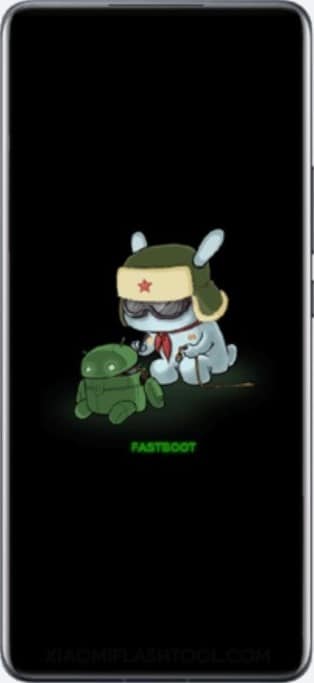
- Step 2. Turn off your phone. Then, press and hold the Volume Down + Power Key simultaneously for 6-8 seconds. This will force your phone to enter the Fastboot mode.

- Step 3. Connect your phone to your computer using a cable when you see this screen flash.
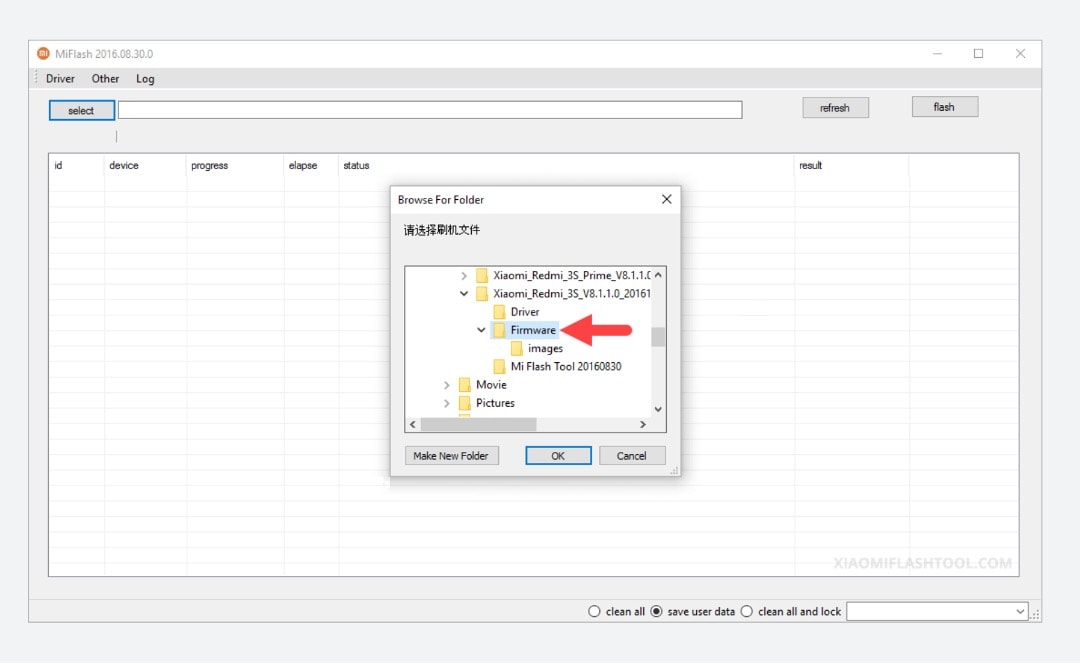
- Step 4. Using the Nokia C12 Pro Flash Tool, click Select. Then, locate the firmware files you downloaded earlier.
- Step 5. Click the refresh button until the flash tool recognizes your device. Then, click flash to replace the firmware. A text saying “success” should appear under the result column.
Congratulations! Your phone should be up and working after following these steps.
Part 3. Method 2: Wondershare Dr.Fone
If you gave the Nokia C12 Pro Flash Tool a shot and your phone is still not cooperating, don’t lose hope. Sometimes, the magic touch needs a slight variation. That’s where Dr.Fone comes into play. This dedicated software can work wonders when fixing various phone problems. It can even help in cases of bricked Nokia C12 Pro phones involving software or firmware issues.
![]()
Dr.Fone - System Repair (Android)
Repair Android System Errors without Any Trouble.
- Fix your Android to normal, no skills required.
- Fix various Android system issues, stuck in boot loop , black screen , or won’t turn on , looping on start, etc.
- The high success rate in resolving Android system issues.
- Compatible with a wide range of Android devices and OS versions
- User-friendly interface with easy-to-follow steps.
3981454 people have downloaded it 
One of Dr.Fone’s most astonishing powers is its “System Repair” feature. This is where the real magic happens. If your Nokia C12 Pro phone is bricked, it can help repair the underlying software glitches that caused the issue. Moreover, Dr.Fone brings a toolbox of features to the table, making it more than just a one-trick pony. Here are its key features:
- **Data Recovery:**If you’ve lost precious data, Dr.Fone can help recover it, even from a bricked phone.
- **Data Transfer:**You can quickly move data between devices, even if one is unresponsive.
- **System Backup & Restore:**Fone can help you create a backup of your phone’s system and restore it when needed.
- **Unlocking Tools:**If you’re locked out of your phone, Dr.Fone can help you regain access.

How To Use Dr.Fone System Recovery Feature To Unbrick a Nokia C12 Pro Phone
Now that you know about Dr.Fone, it’s time to understand how to use it. Hopefully, it can save your bricked Nokia C12 Pro phone from its problems. Follow the steps below:
- Step 1. DownloadDr.Fone from its official website , and launch it on your computer. After entering the Toolbox menu from the left panel, click System Repair. Make sure that your Nokia C12 Pro phone is connected.
- Step 2. Select Android on the next screen.

- Step 3. Initiate the Android System Repair by clicking Start.

- Step 4. Confirm your device details. You can edit any details that might be wrong.

- Step 5. Put your phone into Download mode. Follow the guidelines for phones with or without home buttons. Your phone will begin downloading the dedicated firmware.
Parental Control Software
- Step 6. After downloading the firmware, verify and proceed with the installation by clicking Fix Now. Confirm firmware installation by typing “000000” into the text box in the appearing window. Click Confirm afterward.

- Step 7. After the process is finished, your phone should now be okay. Click Done.
 Lyric Video Creator Professional Version

Part 4. Best Practices/Tips Before Unbricking Your Phone
Before diving into the unbricking process, you must arm yourself with some tips and precautions to ensure your recovery journey is as smooth as possible. Here’s what you need to know:
- Backing Up Data: An Ounce of Prevention. Remember the golden rule: always back up your data before attempting any phone recovery. Unbricking might save your phone, but being safe is better than sorry.
- **Authentic Tools and Software: Stay on the Safe Side.**Using genuine and trustworthy tools is crucial when unbricking your Nokia C12 Pro This applies especially to Dr.Fone, which you should only download from the official website. Additionally, when recovering your phone’s software, use authentic Nokia C12 Pro ROMs (the operating system’s files).
- **Learning from Online Guides and Communities: Seek Guidance.**Navigating the unbricking process might seem daunting, but you’re not alone. There are many online guides, tutorials, and communities where people share their experiences and solutions.
Conclusion
So, there you have it – your guide to fixing a bricked Nokia C12 Pro phone. Remember, bricking happens when your phone stops working. You won’t be afraid when that happens, as you learned about the Nokia C12 Pro Flash Tool and Dr.Fone. They are your phone-saving superheroes that can unbrick even a hard-bricked Nokia C12 Pro phone.
As a parting reminder, always keep a tool ready for emergencies. For this, choose Dr.Fone. It’s a super tool for all your phone problems. Give it a shot and be confident with your phone wherever you go and whatever you do with it.
 safe & secure
3,052,835 people have downloaded it
How To Fix Unresponsive Touch Screen on Nokia C12 Pro
With the increase in our reliance on smartphones, having touchscreen problems on your device can be annoying. Sometimes, it’s even more frustrating than a physically broken screen because you don’t know where the issue is coming from.
If your touchscreen is malfunctioning or doesn’t work correctly, you cannot interact with your device. On this page, you’ll learn general phone touch problems on Android and how to get rid of them. Now explore the article to learn more.

Part 1: Why Is My Android Experiencing Touch Screen Problems
Below are some of the most common reasons you’re experiencing touch problems on your Android smartphone.
- The touchscreen problemfreezes your phone, lags, or hangs.
- Some parts of the screen work fine, but some don’t.
- Your screen responds inaccurately (typing “a” gets you “q” or “z”).
- The touchscreen is automatically operating itself, resulting in ghost touch.
- It doesn’t respond to any taps, and the phone’s screen has stopped working.
- The device is physically damaged, or the screen is cracked or broken.
- Outdated devices are prone to the black/white/blue screen of death.
Part 2: Tips, Fixes, and Workarounds To Fix Your Nokia C12 Pro Touch Problems
If any of the outlined reasons above are the cause of your touch screen malfunctioning, here are some solutions to fix it.
Method 1: Remove the Screen Protector and Phone Case
Some phone cases and screen protectors cause touch problems on your Android screen. This issue is prevalent if you recently changed your phone case or screen protector. It may be due to incompatibility, but you should remove them to see if your phone starts responding again.
Method 2: Clean Your Android Smartphone
A touchscreen malfunctioning can also be a sign of a dirty display. Since the screen relies on contact between your fingers and the touchpad to perform actions, this also applies to foreign particles such as dirt, debris, smudges, oil, and more. Clean your touchscreen with wipes or a soft cloth by gently wiping over the screen.
Method 3: Stop Using Your Android Device for a While
Touch problems also arise due to abnormal temperature changes. Your phone might experience ghost touch if it’s too cold or hot. For your screen to function correctly, it needs to be in a temperate environment. Remember to take breaks between phone usage, especially when the phone gets too hot. Avoid using your device under hot conditions, direct sunlight, or anything affecting your phone’s normal temperature.
Method 4: Restart Your Android
Performing a reboot sounds trivial with such a complicated issue. But sometimes, it’s often the most successful way to fix a touchscreen problem on an Android device. Restarting your Android shuts down and resets all background services, which may have led to your issue.
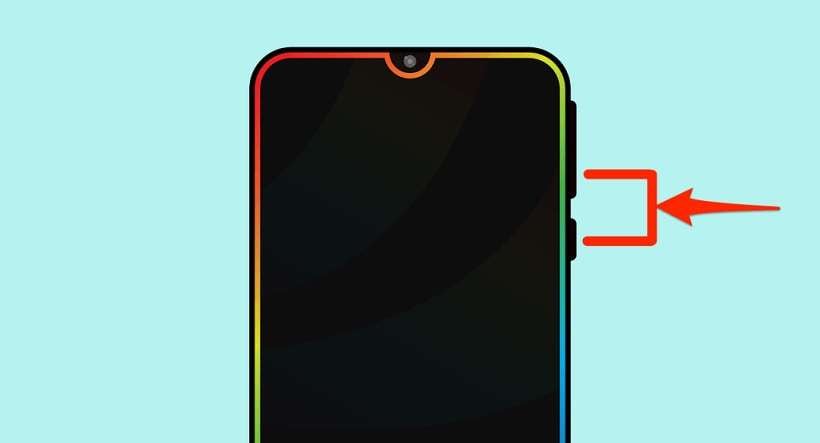
To restart your Android, press and hold the Power button for several seconds to switch off your phone. In other smartphones, you may need to hold down the Power button as well as the Volume Down button at the same time.
Method 5: Factory Data Reset Your Android
Before attempting to have your device checked for any hardware defects, you should try completing a Factory Reset. To do this, go to Settings > Backup and Reset. Next, tap on Factory data reset > Delete all.
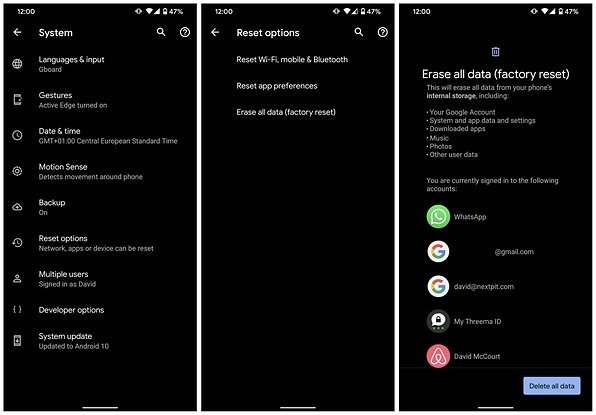
Performing a Factory Data Reset will erase all your data and restore your device to its factory default settings. Creating a backup before doing this step is recommended, as you will lose all your personal data once the process starts.
Method 6: Put Your Android into Recovery Mode
If all else fails, placing your Android into Recovery Mode should be a last resort. Doing this method works similarly to the method above. You should perform this method if the screen is unresponsive and only the buttons on your Android are functional. Here’s how.
Note
Placing your Android into Recovery Mode is different depending on your Android smartphone. Refer to your owner’s manual to see which method is right for your Nokia C12 Pro.
Step 1A: Press and hold the Power button and Volume Down buttons at the same time. Continue holding both buttons until the screen starts.
Step 1B: If your Nokia C12 Pro still has a Home button, press and hold the Home button and the Power button at the same time. Continue holding them until the screen starts.
Step 1C: If step 1A did not put your Android into Recovery Mode, press and hold the Power and Volume Up and Down buttons simultaneously. Continue pressing all three until the screen starts.
Step 2: Use the Volume buttons to navigate the choices, select Wipe data/factory reset, and confirm your choice with the Power button.
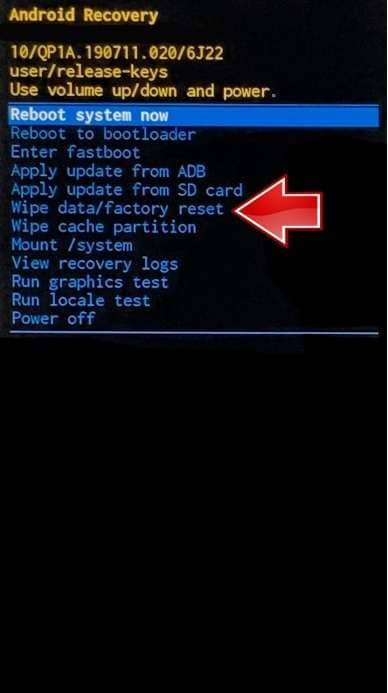
Step 3: Wait for the process to complete and for your Nokia C12 Pro to restart automatically.
Method 7: Replace Your Android Touchscreen
If doing all the earlier workarounds and fixes couldn’t resolve the touchscreen problem, it could be the screen itself. While replacing the touchscreen yourself is possible if you have the technical know-how, it’s still best to bring it to a professional to prevent further damage. You should have your Nokia C12 Pro checked by a technician if the screen is getting weak, has water damage, or has failing screen components.
 “
“
Method 8: Bring it to an Authorized Service Center
Your phone touch problem might not be caused by the screen, even when you had it replaced. If your Android is still unresponsive, it’s best to bring your smartphone to an authorized service center or directly to the phone manufacturer, especially when all efforts are exhausted.
Part 3: How To Fix Android Touch Problem With an Alternative
If all the general phone touch problems on your Nokia C12 Pro persist, you should strongly consider Wondershare Dr.Fone to do the job. The program can fix all Android system issues without any required skills. Problems caused by the operating system or software, such as the black screen of death, boot loop, ghost touch, and more, are done within less than 10 minutes with the program.
Key Features
Dr.Fone – System Repair (Android) has many features you can immediately take advantage of. Here are some of them below.
- Fix All Android Problems In Minutes
Wondershare Dr.Fone allows you to fix all touchscreen problems on your smartphone within less than 10 minutes. Moreover, it has a high success rate making it one of the most reliable tools available today.
- Supports up to 1000+ Android Models
The program supports almost all Nokia C12 Pro models and other Android devices, whether unlocked or from a carrier. Dr.Fone is equipped with all the proper firmware to flash your Nokia C12 Pro with just a few clicks. In addition, it has handy on-screen instructions to help you complete the whole process with ease.

Pros and Cons
Here are the pros and cons of using Dr.Fone – System Repair (Android) to know if you’re still undecided.
Pros
- The user interface is clutter-free, making it highly beginner-friendly.
- The fast processing time to fix your Nokia C12 Pro means you can do more in less time.
Cons
- The free version only works until you see if your Nokia C12 Pro is compatible with the app. You will be required to enter a valid license once you initiate the repair process.
- If you own an iOS device, you’ll have to get the iOS version.
How To Fix Black Phone Screen With Wondershare Dr.Fone
Follow the step-by-step guide below to start fixing general phone screen problems on Android using Wondershare Dr.Fone.
Step 1: Download and install Wondershare Dr.Fone on your computer. Next, launch the program and connect your Nokia C12 Pro to your computer.
 PDF application, powered by AI-based OCR, for unified workflows with both digital and scanned documents.
Step 2: Click Start to initiate the setup on a new window. From there, select the Brand, Name, Model, Country, and Carrier of your Nokia C12 Pro and click Next.
Step 3: Follow the on-screen instructions on the main program window to initiate the repair process. After that, wait for your Android smartphone to return to its original state.
Part 4: FAQs
Here are some FAQs you should remember when experiencing phone touch problems.
1. Does a Cracked Screen Affect Touch on an Android?
If you continue using a smartphone with a cracked screen, there are several implications. Your device will be vulnerable to further damage and might develop touchscreen problems,and your sensors will gradually begin to malfunction. The capabilities of your device are also compromised the longer you delay repairing it. Moreover, a cracked screen can put your fingers at risk of injury due to potential glass splinters.
2. How Do I Temporarily Fix a Cracked Screen?
If you can’t take your cracked screen to a repair shop, apply a small amount of vegetable oil or petroleum jelly to the screen. Doing this will not fix the issue but will make the cracks less noticeable. On the other hand, you can also apply a screen protector to safeguard your phone against further damage. The screen protector slows down or prevents the cracks from getting worse.
3. Can I Use Dr.Fone for Free?
You can download and install Dr.Fone – System Repair (iOS) or (Android) for free to evaluate the program’s offerings. You can do the first few steps to see if the app supports your device. However, you need to get the full version and enter a valid license code to repair your smartphone.

safe & secure
4,471,551 people have downloaded it
Conclusion
If the touchscreen is malfunctioning on your smartphone, one of the fixes above should help solve the problem. If it did not solve the issue, consider using Dr. Fone – System Repair for iOS or Android when you need an all-in-one solution to all your phone screen problems.
However, if your screen is broken or cracked, going to an authorized service center is still your best bet, especially when your screen urgently needs a replacement. Delaying it further may hurt your wallet in the long run, so it’s best to fix it as soon as possible.
9 Solutions to Fix Nokia C12 Pro System Crash Issue
Android crash, better known as Android system crash is not a recent issue and has troubled many users in the past as well. It means when your device crashes suddenly and refuses to turn on again or when your device freezes and becomes unresponsive. It may also happen that your Nokia C12 Pro crashes abruptly but boots up normally only to crash again after a few minutes or hours. Android Crash sounds like a very serious problem and something that could damage your device or permanently destroy the software, but Android system crash can be dealt with easily. Just in case you suffer from an Android crash and want to know how to fix the Android system crash issue, rest assured that this problem is fixable. There are various ways to tackle the situation, to be discussed further, and you may choose the one that best suits you.
In this article, we will also talk about a unique technique to retrieve the data from your device on which Android system crash issue occurs. So let’s go ahead and read on to know more to fix the Android crash error.
Part 1: How to rescue data the Android system crashes?
When you encounter an Android system crash, before looking for solutions to fix it, make sure you retrieve all your data and information stored on your device. This might sound tedious but a very important step indeed.
Dr.Fone - Data Recovery (Android) is currently one of the most popular tools to retrieve data from not only broken or damaged, locked devices, and unresponsive devices but also from devices that face an Android system crash. You may try the software for free for scanning the data to understand its work. Dr.Fone’s Data Extraction tool not only retrieves and back-up contacts and messages but also your photos, videos, audio files, WhatsApp, docs, call logs, and other file folders. It is also equipped to retrieve data from the Nokia C12 Pro device’s internal memory as well as Google drive.
Dr.Fone - Data Recovery (Android)
World’s 1st data retrieval software for broken Android devices.
- Recover data from broken devices or devices that are damaged in any other way such as those stuck in a reboot loop.
- Highest retrieval rate in the industry.
- Recover photos, videos, contacts, messages, call logs, and more.
- Compatible with Nokia C12 Pro devices.
3,623,313 people have downloaded it
You may follow the steps given below to rescue your data from crashed Android devices.
1. Download and install the software on your PC. Run the software and then select the Data Recovery feature. Using a USB, connect your Nokia C12 Pro to the PC.
2. Select “Android” > “Recover from Broken Phone” in the lower right corner.

3. Choose the “Touch screen not responsive or cannot access the phone” to continue.

4. You will now see device options before you. Select yours and move on to feed in your device name and model details.

5. Now press the volume down, power, and home button on your device together to boot the phone in Download mode.

6. As long as your phone is in Download mode, the software will start to analyze phone data.
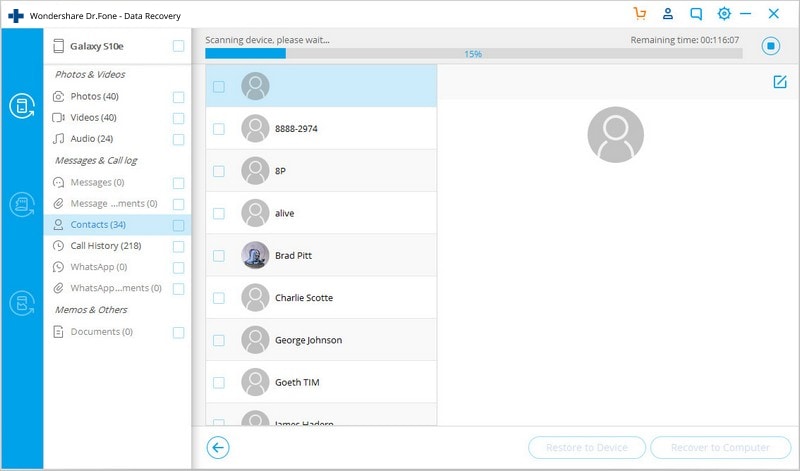
7. Finally, the process will take a few minutes to scan and display your phone data. Select “Recover to Computer” to retrieve all data on your PC as a backup.

Using Dr.Fone Damage Extraction software is intuitive and very safe. It prevents data loss and allows you to adopt various ways to recover your device from the Android system crash issue.
safe & secure
 Forex Robotron Basic Package
Part 2: Why does my Android phone system keep crashing?
Encountering a persistent issue like the Android phone system constantly crashing can be highly frustrating and disruptive. This part delves into the underlying causes of this problem. By understanding these reasons, you can take informed steps to troubleshoot and rectify the issue, ensuring a smoother and more enjoyable smartphone experience.
- Software Glitches and Bugs
- Incompatible or Poorly Optimized Apps
- Outdated Operating System
- Corrupted System Files
- Malware and Security Threats
- Hardware Overheating
- Physical or Hardware Issues
A crashing Android phone system can be attributed to a variety of factors, ranging from software glitches and compatibility issues to hardware-related problems. Keep reading to get it solved!

Part 3: Restart your Nokia C12 Pro
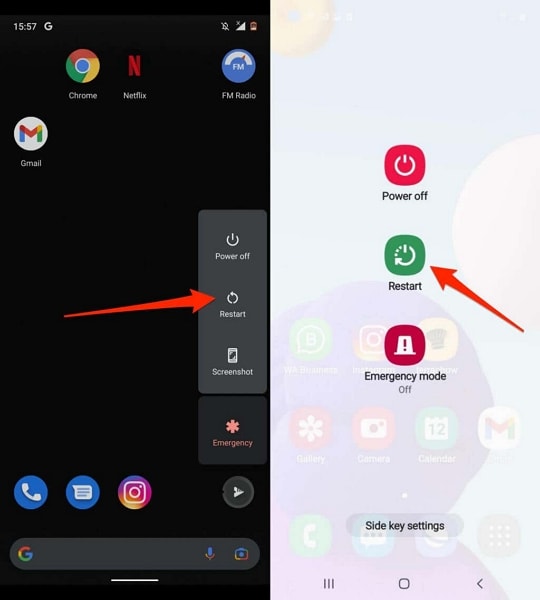
Once you have successfully retrieved your data, consider solving the Android crash issue as soon as possible. Before you redirect to a proper solution for repairing your Nokia C12 Pro system, you can try restarting your device as a quick remedy. Restart the Android device to clear temporary system data and potentially resolve any software glitches causing the crash, which can be done as follows:
Instructions: Hold your Nokia C12 Pro’s “Power” button on the side of the phone. As the following window appears on the screen, select the “Reboot” option to restart the Android device successfully.
![]() FX PRO (Gold Robot + Silver Robot(Basic Package))
FX PRO (Gold Robot + Silver Robot(Basic Package))
Part 4: Shut down unnecessary running apps
Another quick solution to avoid Android devices crashing is to shut down unnecessary apps running in the Nokia C12 Pro device’s background. To cater to that, you need to try out the following steps as a remedy to shutting down unwanted applications:
Step 1: Open the “Settings” of your Nokia C12 Pro and continue to the “Battery and device care” section from the available options. Continue to the “Memory” section on the next window to lead to the applications taking up space on your Nokia C12 Pro.
 PCDJ Karaoki is the complete professional karaoke software designed for KJs and karaoke venues. Karaoki includes an advanced automatic singer rotation list with singer history, key control, news ticker, next singers screen, a song book exporter and printer, a jukebox background music player and many other features designed so you can host karaoke shows faster and easier!
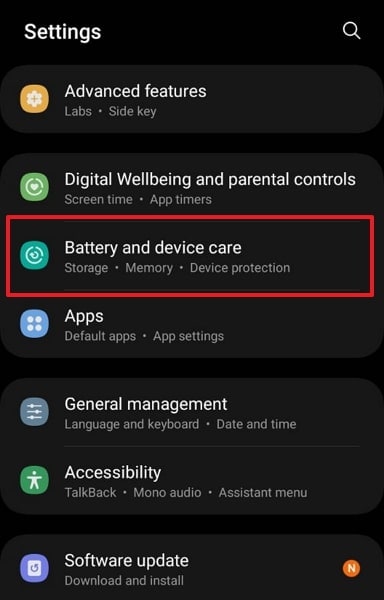
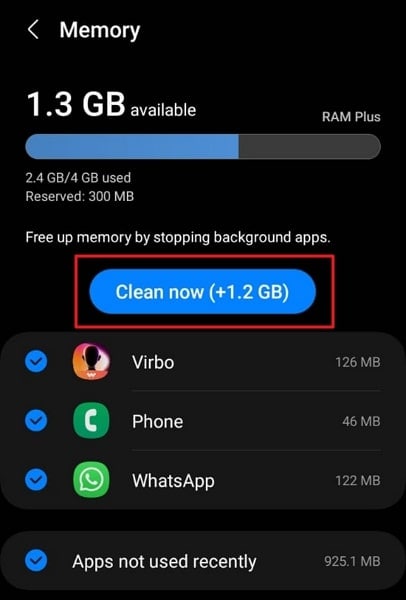
Step 2: As you progress further, you need to select the “Clean now” button to shut down all unnecessary background applications running on the Android.
Part 5: Uninstall incompatible Apps to fix Android crash issue
If your Android system crash takes place frequently but the Nokia C12 Pro device turns on normally after that, there is a chance that some Apps may be causing the problem. Unnecessary and large App files burden the Nokia C12 Pro device system and force it to crash every now and then. Make sure you download, install and store only those Apps which are fully compatible with your Android system. DO NOT download Apps from other unknown sources and use only Google Play store for the purpose. All other incompatible Apps must be deleted to prevent them from tweaking your software.
To uninstall unwanted and incompatible Apps, please follow the steps below.
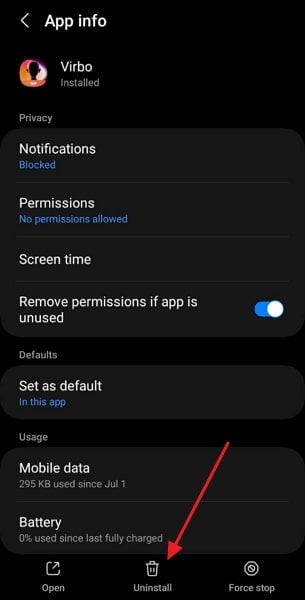
1. Visit “Settings” and search for “Application Manager” or “Apps”.
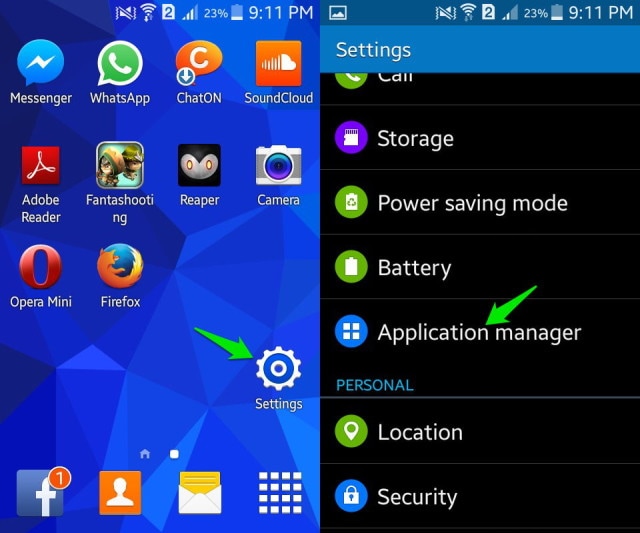
Select the App you wish to uninstall. From the options that appear before you, click on “Uninstall” to delete the App from your device.
You may also uninstall an App directly from the Home Screen (only possible in certain devices) or from the Google Play Store.
Part 6: Check Android storage and free up space
If you are constantly facing issues of your Nokia C12 Pro crashing, there is a possibility that your device’s storage is full. The need to free up space arouses the need to know about the potential steps for checking storage and cleaning up space, which is discussed as follows:
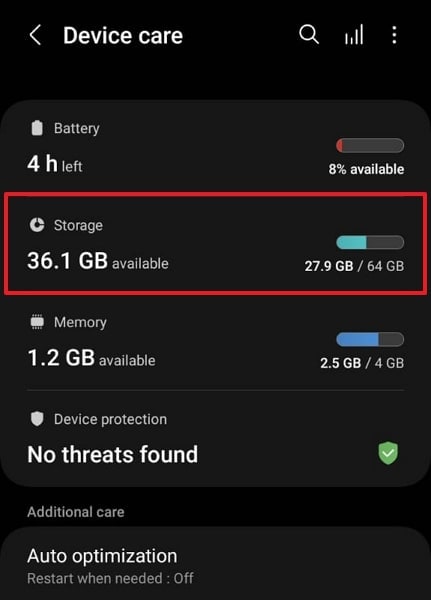
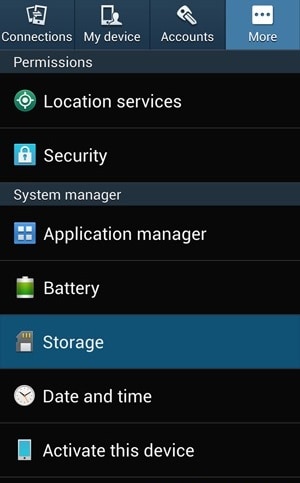
Step 1: You need to navigate into “Settings” and look for the “Battery and device care” section. As you lead next, select the “Storage” option to check the Android storage and see how it is segregated.
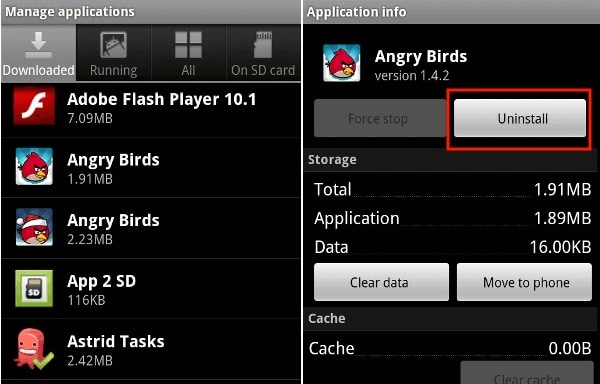
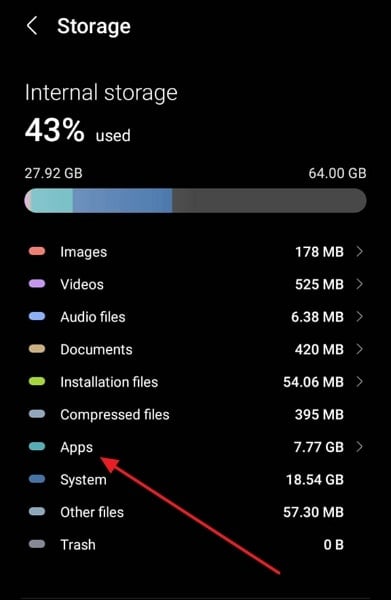
Step 2: As you navigate to the next screen, you can free up space by removing the applications from your Android. For that, tap on “Apps” to open a section containing the list of applications installed on the Android.

Step 3: Go through the list of applications and select any app you want to remove. As you navigate next, select “Uninstall” to lead to removing the app from the Android device.
Part 7: Clear cache partition to fix Android crash issue
Clearing cache is a good idea because it cleans your device and reduces the burden on the Android software and gives it enough space to function normally and carry out its operations.
In case the Android system crash issue is temporary, follow the steps given below to clear your device’s cache:
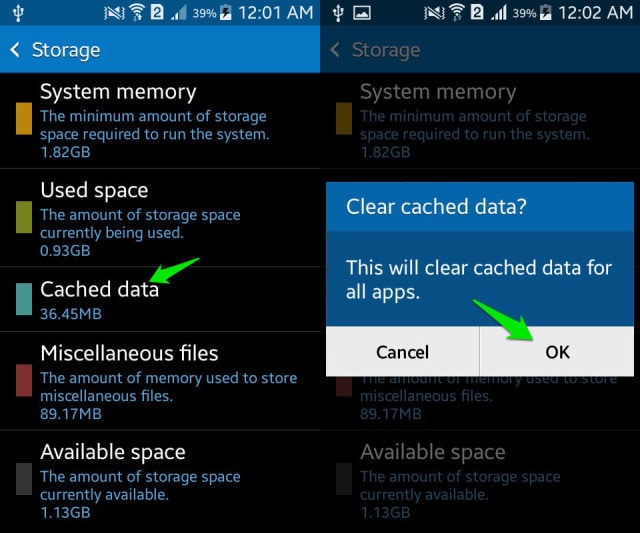
1. On your Nokia C12 Pro, visit “Settings” and find “Storage”
2. Now tap on “Cached Data”, and then click “OK” to clear all unwanted cache from your device as shown above.
However, if the Android crash problem is such that your phone has frozen, becomes unresponsive, and does not turn on, you must first boot into the Recovery Mode screen.
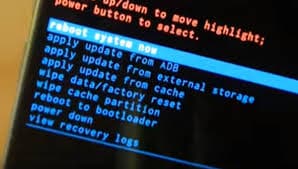
1. Press the volume down button and power button together until you see a screen with multiple options before you.
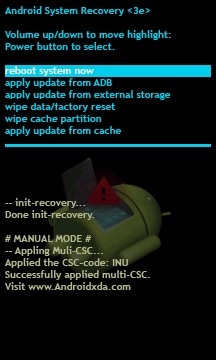
2. Once you are on the Recovery Mode screen, use the volume down key to scroll down and select ”Wipe cache partition” as shown below.
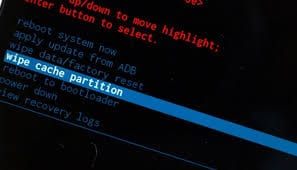
3. After the process is completed, select “Reboot System” which is the first option in the recovery mode screen.
This method will help you erase all the clogged-up and unwanted files and resolve the Android system crash issue. If clearing cache doesn’t help, try formatting your SD Card.
Part 8: Remove the SD card to fix the Android crash issue
Removing and formatting your SD Card to fix the Android System crash issue is helpful when a corrupted SD Card disturbs the Android software forcing it to shut down suddenly.
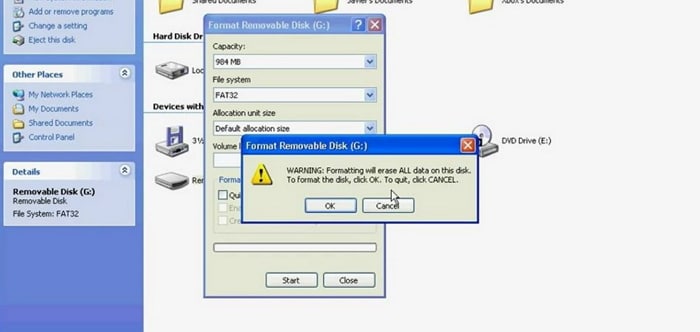
To format your SD Card, just follow the instructions below.
1. Firstly, eject it from the Nokia C12 Pro device.
2. Then using an SD Card reading tool, insert the Card in your PC. Open Computer and then right-click on the SD card to format it.
 Power Tools add-on for Google Sheets, 12-month subscription
Part 9: Update to the latest software version
Updating the Android device will cast out all glitches that prevent it from operating properly. For that, let’s look into the steps explaining how to update your Android software version to the latest option:
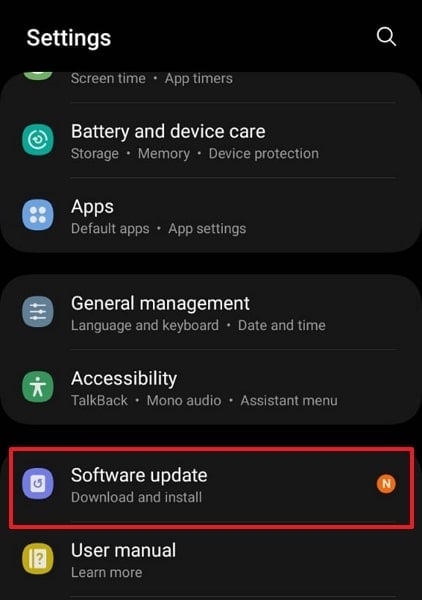
Step 1: As you lead into the “Settings” of your Android, scroll down and look for the “Software Update” option.
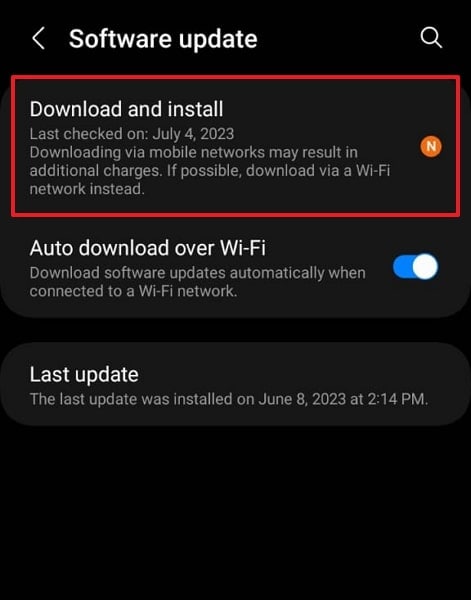
Step 2: On leading to the next screen, select the “Download and Install” option to continue updating your Android to the latest version.
Part 10: Use Wondershare Dr.Fone – System Repair To Fix Android System Crash
If you are not getting any specific solution to the problem, you can try fixing the Android system crash problems using specific tools. These third-party tools can be an excellent option for resolving system errors in Android devices. Wondershare Dr.Fone – System Repair (Android) is a great tool designed to resolve all system issues in Nokia C12 Pro] and other smartphones.
It features a great system providing a one-click Android repair option for fixing all kinds of problems. Along with fixing all basic and advanced Android system issues, it features support for multiple Android devices.
Key Features of Wondershare Dr.Fone – System Repair (Android)
![]()
Dr.Fone - System Repair (Android)
Repair Android System Errors without Any Trouble.
- Fix your Android to normal, no skills required.
- Fix various Android system issues, stuck in boot loop , black screen , or won’t turn on , looping on start, etc.
- The high success rate in resolving Android system issues.
- Compatible with a wide range of Android devices and OS versions
- User-friendly interface with easy-to-follow steps.
3981454 people have downloaded it
As we redirect to resolving Android system errors using Wondershare Dr.Fone – System Repair, let’s look into some essential features that make up the entire tool:
- Features support for all the latest Android devices up to Nokia C12 Pro S22.
- It can help you resolve issues like Android’s black screen of death, being stuck in the boot loop, and many more.
- Provides an easy interface to execute procedures, making it a simple tool with no learning curve.
Steps To Repair Android System Crash Issue Using Dr.Fone – System Repair (Android)
Let’s redirect to the steps that can be used to repair Android system crash issues using Wondershare Dr.Fone – System Repair (Android):
Step 1: Launch and Open System Repair Tool
You need to download and install the latest version of Wondershare Dr.Fone on your computer. Proceed to launch and navigate into the “Toolbox” section. Look for the “System Repair” option and initiate the process while ensuring the Android device is connected to the computer through a USB cable.
Step 2: Start Repairing the Android
After selecting the nature of the Nokia C12 Pro device you want to repair, navigate to a new window where you need to click “Start” to initiate the system repair process.
Step 3: Define the Parameters of Device
You will be redirected to a new window where you need to define and verify some parameters before repairing the Android. Select the “Brand,” provide a “Name,” select a “Model,” and provide a country where it has been bought. Define the “Carrier” and click “Next” after confirming.
Step 4: Put Android in Download Mode
Whatsoever Android you own, you need to put it in Download Mode, depending on the buttons that the Nokia C12 Pro device has. The repairing process initiates as you enter the Download Mode, and new firmware is downloaded on the platform.

Step 5: Fix the Firmware of Android
Once it downloads and is verified, click the “Fix Now” button to repair the Android successfully. You may need to provide a PIN to confirm the process. Once provided, the next screen shows the progress of the repair process. As it completes, click the “Done” button to conclude fixing the Android system crash issue.
safe & secure
Part 11: Factory reset the Nokia C12 Pro device to fix the Android crash issue
Factory Resetting is advisable only when nothing else works. Also, there are two ways of doing it depending on whether the Android crash is permanent or temporary.
Follow the steps given below to factory reset your device while it is switched on:
1. Visit “Settings”.
Now select “Backup and Reset”.
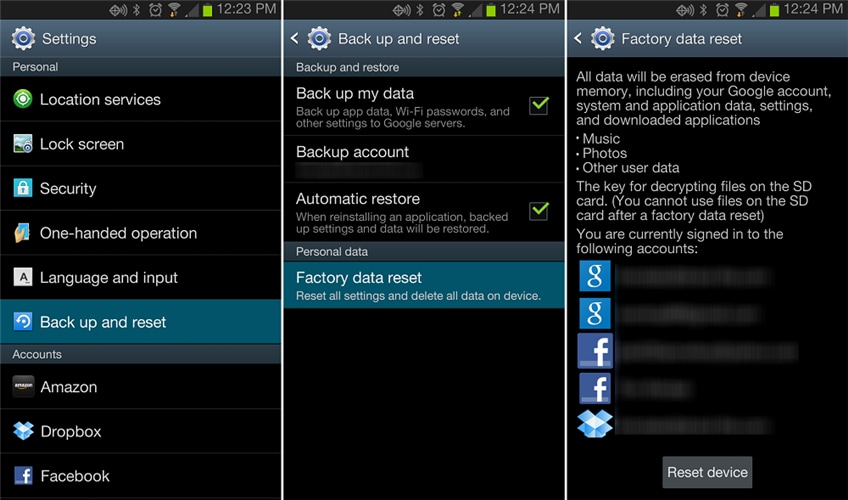
In this step, select “Factory data reset” and then “Reset Device” to confirm Factory Reset.
The process of factory resetting your Nokia C12 Pro is risky and cumbersome, as it deleted all data, but it helps to fix the Android System crash error.
You may also follow the instructions given below to Master set your device in Recovery Mode if it won’t turn on after an Android system crash has taken place:
When you are at the Recovery Mode screen, scroll down using volume down key, and from the options given, select “Factory Reset” using the power key.
Wait for your device to perform the task and then:
Reboot the phone in Recovery Mode by selecting the first option.
Bottomline, the tips given above have helped many to solve the Android system crash issue. So do not hesitate to try them, but don’t forget to extract your data with Dr.Fone’s Data Recovery tool.
safe & secure
- Title: Guide How To Unbrick a Bricked Nokia C12 Pro Phone | Dr.fone
- Author: Nova
- Created at : 2024-07-19 22:06:46
- Updated at : 2024-07-20 22:06:46
- Link: https://change-location.techidaily.com/guide-how-to-unbrick-a-bricked-nokia-c12-pro-phone-drfone-by-drfone-fix-android-problems-fix-android-problems/
- License: This work is licensed under CC BY-NC-SA 4.0.