
Guide How To Unbrick a Bricked Nokia C02 Phone | Dr.fone
Guide: How To Unbrick a Bricked Nokia C02 Phone
Nokia C02 phones are super popular thanks to their excellent features and affordable prices. But being so popular means people try to customize them with custom software. If you’re not careful, you might have a “bricked” Nokia C02 phone. It won’t work at all. It will be more like a brick than a smartphone.
Don’t worry, though. This guide is here to help. It will show you how to unbrick your phone step by step. You’ll learn to bring your phone back to life and make it work again. So, get started on fixing your bricked Nokia C02 phone by reading this article.
Part 1. Common Reasons Why Nokia C02 Phones Get Bricked
A bricked phone might sound like a techy term, but it’s pretty simple – when your Nokia C02 phone turns into a lifeless block that won’t do anything. In this section, you’ll learn all about why this happens, so you can avoid these issues and keep your phone alive as long as possible.

- Trying to flash incompatible ROMs. Sometimes, people want their Nokia C02 phones to run different software like a custom version of Android called a ROM. But if you use the correct ROM for your specific phone, it can mess things up nicely. Also, inexperience with ROM flashing can hard brickyour Nokia C02 Be sure to follow guides and ask for community help online.
- Rooting mishaps/failures.“Rooting” means giving your phone superpowers, but if you mess up, it can go wrong. Your phone might not boot up, leaving you with a brick. Like the previous bullet, follow guides carefully, especially if inexperienced.
- Failed Firmware Updates. When your phone asks you to update its software, following the instructions carefully is essential. If you interrupt the process or something goes wrong, your phone could be bricked.
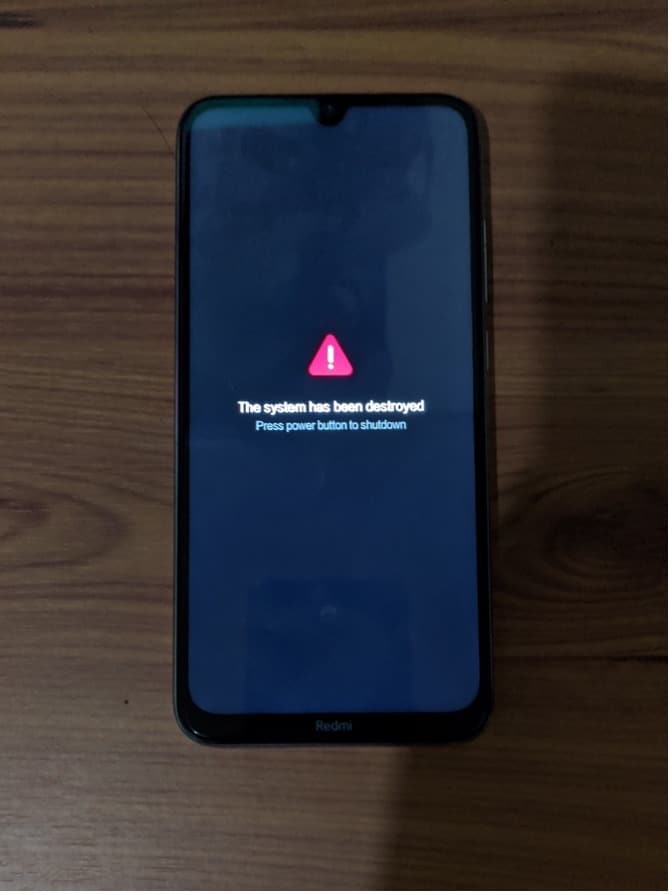
Now, you must know about soft and hard-bricking to learn how to diagnose your phone. Soft bricking is like a phone’s bad day – it might not start up. However, with the right help, you can fix it. Hard bricking is worse. It’s when your phone is a paperweight – it won’t turn on, respond, or do anything useful.

Part 2. Method 1: Use the Nokia C02 Flash Tool
Say you’ve accidentally bricked your Nokia C02 phone due to rooting or ROM flashing. You might feel scared, but imagine having a magic wand that can fix your bricked phone. That’s what the Nokia C02 Flash Tool is –a dedicated Nokia C02 unbricking tool. It lets you install or flash different software onto your phone, giving it a fresh start. Most of the time, a simple firmware flash will unbrick your Nokia C02.
The Nokia C02 Flash Tool is a superhero for various situations. Here are some scenarios where it can save the day:
- **Device Recovery.**If your phone is bricked or acting strange, the Flash Tool can help bring it back to life.
- Firmware Updates. You can use it to install official updates released by Nokia C02, ensuring your phone runs smoothly.
- **Device Customization.**Want a different look for your phone? The Flash Tool can help you install custom ROMs or themes.
- **Bug Fixes.**Got pesky bugs or glitches? The Flash Tool can replace corrupted software to make your phone behave.
- Performance Enhancement. If your phone feels sluggish, the Flash Tool can boost its speed by flashing a new OS.
How To Use the Nokia C02 Flash Tool To Unbrick a Nokia C02 Phone
Now that you know what the Nokia C02 Flash Tool is all about, it’s time to learn how to use it. If you’ve bricked your Nokia C02 phone, follow the steps below:
- Step 1. Download the Nokia C02 Flash Tool and the stock firmware of your device on your computer.
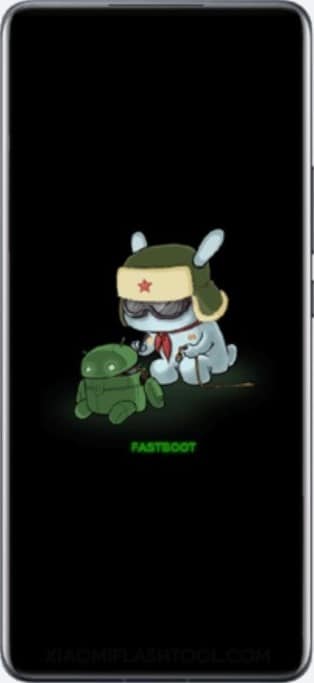
- Step 2. Turn off your phone. Then, press and hold the Volume Down + Power Key simultaneously for 6-8 seconds. This will force your phone to enter the Fastboot mode.


- Step 3. Connect your phone to your computer using a cable when you see this screen flash.
- Step 4. Using the Nokia C02 Flash Tool, click Select. Then, locate the firmware files you downloaded earlier.
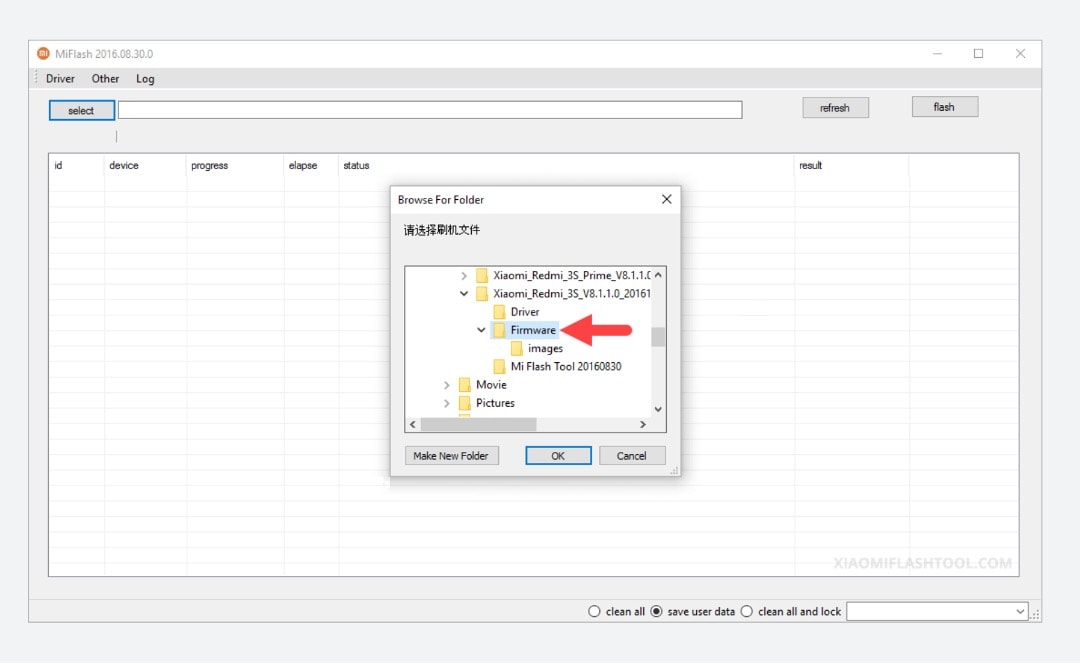
- Step 5. Click the refresh button until the flash tool recognizes your device. Then, click flash to replace the firmware. A text saying “success” should appear under the result column.
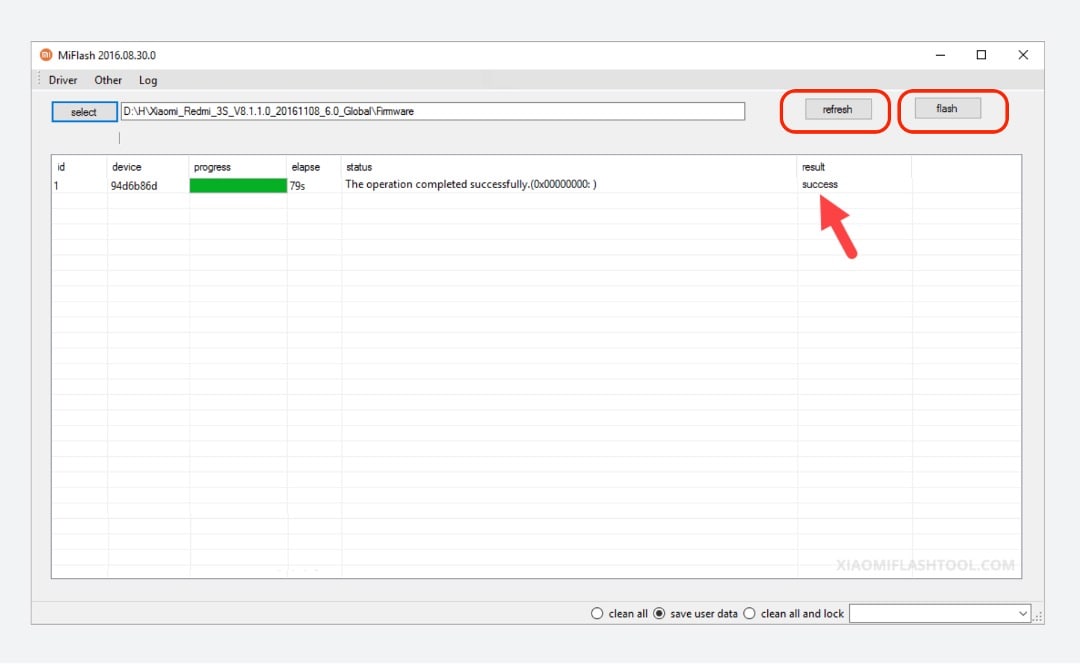
Congratulations! Your phone should be up and working after following these steps.
Part 3. Method 2: Wondershare Dr.Fone
If you gave the Nokia C02 Flash Tool a shot and your phone is still not cooperating, don’t lose hope. Sometimes, the magic touch needs a slight variation. That’s where Dr.Fone comes into play. This dedicated software can work wonders when fixing various phone problems. It can even help in cases of bricked Nokia C02 phones involving software or firmware issues.
![]()
Dr.Fone - System Repair (Android)
Repair Android System Errors without Any Trouble.
- Fix your Android to normal, no skills required.
- Fix various Android system issues, stuck in boot loop , black screen , or won’t turn on , looping on start, etc.
- The high success rate in resolving Android system issues.
- Compatible with a wide range of Android devices and OS versions
- User-friendly interface with easy-to-follow steps.
3981454 people have downloaded it 
One of Dr.Fone’s most astonishing powers is its “System Repair” feature. This is where the real magic happens. If your Nokia C02 phone is bricked, it can help repair the underlying software glitches that caused the issue. Moreover, Dr.Fone brings a toolbox of features to the table, making it more than just a one-trick pony. Here are its key features:
- **Data Recovery:**If you’ve lost precious data, Dr.Fone can help recover it, even from a bricked phone.
- **Data Transfer:**You can quickly move data between devices, even if one is unresponsive.
- **System Backup & Restore:**Fone can help you create a backup of your phone’s system and restore it when needed.
- **Unlocking Tools:**If you’re locked out of your phone, Dr.Fone can help you regain access.
How To Use Dr.Fone System Recovery Feature To Unbrick a Nokia C02 Phone
Now that you know about Dr.Fone, it’s time to understand how to use it. Hopefully, it can save your bricked Nokia C02 phone from its problems. Follow the steps below:
- Step 1. DownloadDr.Fone from its official website , and launch it on your computer. After entering the Toolbox menu from the left panel, click System Repair. Make sure that your Nokia C02 phone is connected.
- Step 2. Select Android on the next screen.

- Step 3. Initiate the Android System Repair by clicking Start.

- Step 4. Confirm your device details. You can edit any details that might be wrong.

- Step 5. Put your phone into Download mode. Follow the guidelines for phones with or without home buttons. Your phone will begin downloading the dedicated firmware.

- Step 6. After downloading the firmware, verify and proceed with the installation by clicking Fix Now. Confirm firmware installation by typing “000000” into the text box in the appearing window. Click Confirm afterward.

- Step 7. After the process is finished, your phone should now be okay. Click Done.

Before diving into the unbricking process, you must arm yourself with some tips and precautions to ensure your recovery journey is as smooth as possible. Here’s what you need to know:
- Backing Up Data: An Ounce of Prevention. Remember the golden rule: always back up your data before attempting any phone recovery. Unbricking might save your phone, but being safe is better than sorry.
- **Authentic Tools and Software: Stay on the Safe Side.**Using genuine and trustworthy tools is crucial when unbricking your Nokia C02 This applies especially to Dr.Fone, which you should only download from the official website. Additionally, when recovering your phone’s software, use authentic Nokia C02 ROMs (the operating system’s files).
- **Learning from Online Guides and Communities: Seek Guidance.**Navigating the unbricking process might seem daunting, but you’re not alone. There are many online guides, tutorials, and communities where people share their experiences and solutions.
Conclusion
So, there you have it – your guide to fixing a bricked Nokia C02 phone. Remember, bricking happens when your phone stops working. You won’t be afraid when that happens, as you learned about the Nokia C02 Flash Tool and Dr.Fone. They are your phone-saving superheroes that can unbrick even a hard-bricked Nokia C02 phone.
As a parting reminder, always keep a tool ready for emergencies. For this, choose Dr.Fone. It’s a super tool for all your phone problems. Give it a shot and be confident with your phone wherever you go and whatever you do with it.
 safe & secure
3,052,835 people have downloaded it
How to Fix Unfortunately, Contacts Has Stopped Error on Nokia C02
Have you recently noticed a message stating “Contacts has stopped”? This is enough to take away all your peace. As, our native contacts app stashes all our useful contacts which are time and again needed by a user. It’s malfunctioning is enough to give us chills. But, why the Nokia C02 or any other Android device incurs such problems?
It can occur while you launch the app or while you’re in the app already finding the required contact or when any other application is trying to gain access to it. So, to rage a battle with this issue, you need to seek help of some powerful methods in killing down the issue of contacts app crashes. And, the best part is that you’ve secured yourself by reaching the right place. We will be taking an in-depth discussion on several methods that may prove to be helpful. Let’s read them up here now.

Part 1: Get Android system fixed in one click
We’re always in search of a method that provides handy solution in a quite speedy and hassle-free manner. There are hundreds of tips and tricks for the same. You never know the possibility of firmware being the major drawback. No amount of manual methods can beat the performance of Dr.Fone - System Repair (Android).It is capable of providing 100% solution to any kind of issues, your phone gets troubled with. It is designed with the technology of combating the problem of black screen of death, app crashes and several other issues. In just a single-click, ward off the issue and free your device with errors
Dr.Fone - System Repair (Android)
Fix Contacts app crashing on Android in one click
- Incorporates with 1-click technology to resolve any issues occurring in your Nokia C02. Black screen of death, app crash, system crash, faulty issues etc.
- fone – Repair (Android) interface is extremely simple for users and lays functionalities aptly.
- One of its kind software with highest success rate in the market.
- Fully compatible with all kinds of Android phones, models, as well as the popular carrier.
- It provides users with 24 hours customer care service to resolve queries.
3,016,434 people have downloaded it
In this tutorial, we will learn the methodology of addressing the contacts keep stopping problem and gain triumph over it.
Step 1: Load program and draw connection of device
Download Dr.Fone - System Repair (Android) on PC. While program installs, use USB cable to connect device with system. From interface, tap on “System Repair” main window.
Step 2: Opt for Android Repair option
You’ll be directed to the “System Repair” screen where you have to opt for “Android Repair” options appearing over the left panel of the program. After that, do not forget to press “Start”.
Step 3: Key in device information
From following screen, fill the fields of “Brand”, “Name”, “Model”, “Country” and several other parameters. Then, tap on “Next” option to proceed further.
Step 4: Download Firmware package
Just follow the on-screen steps for booting your Nokia C02 into download mode. Then, hit the “Next” button to proceed with downloading the most suitable firmware package for your Nokia C02.

Step 5: Repair Android phone
Once the software downloads, the program will automatically repair any issues irking over your phone. Now, your phone is all free from contacts error.
Part 2: 9 Common ways to fix “Unfortunately, Contacts Has Stopped”
2.1 Restart Android system
Our response to any minuscule issue is straightaway restarting phone. This helps in clearing out any problem that might have disrupt the functioning of phone. So, to fix the problem of “Contacts app won’t open”, you too can try out your hand in this method.
- Get hold of your Android system and long press the power button.
- This will fadeout the main screen and showcase several options from where you’ve to tap on “Reboot/Restart” mode.
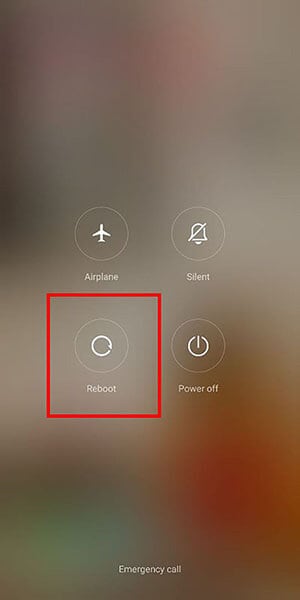
Now, your device will quickly reboot the Nokia C02 device. Once, the Nokia C02 device regains its normal state, check whether the issue is coming again or not.
2.2 Clear cache and data of Contacts app
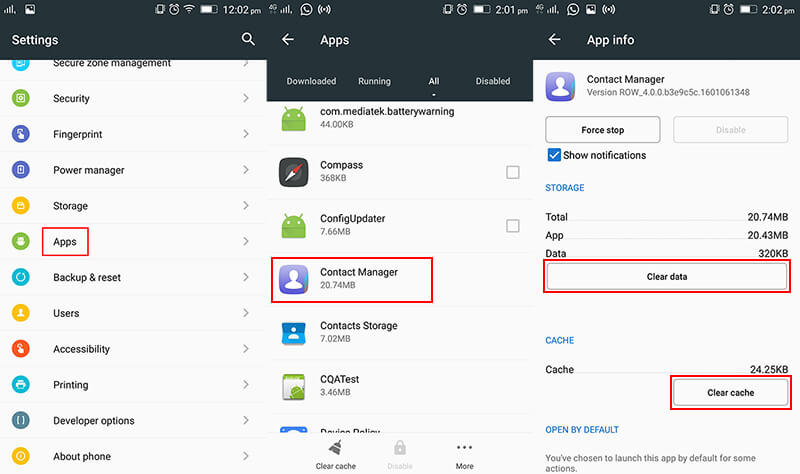
The cache memory basically stashes the copies of the concerned application. It is indeed a streak of copies of the desired app storing information and incurring additional space on the storage. This might be the reason why the contact app crashes rapidly on your Nokia C02. Hence, it can prove to be a good remedy for this problem. Just follow down the steps mentioned below-
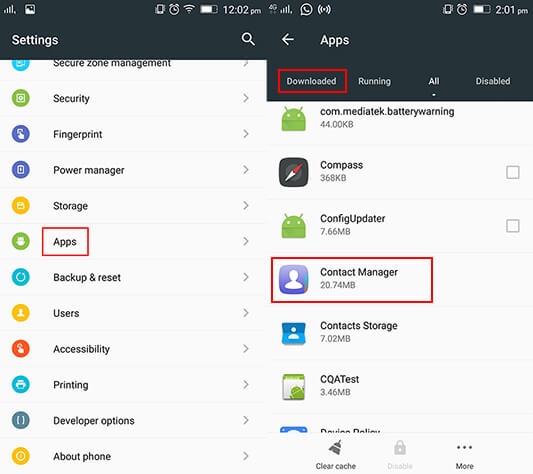
- First of all, go to “Settings” application from the app drawer or from the notification panel.
- Now, surf and select for “Applications” or “Apps & notifications”.
- Here, you need to browse for “Contacts” app and open it.
- On “Contacts” app, just tap on “CLEAR CACHE” and “CLEAR DATA” button. This will prompt the cache memory to be cleared.
2.3 Wipe cache partition
As we know the cache memories are the temporary files build by the firmware. These are of little importance as they are bound to become a bit more corrupted in nature. And sometimes, may indirectly become a hurdle for the working of contacts app. It is good if the Nokia C02 device is cleared off from the caches. Instead of manually wiping down the cache memory, we will understand how to clear off the cache partition in the following steps.
- From device, just power off your device. Then, press the “Volume Down + Power” button with “Home” combinations together.
- In a moment’s time, lose fingers from the “Power” button but do not release fingers from “Volume Down” and “Home” buttons.
- Once you view the “Android System Recovery” screen, just lose the “Volume Down” and “Home” buttons.
- Over the options available, just opt for “wipe cache partition” by tapping the “Volume down” button until the desired option is highlighted.
- Finally, push the “Power” key to give consent to the selection.

- After, the process is through there will be an option for “Reboot System Now”. Tap on it and restart the Nokia C02 device.
2.4 Disable Google+ app
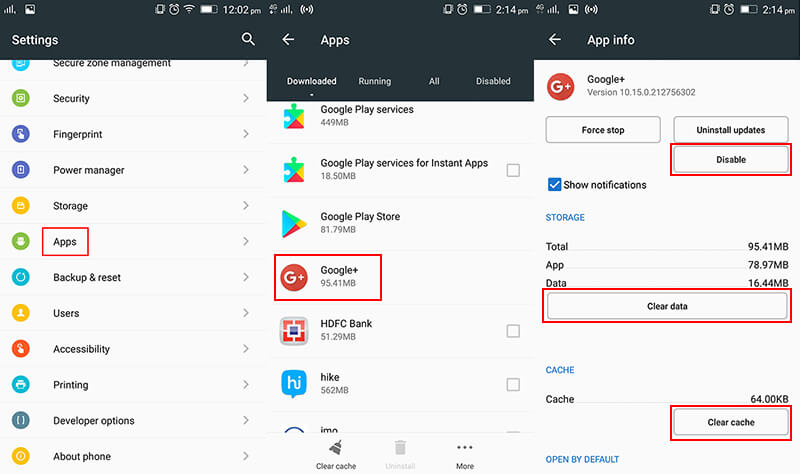
The root cause for detecting any problem is not very easy. You never know the overloading of Google + application might have directly impacted contacts app crashes. To resolve it, disabling it may prove to be a helpful solution. Here is the quick reference for disabling Google+ application.
- First of all, visit “Settings” from your Nokia C02.
- In “Settings”, visit the “Application Manager” or “Applications” menu and browse for “Google +” app.
- From the application main page, you can choose to do either of the methods:
- Either, completely disable the application to work by pressing on “Force stop” or “Disable” feature.
- Or, brush away the unnecessary cache piled up on your storage by using “Clear Cache” functionality.
There will be a prompt stating that the application may misbehave. However, you must disable the feature and check whether it worked out for you or not.
2.5 Update your device software
Many a times, we skip updating our device software thinking it is of less importance. In fact, one must not miss out the updates that occurs in phone. As, without the updates, the scope of some applications are affected to some extent. For its better functioning and avoiding issues like “contacts keep stopping”, here is how you should update device software.
- First and foremost, head on to “Settings” menu. Over there, click on “About Device”.
- There, you need to tap over “Software Update”.
The device will now check whether there are any updates available for your device. If yes, then update application right away.
2.6 Reset App Preferences
As stated, the malfunctioning of contacts can be due to be any unexpected reason. Hence, users can opt for resetting app preferences. This may prove to be helpful in brushing away the issue of “Contacts app won’t open”.
- Launch “Settings” app and surf for “Apps” or “Applications” option on your Nokia C02.
- Just, tap over the three dots appearing at the upper right section and then tap on “Reset app preferences”.
- At last, just select “Reset default apps”.

2.7 Delete voicemail
Do you happen to exchange voicemails quite often? It can trigger to be the reason for contact app crashes. If your device happens to have a bulk of voicemails, you must get rid of them sooner or later. As, these might standout to be the prime reason for contacts stopping on Nokia C02. If you’re unaware about the procedure of removing all kinds of voicemails, you can proceed to make use of the following steps.
- Start with, launching the “Google Voice” app.
- From there, duly opt for “Voicemail”.
- Just click on the press menu option and at last select “Delete” option.
2.8 Uninstall the downloaded apps
Some applications contain some unwanted advertisements and some elements of malware. This can be enough for disrupting the functionality of the built-in contact app won’t open. It is crucial for your phone to be detoxed from such elements. You need to manually scrap off such applications. Do, ensure to download the application from the genuine source for future use.
- On your Nokia C02, just go to “Home” screen and tap on “Apps” icon.
- Then, tap on “Settings” icon followed by going to “Applications” or “Apps & Preferences” menu.
- After that, tap on “Menu icon” which will showcase the apps installed on device.
- Simply, open the app and hit the “Uninstall” button to brush away that app. Repeat the same with other application(s).
Now, check whether you’ve fought the battle with the problem or not.

2.9 Reset to Factory Settings
Last but not least, if all the methods falls flat to resolve the issue of contacts app won’t open. Then, it might be your device has some internal problem. This can be any software crash which might not be fixing with the aforementioned steps. That is where reset to factory settings may prove to be a good option. With this method, your phone will be cleared of all the components, settings and everything present in it. Here are is the comprehensive tutorial for biding bye to the problem of contacts app won’t open.
Note: Do ensure to take a backup of all the data available in your device. As, we don’t want you to regret afterwards.
- Just go to “Settings” and surf and select “Backup & Reset” option.
- You need to toggle on the option for performing the backup on your Google account.
- Then, tap on “Reset” button and then tick mark the option for resetting your phone.


What to Do if Google Play Services Keeps Stopping on Nokia C02

Is the annoying Google Play Services error constantly popping up on your phone? Is it happening while reading, gaming, or browsing social media?
The error constantly plagues thousands of Android users, and it can be incredibly frustrating when you’re using the phone for something important or doing something entirely unrelated to the Google Play app.
Oddly enough, the “Unfortunately, Google Play Services has stopped.” error isn’t severe – you can fix it with a few general and easy-to-do fixes, a factory reset, or a system repair. Below, you’ll find info about why it’s happening and a list of ten possible solutions.

Why Am I Getting the Message “Google Play Services Keeps Stopping?”
Computers and phones often speak in error codes and apps that stop working. Even minor connectivity issues can cause these problems, leaving you wondering what’s wrong with your device or displaying the “Unfortunately, Google Play Services has stopped working.” error message.
Software errors are another set of problems that can also cause this issue. Namely, an average phone user has at least 40 installed apps, and sometimes these apps don’t play well together. They generate problems or steal resources from each other, such as RAM, causing crashes and errors.
There’s also the issue of wrong app versions. Although each Android phone uses the Android operating system, these systems can be vastly different, and the apps built for them can be made to be phone-specific and only run on a specific phone model.
That’s also the case with Google Play Store and Google Play Services.
Why Google Play Services Keeps Stopping
The Google Play Services keeps stopping error is an infamous one, and it can appear for various reasons and even on brand new phones. However, these causes can be categorized into three groups, which are:
- Network Issues
- Software Errors
- Wrong Play Services Version
Regardless of what’s causing the issue on your phone, we’ve compiled a list of ten possible solutions, and you can find those below.
Solutions to Try When Google Play Services Keeps Stopping
There are many solutions for the issue of Google Play Services that keeps stopping. We’ve listed the most famous and effective ones, and you’ll find them below in no particular order. Try them out and see whether they fix the issue.
1. Do a Factory Reset
A factory reset on any smartphone removes all your data on the phone’s internal storage and can even wipe your SD card clean if you select the option. Before you reset your phone to factory settings, ensure you’ve backed up all your essential apps and files. When you’re ready, you can do a factory reset by following these steps:
- Step 1: Go into Settingsand search for “reset.”
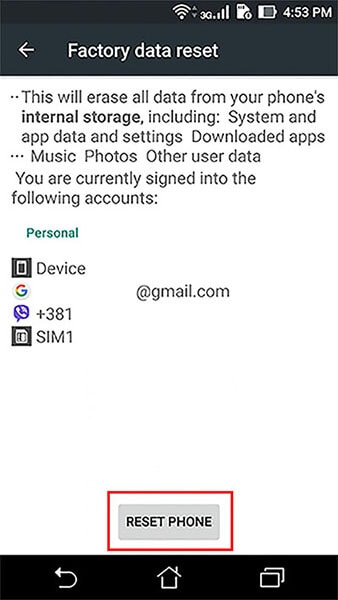
- Step 2: Choose Factory reset.
- Step 3: Tap the Erase all dataor Reset device at the bottom, whichever button is there.


- Step 4: Input your password and confirm the action.
Your phone will now restart and start the reset process. Once the factory reset completes, your phone will look brand new, and you’ll need to install all your apps again. Moreover, your Google Play Services app will likely get fixed by this, too.

2. Update Your System
As keeping your phone’s system and apps updated to the latest possible version is essential and recommended for the best performance and highest efficiency, you can try updating it to see whether it fixes your Google Play Services error. Here’s how:
- Step 1: Open the Settings
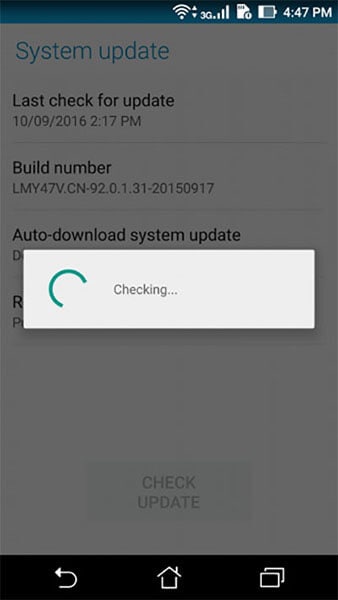
- Step 2: Head into System> System update.
- Step 3: If there’s an update available, click it and go through the process of updating your phone’s system.
Restarting your phone after an update, even if it doesn’t restart itself, is highly advisable, ensuring that the new updates apply without issues.
3. Revert to the Previous Version
As we’ve discussed the wrong Play Services versions above, it’s worth noting that sometimes even the developers can make mistakes and roll out the wrong version for your phone. So, if you notice that the phone is getting the error after you’ve updated Google Services or the Play Store, you can quickly revert to the previous version, and here’s how:
- Step 1: Head into Settings> Apps > Google Play Services.
- Step 2: Press the Disablebutton at the bottom of the screen.
- Step 3: Restart the phone, repeat the process by clicking Enablethis time, and restart the phone again.
As these are system apps, you can’t remove them from the phone, and disabling them will only remove the updates, leaving you with a base version that came with your phone out of the box.
4. Uninstall the App’s Updates and Reinstall
Like reverting to the previous version, you can also try reinstalling updates to fix the Google Play Services has stopped working error. The process is similar to the one above, but we’ve still included the steps. Here’s how you can do that:
Step 1: Go into Settings> Apps and find Google Play Services.
Step 2: Tap it and press Uninstall Updatesat the bottom.
Step 3: Exit the Settingsapp and restart the phone.
Step 4: Open the Play Storeapp and head into the app’s settings by clicking your profile icon. Then scroll to the bottom, and tap Settings.
Step 5: Find and tap the Play Store versionto update your Google Play Services.

As you’re already there, you might as well update all other apps after you tap Manage apps & device. That will ensure that older and not-up-to-date apps aren’t causing the issue.

5. Check Storage
Believe it or not, one of the leading causes of the Google Play Services issue is a phone overfilled with apps. Namely, if you have insufficient storage, the Google Play Store app will likely crash and display errors such as “Unfortunately, Google Play Services has stopped working.”
Head into your phone’s Settings and select Storage to see how your phone’s doing storage-wise. Deleting a few apps you don’t use and transferring your photo and video library to a PC is highly advisable if your phone’s storage space lacks gigabytes.
6. Do a System Repair
Although the other solutions here are general fixes that might help, a system repair might take a bit longer but will undoubtedly fix your issue. You can use the Wondershare Dr.Fone app to repair the system and eliminate the annoying “Unfortunately, Google Play Services has stopped working” error.
Moreover, Dr. Fone works on Android and iOS devices and can fix various phone issues, including boot loops, a white screen of death, a stuck phone, etc. That’s why we’ve included a guide on using it for an Android phone issue. Here’s how:
Step 1: Launch the Wondershare Dr.Fone app on your PC and head into Toolkit> System Repair > Android.
Step 2: Select the type of issue you want to fix > Start.
Step 3: Select the make and model of your phone so that Dr.Fone can find the appropriate Android software.
Step 4: Connect the phone to the PC via a USB cable and follow the on-screen instructions to put the phone into Download Mode. The instructions are available for both phones with and without the home button.

Step 5: Select the appropriate Android firmware, download it, and hit Fix Nowafter it downloads.
Step 6: Enter the code and hit Confirmto continue the system repair process. When it’s done, click the Done
That’s all it takes to do a system repair with Wondershare Dr.Fone. Give the software a few minutes to complete, during which your phone might restart a few times. Once it’s done, your Google Play Services app will undoubtedly work.
7. Clear Cache
The easiest and the most obvious fix for many Android apps is clearing the app’s cache. Here’s how you can do that for Google Play Services and Google Play Store:
- Step 1: Go into Settings> Apps and find the Google Play Store
- Step 2: Tap Storageand hit the Clear cache
 vMix Basic HD - Software based live production. vMix Basic HD includes 4 inputs, 3 cameras, streaming, recording, playlist.
- Step 3: Repeat the process for the Google Play Services
If this doesn’t work, move on to another possible fix.
8. Check Date and Time Settings
Oddly enough, the Google Play Services app is prone to failure because of an incorrectly set time or date. That’s because Google’s servers constantly check these settings before issuing updates to the Nokia C02 devices, so you’ll need to ensure they’re correct beforehand. Here’s how:
Step 1: Head into Settings> System > Date & Time.
Step 2: Ensure that both “**Use network–provided time” and “Use network-provided time zone**” are toggled on.
Step 3: If this doesn’t work, you can try repeating the process and manually setting the time and the time zone.

Once you check or change these settings, try using the Google Play Store app and check whether the issue is fixed. Restarting the phone after changing the settings is also highly advisable.
9. Troubleshoot Your Internet Connection
Another regularly overlooked troublemaker is a poor internet connection. That’s because most apps nowadays are meant to work in online mode only, and losing connection or using a bad one interferes with the app’s functionality.
To test the internet connection on your Nokia C02, you should open a browser and head to a random internet page to see if it’s opening and whether there are any delays. If it’s working fine, your internet connection isn’t the problem.
10. Adjust Google Play Services Permissions
Although permissions rarely change, they can cause issues if you change them accidentally. These settings can be found in the same place where you would uninstall updates or clear the app’s cache, so you can use some of the steps mentioned above to check them.
Once inside Permission Settings, check whether the Google Play Services and Play Store apps have sufficient permission to do their jobs and whether any required permissions were recently removed. If so, grant these two apps their permissions back.
safe & secure
4,953,228 people have downloaded it
Conclusion
Although it’s an incredibly frustrating error, the “Unfortunately, Google Play Services has stopped” message is more annoying than serious. We’ve explained why it happens, but we’ve also given you a list of solutions to fix it.
Our list includes various fixes, from simple ones, like deleting the app’s cache and ensuring your network works fine, to more serious ones, like doing a factory reset. Alternatively, you can do a system repair with the help of Wondershare Dr.Fone, which will certainly fix the problem, but it might be a bit more complicated than cache deletion.
- Title: Guide How To Unbrick a Bricked Nokia C02 Phone | Dr.fone
- Author: Nova
- Created at : 2024-07-19 22:06:40
- Updated at : 2024-07-20 22:06:40
- Link: https://change-location.techidaily.com/guide-how-to-unbrick-a-bricked-nokia-c02-phone-drfone-by-drfone-fix-android-problems-fix-android-problems/
- License: This work is licensed under CC BY-NC-SA 4.0.