
Guide How To Unbrick a Bricked Motorola Edge 40 Neo Phone | Dr.fone
Guide: How To Unbrick a Bricked Motorola Edge 40 Neo Phone
Motorola Edge 40 Neo phones are super popular thanks to their excellent features and affordable prices. But being so popular means people try to customize them with custom software. If you’re not careful, you might have a “bricked” Motorola Edge 40 Neo phone. It won’t work at all. It will be more like a brick than a smartphone.
Don’t worry, though. This guide is here to help. It will show you how to unbrick your phone step by step. You’ll learn to bring your phone back to life and make it work again. So, get started on fixing your bricked Motorola Edge 40 Neo phone by reading this article.

Part 1. Common Reasons Why Motorola Edge 40 Neo Phones Get Bricked
A bricked phone might sound like a techy term, but it’s pretty simple – when your Motorola Edge 40 Neo phone turns into a lifeless block that won’t do anything. In this section, you’ll learn all about why this happens, so you can avoid these issues and keep your phone alive as long as possible.
- Trying to flash incompatible ROMs. Sometimes, people want their Motorola Edge 40 Neo phones to run different software like a custom version of Android called a ROM. But if you use the correct ROM for your specific phone, it can mess things up nicely. Also, inexperience with ROM flashing can hard brickyour Motorola Edge 40 Neo Be sure to follow guides and ask for community help online.
- Rooting mishaps/failures.“Rooting” means giving your phone superpowers, but if you mess up, it can go wrong. Your phone might not boot up, leaving you with a brick. Like the previous bullet, follow guides carefully, especially if inexperienced.
- Failed Firmware Updates. When your phone asks you to update its software, following the instructions carefully is essential. If you interrupt the process or something goes wrong, your phone could be bricked.
Now, you must know about soft and hard-bricking to learn how to diagnose your phone. Soft bricking is like a phone’s bad day – it might not start up. However, with the right help, you can fix it. Hard bricking is worse. It’s when your phone is a paperweight – it won’t turn on, respond, or do anything useful.
Part 2. Method 1: Use the Motorola Edge 40 Neo Flash Tool To Recover Bricked Motorola Edge 40 Neo Phones
Say you’ve accidentally bricked your Motorola Edge 40 Neo phone due to rooting or ROM flashing. You might feel scared, but imagine having a magic wand that can fix your bricked phone. That’s what the Motorola Edge 40 Neo Flash Tool is –a dedicated Motorola Edge 40 Neo unbricking tool. It lets you install or flash different software onto your phone, giving it a fresh start. Most of the time, a simple firmware flash will unbrick your Motorola Edge 40 Neo.
The Motorola Edge 40 Neo Flash Tool is a superhero for various situations. Here are some scenarios where it can save the day:
- **Device Recovery.**If your phone is bricked or acting strange, the Flash Tool can help bring it back to life.
- Firmware Updates. You can use it to install official updates released by Motorola Edge 40 Neo, ensuring your phone runs smoothly.
- **Device Customization.**Want a different look for your phone? The Flash Tool can help you install custom ROMs or themes.
- **Bug Fixes.**Got pesky bugs or glitches? The Flash Tool can replace corrupted software to make your phone behave.
- Performance Enhancement. If your phone feels sluggish, the Flash Tool can boost its speed by flashing a new OS.

How To Use the Motorola Edge 40 Neo Flash Tool To Unbrick a Motorola Edge 40 Neo Phone
Now that you know what the Motorola Edge 40 Neo Flash Tool is all about, it’s time to learn how to use it. If you’ve bricked your Motorola Edge 40 Neo phone, follow the steps below:
- Step 1. Download the Motorola Edge 40 Neo Flash Tool and the stock firmware of your device on your computer.
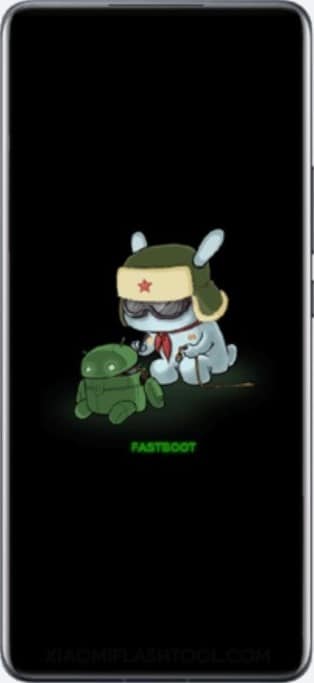
- Step 2. Turn off your phone. Then, press and hold the Volume Down + Power Key simultaneously for 6-8 seconds. This will force your phone to enter the Fastboot mode.
 KoolReport Pro is an advanced solution for creating data reports and dashboards in PHP. Equipped with all extended packages , KoolReport Pro is able to connect to various datasources, perform advanced data analysis, construct stunning charts and graphs and export your beautiful work to PDF, Excel, JPG or other formats. Plus, it includes powerful built-in reports such as pivot report and drill-down report which will save your time in building ones.
 It will help you to write dynamic data reports easily, to construct intuitive dashboards or to build a whole business intelligence cockpit.
KoolReport Pro package goes with Full Source Code, Royal Free, ONE (1) Year Priority Support, ONE (1) Year Free Upgrade and 30-Days Money Back Guarantee.
Developer License allows Single Developer to create Unlimited Reports, deploy on Unlimited Servers and able deliver the work to Unlimited Clients.

- Step 3. Connect your phone to your computer using a cable when you see this screen flash.
- Step 4. Using the Motorola Edge 40 Neo Flash Tool, click Select. Then, locate the firmware files you downloaded earlier.
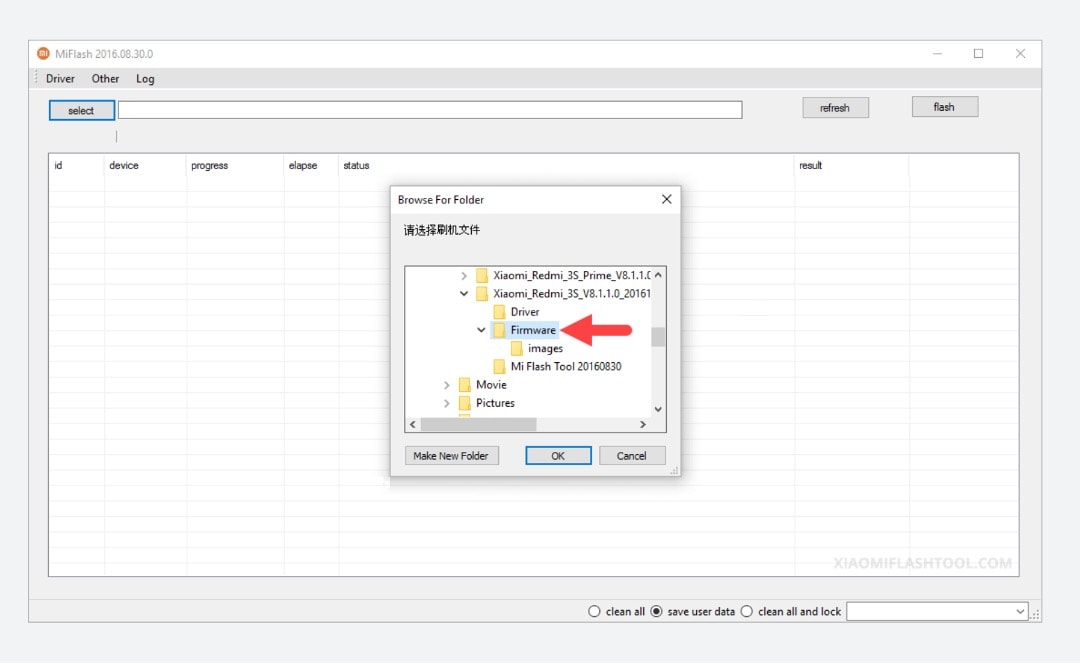
- Step 5. Click the refresh button until the flash tool recognizes your device. Then, click flash to replace the firmware. A text saying “success” should appear under the result column.
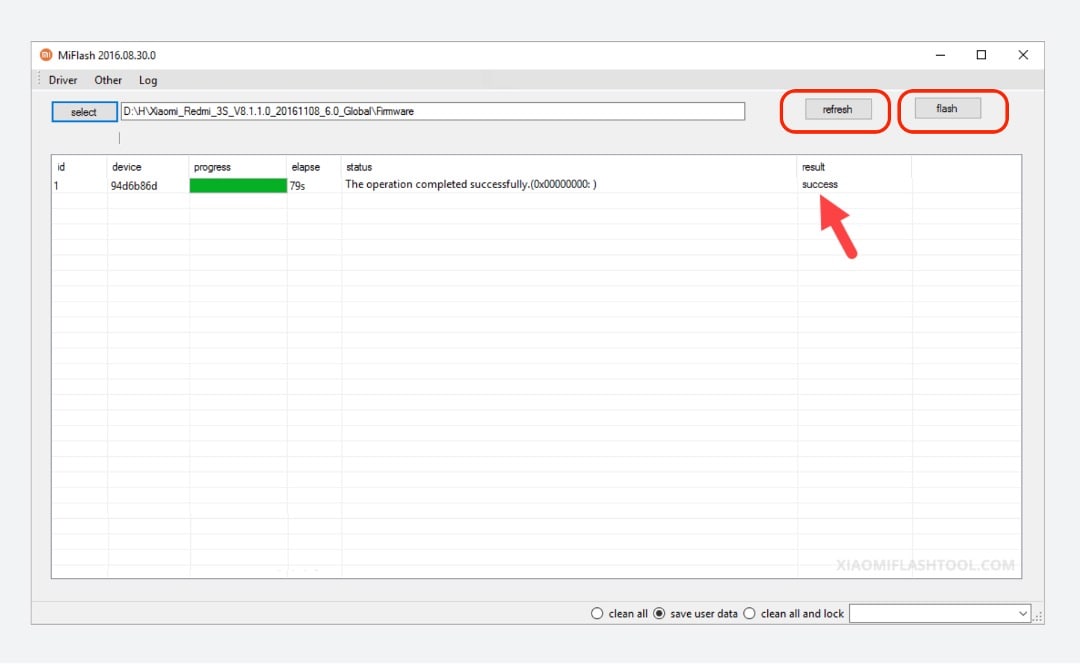
Congratulations! Your phone should be up and working after following these steps.
Part 3. Method 2: Wondershare Dr.Fone System Repair – Your One-Stop Shop for Unbricking Your Motorola Edge 40 Neo Phone
If you gave the Motorola Edge 40 Neo Flash Tool a shot and your phone is still not cooperating, don’t lose hope. Sometimes, the magic touch needs a slight variation. That’s where Dr.Fone comes into play. This dedicated software can work wonders when fixing various phone problems. It can even help in cases of bricked Motorola Edge 40 Neo phones involving software or firmware issues.
![]()
Dr.Fone - System Repair (Android)
Repair Android System Errors without Any Trouble.
- Fix your Android to normal, no skills required.
- Fix various Android system issues, stuck in boot loop , black screen , or won’t turn on , looping on start, etc.
- The high success rate in resolving Android system issues.
- Compatible with a wide range of Android devices and OS versions
- User-friendly interface with easy-to-follow steps.
3981454 people have downloaded it
 Forex Robotron Gold Package
One of Dr.Fone’s most astonishing powers is its “System Repair” feature. This is where the real magic happens. If your Motorola Edge 40 Neo phone is bricked, it can help repair the underlying software glitches that caused the issue. Moreover, Dr.Fone brings a toolbox of features to the table, making it more than just a one-trick pony. Here are its key features:
- **Data Recovery:**If you’ve lost precious data, Dr.Fone can help recover it, even from a bricked phone.
- **Data Transfer:**You can quickly move data between devices, even if one is unresponsive.
- **System Backup & Restore:**Fone can help you create a backup of your phone’s system and restore it when needed.
- **Unlocking Tools:**If you’re locked out of your phone, Dr.Fone can help you regain access.
How To Use Dr.Fone System Recovery Feature To Unbrick a Motorola Edge 40 Neo Phone
Now that you know about Dr.Fone, it’s time to understand how to use it. Hopefully, it can save your bricked Motorola Edge 40 Neo phone from its problems. Follow the steps below:
- Step 1. DownloadDr.Fone from its official website , and launch it on your computer. After entering the Toolbox menu from the left panel, click System Repair. Make sure that your Motorola Edge 40 Neo phone is connected.
- Step 2. Select Android on the next screen.

- Step 3. Initiate the Android System Repair by clicking Start.

- Step 4. Confirm your device details. You can edit any details that might be wrong.


- Step 5. Put your phone into Download mode. Follow the guidelines for phones with or without home buttons. Your phone will begin downloading the dedicated firmware.

- Step 6. After downloading the firmware, verify and proceed with the installation by clicking Fix Now. Confirm firmware installation by typing “000000” into the text box in the appearing window. Click Confirm afterward.

- Step 7. After the process is finished, your phone should now be okay. Click Done.

Part 4. Best Practices/Tips Before Unbricking Your Phone
Before diving into the unbricking process, you must arm yourself with some tips and precautions to ensure your recovery journey is as smooth as possible. Here’s what you need to know:
- Backing Up Data: An Ounce of Prevention. Remember the golden rule: always back up your data before attempting any phone recovery. Unbricking might save your phone, but being safe is better than sorry.
- **Authentic Tools and Software: Stay on the Safe Side.**Using genuine and trustworthy tools is crucial when unbricking your Motorola Edge 40 Neo This applies especially to Dr.Fone, which you should only download from the official website. Additionally, when recovering your phone’s software, use authentic Motorola Edge 40 Neo ROMs (the operating system’s files).
- **Learning from Online Guides and Communities: Seek Guidance.**Navigating the unbricking process might seem daunting, but you’re not alone. There are many online guides, tutorials, and communities where people share their experiences and solutions.
Conclusion
So, there you have it – your guide to fixing a bricked Motorola Edge 40 Neo phone. Remember, bricking happens when your phone stops working. You won’t be afraid when that happens, as you learned about the Motorola Edge 40 Neo Flash Tool and Dr.Fone. They are your phone-saving superheroes that can unbrick even a hard-bricked Motorola Edge 40 Neo phone.
As a parting reminder, always keep a tool ready for emergencies. For this, choose Dr.Fone. It’s a super tool for all your phone problems. Give it a shot and be confident with your phone wherever you go and whatever you do with it.
 safe & secure
3,052,835 people have downloaded it
Ways to Unbrick Your Android Device: Various Ways for Recovery
When your Motorola Edge 40 Neo becomes unresponsive or frozen after mistakenly flashing a ROM or rooting, you are informed that the phone has been bricked. The most terrifying aspect will not just be gadget loss, but also data erasure. However, what exactly is a bricked phone, and, more importantly, how do you fix a bricked Android phone?
This article will explain what a bricked android phone is, why an Android phone becomes bricked, how to unbrick an Android phone without losing data and a third-party application you can use.
Part 1. Causes of Bricked Phones
In everyday settings, our mobile devices have become our greatest friends, therefore breaking your phone is the last thing you want to do. There are different reasons why devices brick, and we must be familiar with them in order to comprehend the various techniques to repair bricked devices.
Here are some common reasons why your Motorola Edge 40 Neo is bricked:
- **Flashing Stock/Custom ROM:**It is possible that you installed an incompatible ROM in the Android phone, that the phone shuts off during the process, or that you have performed other errors that cause your phone to restart indefinitely or to become stuck at the starting screen.
- **Rooting an Android device:**You are unable to effectively root the Motorola Edge 40 Neo device.
- **Android firmware is being updated:**If the phone is interrupted when updating the Android firmware, it will be bricked.
- **Installing harmful applications:**You installed harmful programs on your Motorola Edge 40 Neo, or the phone was infected with a virus.
Part 2. How to Fix a Bricked Phone
The first step is to establish how badly your device is bricked. In most cases, you will be working with soft bricks that are pretty simple to repair. If your phone is stuck in a boot loop or enters recovery mode every time you turn it on, you may have a soft brick.
To repair bricked Android phones and tablets, you must first thoroughly examine the Motorola Edge 40 Neo device’s state. Before you begin troubleshooting, determine the sort of bricking that your phone is experiencing. However, there is no specific software to unbrick your Motorola Edge 40 Neo; you may need to learn the complexities of this issue or hire a professional to do it for you.
 safe & secure
Here are some simple methods for repairing bricked Android devices:

Method 1. Reboot the Phone in Safe Mode
Trying to reboot your android device in safe mode is the first and easiest thing you should try if your phone is bricked. Here’s how to do it:
- Step 1: Turn off your smartphone and press the Volume Up + Power button to enter recovery mode. Then, using the volume controls, navigate the menu and select Reboot system now.

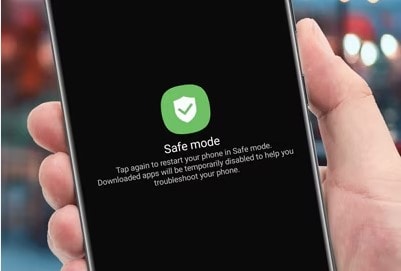
- Step 2: Select the highlighted option by pressing the Power button. After that, wait for your device to reset normally.
- Note: The steps for booting into recovery mode may change based on the manufacturer of your device. For further information, go to the user manual for your phone or tablet.
Method 2. Wipe the Cache Partition
This is the first indication that a user’s phone has gone bricked. The phone turned on automatically, however it became stuck or frozen on the logo screen. The issue might be caused by the undeleting of data and cache, which prevents the phone from displaying the home screen.
This issue, however, may be resolved by wiping the data and cache partitions in recovery mode. You must do the following to do this:
- Step 1: Turn off your smartphone and enter recovery mode by pressing the Power and Volume Down buttons simultaneously. Different devices have various approaches for entering recovery mode, so you may perform better.
- Step 2: After entering recovery mode, you should see the screen below. Remember to pick Advanced and then “Wipe Dalvik Cache” if your device is under Clockwork Mod recovery. Return to the main screen and select “Wipe Cache Partition” once more.
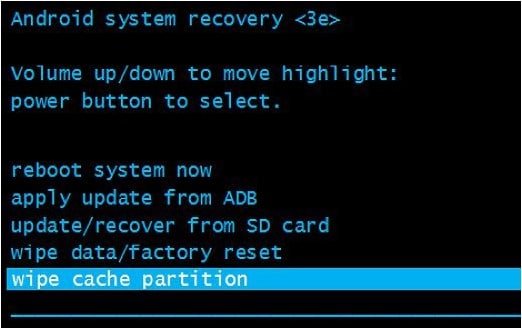
- Step 3: Finally, on your smartphone, choose the Reboot system immediately.
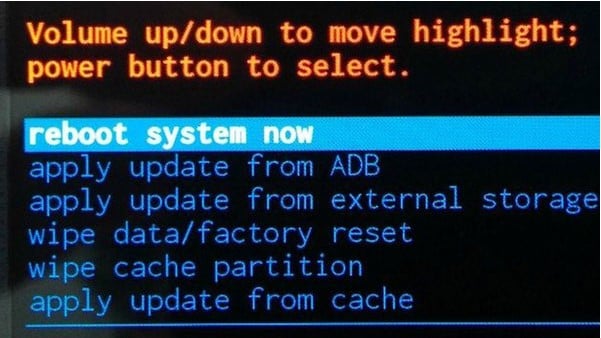
Method 3. Perform a Factory Reset
A factory reset can undo the alterations made to your device that resulted in the brick phone, but you will lose everything you have downloaded and installed in the process. Here’s how to restore a bricked Android phone to factory settings:
- Step 1: Boot your device into recovery mode (turn off your device, then press power button + volume up button).
- Step 2: Select “Wipe Data/“Factory Reset” then confirm the action. When the process is done, you’ll be returned to the recovery mode menu.
- Step 3: Select “Reboot System Now” to restart your device.
Method 4. Flash a Custom ROM
If you boot your phone directly into recovery mode, there’s a problem with the ROM you loaded. Then simply flash the following custom ROM on your phone:
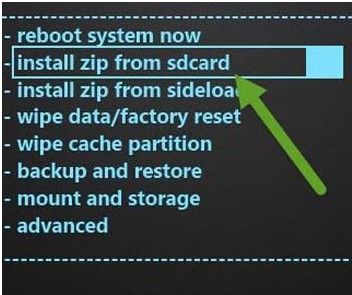
- Step 1: Save the required ROM (in ZIP format) to an SD card. The SD card should then be inserted into your Motorola Edge 40 Neo.
- Step 2: Click the “Install zip from sdcard” button. Then, select the ZIP file that contains the ROM. Finally, click the “reboot system now” button.
Method 5. Using Wondershare Dr.Fone to Fix bricked Android Devices
Wondershare Dr.Fone - Data Recovery is the first data recovery solution for any damaged Android smartphone in the globe. It offers one of the greatest recovery rates and can recover a variety of information like images, videos, contacts, messages, and call logs. The program is most effective with Motorola Edge 40 Neo smartphones.
While it is not an Android unbrick tool, it is a useful tool for retrieving data when your Motorola Edge 40 Neo becomes bricked. It is quite easy to use:
- Step 1: Launch Wondershare Dr.Fone and select “Data Recovery” > “Recover Android Data” from the menu. Then, select “****Recover from Broken Phone”.

- Step 2: Choose the file types you wish to recover. Click “Next” and then select the type of damage your phone is experiencing. Select “Touch screen not responsive, or cannot access the phone” or “Black/broken screen”.

- Step 3: Use the recovery wizard to enter your Android smartphone into Download Mode. Connect your Android handset to the computer after following the instructions to begin automatically analyzing your device.
- Step 4: The program will provide a list of all recoverable files, organized by file type. To preview the file, highlight it. Choose the files you wish to recover and then click “Recover” to save all the data you want to restore.

 SwifDoo PDF Perpetual (1 PC) Free upgrade. No monthly fees ever.
 safe & secure
Part 3. How to Prevent Bricking Your Phone
How to prevent a device from “bricking” itself and how to repair it if it does The delay is set by the MCU, but it should be long enough to allow the debug adapter to connect to the Motorola Edge 40 Neo device and halt it before the Motorola Edge 40 Neo device disables itself.
Here are some things to remember to prevent your device from bricking:
- Avoiding unofficial firmware updates: Installing unapproved OS firmware on your phone will most certainly violate any manufacturer’s warranty you have on it. Read the installation instructions for your unique phone model thoroughly and then carefully follow them, taking time and patience.
- **Being cautious when rooting or jail breaking:**Rooting and Jail breaking disables parts of the operating system’s built-in security mechanisms, which are part of what makes the operating system safe, and your data protected from exposure or damage.
- **Install an antivirus application on your device:**Mobile devices increase the danger of data leaks and breaches. As a result, antiviral software is beneficial on mobile phones. Mobile Device Management is an excellent choice for virus protection on your mobile device.
- Backup your phone data regularly: Backing up your phone safeguards your data in the event that you lose it, it is stolen, or it no longer works. When it comes time to replace your phone, having a backup makes it simple to restore your data to the new device. Furthermore, backing up your phone allows you to organize your data so that it is easier to access.
- Avoid installing apps from untrusted sources: Apps installed from unauthorized sources make your device and personal data more exposed to dangers such as Ransomware. So you should be wary of where you download applications.
Conclusion
It is certainly upsetting when your gadget bricks, but you may attempt the solutions listed above to resolve the issue. Meanwhile, if you want to solve the problem quickly and easily, you can try Wondershare Dr.Fone. It can not only help you repair your Android smartphone, but it can also help you extract data from a bricked device, recover data, and many more Android device solutions!

safe & secure
Motorola Edge 40 Neo Camera Not Working Unexpected Error? Fix It Now
For all its glory and goodness, the Android OS often has its users pulling their hair in frustration at just how buggy the OS can be at times. So, if you’re having one of those days today, we are here to help. Camera app is one of the most used apps on smartphones today. People only launch the app when they want to take a photo, for everything else there’s a dedicated photo gallery app. What happens when you launch the camera app only to realize it threw an error and you missed your photo moment? Don’t throw the phone, not yet. Let us help you out.

Part I: Why Is Android Camera Not Working?
There are a few reasons why the camera app is not working on your Motorola Edge 40 Neo.
Low Memory
Camera app does rely heavily on system resources, so in case you have too many apps open and for some reason the OS is not able to manage the resources appropriately for the camera app to function as it should, you will get a camera error.
Low Storage
The camera app needs storage space to save the photos it takes. So, in case your phone is running low on storage space, the camera app would likely malfunction as it would have no way to store the photos it would be taking.
General Bugs And Glitches
OS bugs and general glitches within the OS and the camera app can cause camera not working issue anytime during everyday operation. This is part and parcel of any technology.
Hardware Issues
In the rarest cases, there might have developed an actual hardware issue with the camera system on your Motorola Edge 40 Neo. The likely culprit is misuse and abuse, such as a dropped phone or maybe the phone was too hot for extended periods of time, causing hardware issues.
Part II: How To Fix Android Camera Not Working Issue?
So, how to get the Android camera not working problem solved? There are a few ways you can try fixing the camera not working issue on your Motorola Edge 40 Neo right where you are, without needing to take the Motorola Edge 40 Neo device to the manufacturer’s service center.
II.I: Restart The Handset
One of the first things to do any time an app or your phone or tablet does not work like it should, restarting the Motorola Edge 40 Neo device refreshes everything just enough to resolve most commonly occurring issues.


Use the power button on your smartphone to restart your Android handset and see if this resolves the issue.

II.II: Close And Relaunch The Camera App
If the camera app (or any app for that matter) has been in the background for a while and then it is brought to the foreground, there are always chances of it crashing for any reason, or not working as expected. So, closing the app completely and relaunching it is recommended.
Step 1: Launch the app switcher on your specific Android device the way your device manufacturer suggests you to. Usually, it is a swipe up and hold gesture to get into the app switcher.

Step 2: Next, you can choose to close just the camera app or, better yet, close all apps by tapping the Close All button. Flicking any app upwards (quick upward swipe) is how you close an app. If there is no Close All button anywhere, repeat the gesture for all open apps.
II.III: Check App Permissions
These days, thanks to strides in the privacy initiatives, apps need permissions before they can function the way they do. Most of the times, apps such as camera do have the necessary permissions, but sometimes it is possible that the permissions are set incorrectly. To check if the camera app has the requisite permissions, do the following:
Step 1: Go to Settings > Apps > Camera > Permissions.

Step 2: Tap Camera.

Step 3: See if the selected option is Allow Only While Using This App. If not, select it.
II.IV: Clear The Camera App Cache
Clearing the camera app cache is sometimes helpful. To do that:
Step 1: Go to Settings > Apps > Camera and tap Storage Usage.


Step 2: Tap Clear Cache.

II.V: Clear The Photo Gallery App Cache
The camera app is closely tied to the photo gallery app that comes baked in into Android OS. That is because photos that the camera app takes are stored in the photo gallery app. Consequently, if there were any issues in the photo gallery app, that could lead to the camera app not working on Android problem. Here’s how to clear the photo gallery app cache:
Step 1: Go to Settings > Apps > Photos > Storage Usage.

Step 2: Tap Clear Cache.
II.VI: Check For App Updates
This does not happen always, but sometimes, with known bugs and issues, there may be an update released that fixes those bugs and issues that prevent some users from using a given app reliably. Checking for updates is a good step to make sure that your camera app is updated to the latest version possible.
Step 1: Go to Play Store and tap your profile picture on the right.


Step 2: Tap Manage Apps and Device.

Step 3: If there are updates available, Tap Update All to update all apps.
 The BootIt Collection covers multi-booting, partitioning, and disk imaging on traditional PC’s using the standard BIOS and newer PC’s using UEFI. The collection includes BootIt Bare Metal (BIBM) for standard BIOS systems and BootIt UEFI (BIU) for UEFI system.
II.VII: Cool The Phone Down
We do not realize the immense power that is packed into the thin smartphone form factor these days. If you have been using the phone to video chat for a while now, you might not realize that the phone has become hot, especially if you are using a desk stand. Same for shooting high-resolution videos; the phone does get quite hot shooting high-resolution videos.
If this is the case, close all apps and let the phone cool down. You might even want to shut the phone off to help cool it faster.
II.VIII: Nudge The Camera System
You may want to tap your camera system (the lenses and surrounding area) gently to see if that gets the camera working. In case it did, this is indicative of a hardware issue, and you should get it checked at the service center at your earliest convenience.
II.IX: Fix Android Camera Not Working Issue In One Click (With Dr.Fone)
Now, if the above fixes have not worked, you might want to repair your Android OS once before you make that appointment with the service centre. And, we have just the app to help you fix your camera not working on Android problem quickly.
Wondershare Dr.Fone is a multi-module app that works on both Windows and macOS and is the only app you will ever need to resolve nearly all of your smartphone and tablet issues that you are likely to encounter. Need to take backups? Dr.Fone Phone Backup has you covered with the ability to take and restore even selective backups, and to any location such as your computer or an external disk as well. Want to transfer WhatsApp chats to a new phone? Use WhatsApp Transfer to do just that! Bought a new phone? Use Phone Transfer to transfer contents from old phone to new, and then use Dr.Fone Data Eraser to securely wipe your old phone before giving it away!
Today, we will use Dr.Fone’s System Repair (Android) module to fix Android camera not working issue quickly.
Download Dr.Fone here.
safe & secure
Step 1: Launch Dr.Fone app on your PC or Mac.
Step 2: Click System Repair module and then Android.
Step 3: For now, don’t bother with the scenarios given and click Start to go to the next screen.
Step 4: Your Android device will be detected by Dr.Fone. If anything seems incorrect, use the dropdown options to change it, and click Next.
Step 5: Your phone needs to be put into Download mode before it can be repaired. Follow the instructions shown onscreen and click Next.

Step 6: Dr.Fone automatically downloads the most recent firmware for your device and when it is ready, waits for your input. Click Fix Now to start the repair process.

Step 7: You will need to enter a 6-digit code (digit zero, six times – 000000) to confirm and begin the repair process.
When the repair is complete, Dr.Fone shows the final screen as below:
safe & secure
Conclusion
The camera app on your smartphone is one of the most important apps you use. This is not a game; this is an app that makes previous memories possible for you. So, when you get any of those incorrigible errors that are impossible to make sense of, what do you do? This guide gives you 9 fixes to fix Android camera not working error quickly and easily.
- Title: Guide How To Unbrick a Bricked Motorola Edge 40 Neo Phone | Dr.fone
- Author: Nova
- Created at : 2024-07-19 22:06:14
- Updated at : 2024-07-20 22:06:14
- Link: https://change-location.techidaily.com/guide-how-to-unbrick-a-bricked-motorola-edge-40-neo-phone-drfone-by-drfone-fix-android-problems-fix-android-problems/
- License: This work is licensed under CC BY-NC-SA 4.0.