
Guide How To Unbrick a Bricked Infinix Note 30 5G Phone | Dr.fone
Guide: How To Unbrick a Bricked Infinix Note 30 5G Phone
Infinix Note 30 5G phones are super popular thanks to their excellent features and affordable prices. But being so popular means people try to customize them with custom software. If you’re not careful, you might have a “bricked” Infinix Note 30 5G phone. It won’t work at all. It will be more like a brick than a smartphone.
Don’t worry, though. This guide is here to help. It will show you how to unbrick your phone step by step. You’ll learn to bring your phone back to life and make it work again. So, get started on fixing your bricked Infinix Note 30 5G phone by reading this article.

Part 1. Common Reasons Why Infinix Note 30 5G Phones Get Bricked
A bricked phone might sound like a techy term, but it’s pretty simple – when your Infinix Note 30 5G phone turns into a lifeless block that won’t do anything. In this section, you’ll learn all about why this happens, so you can avoid these issues and keep your phone alive as long as possible.

- Trying to flash incompatible ROMs. Sometimes, people want their Infinix Note 30 5G phones to run different software like a custom version of Android called a ROM. But if you use the correct ROM for your specific phone, it can mess things up nicely. Also, inexperience with ROM flashing can hard brickyour Infinix Note 30 5G Be sure to follow guides and ask for community help online.
- Rooting mishaps/failures.“Rooting” means giving your phone superpowers, but if you mess up, it can go wrong. Your phone might not boot up, leaving you with a brick. Like the previous bullet, follow guides carefully, especially if inexperienced.
- Failed Firmware Updates. When your phone asks you to update its software, following the instructions carefully is essential. If you interrupt the process or something goes wrong, your phone could be bricked.
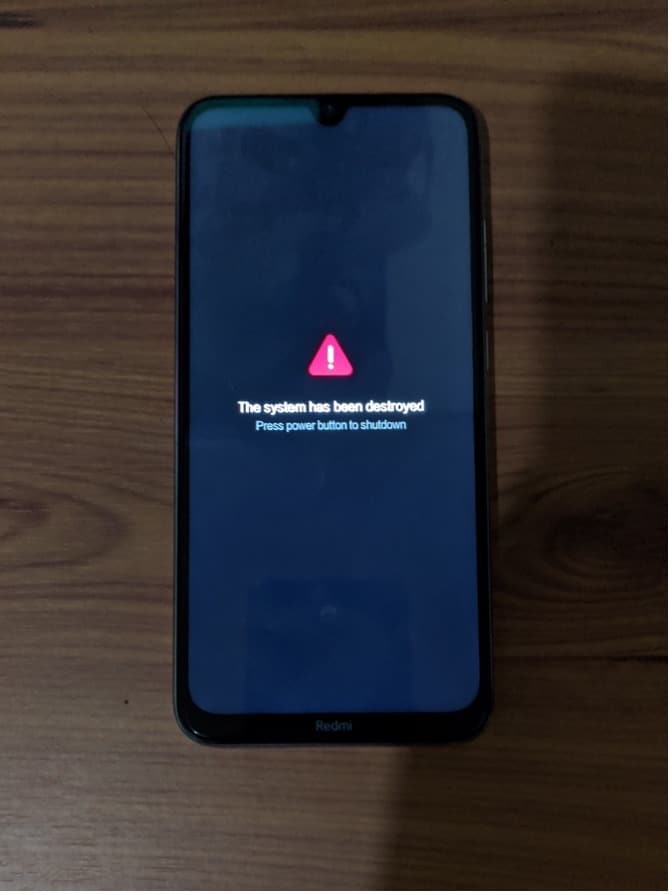
Now, you must know about soft and hard-bricking to learn how to diagnose your phone. Soft bricking is like a phone’s bad day – it might not start up. However, with the right help, you can fix it. Hard bricking is worse. It’s when your phone is a paperweight – it won’t turn on, respond, or do anything useful.
Part 2. Method 1: Use the Infinix Note 30 5G Flash Tool To Recover Bricked Infinix Note 30 5G Phones
Say you’ve accidentally bricked your Infinix Note 30 5G phone due to rooting or ROM flashing. You might feel scared, but imagine having a magic wand that can fix your bricked phone. That’s what the Infinix Note 30 5G Flash Tool is –a dedicated Infinix Note 30 5G unbricking tool. It lets you install or flash different software onto your phone, giving it a fresh start. Most of the time, a simple firmware flash will unbrick your Infinix Note 30 5G.
The Infinix Note 30 5G Flash Tool is a superhero for various situations. Here are some scenarios where it can save the day:
- **Device Recovery.**If your phone is bricked or acting strange, the Flash Tool can help bring it back to life.
- Firmware Updates. You can use it to install official updates released by Infinix Note 30 5G, ensuring your phone runs smoothly.
- **Device Customization.**Want a different look for your phone? The Flash Tool can help you install custom ROMs or themes.
- **Bug Fixes.**Got pesky bugs or glitches? The Flash Tool can replace corrupted software to make your phone behave.
- Performance Enhancement. If your phone feels sluggish, the Flash Tool can boost its speed by flashing a new OS.
How To Use the Infinix Note 30 5G Flash Tool To Unbrick a Infinix Note 30 5G Phone
Now that you know what the Infinix Note 30 5G Flash Tool is all about, it’s time to learn how to use it. If you’ve bricked your Infinix Note 30 5G phone, follow the steps below:
- Step 1. Download the Infinix Note 30 5G Flash Tool and the stock firmware of your device on your computer.
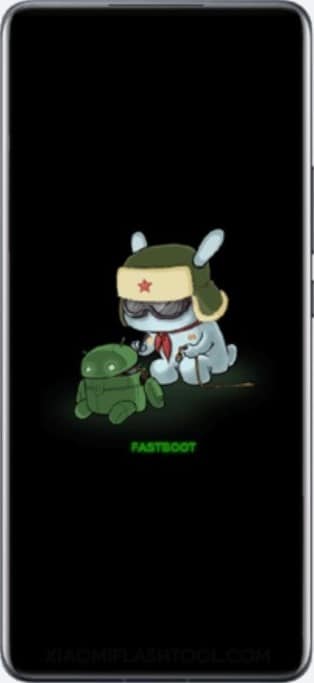
- Step 2. Turn off your phone. Then, press and hold the Volume Down + Power Key simultaneously for 6-8 seconds. This will force your phone to enter the Fastboot mode.

- Step 3. Connect your phone to your computer using a cable when you see this screen flash.
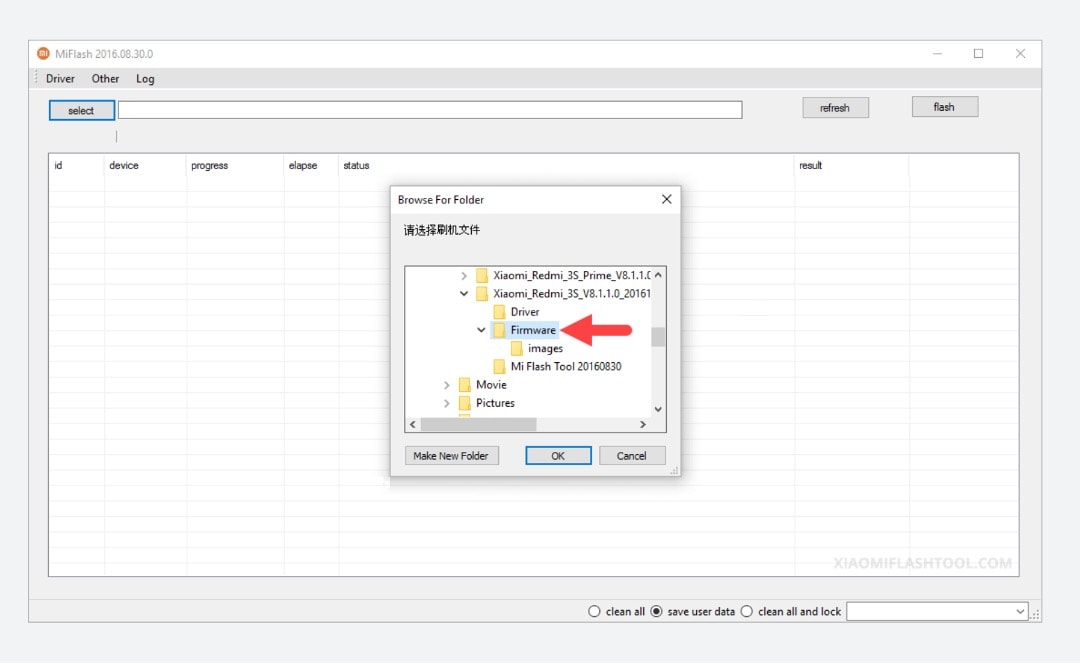
- Step 4. Using the Infinix Note 30 5G Flash Tool, click Select. Then, locate the firmware files you downloaded earlier.
- Step 5. Click the refresh button until the flash tool recognizes your device. Then, click flash to replace the firmware. A text saying “success” should appear under the result column.
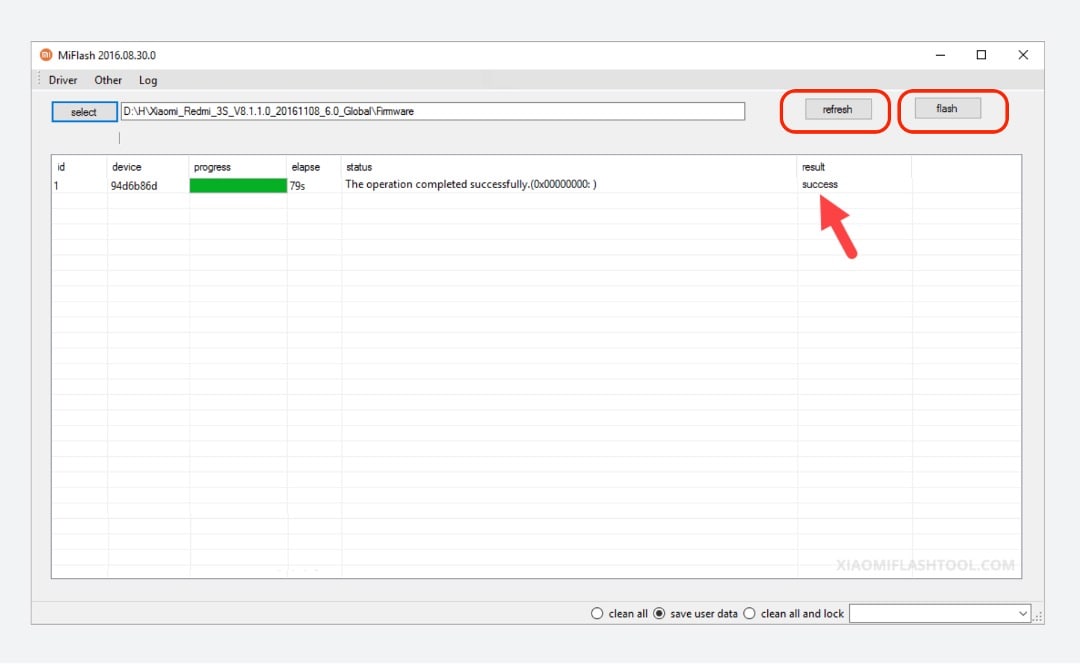
Congratulations! Your phone should be up and working after following these steps.
Part 3. Method 2: Wondershare Dr.Fone System Repair – Your One-Stop Shop for Unbricking Your Infinix Note 30 5G Phone
If you gave the Infinix Note 30 5G Flash Tool a shot and your phone is still not cooperating, don’t lose hope. Sometimes, the magic touch needs a slight variation. That’s where Dr.Fone comes into play. This dedicated software can work wonders when fixing various phone problems. It can even help in cases of bricked Infinix Note 30 5G phones involving software or firmware issues.
![]()
Dr.Fone - System Repair (Android)
Repair Android System Errors without Any Trouble.
- Fix your Android to normal, no skills required.
- Fix various Android system issues, stuck in boot loop , black screen , or won’t turn on , looping on start, etc.
- The high success rate in resolving Android system issues.
- Compatible with a wide range of Android devices and OS versions
- User-friendly interface with easy-to-follow steps.
3981454 people have downloaded it

One of Dr.Fone’s most astonishing powers is its “System Repair” feature. This is where the real magic happens. If your Infinix Note 30 5G phone is bricked, it can help repair the underlying software glitches that caused the issue. Moreover, Dr.Fone brings a toolbox of features to the table, making it more than just a one-trick pony. Here are its key features:
- **Data Recovery:**If you’ve lost precious data, Dr.Fone can help recover it, even from a bricked phone.
- **Data Transfer:**You can quickly move data between devices, even if one is unresponsive.
- **System Backup & Restore:**Fone can help you create a backup of your phone’s system and restore it when needed.
- **Unlocking Tools:**If you’re locked out of your phone, Dr.Fone can help you regain access.
How To Use Dr.Fone System Recovery Feature To Unbrick a Infinix Note 30 5G Phone
Now that you know about Dr.Fone, it’s time to understand how to use it. Hopefully, it can save your bricked Infinix Note 30 5G phone from its problems. Follow the steps below:
- Step 1. DownloadDr.Fone from its official website , and launch it on your computer. After entering the Toolbox menu from the left panel, click System Repair. Make sure that your Infinix Note 30 5G phone is connected.
- Step 2. Select Android on the next screen.

- Step 3. Initiate the Android System Repair by clicking Start.

- Step 4. Confirm your device details. You can edit any details that might be wrong.

- Step 5. Put your phone into Download mode. Follow the guidelines for phones with or without home buttons. Your phone will begin downloading the dedicated firmware.

- Step 6. After downloading the firmware, verify and proceed with the installation by clicking Fix Now. Confirm firmware installation by typing “000000” into the text box in the appearing window. Click Confirm afterward.

- Step 7. After the process is finished, your phone should now be okay. Click Done.

Part 4. Best Practices/Tips Before Unbricking Your Phone
Before diving into the unbricking process, you must arm yourself with some tips and precautions to ensure your recovery journey is as smooth as possible. Here’s what you need to know:
- Backing Up Data: An Ounce of Prevention. Remember the golden rule: always back up your data before attempting any phone recovery. Unbricking might save your phone, but being safe is better than sorry.
- **Authentic Tools and Software: Stay on the Safe Side.**Using genuine and trustworthy tools is crucial when unbricking your Infinix Note 30 5G This applies especially to Dr.Fone, which you should only download from the official website. Additionally, when recovering your phone’s software, use authentic Infinix Note 30 5G ROMs (the operating system’s files).
- **Learning from Online Guides and Communities: Seek Guidance.**Navigating the unbricking process might seem daunting, but you’re not alone. There are many online guides, tutorials, and communities where people share their experiences and solutions.
Conclusion
So, there you have it – your guide to fixing a bricked Infinix Note 30 5G phone. Remember, bricking happens when your phone stops working. You won’t be afraid when that happens, as you learned about the Infinix Note 30 5G Flash Tool and Dr.Fone. They are your phone-saving superheroes that can unbrick even a hard-bricked Infinix Note 30 5G phone.
As a parting reminder, always keep a tool ready for emergencies. For this, choose Dr.Fone. It’s a super tool for all your phone problems. Give it a shot and be confident with your phone wherever you go and whatever you do with it.
 safe & secure
3,052,835 people have downloaded it
Infinix Note 30 5G Camera Not Working Unexpected Error? Fix It Now
For all its glory and goodness, the Android OS often has its users pulling their hair in frustration at just how buggy the OS can be at times. So, if you’re having one of those days today, we are here to help. Camera app is one of the most used apps on smartphones today. People only launch the app when they want to take a photo, for everything else there’s a dedicated photo gallery app. What happens when you launch the camera app only to realize it threw an error and you missed your photo moment? Don’t throw the phone, not yet. Let us help you out.


Part I: Why Is Android Camera Not Working?
There are a few reasons why the camera app is not working on your Infinix Note 30 5G.
Low Memory
Camera app does rely heavily on system resources, so in case you have too many apps open and for some reason the OS is not able to manage the resources appropriately for the camera app to function as it should, you will get a camera error.
Low Storage
The camera app needs storage space to save the photos it takes. So, in case your phone is running low on storage space, the camera app would likely malfunction as it would have no way to store the photos it would be taking.
General Bugs And Glitches
OS bugs and general glitches within the OS and the camera app can cause camera not working issue anytime during everyday operation. This is part and parcel of any technology.
Hardware Issues
In the rarest cases, there might have developed an actual hardware issue with the camera system on your Infinix Note 30 5G. The likely culprit is misuse and abuse, such as a dropped phone or maybe the phone was too hot for extended periods of time, causing hardware issues.

Part II: How To Fix Android Camera Not Working Issue?
So, how to get the Android camera not working problem solved? There are a few ways you can try fixing the camera not working issue on your Infinix Note 30 5G right where you are, without needing to take the Infinix Note 30 5G device to the manufacturer’s service center.
II.I: Restart The Handset
One of the first things to do any time an app or your phone or tablet does not work like it should, restarting the Infinix Note 30 5G device refreshes everything just enough to resolve most commonly occurring issues.

Use the power button on your smartphone to restart your Android handset and see if this resolves the issue.
II.II: Close And Relaunch The Camera App
If the camera app (or any app for that matter) has been in the background for a while and then it is brought to the foreground, there are always chances of it crashing for any reason, or not working as expected. So, closing the app completely and relaunching it is recommended.
Step 1: Launch the app switcher on your specific Android device the way your device manufacturer suggests you to. Usually, it is a swipe up and hold gesture to get into the app switcher.
 PCDJ DEX 3 for Windows & MAC is the total entertainment DJ software solution, offering audio, video, and karaoke mixing ability. Automatic beat-sync, smart looping, 4 decks, DJ MIDI controller support, Karaoke Streaming and much more.
Step 2: Next, you can choose to close just the camera app or, better yet, close all apps by tapping the Close All button. Flicking any app upwards (quick upward swipe) is how you close an app. If there is no Close All button anywhere, repeat the gesture for all open apps.
II.III: Check App Permissions
These days, thanks to strides in the privacy initiatives, apps need permissions before they can function the way they do. Most of the times, apps such as camera do have the necessary permissions, but sometimes it is possible that the permissions are set incorrectly. To check if the camera app has the requisite permissions, do the following:
Step 1: Go to Settings > Apps > Camera > Permissions.

Step 2: Tap Camera.

Step 3: See if the selected option is Allow Only While Using This App. If not, select it.
II.IV: Clear The Camera App Cache
Clearing the camera app cache is sometimes helpful. To do that:
Step 1: Go to Settings > Apps > Camera and tap Storage Usage.

Step 2: Tap Clear Cache.


II.V: Clear The Photo Gallery App Cache
The camera app is closely tied to the photo gallery app that comes baked in into Android OS. That is because photos that the camera app takes are stored in the photo gallery app. Consequently, if there were any issues in the photo gallery app, that could lead to the camera app not working on Android problem. Here’s how to clear the photo gallery app cache:
Step 1: Go to Settings > Apps > Photos > Storage Usage.

Step 2: Tap Clear Cache.
II.VI: Check For App Updates
This does not happen always, but sometimes, with known bugs and issues, there may be an update released that fixes those bugs and issues that prevent some users from using a given app reliably. Checking for updates is a good step to make sure that your camera app is updated to the latest version possible.
Step 1: Go to Play Store and tap your profile picture on the right.

Step 2: Tap Manage Apps and Device.

Step 3: If there are updates available, Tap Update All to update all apps.
II.VII: Cool The Phone Down
We do not realize the immense power that is packed into the thin smartphone form factor these days. If you have been using the phone to video chat for a while now, you might not realize that the phone has become hot, especially if you are using a desk stand. Same for shooting high-resolution videos; the phone does get quite hot shooting high-resolution videos.
If this is the case, close all apps and let the phone cool down. You might even want to shut the phone off to help cool it faster.
II.VIII: Nudge The Camera System
You may want to tap your camera system (the lenses and surrounding area) gently to see if that gets the camera working. In case it did, this is indicative of a hardware issue, and you should get it checked at the service center at your earliest convenience.
II.IX: Fix Android Camera Not Working Issue In One Click (With Dr.Fone)
Now, if the above fixes have not worked, you might want to repair your Android OS once before you make that appointment with the service centre. And, we have just the app to help you fix your camera not working on Android problem quickly.
Wondershare Dr.Fone is a multi-module app that works on both Windows and macOS and is the only app you will ever need to resolve nearly all of your smartphone and tablet issues that you are likely to encounter. Need to take backups? Dr.Fone Phone Backup has you covered with the ability to take and restore even selective backups, and to any location such as your computer or an external disk as well. Want to transfer WhatsApp chats to a new phone? Use WhatsApp Transfer to do just that! Bought a new phone? Use Phone Transfer to transfer contents from old phone to new, and then use Dr.Fone Data Eraser to securely wipe your old phone before giving it away!
Today, we will use Dr.Fone’s System Repair (Android) module to fix Android camera not working issue quickly.
Download Dr.Fone here.
safe & secure
Step 1: Launch Dr.Fone app on your PC or Mac.
Step 2: Click System Repair module and then Android.
Step 3: For now, don’t bother with the scenarios given and click Start to go to the next screen.

Step 4: Your Android device will be detected by Dr.Fone. If anything seems incorrect, use the dropdown options to change it, and click Next.
Step 5: Your phone needs to be put into Download mode before it can be repaired. Follow the instructions shown onscreen and click Next.

Step 6: Dr.Fone automatically downloads the most recent firmware for your device and when it is ready, waits for your input. Click Fix Now to start the repair process.

Step 7: You will need to enter a 6-digit code (digit zero, six times – 000000) to confirm and begin the repair process.
When the repair is complete, Dr.Fone shows the final screen as below:
safe & secure
Conclusion
The camera app on your smartphone is one of the most important apps you use. This is not a game; this is an app that makes previous memories possible for you. So, when you get any of those incorrigible errors that are impossible to make sense of, what do you do? This guide gives you 9 fixes to fix Android camera not working error quickly and easily.
4 Ways to Fix Android Blue Screen of Death On Infinix Note 30 5G
Android is undoubtedly amongst the best smartphone platforms but comes with its own share of glitches. The Android screen of death is observed by many users all over the world who complain of their device screen turning blue rendering their phone/tablet unresponsive. This is called the Android blue screen of death and it usually occurs when you turn on your device by pressing the Power On button but your device does not boot up normally and remains stuck at a plain blue screen without any error message.
Such an Android screen of death is caused by a temporary software crash but can also occur due to certain hardware issues. We understand the inconvenience caused to you when you see the Android blue screen of death. Here are ways to fix the error and great software to extract all your data to keep it unaltered and safe.
Read on to learn more about the Android screen of death and ways to combat it.
Part 1: How to rescue data on Infinix Note 30 5G with blue screen of death?
The Android blue screen of death issue is not a difficult problem to deal with and can be fixed by you by following the easy steps given in this article. We suggest that all readers rescue the data stored on their Android devices to prevent data loss and keep it stored in your PC from where it can be accessed and recovered by you anytime, anywhere. This task might sound tedious, but, we have for you Dr.Fone - Data Recovery (Android) , a software specially designed to retrieve data from broken and damaged Infinix Note 30 5G phones and tabs, especially Infinix Note 30 5G devices, and keep it safe in your PC without tampering with it or altering its format. It efficiently extracts data from broken or unresponsive Infinix Note 30 5G devices, phones/tabs stuck at black/blue screen, or whose system crashed due to a virus attack.
Dr.Fone - Data Recovery (Android)
World’s 1st data retrieval software for broken Android devices.
- It can also be used to recover data from broken devices or devices that are damaged in any other way such as those stuck in a reboot loop.
- Highest retrieval rate in the industry.
- Recover photos, videos, contacts, messages, call logs, and more.
- Compatible with Infinix Note 30 5G devices.
3,145,271 people have downloaded it
Follow the steps given below to extract data when you experience an Android screen of death:
1. Download, install, and run the Dr.Fone - Data Recovery (Android) tool on your PC. Connect your device using a USB cable and move on to the main screen of the software.
2. Once you launch the software, you will see many tabs before you. Click on “Data Recovery” > “Android”.

3. And then choose “Recover from Broken Phone” from the program’s screen.

4. In this step, choose from the two options before you the true nature of your device as shown in the screenshot below.

5. You will now be asked to feed in your phone’s model type and name as shown in the screenshot below. Give correct details for the software to identify your device smoothly and hit “Next”.
Parental Control Software
6. In this step, refer to the instructions in your device manual to enter into Download Mode on your Infinix Note 30 5G and hit “Next”. An example of what to do to reach Download Mode is shown below.

7. Finally, let the software recognize your Infinix Note 30 5G, and start to download the recovery package for your device.
 SwifDoo PDF Perpetual (1 PC) Free upgrade. No monthly fees ever.

8. Once it does, you will be able to preview all the files on the screen in front of you before you hit “Recover to Computer”.

The process may take up to a few minutes and once it’s done all your files will be extracted and stored on your PC. You can now move on to troubleshooting the problem without the fear of losing all your important data.

safe & secure
 PDF application, powered by AI-based OCR, for unified workflows with both digital and scanned documents.
 Part 2: One click to fix the Android blue screen of death
We understand how annoying it is to see the Android blue screen of death and fail to access your device data. But, with Dr.Fone - System Repair (Android) , your troubles would burst away.
This software effectively fixes Android screen of death issue along with app crashing, bricked or unresponsive device, stuck on Infinix Note 30 5G logo, etc. All Android issues are well taken care of by Dr.Fone - System Repair (Android) with one click.
Dr.Fone - System Repair (Android)
Easy and effective solution to fix the Android blue screen of death!
- Every kind of Android system error and problem is resolved.
- It is the premier Android repair software in the market.
- All the latest Infinix Note 30 5G devices are supported by this program.
- Android blue screen of death can be fixed with a single click.
- Easy to use and no technical skills are needed to operate it.
4,750,154 people have downloaded it
Note: Backing up your device is significant before you carry out the Android repair process. The process of fixing the Android blue screen of death issue may erase data from your Infinix Note 30 5G. So backing up your Android seems a viable option.
Phase 1: Connecting your Android after preparing it
Step 1: Installation and running Dr.Fone - System Repair (Android) on your system takes you to the main screen. Choose the ‘System Repair’ option followed by connecting the Android device.
Step 2: Press the ‘Android Repair’ option before tapping the ‘Start’ button.
Step 3: Over the Infinix Note 30 5G device information window, select all relevant data about your device followed by the ‘Next’ button.
Phase 2: Initiate repairing after entering ‘Download’ mode
Step 1: Get the Infinix Note 30 5G device in ‘Download’ mode to fix the Android blue screen of death issue. Here is how –
- On a ‘Home’ button-less device – you need to switch off the Infinix Note 30 5G device. Now, hold the ‘Volume Down’, ‘Power’, and ‘Bixby’ keys together for about 10 seconds and release. Hit the ‘Volume Up’ key to get into ‘Download’ mode.
- On a ‘Home’ button device – shut down the Android phone/tablet, and then push the ‘Power’, ‘Volume Down’, and ‘Home’ keys for 10 seconds. Let go of the keys and press the ‘Volume Up’ key to enter ‘Download’ mode.
Step 2: Tap the ‘Next’ button to download firmware.

Step 3: Dr.Fone - System Repair (Android) would verify the firmware post-download. It will start repairing the Android system automatically.

safe & secure
Part 3: Force Restart Your Infinix Note 30 5G
A force restart is a basic step that can clear minor software glitches. It has the potential to resolve the Android blue screen of death issue. Force restarting your device can clear temporary bugs and reset all processes. It is a simple yet often overlooked way to fix the Android blue screen of death issue. Use the following steps to force restart your Infinix Note 30 5G:
Step: On your Infinix Note 30 5G, press and hold the “Power” and “Volume Down” keys for around 10 seconds. Release the keys when your device reboots and wait for it to complete rebooting.
 Power Tools add-on for Google Sheets, 12-month subscription

Part 4: Remove phone battery to fix blue screen of death
The best home remedy to fix any kind of Android screen of death remove the Infinix Note 30 5G device’s battery. This technique might sound too simple, but it has solved the Android blue screen of death issue for many users whose devices started normally after reinserting the battery. Here is what you should do.
1. Open the back cover of your Infinix Note 30 5G and carefully remove its battery.

2. Let the battery be out for 5-7 minutes. Meanwhile, long press the power button to drain out any residual charge from your device.
3. Now reinsert the battery and attach the back cover.
4. Turn on your device and see that it boots normally all the way to the Home/Locked Screen without getting stuck at Android blue screen of death.
Note: Not all Android devices allow you to remove their battery. If you own such a device, try the next step as it is your only option to fix the Android blue screen of death problem.
Part 5: Put out your SIM Card/SD card and reinsert
In some cases, issues related to the Android blue screen of death can be caused by problems with the SIM card or SD card. Removing and reinserting these cards can help resolve potential conflicts or glitches. Remember that this method can help resolve issues related to SIM card or SD card conflicts. However, it may not address more complex software or hardware problems causing the blue screen issue.
 The BootIt Collection covers multi-booting, partitioning, and disk imaging on traditional PC’s using the standard BIOS and newer PC’s using UEFI. The collection includes BootIt Bare Metal (BIBM) for standard BIOS systems and BootIt UEFI (BIU) for UEFI system.
Part 6: Clean or change the LCD connector
If you’re facing the Android blue screen of death issue, the issue might be related to a hardware problem. The problem can be a loose or damaged LCD connector. In this scenario, you can try cleaning or changing the connector. This method is more advanced and involves disassembling your device. That’s why you need to proceed with caution and only if you’re comfortable with hardware tasks.
Part 7: Update to the latest Android version
Software problems can manifest the Android equivalent of a blue screen of death. It is usually triggered by errors or anomalies within the operating system. To address these concerns, upgrading to the most recent version of the Android OS proves effective. However, updating your device’s software could introduce fresh glitches or compatibility conflicts. These steps outline the process of updating your device to the latest OS:
Step: Open the Settings app on your Infinix Note 30 5G by locating and launching it. Proceed by scrolling through the options and selecting “Software Update.” In the ensuing screen, choose “Download and Install” to start a search for any available updates.


Part 8: How to fix the Android blue screen of death by factory reset?
The Android screen of death is a very confusing issue as it freezes your device at a blue screen with no options to navigate further. In such a situation you may consider performing a Factory Reset, better known as Hard Reset as you will need to enter Recovery Mode to implement this technique. Although resting your device will wipe off all its data but you don’t need to worry as Dr.Fone toolkit Android Data Extraction software can retrieve all your files and keep them safe.
Accessing Recovery Mode differs for different Android devices. Thus, we suggest that you consult your device manual to understand how to boot into Recovery Mode on your particular Android device and then follow the steps given below:
Once you are on the Recovery Screen, you will see a list of options before you, similar to the screenshot below.

Use the Volume Down button to scroll downwards and reach the “Wipe data/Factory reset” option.

Now use the power button to select it and wait for the Infinix Note 30 5G device to reboot automatically.
You will notice that the Android device will turn back on without getting stuck at the Android blue screen of death. Now you can set up your device from scratch.
Part 9: What Should You Do if Android Still Stuck on Blue Screen?
Have you tried all the methods, and your Infinix Note 30 5G is still stuck on the blue screen of death? In this case, it’s important to consider the possibility of a hardware issue. Remember that hardware issues can be complex. Trying to fix things without the right expertise can result in additional harm. If you’re uncertain about the next steps, it’s wisest to ask for assistance from a trained professional.
The Android screen of death, especially the Android blue screen of death, is not a very pleasant sight and could worry you. The good news is that this problem can be fixed by you sitting at home without any technical assistance. Follow the simple and easy tips given above to reboot your device and use the Dr.Fone - Data Recovery (Damaged Device) tool to rescue your data in the most efficient and effective way, then use Dr.Fone - System Repair (Android) to repair your Infinix Note 30 5G.
safe & secure
- Title: Guide How To Unbrick a Bricked Infinix Note 30 5G Phone | Dr.fone
- Author: Nova
- Created at : 2024-07-19 22:05:17
- Updated at : 2024-07-20 22:05:17
- Link: https://change-location.techidaily.com/guide-how-to-unbrick-a-bricked-infinix-note-30-5g-phone-drfone-by-drfone-fix-android-problems-fix-android-problems/
- License: This work is licensed under CC BY-NC-SA 4.0.