
All You Need To Know About Mega Greninja For Vivo X Fold 2 | Dr.fone
All You Need To Know About Mega Greninja For Vivo X Fold 2
Are you a fan of Pokemon Go? Then, you will find this article not only useful but also quite interesting. In case you have never played this game before, then you should know that Pokemon Go is a fantastic augmented reality game.
It requires the use of GPS (Global Positioning System) to track your location. Basically, Pokemon Go is a mobile application which you can easily download from Google Play Store or App Store, and it’s absolutely free. In simple words, you can say that Pokemon Go makes use of mapping technology so as to plot your actual location as you roam around in the streets to catch your favourite Pokemon.
When you play the game, your main goal would be to catch as many Pokemon or fictional characters as you can. Your main task will be to battle your opponents to catch the Pokemon and then train them.
It’s worth mentioning here that this AR-game is absolutely convenient to play. Now, one of the most amazing features that have been added to this game is Mega Evolution. But, unfortunately if you were of the opinion that greninja can mega evolve, then you are completely wrong, in fact you should note that no Kalos pokemon can mega evolve.
Through this article, we will discuss all you need to know about Greninja. So, without any further delay, let’s get started.

Part 1: Who is Mega greninja?

Also, called the Ninja Pokemon, Greninja is Dark/ Water-type pokemon. Some people love to call it a frog-like master. One of the most amazing features of Greninja pokemon is that with its swift movements, you will notice that this pokemon succeeds in confusing its opponents.
It makes use of very sharp throwing stars to slice its enemies. It features Torrent ability.
There are various weaknesses of this pokemon which include “Fighting”, “Grass”, “Electric”, “Bug”, and “Fairy”.Its worth mentioning here that Greninja pokemon is the final evolution of Froakie.
Part 2: What are the Strengths of Greninja in Pokemon?


Greninja is resistant to “Water”, “Fire”, “Ice”, “Dark”, “Steel” and finally “Ghost”. Also, this pokemon is immune to “Psychic”. This pokemon’s presence can be very intimidating for its opponents, it would not be wrong if we say that Greninja is quite unpredictable. There is no doubt that the counter attacks of Greniaja prove to be very dangerous for its enemies.
Part 3: How to Catch Greninja?
In order to catch Greninja, you will be required to fulfill specific requirements in the Pokemon Sun and Moon Exclusive demo.
First of all, after launching the Pokemon Sun and Moon Demo, go to the Pokemon Center.
Then, you’ll meet Professor Kukui and when he starts talking to you and asks what you wish to do , choose the option of “bring to full version.After that, you will be required to choose Ash-Greninja. Then, open the full game, finally you have to enter the nearest Pokémon Center.
Catching your favourite Pokemon or to mega evolve a specific pokemon will require you to go to different places or explore different locations, but it’s not always possible to step out of your house, it might be raining, or its night time, in the case, we recommend using software called Dr.Fone(Virtual Location).
With the help of this amazing software, you can teleport to any location or place in the whole without even requiring you to step out of your house.
In order to get started with Dr.Fone, you need to download Dr.Fone(Virtual Location) iOS. Then, you have to install Dr.fone on your smartphone. Finally, you have to launch Dr.Fone (Virtual Location) on your device.

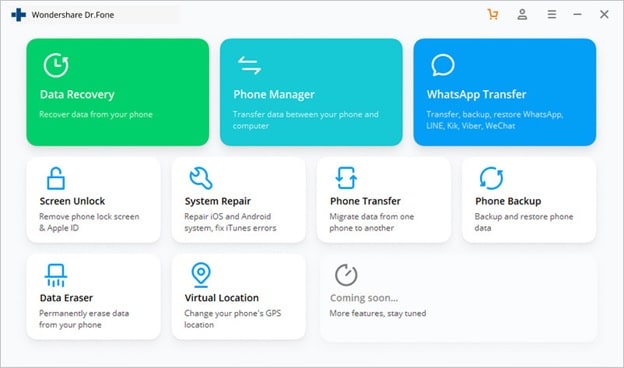
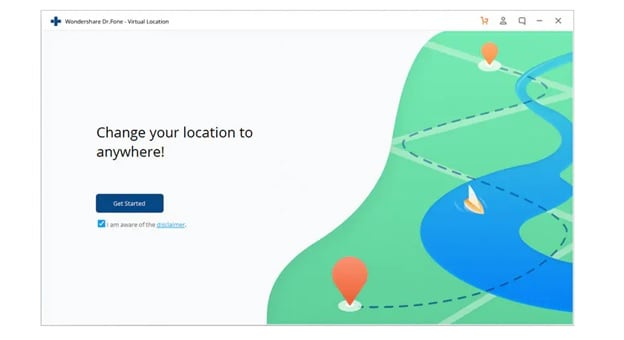
Step 1: You have to tap on “Virtual Location” among the various options that you will notice therein. It’s important to ensure that when you are setting up Dr.Fone on your device, always ensure that your iPhone is connected to the PC. Then, click on “Get Started”.
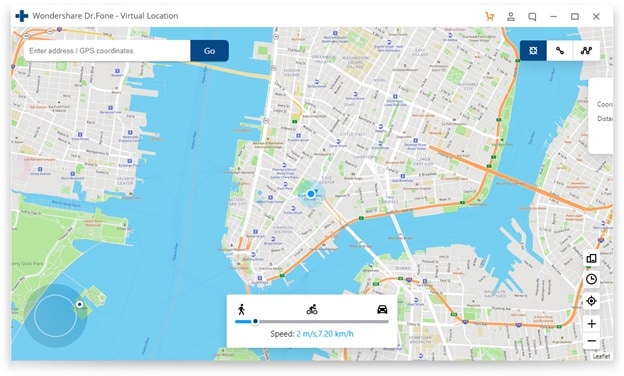
Step 2: If you have executed the prior steps or directions successfully, then you will see a new window that shows your actual location on a map will get displayed on your screen. Now, make sure that your displayed location on moa is accurate, if not, then click on “Center On,” with the help of this, you’ll be able to make your location correct.
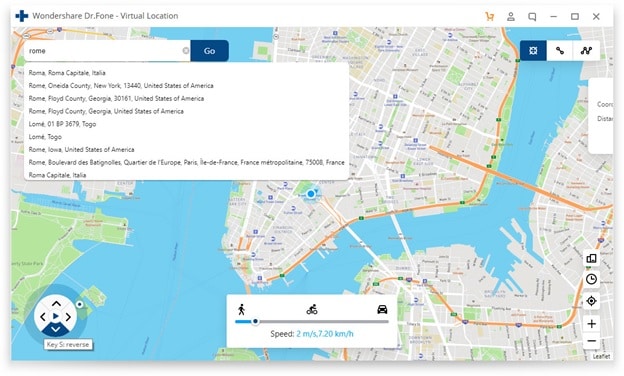
Step 3: After all the previous steps, the next step is to click on the “teleport mode” icon, which will be located in the upper-right part. This will activate the teleport mode. After that, you have to enter the name of the location or place where you wish to teleport to in the upper left field. Finally, tap on “Go”. As an example, we are going to enter “Italy”, Rome in the left field.
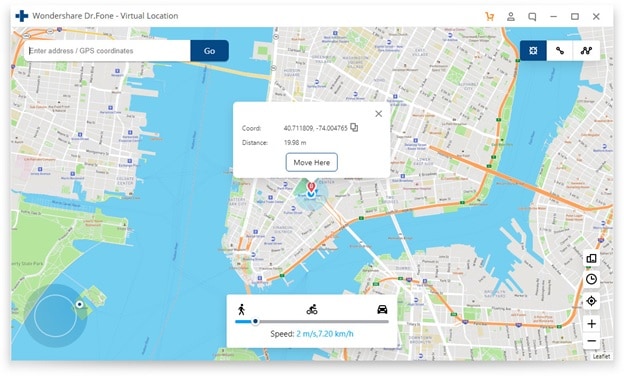
Step 4: In this manner, your location will now be understood or set by the system to “Italy”. You’ll see a pop-up box; you have to just click on “Move On”.
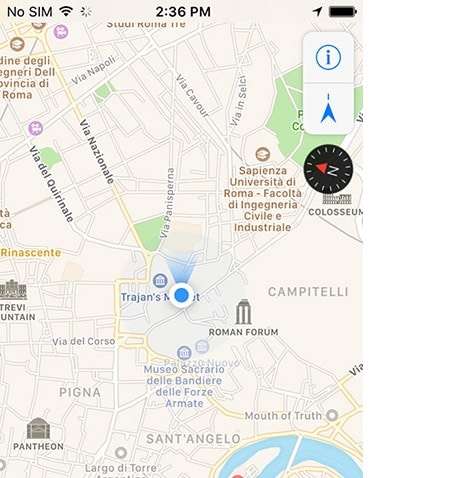
Step 5: If you have followed the directions accurately, your actual location on the map will now be set to “Italy”. You can confirm your location from the Pokemon Go’s map. Finally, below we have provided a screenshot of how the location will be shown.
 WonderFox DVD Ripper Pro
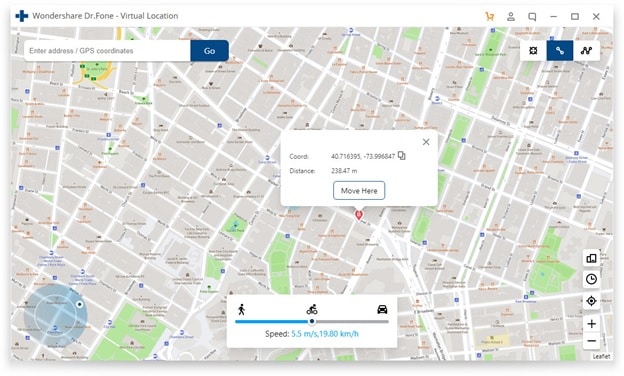
Step 6: Also, you’ll see that the location on your iPhone would have also changed now to “Italy” or any other place that you have entered earlier.
Conclusion
So, we have reached the end of this article. We hope that you found the article quite useful as well as insightful. We also hope that with the help of the setup guide for Dr.Fone you can now easily catch your favourite pokemon by teleporting to different locations across the world. If you have any doubts or suggestions related to this article, then feel free to write it down in the comment section. So, this was all from our side for now. Stay Tuned

Can I use iTools gpx file to catch the rare Pokemon On Vivo X Fold 2
Pokemon continues to be an after-sought mobile gaming app. The iTool gpx completes the game. This tool is dully smart, letting you catch Pokemon without much hassle. iTools is a replacement for iTunes which you can now use to manage your iDevice and computer. Its simplicity makes it a walk-in-the-park as you try to catch Pokemon. It will save your computer battery life and also save you from complex background operations.
It will inform you when a pokestop arrives without the need to even use your phone. More so, simply connect the Vivo X Fold 2 device to your phone via Bluetooth technology and move along as you enjoy your game. The device will vibrate or blink, an indication that you need to get ready to catch a Pokemon. So yes, you can use iTool gpx file to catch rare Pokemon.
Part 1:What can the gpx file do?
The gpx file is mainly used in software applications to transfer information about tracks and points from one application to another. These files are saved in ‘XML’ format, which makes it easy to import and read GPS data by several programs.
How to download gpx file on iOS and Android
On iOS
First, open the route that you are interested in, then select the ‘Export gpx’ option > ‘Export’ in the lower line. Next, choose whether to forward the gpx file via a provider or to copy and save it in your data.
On Android
Open the route you are interested in and hit the ‘More’ option. Next, select the ‘Export gps’ option and the file will be downloaded to your smartphone. You can forward the route to various providers by tapping the ‘Share’ button.
Why gpx Pokemon
Many games have thronged our screens but not many matches Pokemon. Once you download gpx to iTools mobile, you get real-life benefits from this hottest virtual game. As gpx files are a list of exact locations that form a route for cycling or walking, they direct the player. A player can, therefore, see their location regarding the route via GPS for surety.
Likewise, players are assured of being on the right trail when they use navigation apps with gpx files. And whey they get off track, they can redirect themselves to the path and continue gaming.
Part 2:Where to find the iTools gpx file
You have to import gpx file before opening it. The easiest way is to upload it to the web version of Google Maps. First, open and sign in to Google Maps then add a gpx file as a new map. Follow these steps.
- First, open the Google Maps menu and select ‘Your places’.
- Select ‘Maps’ > ‘Create map’.
- Select the ‘Import’ button after a new Google Maps window opens.
- Finally, upload your gpx file. You should see the map data in your file on Google Maps.
For you to use gpx file iTools, you first have to enable the virtual location on your device. It is from the virtual location where you can cycle and pin mode with teleport and joystick. More so, you can adjust the speed as desired. You just need to choose your favorite location and get to playing. Import, export, and save the iTools gpx to continue from your last stop point.
Follow these steps to save the iTools gpx file and get gpx files from friends
With ThinkSky, you can add gpx file to iTools and fake your gps location. This app comes with plenty of functionalities to make every fake location appear real to your friends.
- First, determine and click on the point that you wish to fake.
- Next, copy the coordinates by clicking the ‘Copy to clipboard’ button.
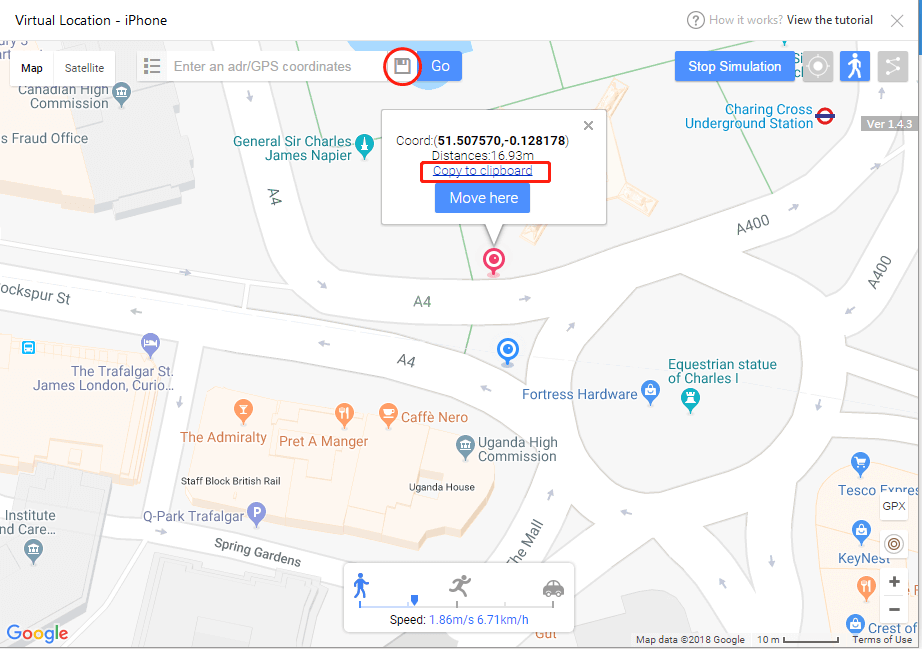
- Then, confirm group name and click on the ‘Save’ icon. You’ll see it located besides the search bar.
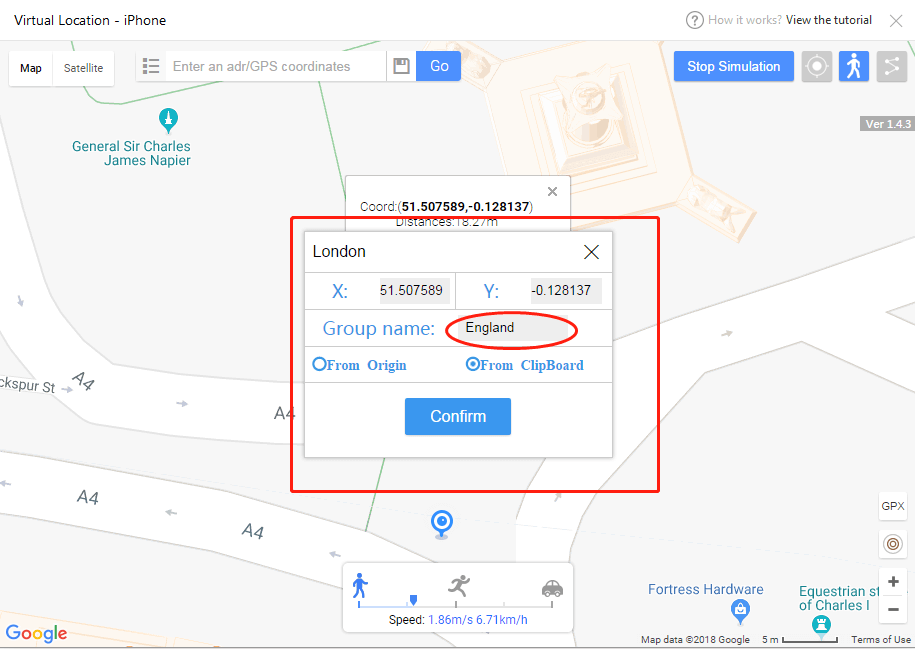
- Lastly, input the coordinates names and group name and then export your favorite location list.
Part 3:Is there any safer tool to spoof Pokemon with iTools file?
You can opt for other safer tools for route creator. Perhaps it is raining and you can’t step out. Or it is already late in the night. What do you do? Just fake it! Dr.Fone comes with advanced features to help you iSpoofer gpx routes and fake your locations in simple steps.
How to export and import gpx to save and share location with Dr.Fone
First, you need to download, install, and launch Dr. Fone – Virtual Location to your computer. Then click the ‘Virtual Location’ option and connect your iPhone to the computer. Next, hit the ‘Get Started’ button. You’ll be redirected to a new window to find the actual location on your map. Please follow these steps to export and import gpx to save and share.

Step 1. Save the path as gpx.file
Dr. Fone virtual location supports saving customized routes. Click the ‘Export’ button once it pops-up.
Step 2. Import file
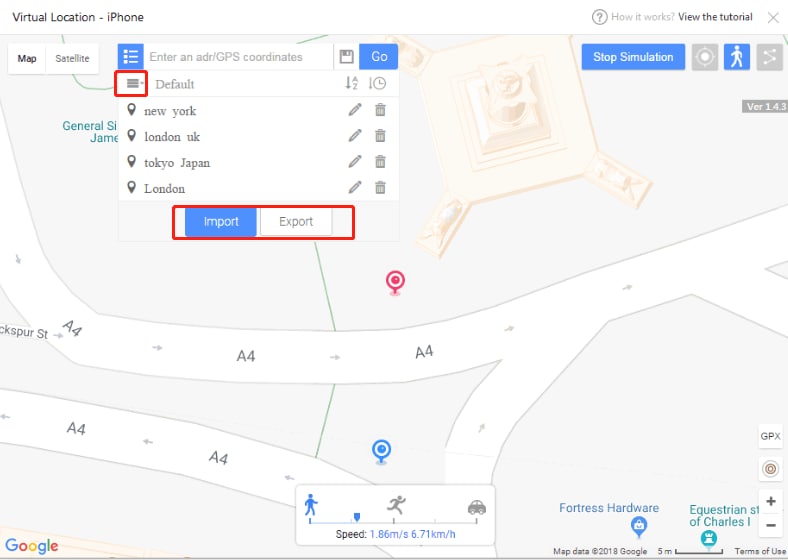
Next, import the shared gpx file into the app. You can download the gpx file from other websites or you can get it from friends. To import the file, go to the main screen of the app and check under the ‘Add-to-favorites’ icon then click the ‘Import’ button. Wait as the file is imported then click the ‘Save’ button after the process is completed.

You can also add your favorite iSpoofer gpx routes. To add any spot into your favorites, check for the five-star icon and click to add the route to favorites. You should see ‘Collection successfully’ after adding your favorites. This gpx route creator makes it easy to walk along your favorite routes. Click the ‘Move’ button and reach any place with a click of a button.


The Bottom Line
Being a first timer, you may find it very complicated to fake your gps location. But Pokemon map creator makes it easy. Dr. Fone virtual location works seamlessly with your iOS device to take you virtually to any place in the world, from the comfort of your living room.
Pokémon Go Cooldown Chart On Vivo X Fold 2
Pokémon Go is a viral game; hence many people try to cheat to achieve high scores and invade others’ privacy. The good news is that the Pokémon company is very responsive to preventing and combating such attacks. Cooldown Pokémon go another such feature to deter cheating. So let us discuss what cooldown means.
What is a cooldown? Cooldown Time restricts to stop a player from repeating multiple actions at different locations in a specified period.
 PDF application, powered by AI-based OCR, for unified workflows with both digital and scanned documents.
 Part 1: What does Soft Banned & Cooldown Mean?
A soft ban is a restriction to discourage people from playing Pokémon Go while driving or moving. The three primary reasons for getting a soft ban are GPS spoofing, sharing accounts, and traveling fast. A soft ban is a temporary ban triggered when the Pokémon determines that the player cannot arrive within a period. So how do you know if you’re soft-banned Pokémon go? A soft ban has some consequences, i.e., wasting tickets, no Pokémon guarding towers, no attacking Pokémon defending towers, etc.
What does cool down mean? Cooldown is the time a player has to wait after completing the in-game action. It is calculated from the distance you travel between the triggering activities. It depends on distance travel, and the time for cooldown is also high when the distance is high.
Part 2: What Happens When You Get a Soft Ban?
When you get a soft ban, its duration is about 12 hours. In this period, any Pokémon you catch during the ban period will leave even if you use any ball type or berries. It also restricts you from winning gym fights and looting Pokéstops. You can still keep playing Pokémon, though, as it is the most lenient form of ban.
Part 3: Cooldown Rules and How to Avoid Soft Ban in Pokémon Go?
1. How long does it take for a Pokémon to Cool Down?
The cooldown time is proportional to the distance covered by the player. So, when you perform an action marking our location, the cooldown time starts, and you must wait until the cooldown time is over. Here is a quick review of how long the cooldown you can expect.
| Total Distance Covered | Cooldown Period |
|---|---|
| 1 km | 30 seconds |
| 5 km | 2 minutes |
| 10 km | 6 minutes |
| 25 km | 11 minutes |
| 30 km | 14 minutes |
| 65 km | 22 minutes |
| 81 km | 25 minutes |
| 100 km | 35 minutes |
| 250 km | 45 minutes |
| 500 km | 1 hour |
| 750 km | 1 hour 20 minutes |
| 1000 km | 1 hour 30 minutes |
| >1500 km | 2 hour |

2. How long must I wait to avoid a softban?
The waiting period for a soft ban is around 12 hours. After this time, if you can try and catch a Pokémon, it means the soft ban is over.
3. Actions that Do trigger cooldown?
The main reasons for a soft ban are GPS spoofing, changing your location to a distant place in a short time, and traveling too fast to combat playing while driving. Sharing accounts is another reason.
So, what action of a player can trigger a cooldown? Let us list them here for quick reference.
- If you catch a wild Pokémon, like the ones coming from Incense, Meltan’s Mystery Box،, Lure Modules, and Special Lures.
- Another trigger of the cooldown is dropping the ball on the encounter screen.
- When you feed a wild Pokémon a berry.
- When you feed a gym defender on a screen radar.
- Gym battles.
- When a Pokémon flees, if you try to catch it.
4. Actions that DO NOT trigger cooldown?
On the other hand, some actions that do not trigger a cooldown in Pokémon Go;
- We are encountering a wild Pokémon.
- Feeding a berry to a gym defender remotely.
- Teleporting
- Auto Walking
- Eggs hatching
- Exchanging gifts.
- Pokémon evolution.
- Catching reward Pokémon from quests
- Speed raids but only after a 2-hour Cooldown
- Trading a Pokémon
- Transferring a Pokémon
- Buddy changing
- Using Candies and Stardust to get a second move for a Pokémon
- Incense, Lucky Egg or Starpiece
- Player vs. Player or team leader battles
- Buying a Lure Module or Special Lure at a PokéStop
- Buying coins and shop items
- Pokémon power up
- Speed raids without a 2-hour Cooldown
- Claiming rewards
- Changing your avatar’s clothes or items
- Clicking on a gym with an active raid to get a free raid pass
- Finding and catching certain Pokémon from s Smeargle and Party Hat Pikachu
- Dropping a ball
5. What happens if you break the cooldown of Pokémon Go?
When you break the cooldown Pokémon go, you are bound to face a soft ban. How do you know if you’re soft-banned Pokémon go? If you attempt to take any action in the game and receive a “Try Again Later” error message, it means you are soft banned.
Part 4: The Safest Way to Teleport in Pokémon GO Without Getting Banned?
As we already discussed, teleport does not trigger soft ban or cooldown restrictions. So, it is a valid method of moving on without any risks. While location spoofers and using VPNs can be risky, and you may get banned and lose your records, we recommend using a safe application that is Dr.Fone Virtual location, to elevate your game and fun.
Dr. Fone allows you to teleport anywhere in the world along with other unique features, including route simulation, GPS control, and unlimited choices of locations. Also, the new location gets active right away in the game.
It is a very simple-to-use application and provides robust results if you follow the guidelines. You have to make sure that the following best practices are followed, including;
- Always wait for the cooldown period to be over so that the game does not flag your account because of very fast movement and change of location. We have discussed the optimal cooldown time in the above section.
- Always log off from Pokémon before teleporting so the game does not detect your actions. For logging out, go to settings in your game by clicking the Pokeball in the center of the screen. Scroll down to locate and click the logout button.
Dr.Fone - Virtual Location (iOS/Android) is an easy and reliable teleporting method for Android and iOS. So let us visit how to teleport using this software step by step.
Part 5: How to Teleport in Pokémon Go Using Dr. Fone - Virtual Location
Looking for a Pokémon Go Spoofer that’s still working? Or thinking about how to teleport in Pokémon Go safely? Meet Dr.Fone - Virtual Location! This powerful GPS location spoofing software lets you use a fake location without risking a ban. No jailbreak is required. Unlock the Pokémon Go map in restricted areas, and enjoy keyboard and joystick modes for seamless movement.
Step 1: Launch the Dr.Fone app and open the “Virtual Location” feature.
 Forex Robotron Gold Package
Connect your phone to the system and click on the “Get Started” button to start the process.
Step 2: Select a location to teleport
In the new screen, navigate to the teleport option on the menu in the top-right corner and click the button to launch it.

Now, you can choose the location by entering its name in the search bar or coordinates if you want to be more precise. Then, you can see the desired location on the map on the screen.

Step 3: Teleport your location on Pokémon Go
When you reach the target location and move your pin, click the “Move Here” button.

Voila! You have teleported your location to the desired place.

When you want to stop this teleporting, simply click the “Stop Simulation” button and your real location will take effect.
Conclusion
Pokémon Go is a viral and fantastic game. However, sometimes players get into trouble trying to beat its restriction or break the cooldown of Pokémon go and even compromise their phone’s security and game records. Teleporting using Dr.Fone - Virtual Location application is a simple and effective method of excelling in the game and avoiding bans while enjoying the perks of fast movements. We highly recommend using reliable applications to keep your phone and game secure.
- Title: All You Need To Know About Mega Greninja For Vivo X Fold 2 | Dr.fone
- Author: Nova
- Created at : 2024-07-19 19:57:32
- Updated at : 2024-07-20 19:57:32
- Link: https://change-location.techidaily.com/all-you-need-to-know-about-mega-greninja-for-vivo-x-fold-2-drfone-by-drfone-virtual-android/
- License: This work is licensed under CC BY-NC-SA 4.0.